how to recover from OSX/Dok malware – updated

Last updated: May 10th, 2017 to include Dok.B variant.
There’s been a lot of drama the last few days over a new malware attack on macOS.
There’s FOUR steps to removing the malware.
1. Remove the installed files
Both my apps, DetectX and FastTasks 2 will detect this malware, and remove the appropriate files. For those of you that like to do things by hand, here’s the list of things to look for. You may find some and not others. Any you do find need to be removed:
~/Downloads/Dok.zip
~/Downloads/Dok/Dokument/Contents
~/Library/Containers/.bella/Bella
~/Library/Containers/.bella/bella.db
~/Library/LaunchAgents/com.apple.iTunes.plist
~/Library/LaunchAgents/com.apple.Safari.pac.plist
~/Library/LaunchAgents/com.apple.Safari.proxy.plist
/Library/Containers/.bella/Bella
/Library/Containers/.bella/bella.db
/usr/local/bin/SafariProxy
/Users/Shared/AppStore.app
You might also want to remove the dead ‘AppStore.app’ login item (if it’s still there) from System Preferences | Users & Groups | Login Items.
2. Remove the network proxy redirecting your internet traffic
Victims also need to remove the sneaky proxy that’s redirecting their internet traffic from System Preferences’ Network pane. While this can be done manually, it’s a lot of clicking, especially since you must do it for all services. Easier, then, to use this AppleScript. Note it will need an Admin password.
Get the script from my pastebin (if you copy and paste from a webpage like this and the script won’t compile, get the source from pastebin).
###########################################################
-->> ABOUT
###########################################################
(*
Phil Stokes — 2017
applehelpwriter.com
sqwarq.com
*)
###########################################################
–>> DESCRIPTION
###########################################################
(*
Turn off the Automatic Proxy Configuration in Network System Preferences.
*)
###########################################################
–>> USAGE
###########################################################
(*
Requires Admin password.
This script was developed primarily as part of a remedy for victims of OSX/Dok malware.
*)
###########################################################
–>> COMMANDS
###########################################################
set services to paragraphs of (do shell script “networksetup -listallnetworkservices”)
set autoproxyURL to ” 0.0.0.0″
set autoproxySERVICE to “”
repeat with i from 2 to (count of services)
set autoproxySERVICE to item i of services as text
do shell script (“networksetup -setautoproxyurl ” & (quoted form of autoproxySERVICE) & autoproxyURL) with administrator privileges
do shell script (“networksetup -setautoproxystate ” & (quoted form of autoproxySERVICE) & ” off”) with administrator privileges
end repeat
###########################################################
#EOF
If you’re not comfortable running AppleScripts, you can do it manually as shown in the screenshot below, but remember you need to go through and do the procedure for every one of your services (Ethernet, Wi-Fi, Bluetooth Pan, etc) individually.

3. Remove the fake certificate
Thirdly, you’ll want to get rid of the fake certificate in the System keychain. In Terminal, search to see if the ‘cert.der’ certificate file still exists:
cd /tmp; ls -alF
If you see ‘cert.der’ listed, then issue the following command in the Terminal window:
security remove-trusted-cert -d /tmp/cert.der
Then, go back to Terminal and do
rm /tmp/cert.der
If not, then try both this
security remove-trusted-cert -D
and check in Keychain Access.app by searching for ‘Comodo’ and looking for a certificate that has the fake Comodo serial number:00 EB 08 6A 4F 53 BE BA 4D.
4. Remove permissive admin access set by the malware
Back to Terminal for this one, and mind your typing. You don’t want to make any mistakes here…
At the command line prompt, type
sudo visudo
and provide an Admin user name. You won’t be able to see what you type, so type slowly, but at least you get 3 goes at it.
When you’ve got that in correctly, you should see the sudoers file, it’ll look something like this:
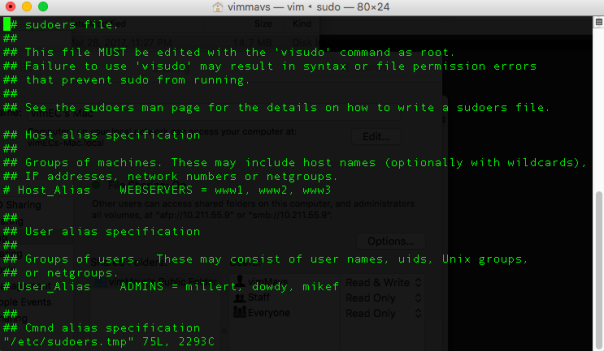
Use the arrow key to move the cursor down to the beginning of the line that says
%USER_NAME_HERE% ALL=(ALL) NOPASSWD: ALL
On your keyboard hit the ‘d’ key twice (i.e, type dd). The line should magically disappear*.
Finally, type
:wq!
(that’s a semi-colon, a lowercase w, lowercase q and an exclamation mark) to save your changes and quit. That’s it!
And with that, you should be done with OSX/Dok malware! 🙂
*If anything went wrong in visudo, you can press the u key once to undo your last action (the ‘u’ key only undoes the last keyboard action, so if you press it twice it’ll undo the undo = redo, so beware!)
Posted on April 29, 2017, in Mobile and tagged malware, osx/dok, Security-2. Bookmark the permalink. Leave a comment.


Leave a comment
Comments 0