Category Archives: Mobile
Mobile security
defending against EvilOSX, a python RAT with a twist in its tail
EvilOSX is a malware project hosted on GitHub that offers attackers a highly customisable and extensible attack tool that will work on both past and present versions of macOS. The project can be downloaded by anyone and, should that person choose, be used to compromise the Macs of others.
What particularly interested me about this project was how the customisation afforded to the attacker (i.e., anyone who downloads and builds the project, then deploys it against someone else) makes it difficult for security software like my own DetectX Swift to accurately track it down when it’s installed on a victim’s machine.
In this post we’ll explore EvilOSX’s capabilities, customisations, and detection signatures. We’ll see that our ability to effectively detect EvilOSX will depend very much on the skill of the attacker and the determination of the defender.
For low-skilled attackers, we can predict a reasonably high success rate. However, attacker’s with more advanced programming skills that are able to customise EvilOSX’s source code to avoid detection are going to present a bigger problem. Specifically, they’re going to put defenders in an awkward position where they will have to balance successful detection rates against the risk of increasing false positives.
We’ll conclude the discussion by looking at ways that individuals can choose for themselves how to balance that particular scale.
What is it?
EvilOSX is best described as a RAT. The appropriately named acronym stands for remote access trojan, which in human language means a program that can be used to spy on a computer user by accessing things like the computer’s webcam, microphone, and screenshot utility, and by downloading personal files without the victim’s knowledge. It may or may not have the ability to acquire the user’s password, but in general it can be assumed that a RAT will have at least the same access to files on the machine as the login user that has been compromised.
Whether EvilOSX is intentionally malicious or ‘an educational tool’ is very much a matter of perspective. Genuine malware authors are primarily in the business of making money, and the fact that EvilOSX (the name is a bit of a giveaway) is there for anyone to use (or abuse) without obvious financial benefit to the author is arguably a strong argument for the latter. What isn’t in doubt, however, is that the software can be readily used for malicious purposes. Irresponsible to publish such code? Maybe. Malicious? Like all weapons, that depends on who’s wielding it. And as I intimated in the opening section, exactly how damaging this software can be will very much depend on the intentions and skills of the person ‘behind the wheel’.
How does it work?
When an attacker decides to use EvilOSX, they basically build a new executable on their own system from the downloaded project, and then find a way – through social engineering or exploiting some other vulnerability – to run that executable on the target’s system.
There is no ‘zero-day’ here, and out of the box EvilOSX doesn’t provide a dropper to infect a user’s machine. That means everybody already has a first line of defence against a malicious attacker with this tool: Prudent browsing and careful analysis of anything you download, especially in terms of investigating what a downloaded item installs when you run it (DetectX’s History function is specifically designed to help you with this).
EvilOSX doesn’t need to be run with elevated privileges, however, nor does the attacker need to compromise the user’s password. As intimated earlier, it’ll run with whatever privileges the current user has (but, alas, that is often Admin for many Mac users). All the attacker needs to do is to convince the victim to download something that looks innocuous and run it.
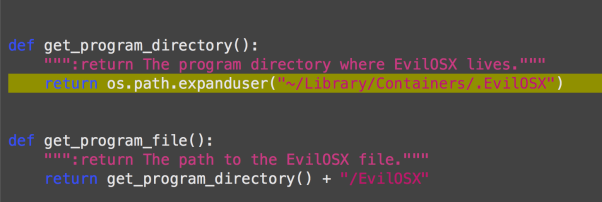
Once run, the malicious file will set up the malware’s persistence mechanism (by default, a user Launch Agent) and executable (the default is in the user’s ~/Library/Containers folder) and then delete itself, thus making it harder to discover after the fact how the infection occurred.
After successful installation, the attacker can now remotely connect to the infected machine whenever both the client (i.e., victim) and server (i.e., attacker) are online.

Once the attacker has surreptitiously connected to the client, there are a number of options, including webcam, screenshots, and downloading and exfiltrating browser history.
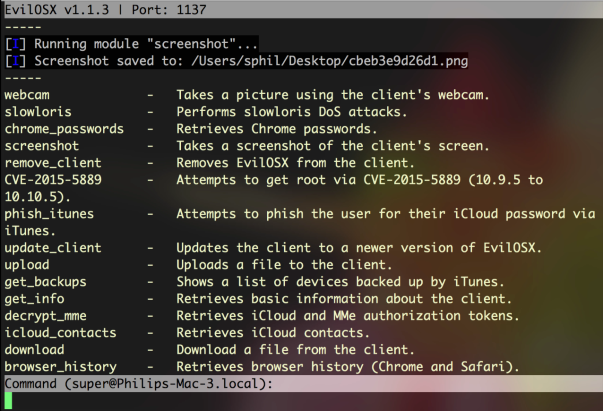
In my tests, some of the modules shown in the above image didn’t work, but the webcam, screenshots, browser history and the ability to download files from the victim’s machine were all fully functional.
Customisation options
By default, EvilOSX will offer the attacker the option of making a LaunchAgent with a custom name – literally, anything the attacker wants to invent, or to use the default com.apple.EvilOSX.

That in itself isn’t a problem for DetectX Swift, which examines all Launch Agents and their program arguments regardless of the actual filename. The malware also offers the option to not install a Launch Agent at all. Again, DetectX Swift will still look for the malware even if there’s no Launch Agent, but more on this in the final sections below.
If configured, the malware installs the Launch Agent and, by default, points it to run a binary located at ~/Library/Containers/.EvilOSX. There’s no option for changing this in the set up routine itself, but the path to the program argument is easily modified if the attacker is willing to do some basic editing of the source code.
Making matters even more difficult is that with a little know-how, the attacker could easily adapt EvilOSX to not use a Launch Agent at all and to use one of a variety of other persistence methods available on OSX like cron jobs, at jobs and one or two others that are not widely known. I’ll forego giving a complete rundown of them all here, but for those interested in learning more about it, try Jason Bradley’s OS X Incident Response: Scripting and Analysis for a good intro.
String pattern detection
Faced with unknown file names in unknown locations, how does an on-demand security tool like DetectX Swift go about ensuring this kind of threat doesn’t get past its detector search? Let’s start to answer that by looking at the attack code that runs on the victim’s machine.
We can see what the attack code is going to look like before it’s built from examining this part of the source code:

As the image above shows, the structure and contents of the file are determined by the output_file.write commands. Before exploring those, lets just take a look at what the finished file looks like. Here’s the start of the file:
and here’s the final lines:

Notice how the first four lines of the executable match up with the first four output_file.write commands. There’s a little leeway here for an attacker to make some customisations. The first line is required because, as noted by the developer, changing that will effectively nullify the ability of the Launch Agent to run the attack code. Line 4, or some version of it, is also pretty indispensable, as the malware is going to need functions from Python’s os module in order to run a lot of its own commands. Line 3, however, is more easily customised. Note in particular that the output_file.write instruction defines how long the random key shall be: between 10 and 69 (inclusive) characters long. One doesn’t have to be much of an expert to see how easy it would be to change those values.
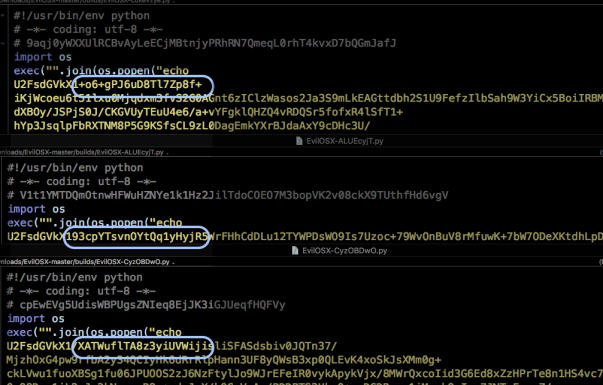
Line 5 in the executable is where things get really interesting, both for attacker and defender. As it is, that line contains the entire attack code, encrypted into gibberish by first encoding the raw python code in base64 and then encrypting it with AES256. That will be random for each build, based on the random key written at Line 3. We can see this in the next image, which shows the encrypted code from three different builds. Everything from the highlighted box onwards to the last 100 or so characters of the script are random.
However, as one of my favourite 80s pop songs goes, some things change, some stay the same. The first thing that we can note, as defenders, is that when this code is running on a victim’s machine, we’re going to see it in the output of ps. If you want to try it on your own machine, run this from the command line (aka in the Terminal.app):
ps -axo ppid,pid,command | grep python | grep -v python
That will return anything running on your Mac with python in the command or command arguments.
Of course, the victim (and yourself!) may well have legitimate Python programs running. To limit our hits, we can run the file command on each result from ps and see what it returns. Our attack code, being a single, heavily encrypted and extremely long line in the region of 30,000 characters, will return this indicator:
file: Python script text executable, ASCII text, with very long lines
That still isn’t going to be unique, but the test will futher narrow down our list of candidates. We can then use string pattern detection on the remaining suspects to see which contain the following plain text items,
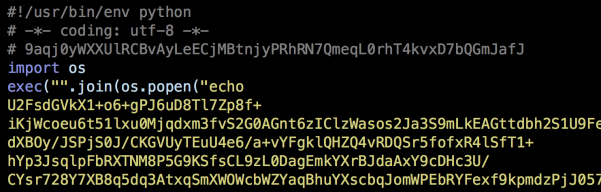
import osexec("".join(os.popen("echo -md sha256 | base64 --decode")We could arguably even include this:
U2FsdGVkX1which occurs immediately after echo, but for reasons I’m about to explain, that might not be a good idea. Still, from the default source code provided by the developer, if we find all of those indicators in the same file, we can be reasonably certain of a match (in truth, there’s a couple of other indicators that I haven’t mentioned here in order to keep DetectX Swift one-step ahead of the attackers).
Unfortunately for defenders, the attacker has a few workarounds available to them for defeating string pattern detection. To begin with, the attacker could adapt the code to use something other than base64, or indeed nothing at all. Similary, AES256 isn’t the only option for encryption. For these reasons,we can’t assume that we’ll find something like U2FsdGVkX1 in the malicious file. Then, there’s the original source code’s use of the long-deprecated os.popen. That is an odd choice to start with, and someone with a bit of experience in Python would be able to rewrite that line to avoid the telling indicators.
Skill level and customisation options

Advanced detection options
At this point you may be feeling that the attacker holds all the cards, and to a certain extent that is true, but there are some positive takeaways. First, we can be fairly sure of catching the neophyte hackers (aka “script kiddies”) with little to no programming experience who are trying to hack their friends, school or random strangers on the internet. The motivation to adapt the code is probably not going to be there for a large number of people just doing it 4 the lulz.
Secondly, depending on your tolerance for investigating false positives, and as I’ll explain how below, if you needed to be super vigilant, you could simply check on every python executable running on your Mac which file identifies as having ‘very long lines’. For sure, there are legitimate programs doing that, but the number still isn’t going to be that high on any given machine, and the paths to those legit programs are going to be readily identifiable. If security is of overriding importance, then it’s not much inconvenience, and time well spent.
By default, DetectX Swift will find instances of EvilOSX running on a mac when it’s used out of the box, and when its used with a modified launch agent and executable path. It will also still find it when the attacker has made certain alterations to the source code. However, a determined attacker who chooses to rewrite the source code specifically to avoid string pattern detection is always going to be one-step ahead of our heuristics.
We are not out of options though. You can still use DetectX Swift combined with the Terminal.app as a means to making custom detections as mentioned above. Here’s how:
- Launch DetectX Swift and allow it to search for the variations of EvilOSX it knows about. If nothing is returned, go into the Profile view.
- Click inside the dynamic profiler view, and press Command-F and type python into the search field.
- If there are no hits in the Running Processes section, you don’t have EvilOSX running on your machine.
- If there are any hits within the Running Processes section, make a note of each one’s command file path by selecting it in the view and pressing Command-C to copy it.
- Switch to the Terminal app, type
file(with a space) and Command-V to paste. If the path has any spaces in it, surround it in single quotes. Then press return. - If the path doesn’t come back with ‘very long lines’, the file isn’t EvilOSX.
- If it does, hit the up arrow on the keyboard to put the previous command back at the prompt, use Control-A to move the cursor to the beginning of the line, and replace the word
filewithcat(if you’re familiar withVior similar command line text editors use one of those instead). Hit return. - Does the file end with
readlines()))? - Use command and the up arrow to go back up to the beginning of the file. How close does the file look to matching what you’ve seen here? Look for variations like
import * from osandimport subprocess. - Consider the path that you pasted in. Is it something that looks like it belongs to a genuine program, or is it a completely unfamiliar? Anything that points to ~/Library and isn’t contained within a recognized application named folder should warrant further investigation.

Inspect the output from cat with the following in mind:
You’ll need to consider carefully the answers to 8, 9, & 10, with an emphasis on the latter, for each python file you tested to make an assessment. If you’re in any doubt, contact us here at Sqwarq and we’ll be glad to take a look at it and confirm one way or the other.
Conclusion
EvilOSX is just one of an increasing number of Python RAT projects that are appearing on the internet. It’s not particularly sophisticated, and this is both a strength and a weakness. With modest programming skills, an attacker can modify the source code to increase the chances of evading automated detections. However, vigilant users can still identify EvilOSX if they know what to look for, as explained in the preceding sections of this post, or by contacting Sqwarq support for free advice.
Stay safe, folks! 🙂
why malware loves auto login (and why you shouldn’t)

Whenever I talk to people about the dangers of having their mac set to login automatically without requiring a password, I’m often waved away as an old worryguts. “I’m the only user on my mac”, they say, and “My mac is unlikely to get stolen”.
These optimistic dismissals may turn out to be true or false, but aren’t really relevant to the main security issue. Auto login presents a threat to anyone connecting to the internet.
To see why this is so, let’s look at how auto login works. First of all, the user enables auto login through System Preferences’ ‘Users & Groups’ pane. Open the pane and click on the Login Options item at the bottom of the sidebar (see the screenshot above). Choose a user from the ‘Automatic login:’ pop-up menu. You’ll need to provide the account password.
Where it gets interesting is what macOS does next with that information. You might perhaps think it secures that information safely in your Keychain, but that wouldn’t work at all. Your Keychain needs a user password to unlock it, so auto login can hardly unlock your Keychain to get the stored password out. No, it needs to be stored somewhere else that can be accessed when the computer starts up.
That place is in the hidden folder /etc/, and specifically in a file called kcpassword. This is outside of any user’s Home directory, so the system doesn’t need a user password to access it.
However, if you try to open that file to read it yourself (we’ll do this shortly, hold on), you’ll find you can’t read it without providing your admin password (the boot process already runs as root, so it doesn’t have this problem). For reasons we’ll see in a moment, you’d be mistaken to take much comfort from that in terms of security, but lets stick with /etc/kcpassword for a while first.
Now here’s something anybody can do, with or without elevated privileges (and by ‘anybody’ here we also mean ‘any process’): test to see if /etc/kcpassword exists. The file is only created when auto login is enabled, and it’s deleted when it’s turned off; thus, existence of the file is a simple way to check whether a mac has auto login enabled without needing to go through a user’s System Preferences pane.
A malicious program, for example, might run some code like this to test whether a target system is set to auto login:

If the file does exist, then passwordExploit will be ‘TRUE’, and all the attacker has to do now is execute code to read and parse the file:

We can take a look at what the file contains easily enough from the command line. Assuming you have auto login enabled (or you could just enable it temporarily for fun if you want to play along), try
sudo cat /etc/kcpassword
As we’ve already seen, you’ll need a password to see the password, but this isn’t a problem that’s going to phase a malware author, and nor does it mean that the malware author won’t be interested in the prize. Again, hold those thoughts while we look at what’s inside the kcpassword file.
Here’s what mine contains:

Hmm, goobledygook, it seems. Encrypted nonsense that surely takes a lifetime to break, no? Far from it. Be ready to behold the masterpiece of wisdom, humour or nearest book title that is your password by pasting this into the command line:
sudo ruby -e'key=[125,137,82,35,210,188,221,234,163,185,31];
IO.read("/etc/kcpassword").bytes.each_with_index{|b,i|break if key.include?(b);
print [b^key[i%key.size]].pack("U*")}'
Tradaa! And here’s my inglorious password: k33p_out_th3_badi3z.

How is that possible? No, it’s not some secret new encryption breaking technique. The fact is the kcpassword is not encrypted at all, it’s XOR’d. To see the basic idea, take the first character, ‘?’. The asci code for ‘?’ is 63 (this is for demonstration purposes only; the actual XOR’ing is done in hexadecimal rather than the simpler decimal used in this example). That number in binary is 00111111. To XOR it, all I have to do is provide another binary number, lets say 84, which is 01010100, and apply the rule that for each equivalent bit in the two numbers, if the bits are the same we output a zero, and if they are different we output a 1. Thus, ‘?’ (63) ^ ’T’ (84) comes out like so:
00111111 (asci 63 = ‘?’ – encoded password character)
01010100 (asci 84 = ’T’ – XOR mask)
—————
01101011 (asci 107 = ‘k’ – plain text password character)
Now, if we go through each of the characters in my encoded (note, not ‘encrypted’) password, and apply the correct XOR mask for each, we can reveal the password — note the mask for the first character in my demo was 84, but each character is XOR’d with a different mask — and that’s precisely what the Ruby script we used above did (again, noting that the masks are in hex rather than decimal).
OK, now you may have some questions. 🙂 The first is probably: do Apple KNOW THIS!? Oh sure, of course! Nobody uses XOR for security, at least not like this, but you can’t blame Apple that much. It’s a reasonable assumption on their behalf that if a user sets their computer to auto login, security isn’t high on their priority list. The second reason why Apple probably feel unconcerned by this is that you need a password to see the password, so surely there’s no real danger?
That may have made sense 30 or 40 years ago when the only people who had admin passwords were, well, administrators, and when processes couldn’t easily exfiltrate data via the internet. It doesn’t make much sense nowadays in a computing environment where people download software from unknown sources which immediately asks the user for a password to install and then phones home. Users rarely say ‘no’ to such requests (after all, they downloaded the software because they wanted to run it, right?) and almost certainly have no idea what processes run with admin privileges as a result.
It would also be a mistake to believe that, in this scenario, a piece of malware that has just tricked the user into providing an admin password to install would not need or want to run the exploit against the kcpassword file. Far from it.
Usually, when apps ask for your password to install, they don’t get to see the password directly. Some malware will present a false dialog to do this, but most will take the easier (and less suspicious) route of letting macOS mediate the process. A legitimate password dialog box is actually from macOS, and it only grants privileges to the requesting app; it does not give them the password in plain text. But the plain text password is the holy grail of malware persistence: as powerful as elevated privileges are, they may also be temporary, limited, and revoked; they also can’t be stored or easily transferred.
To see why this matters, consider a piece of malware that gains elevated privileges through the OS in the way described, but not the password. If the malware is discovered, it can be removed. If the attacker wants to strike again, they have to fool the same person into the same trick of installing their software as they did before. In a world where we’re all increasingly ‘once-bitten twice shy’ when it comes to computer security, that’s not a trivial task.
On the other hand, if the attacker gains the plain-text password from the first attack, this can either be stored elsewhere on the victim’s computer (somewhere that doesn’t need privileges to be accessed) or even sent back to the attacker’s remote command and control server. In that case, even deleting the malware isn’t going stop the attacker (indeed the attacker may delete the malware themselves to avoid detection!). All they have to do is connect to your mac remotely, input your admin password and they’re straight back in again.
I hope it’s clear from this that due to the weak obfuscation of the kcpassword file, auto login is a tremendously bad idea. It doesn’t matter whether your mac is locked in a one-person vestibule with round-the-clock guards. It’s when your mac is in use that it’s vulnerable.
Moral of the tale: disable auto login, folks, especially those of you that just enabled it to play along with this post!
Acknowledgements:
Ruby script: http://osxnotes.net/passwords.html
Background info: OSX Incident Response – Jaron Bradley
how to recover from OSX/Dok malware – updated

Last updated: May 10th, 2017 to include Dok.B variant.
There’s been a lot of drama the last few days over a new malware attack on macOS.
There’s FOUR steps to removing the malware.
1. Remove the installed files
Both my apps, DetectX and FastTasks 2 will detect this malware, and remove the appropriate files. For those of you that like to do things by hand, here’s the list of things to look for. You may find some and not others. Any you do find need to be removed:
~/Downloads/Dok.zip
~/Downloads/Dok/Dokument/Contents
~/Library/Containers/.bella/Bella
~/Library/Containers/.bella/bella.db
~/Library/LaunchAgents/com.apple.iTunes.plist
~/Library/LaunchAgents/com.apple.Safari.pac.plist
~/Library/LaunchAgents/com.apple.Safari.proxy.plist
/Library/Containers/.bella/Bella
/Library/Containers/.bella/bella.db
/usr/local/bin/SafariProxy
/Users/Shared/AppStore.app
You might also want to remove the dead ‘AppStore.app’ login item (if it’s still there) from System Preferences | Users & Groups | Login Items.
2. Remove the network proxy redirecting your internet traffic
Victims also need to remove the sneaky proxy that’s redirecting their internet traffic from System Preferences’ Network pane. While this can be done manually, it’s a lot of clicking, especially since you must do it for all services. Easier, then, to use this AppleScript. Note it will need an Admin password.
Get the script from my pastebin (if you copy and paste from a webpage like this and the script won’t compile, get the source from pastebin).
###########################################################
-->> ABOUT
###########################################################
(*
Phil Stokes — 2017
applehelpwriter.com
sqwarq.com
*)
###########################################################
–>> DESCRIPTION
###########################################################
(*
Turn off the Automatic Proxy Configuration in Network System Preferences.
*)
###########################################################
–>> USAGE
###########################################################
(*
Requires Admin password.
This script was developed primarily as part of a remedy for victims of OSX/Dok malware.
*)
###########################################################
–>> COMMANDS
###########################################################
set services to paragraphs of (do shell script “networksetup -listallnetworkservices”)
set autoproxyURL to ” 0.0.0.0″
set autoproxySERVICE to “”
repeat with i from 2 to (count of services)
set autoproxySERVICE to item i of services as text
do shell script (“networksetup -setautoproxyurl ” & (quoted form of autoproxySERVICE) & autoproxyURL) with administrator privileges
do shell script (“networksetup -setautoproxystate ” & (quoted form of autoproxySERVICE) & ” off”) with administrator privileges
end repeat
###########################################################
#EOF
If you’re not comfortable running AppleScripts, you can do it manually as shown in the screenshot below, but remember you need to go through and do the procedure for every one of your services (Ethernet, Wi-Fi, Bluetooth Pan, etc) individually.

3. Remove the fake certificate
Thirdly, you’ll want to get rid of the fake certificate in the System keychain. In Terminal, search to see if the ‘cert.der’ certificate file still exists:
cd /tmp; ls -alF
If you see ‘cert.der’ listed, then issue the following command in the Terminal window:
security remove-trusted-cert -d /tmp/cert.der
Then, go back to Terminal and do
rm /tmp/cert.der
If not, then try both this
security remove-trusted-cert -D
and check in Keychain Access.app by searching for ‘Comodo’ and looking for a certificate that has the fake Comodo serial number:00 EB 08 6A 4F 53 BE BA 4D.
4. Remove permissive admin access set by the malware
Back to Terminal for this one, and mind your typing. You don’t want to make any mistakes here…
At the command line prompt, type
sudo visudo
and provide an Admin user name. You won’t be able to see what you type, so type slowly, but at least you get 3 goes at it.
When you’ve got that in correctly, you should see the sudoers file, it’ll look something like this:
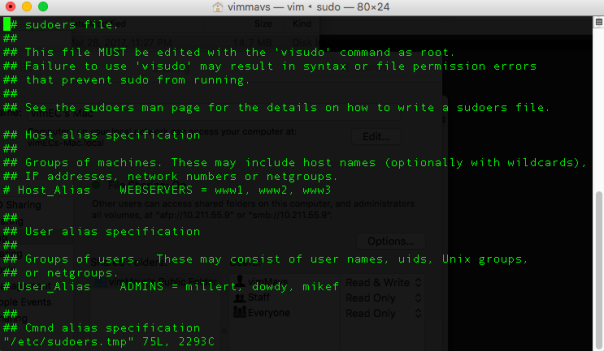
Use the arrow key to move the cursor down to the beginning of the line that says
%USER_NAME_HERE% ALL=(ALL) NOPASSWD: ALL
On your keyboard hit the ‘d’ key twice (i.e, type dd). The line should magically disappear*.
Finally, type
:wq!
(that’s a semi-colon, a lowercase w, lowercase q and an exclamation mark) to save your changes and quit. That’s it!
And with that, you should be done with OSX/Dok malware! 🙂
*If anything went wrong in visudo, you can press the u key once to undo your last action (the ‘u’ key only undoes the last keyboard action, so if you press it twice it’ll undo the undo = redo, so beware!)
BackupCam – a dash cam for your mac
The initial release of BackupCam has just gone live over on sqwarq.com.
The idea behind BackupCam is to keep a continuous, rolling video of the last few minutes of activity on your mac, in just the same way as dash cams in cars work.
There’s a couple of scenarios where this might be useful. If you’re working on a project where ‘undo’ doesn’t always work reliably or when you most need it to – Xcode, for example, can often let you get your project in a mess without offering you a clear path as to how you got there or how to get back, short of discarding all changes in a particular file – with BackupCam you’ll be able to see exactly how you got to where you are.
Similarly, BackupCam can also help you to review changes that you may not have noticed at the time – perhaps if you were distracted by something else happening, either on screen or off. This can help both as a security and a troubleshooting tool
BackupCam can record up to the previous 30 minutes activity, so may help you recover something that is missed even by Time Machine or other traditional file backup mechanism.
More details are over on the BackupCam webpage, but I’ll just note here that BackupCam can also be controlled by AppleScript, with all the flexibility that that offers. Here’s a sample script that checks whether the last recording was longer ago than the time interval set in BackupCam. If it is, it kicks off a new recording session:

BackupCam is still in the early stages of development (we’re calling v1 a beta), so please feel free to report any bugs or enhancments you’d like to see. At the moment, it requires 10.11.6 or higher and only records the main display. I plan to add support for multiple displays in a future update.
how to keep the iDoctor away

DetectX has been updated today to v2.37, and amongst other changes now detects and removes iDoctor.app. This piece of software appears to be another MacKeeper clone, with both sharing a common interface, code and file structures.
In the screenshot above, you can see DetectX doing its work – note the parallel file detections as DetectX hunts down both MacKeeper and iDoctor.
Below is a sidebar shot of MacKeeper on the left and iDoctor on the right. Underneath that are shots showing how the two interfaces are almost direct mirrors of each other. It’s hard to believe these are not both being built from the same base code, and we strongly suspect that the developers of iDoctor are very likely the same developers of MacKeeper, or at least real close friends!


discovering how Dropbox hacks your mac
Update: Dropbox hack blocked by Apple in Sierra
Following my post revealing Dropbox’s Dirty Little Security Hack a few weeks ago, I thought I’d look deeper into how Dropbox was getting around Apple’s security.
After a little digging around in Apple’s vast documentation, it occurred to me to check the authorization database and see if that had been tampered with. According to the docs:
In a policy-based system, a user requests authorization—the act of granting a right or privilege—to perform a privileged operation. Authorization is performed through an agent so the user doesn’t have to trust the application with a password. The agent is the user interface— operating on behalf of the Security Server—used to obtain the user’s password or other form of identification, which also ensures consistency between applications. The Security Server—a Core Services daemon in OS X that deals with authorization and authentication—determines whether no one, everyone, or only certain users may perform a privileged operation.
The list of authorization “rights” used by the system to manage this “policy based system” is held in /var/db/auth.db database, and a backup or default copy is retained in /System/Library/Security/authorization.plist.
Looking at the default with
defaults read /System/Library/Security/authorization.plist
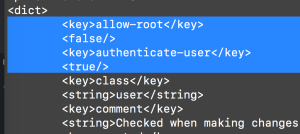
we can find that there is an authorization right for System Preferences’ Accessibility list, which says:
"system.preferences.accessibility" = {
class = user;
comment = "Checked when making changes to the Accessibility Preferences.";
group = admin;
shared = 0;
timeout = 0;
That file’s comments also state that “The allow-root property specifies whether a right should be allowed automatically if the requesting process is running with uid == 0. This defaults to false if not specified.”
In other words, if allow-root isn’t explicitly set, the default is that even a process with root user privileges does not have the right to perform that operation. Since that’s not specified in the default shown above, then even root couldn’t add Dropbox to the list of apps in Accessibility preferences. Is it possible then, that Dropbox had overriden this setting in the auth.db? Let’s go and check!
To see what the current policies are, you have to actually read the sql database in /var/db/auth.db. There’s various ways of doing that, but the easiest for me was to access auth.db through the command line using the security tool. Issuing the following command in Terminal will return us the currently active policy for Accessibility:
security authorization read system.preferences.accessibility
On my machine, this returned:
Root wasn’t allowed to override Accessibility, and authenticate was on, so it couldn’t be this way that Dropbox was hacking my mac.
Security on OS X is a complex beast, however, and there are other authorization protocols at work. One that I already knew of is tccutil. If you issue man tccutil in Terminal, you’ll see this:
tccutil(1) BSD General Commands Manual tccutil(1)
NAME
tccutil — manage the privacy databaseSYNOPSIS
tccutil command serviceDESCRIPTION
The tccutil command manages the privacy database, which stores decisions the user has made about
whether apps may access personal data.One command is current supported:
reset Reset all decisions for the specified service, causing apps to prompt again the next time
they access the service.EXAMPLES
To reset all decisions about whether apps may access the address book:tccutil reset AddressBook
Darwin April 3, 2012 Darwin
(END)
I had heard of a hack of this utility that was related directly to adding apps to Accessibility list over a year ago when I stumbled across this stackexchange page. In short, what that hack suggests is that you modify tcc directly by inserting an entry into the sql database located here /Library/Application Support/com.apple.TCC/TCC.db.
You can read the current list with the command:
sudo sqlite3 /Library/Application\ Support/com.apple.TCC/TCC.db 'select * from access'.
To insert an app in the list, you grab it’s bundle identifier (in the case of Dropbox, that’s com.getdropbox.dropbox), and issue:
sudo sqlite3 /Library/Application\ Support/com.apple.TCC/TCC.db “REPLACE INTO access VALUES(‘kTCCServiceAccessibility’,’com.getdropbox.dropbox’,0,1,1,NULL, NULL);”
(*note the code given on the stackexchange page isn’t quite correct for the latest builds of the mac operating system, in which the access table now has 7 columns and so requires and extra “NULL” on the end as shown above).
I tested this with several of my own apps and found it worked reliably. It’ll even work while System Preferences is open, which is exactly the behaviour I saw with Dropbox.
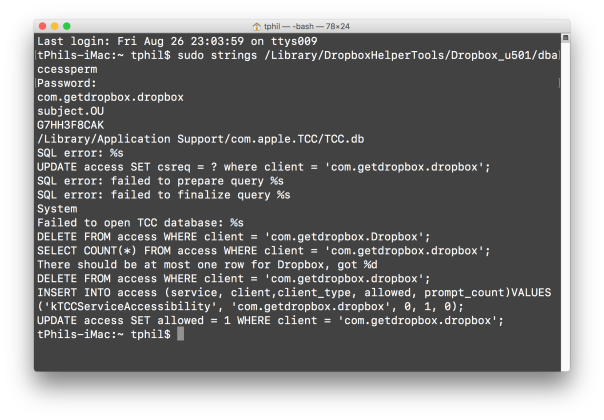
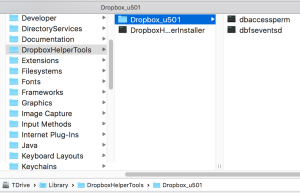
It remained to prove, though, that this was indeed the hack that Dropbox was using, and so I started to look at what exactly Dropbox did after being given an admin password on installation or launch. Using DetectX, I was able to see that Dropbox added a new folder to my /Library folder after the password was entered:


As can be seen, instead of adding something to the PrivilegedHelperTools folder as is standard behaviour for apps on the mac that need elevated privileges for one or two specialist operations, Dropbox installs its own folder containing these interesting items:
Not one, but three binaries! I wonder what they do? The first thing I did on each was to run the strings command on them. I still haven’t determined what that 1.5MB DropboxHelperInstaller binary is doing (that’s pretty big for a binary for a helper app), but its jam-packed with strings relating to file compression and encryption. The string output for dbfseventsd binary didn’t reveal anything much interesting, but with the deliciously named dbaccessperm file, we finally hit gold and the exact proof I was looking for that Dropbox was using a sql attack on the tcc database to circumvent Apple’s authorization policy:
This is all the more telling when we look at what Dropbox themselves say when queried about why their app is in the list of Accessibility apps here. After a great deal of obfuscation, misdirection and irrelevance in which they mention everything about permissions in general and nothing about Accessibility in particular, or that they’re hacking their way into the user’s Accessibility list rather than going through the supported channel of presenting the user with a dialog box and asking for permission, comes this line:
we need to request all the permissions we need or even may need in the future.
(my emphasis)
Ostensibly, that’s in the context of Drobpox on mobile apps, but since the question isn’t related to mobile apps at all, I think interpreting anything said there as being honest is naive at best. What I do suspect, especially in light of the fact that there just doesn’t seem to be any need for Dropbox to have Accessibility permissions, is that it’s in there just in case they want that access in the future. If that’s right, it suggests that Dropbox simply want to have access to anything and everything on your mac, whether it’s needed or not.
The upshot for me was that I learned a few things about how security and authorisation work on the mac that I didn’t know before investigating what Dropbox was up to. But most of all, I learned that I don’t trust Dropbox at all. Unnecessary privileges and backdooring are what I call untrustworthy behaviour and a clear breach of user trust. With Apple’s recent stance against the FBI and their commitment to privacy in general, I feel moving over to iCloud and dropping Dropbox is a far more sensible way to go for me. For those of you who are stuck with Dropbox but don’t want to allow it access to Accessibility features, you can thwart Dropbox’s hack by following my procedure here.
🙂
Further Reading:
Dropbox hack blocked by Apple in Sierra
Revealing Dropbox’s Dirty Little Security Hack
ejecting some, all or just specified disks

We posted this one liner some time ago in response to the fact that you can’t actually get the Finder to eject all volumes on multiple drives at the same time.
However, I thought it’d be good to have a slightly more useful version. In this version, you can choose individual volumes or all volumes from a list. Optionally, you could also include collections.

Suppose for example you wanted to eject one volume from one physical drive along with one from another and two from a third? To do that, just uncomment these two lines and supply your own volume names in the collection_1 list:
--if you want to create an item that groups some volumes together uncomment the following two lines:# set collection_1 to {"Archive 1.5TB", "BUFFALO 500GB", "This disk", "That disk", "Another disk"} -- supply as many disks names you want to group together here# set diskList to {"All Disks", "Disk Group 1"}
Then, when you run the script, choose ‘Disk Group 1’ to eject that collection of volumes. You could of course adapt the script to include more than one collection.
You can get the full script from my pastebin here.
Enjoy! 🙂
applescript: file & folder handlers

Here’s a few of the AppleScript handlers I use for getting contents of folders (examples 1 & 2), or for getting the text of a file (example 3).
In all three cases, you give the handler a path string in POSIX form, e.g, ~/Desktop or (for example 3), ~/Desktop/sometext.txt.
In example 1, what you get back is a list of the item names in the folder. It doesn’t include hidden or invisible files.
In example 2, what you get back is a record of all the items and their properties. This can be an immensely useful and powerful handler.
In example 3, what you get back is a text variable whose value is the complete text of the file.
Hope these come in as handy for you folks as they have for me!
Click here to get the handlers from my pastebin.
Enjoy! 🙂
Note: The getFileContents() handler requires OSX 10.10 or higher.

