Category Archives: Safari 6.0
run Terminal commands from any app
In this post I’m going to show you how you can select a piece of text in any app and have it run in Terminal simply by hitting a hotkey. The trick is especially useful for running commands you find on websites (like this one!) in a browser like Safari or Firefox.
This 20-second clip demonstrates running a command from a Firefox browser and another one from TextEdit, but you can also do it from an AppleScript editor window (and indeed any app that has selectable text), which can be useful for testing the formatting of your ‘do shell script’ commands and the like:
The first thing you’re going to need is to create an Automator workflow, add an AppleScript action and insert some code. Really? Nah, just kidding. I did it for you. 🙂 Just download, unzip and double-click the .workflow file to install the completed Service:
Download Run in Terminal.workflow.zip
Click through the various dialog boxes and choose ‘Install’ on the last one* (note for Snow Leopard users: the service will open directly in Automator; just do ‘command-shift-S’ to name it and save it).

All you need to do now is set the hotkey. Open > System Preferences.. > Keyboard | Shortcuts and click ‘Services’ in the sidebar. Scroll down the window till you see the ‘Run in Terminal’ command. Click on the far right to add a shortcut of your choice. The one I used in the video is ‘command-option-control-T’ (‘T’ for ‘Terminal’ helps me remember the shortcut).
To use the Service, just highlight any Terminal command by triple clicking it and pressing your hotkey. Try this one,
cd ~/Desktop; ls -alF
which lists all the visible and invisible files on your Desktop, as a test.
You can also get to the Service from both the contextual menu (right-click > Services) and the application menu bar at the top (e.g., Safari > Services).
As a bonus, try out your new Service on the Terminal command in this post, and now you’ll be able to run Terminal commands even from Quick Look previews in Finder!
Enjoy! 🙂
enable trackpad zoom in Firefox

With Firefox 29 just out, I’ve been testing it out as an alternative to Safari. However, if you’re new to Firefox you’ll probably find that the trackpad pinch and zoom gestures are not set by default. To turn them on, you’re going to need to do a bit of tinkering.
Open Firefox and type
about:config
in the address bar. Then type ‘browser.gesture’ in the search field and make the following changes to the ‘Value’ field for each of these preferences:
browser.gesture.pinch.in -> cmd_fullZoomReduce
browser.gesture.pinch.in.shift -> cmd_fullZoomReset
browser.gesture.pinch.out -> cmd_fullZoomEnlarge
browser.gesture.pinch.out.shift -> cmd_fullZoomReset
browser.gesture.pinch.latched -> false
Optionally you might want to also reduce the browser.gesture.pinch.threshold (I’ve got mine on 60).
how to clear Safari’s cookies on quit
If ever there was a free app that deserved more recognition, it’s Safari Cleaner (direct download). Developed out of a simple applescript, this app does what many people would expect Safari to have an option to do in the Preferences panels: automatically clear stored information when Safari quits.
Personally, I’ve found this particularly needsome since signing into any Google service seems to be particularly irritating. Gmail, for example, needs several clicks just to be told that you don’t want to be remembered. Safari Cleaner takes care of automatically ‘forgetting’ as much or as little info as you want without you having to remember to clear cookies or caches. It’ll also, thankfully, forget Top Sites. 
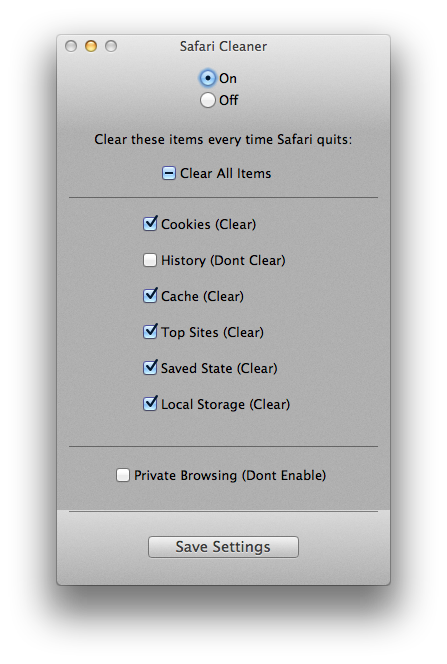
Personally, I leave my history as that’s something I regularly need across sessions, but the rest, I’m happy to be forgotten. If you’re wondering why anyone might care, well, there’s a whole bunch of reasons including protecting you from malware and malicious websites, but at least one other is nicely detailed in this Ars Technica article, which explains how cookies can be used to track your physical whereabouts.
One caveat to note with Safari Cleaner: in my tests, I’ve noticed that if you click and restart Safari in rapid succession (within about 5 seconds or less), the script hasn’t had time to complete running and caches and cookies aren’t cleared. To be safe, you probably want a nice 10 secs or so between quitting and relaunching Safari if you absolutely must be sure the previous session was wiped out.
Once you’ve run and set up Safari Cleaner’s options, you can quit the app and it’ll just carry on working in the background. Launch the app only if you want to change your options. If you want to uninstall it, note that there’s an uninstaller in the DMG, so don’t throw that away.
discover 10 new OS X shortcuts

No matter how many times I visit this page, I always find something new that I hadn’t tried before. So the title of this post is more of a suggestion than a description. Why not take a poke around Apple’s shortcut list and discover ten that you don’t already know? I’m going to give a quick round up of ten shortcuts that I use on a regular basis.
1. ⌘ ⌃ Space
Command-Control-Space is a universal shortcut (i.e., you can use it no matter what application is currently active) for bringing up the character viewer (see the screenshot, top of page). In order for it to work, the cursor must be in a text field where character entry is possible, but you can use it literally anywhere: text documents, search fields, browser bars, save dialogs, etc. I used it heavily in creating this post!
2. ⌘ ⌃
Command-Control-Eject saves you having to trawl all the way up to the icon top left of your screen and choose ‘Restart…’. It’ll give you the chance to save any unsaved work or cancel the shutdown. This shortcut has a cousin, too: add the option key (⌘ ⌥ ⌃  ) to the mix and you get Shutdown instead of Restart.
3. ⌘ ⌫
One of my pet annoyances is continually being asked if I want to save ‘Untitled’ documents, those that I’ve never saved before, when trying to quickly quit an app. Having to take my fingers off the keyboard to move the cursor down to that ‘Delete’ button is time-consuming, and tabbing to it takes multiple hits of the tab key. Fortunately, ‘Command-Delete’ will let you discard the document immediately from the keyboard in one quick shot.

4. ⌘ G
Most people are familiar with invoking ‘Find’ on a page by using ‘Command-F’, but have you ever got annoyed by having to mouse up to those tiny little jump arrows in order to cycle through the hits?

Save your eyes and use Command G instead! Note that you have to invoke Find with ‘Command F’ first.
5. ⌃A, ⌃E, ⌃K
That’s three separate shortcuts not one! In any text field, Control-A moves the cursor to the beginning of the line; Control-E moves it to the end, while ⌃K deletes everything from the cursor to the end of the line. Old-hands of the Terminal and other command-line utilities will know these well, but even they may be surprised that these work across a wide-range of GUI apps, too. Particularly useful in Web browser address bars, search fields, Spotlight and so on.
6. ⌘ L
Command-L in Safari and other browser-based apps (including Xcode’s Documentation viewer  ) will immediately move the focus to the address bar/search bar and allow you to edit its contents. No clicking necessary!
7.⌘ ⌃ 1, ⌘ ⌃ 2, ⌘ ⌃ 3
Three commands new for Safari’s sidebar. Respectively, open the sidebar with Bookmarks showing, with Reading list showing, and with Shared links showing. Hitting the same shortcut again toggles the sidebar closed. Note that those are the numbers ‘1’, ‘2’ and ‘3’, not F1, F2, F3.
8. ⌘ ⇧ A, ⌘ ⇧ U, ⌘ ⇧ H, ⌘ ⇧ D
Again, that’s 4 different shortcuts, this time for the Finder. OK, hands up all those that switch to the Finder, hit Command-N to open a new window, and then click to their Desktop? Save yourself the grief (and the time), just activate Finder and hit Command-Shift-D. No need to open a window first, the shortcut will open a new window for you showing your Desktop folder. The others do the same thing but for different folders: Command-Shift-A opens your Applications folder, Command-Shift-U the Utilities folder, Command-Shift-H opens your Home folder.
9. ⌘ F1
This one’s for those of you with dual monitors or when your Mac is hooked up to a projector. Command-F1 toggles between mirroring and separate monitor views. Great for presentations.
10.(fn) ⌃ F8
Control-F8 activates the Status bar (top right row of icons on your screen). Use the left/right arrow keys to move along them, and the up/down arrows to select things in any menu. Hit ‘enter/return’ to perform the action. Note that on laptops you may need to invoke the fn ‘Function’ key, depending on your settings in Keyboard Preferences.
This is a great one for turning on/off Bluetooth, Wifi and checking Mavericks’ new Energy monitor in the Battery/Power icon. Mostly though, I use it for manually starting Time Machine backups or entering TM’s “star wars” interface (oh, and as a bonus…note that (fn) ⌃ F2 activates the other side of the menu bar (i.e., the menu). Enjoy!

Got your own favourite shortcuts? Tell us what you use most in the Comments! 🙂
Transmission – Port is closed
I don’t often get into 3rd-party software or non-Mac hardware issues, but here’s a little trick I discovered today that could prevent a situation that adversely affects Safari and other network software.
Not so long ago I bought a new router, and everything was working fine. However, when I recently fired up Transmission, I found that not only were my downloads not so fast as I’d normally expect, but that all internet browsing was completely throttled. Basically, Safari would just get stuck half way into loading a page and eventually timeout. Killing Transmission would immediately restore Safari’s connectivity.
Looking in Transmission’s preferences ‘Network’ pane revealed that the port was either closed (red button) or the port could not be checked (yellow button). Now there are a number of reasons this can happen, but since I knew nothing had changed except my router since the last time Transmission was successfully used, I decided to go check out some of the router’s settings.
To do this, quit Transmission if it’s running, then enter your router’s IP address in Safari’s search bar. Typically, this will be something like 192.168.1.1, but if you’re not sure, you can find your router’s IP using my free utility ‘FastTasks‘.
Once you’re in your router’s admin pages, look for Advanced network settings. In my router, I found a bunch of firewall and network protocols (see the first screenshot below). Neither disabling NAT nor UPnP had any effect (those were my first thoughts about the likely culprit), but turning off the ipSec PassThrough option sure did, with the upshot that Safari and Transmission are not only playing nicely together again, but Transmission’s download speeds have markedly improved. 🙂
Here’s the settings I used to get back up and running; see if you can find similar options if you’re experiencing the same problem.

Turning off ‘ipSec PassThrough’ in my Router’s Advanced Settings:

Transmission’s Network Preferences pane:
search Safari Reading List

This is something I’ve been thinking about for a while. I have a pretty long Reading List and Spotlight often fails to find things in it. For that reason I came up with this little script which you might find useful.
1. Open up Automator by typing auto in Spotlight.
2. Click on ‘Service’ (the big cog wheel) and then ‘Choose’.

3. Change the Service receives option to “No input” from the dropdown menu.
4. In the small filter bar to the left, type ‘run app’. You should see an action called ‘Run AppleScript’ in the second column. Drag it to the big pane on the right.

5. Select all the purple text inside the window and delete it. You don’t need any of it.
6. Command click on the image below, and copy the code from the pastebin page that opens up in another Safari tab. Paste the code into the Automator pane.

7. Hit ‘Command-S’ and give it a name like ‘Search Safari Reading List’. Click ‘Save’ (note: you do not specify a location for the save as it will automatically be saved in your ~/Library/Services folder).
8. Now click on the main menu for any app and have a look in the Services submenu. You should see your new service there (to add the keyboard shortcut, see Step 10 below).

9. Test it to make sure it works as expected. You should end up with something that looks like this:

10. If you want to assign a universal shortcut key like mine in the screenshot from Step 8, do so by going to > System Preferences > Keyboard > Keyboard shortcuts. Look in Services for the name you gave it and add the shortcut by clicking in the empty space to the far right of the name.

A note on usage:
The reading list is really just a list of special bookmarks, with one difference: they contain short snippets or previews from each page. This has an impact on the way my script works in the following way: if the search string is in the preview snippet but isn’t in the URL, you’ll get back the line from the snippet but you won’t get the URL. It might be possible to code round that, but I haven’t had time to figure it out yet. If that’s a feature you want, send me a nag mail and I’ll put it on my list of things to do! ;). Otherwise it appears to function quite well as a workaround for the lack of a proper search facility.
5 things you never knew about Spotlight

Whenever I’m helping customers with a misbehaving Mac, one of the most common things I hear is ‘Wow, I didn’t know you could do that with Spotlight!’ Whereas the average user will navigate around their computer by trawling through Finder, the savvy user knows how to get to places, launch apps, search the internet and calculate their tax with a few simple Spotlight tricks. In this post we’ll look at how to increase your productivity by using Spotlight for fast access to a variety of common functions. But first, we need to get Spotlight set up for maximum efficiency.
Set up the hotkey
To get the most out of Spotlight, the first thing to do is set up the keyboard hotkey. By default, this is usually ‘command-spacebar’, but if you are using multiple languages you might want to reserve that for the Input Switcher. Instead, I use ‘option-command-spacebar’, not least because this nice 3-finger combination can be executed with the left-hand while the right hand is reaching for the coffee mug… 😉
Whatever your choice of hotkey, keep it close to the bottom of the keyboard, as the other keys that you will want to be able to rapidly access are the cursor arrows and the ‘return’ key. If you haven’t set up your Spotlight hotkey yet, the fastest way to do so is to click on Spotlight on the top right of your screen with the mouse or trackpad and type
spot
and then hit ‘return’ on the keyboard (if Spotlight isn’t the top hit, just use the arrow down key to move down till you hit it)

After hitting ‘return’, you’ll be presented with the Spotlight preferences panel. At the bottom, you’ll see fields to define both the Spotlight menu keyboard shortcut and the Spotlight window keyboard shortcut. For the purposes of this post, we’re only interested in the menu shortcut (but feel free to set up the window one too, if you wish!). Once your hotkey is set up you can forget about the annoying inconvenience of dragging your cursor up to the top right corner. Just hit your hotkey combination to open the Spotlight search field.

But don’t close the Spotlight prefs just yet. The main pane in the window is the Search Results panel which lists the order in which results appear. You can alter the order of results that Spotlight shows by dragging items up and down the list. Altering this to your likes is a big part of getting the most out of Spotlight. If Spotlight is always showing you lots of results from Mail that you don’t want to see, for example, drag “Messages & Chats” to the bottom of the list.
For the purposes of this tip, make sure Applications is no.1 in the list and System Prefs no. 2, and Folders at no. 3. Follow that with Documents, Images, PDFs and so on according to the kind of files you access most often on a daily basis. A set up like this will make Spotlight much more efficient at navigating around your mac, and once you get the hang of it you’ll find yourself trawling through Finder much less often.
Incidentally, I don’t recommend unchecking any of those boxes. We want more power in our searches, not less; you never know when you might be looking for something that just won’t show up in a search because you’ve forgotten that you excluded those results in Spotlight’s preferences. Besides, there are better ways to restrict your searches in Spotlight like this and this.
When you’re done with setting up Spotlight’s preferences, hit ‘command’ and ‘Q’ to close System Preferences and read on.
1. Use Spotlight as an App Launcher
Long before the Apple engineers dreamed up Launchpad, many of us were already launching apps in half the time it takes in the Dock, Finder, or (now) even Launchpad itself. You can open any app with Spotlight just by typing three or four characters. Sometimes, just one is enough! All you need to do is hit your hotkey (see above) and type the first three or four letters of the App’s name and hit ‘return’.
Try typing tex and hitting ‘return’ to instantly open TextEdit, or act for ‘Activity Monitor’. iPhoto should be the top hit with ip. If you use Terminal a lot, there’s no need to go rooting around in the Applications/Utilities menu to open it. Simply hit the Spotlight hotkey and type
term
and hit ‘return’.
If you have Carbon Copy Cloner, type CCC, and if you use 1Password, just the number 1 and return should do the trick.
saf will open Safari and mai will launch Mail in an instant. Experiment with your favourite or most commonly used apps and you’ll find that using Spotlight is twice as fast as any other method.
As a bonus, if you moved Folders up to no.3 in the Preferences list, experiment with the first few letters of your favourite folders. Try some of these and see what comes up as the top hit:
home, downl, mov, musi, docu.
2. Use Spotlight to access System Prefs
We already saw one of Spotlight’s hidden uses – fast access to System Preferences. In fact you can do this with any of them. Want to check your login items in Users & Accounts | Login Items? No need to go clicking all round the desktop, hit your Spotlight hotkey and type
user
or
secu
if you want to change your Security preferences quickly.
Don’t hit ‘return’ just yet – check to see what is the ‘top hit’, as you might find that you have to “arrow down” an item or two. Even so, this is a whole lot faster than wading through either Finder or the menu.
Typing
sys
and hitting ‘return’ is also a fast way to open the main System Preferences panel.
3. Dictionary
Hit the Spotlight hotkey and try typing the word
codec
Just press ‘command-L’ to go straight to the dictionary entry and see its definition in a pop-up panel. Alternatively, hit ‘command-D’ to open the word in the Dictionary app.
Also note that in Spotlight, you can jump around by holding down the ‘command’ key and pressing the down arrow key (each press of the arrow key conveniently takes you to the top of each section; release the ‘command’ key and use the down arrow alone to move one item at a time within the section). Using the ‘control’ key and the down or up arrow takes you to the very bottom or the very top of the list, respectively.
When you’re done with Spotlight, just hit your hotkey combination again to dismiss it. You can also use the ‘esc’ key here: one tap of ‘esc’ will clear the Spotlight search bar, two will dismiss it.
4. Website search
But suppose you type in a word that Dictionary.app doesn’t know? Try
plomic
Again, use your command and arrow key to jump down to the bottom of the results and this time choose ‘search the web’. That will automatically open Safari and put the term in the search bar and return the results. But you’re not limited to dictionary searches, you can use Spotlight’s search bar just like the Google search bar in Safari. Try typing in
mini ipad versus samsung galaxy review
or
best small car of 2012
or anything else you might want to search the web for. Yep, Spotlight isn’t just a file finder on your mac – it’s a google search engine, too!
5. Use Spotlight as a Calculator
Want to quickly know what 17.5% of $45,000 is? Hit your Spotlight hotkey and type:
45000*17.5%
Don’t press ‘return’ – difficult to break that habit, I know! – the result is already listed next to the ‘Calculator’ icon, just look down to see the search results and the answer is already there!
You can of course do all the standard calculator functions like / for divide, * for multiplication and + and – for addition and subtraction. You can even do powers (3 to the power of 5 = 3^5) as well as bracket expansion. Try
(3x5)^2 and compare the result with 3*5^2
So whether its App launching, web searching, opening system prefs or using the dictionary or calculator, hitting your Spotlight hotkey is a habit you want to develop for faster computing. At least for me, it’s probably the most frequent keystroke I use on a daily basis.
🙂
disable captive network assistant

If you use coffee shop wifi services or others that require internet login, you’ve probably noticed in both Lion and Mountain Lion that OS X will produce a pop-up Safari window asking you to login. This can be annoying for several reasons:
1. The window floats on top and gets in the way if you’re trying to do something else
2. The window doesn’t keep cookies or allow plug-ins like 1Password, so you have to enter the login details manually every time
3. Sometimes the pop-up window will simply produce an error message that it can’t connect to the network. You either have to dismiss it manually or wait for it to go (it’ll normally auto-close after about 30 seconds)
If you find this behaviour annoying and want to stop it, there’s a very simple solution (and one that’s also easy to undo if you want to reverse it). Here’s what you do.
1. First go to
[Hard Disk] > System > Library > CoreServices > Captive Network Assistant.app
Click on the app once, and hit ‘return’ on your keyboard. This will make the name editable.
2. Hit the ‘left arrow’ key once to move the cursor to the beginning of the name and to unselect the text.
3. Type an ‘X’ (actually any letter will do, but I like ‘X’ so I can easily find the app later at the bottom of the list even if I forgot its exact name).
4. Hit ‘return’ on the keyboard. At this point, OS X will ask you to provide an Admin password as only Admin users are allowed to mess with files in the System directory. Type in your password and hit ‘OK’.
The name should now read ‘XCaptive Network Assistant.app’.
And that’s it! Captive Network Assistant will never run again unless you decide to change its name back to what it was (to do so, just repeat the procedure above and remove the ‘X’). Of course, you can still login to your internet or coffee shop wifi services by opening a normal browser window. The bonus is now your browser can fill the login details from cookies (if enabled) or your password manager.
🙂
featured picture: illuminated jellyfish by weaverglenn
problems with wifi, Safari and Mountain Lion

If you’ve upgraded to Mountain Lion and traded swift wifi and fast Safari for a flakey internet connection and sluggish browser, you are not alone. Widespread reports of problems with wifi, Safari and Mountain Lion have been mounting ever since July 25th. However, unlike the lengthy debacle with similar wifi problems experienced after the Lion upgrade last year, a lot of users are finding their problems can be solved by using one or more of the tips below.
1. Create a new location and renew the DHCP lease
OS X Daily have a step-by-step procedure here
http://osxdaily.com/2012/08/02/fix-os-x-mountain-lion-wireless-connection-problems/
that is proving hugely successful. Don’t forget to follow their second step about changing the MTU value while you’re at it.
2. Reset default system preferences
If that didn’t do it for you, it’s time to roll up your sleeves and enter Terminal! Open the Terminal.app from
/Applications/Utilities/Terminal.app
and paste this command
rm ~/Library/Preferences/com.apple.systempreferences.plist
then press ‘return’.
You will need to restart your mac to see if this has had any beneficial effect, so do that now.
3. Do PRAM & SMC resets
If you’re still suffering problems, it’s time for a couple of system resets. To do the SMC reset you will need to see what kind of mac you have, as the procedure is different for some models. Take a look here and follow the instructions for your model.
Before powering up after the SMC reset, also take the trouble to do a PRAM reset. To do that:
i. Ensure the machine is powered off.
ii. Locate the following keys on your keyboard in preparation for Step 4:
‘command’ – ‘option’ – ‘P’ – ‘R’
iii. Press the ‘power on’ button.
iv. Immediately – and before the grey screen appears – hold down ‘command-option-P-R’ all together.
v. Keep them held down until you’ve heard the start-up chime twice. After you release them you should hear it again, and hopefully your Mac will boot up without wifi/Safari issues.
4. Check Wifi connection
And if that doesn’t work? Time to check your wifi connection. See how strong your signal-to-noise ratio is. You need something in the order of 25 or higher. To find out whether you signal is strong enough, hold down the ‘option’ key and click on the wifi icon in the menu bar. Choose Open Wifi Diagnostics from the menu.
When you see the welcome screen, ignore the ‘Continue’ button and instead press ‘command-N’ on your keyboard.
Click wifi scan in the task bar and scroll to the right where you will see two numbers, ‘signal’ and ‘noise’. Ignore the minus ‘-‘ signs, and subtract the signal number from the ‘noise’ number. Anything over 25 is a good enough signal, below that and the signal is too weak for a reliable connection. Over 40 is excellent (in the example below, you can see the SNR is 34, a pretty good signal for a home router located on the next floor).

If your SNR is lower than 25 you need to either move the computer closer to the router or find a better connection. If the ‘Noise’ shows a very low figure (equals more noise), you can try changing the channel on your router. Look at the other routers in the list and if they are using the same channel as yours, switch your router to something else between 1 and 11.
5. Reinstall OS X
If all else fails…some users are reporting that simply reinstalling OS X is solving the problem for them. Reinstalling doesn’t touch your Apps or user data, but its always wise to make sure you have a backup before undertaking such an operation.
To reinstall, restart the computer while also holding down ‘command-R’ on the keyboard. From the Utilities window that opens up, choose ‘Reinstall OS X’.
Still having problems? Let us know in the comments below.
🙂
featured picture: Internet by ~vagraine

