Blog Archives
how to reveal hidden users

With malware big in the news again, and evidence that at least one malware variant that targets macOS creates hidden users on the victim’s system, here’s a timely tip on how to check for unwelcome guests.
For this tip, we’re going to use the Terminal, which you can find in the /Applications/Utilities folder. If you’re not a frequent visitor to the land of the command line, you might want to see my 3-part series “Learning the Terminal”.
Regardless, the first thing we’re going to do in Terminal is about the simplest command you’ll ever type: w. Yep, type a single ‘w’ at the prompt and press return.

The w utility is a very quick way to see who’s currently logged on to your system and to ensure that there’s no surprises. You should see a couple of entries for yourself: one as ‘console’ and one as ‘s***’. The first represents a login through the usual Desktop GUI login window; the second is there because you just logged into Terminal. Anybody else logged in either via the command line (like a potential remote user) or the GUI will show up here. Notice that on my machine, there’s another user called ‘Developer’ who hasn’t logged in using the GUI, but is logged in via a command line interface. Note that ‘w’ returns the full user name, not the short one.
While the w utility will tell you if a hidden user is currently logged on, what if there’s a hidden user that isn’t active at the particular time you check? To look for those, we have a couple of options. First, we can use the dscl utility to list all users, and you might be surprised at how many there are:
dscl . -list /Users
Look to the end of that list where the names that don’t begin with an underscore start. ‘Daemon’, ‘Nobody’, ‘Root’ and ‘Guest’ are all standard system accounts, as are all those entries that begin with an underscore. Don’t worry about those. However, aside from those, you should only see names that you recognise. To make things a little easier, we can add another command to the dscl command to filter that list. Try this
dscl . -list /Users | grep -vE ‘_|root|nobody|daemon|Guest’
That should now only return the names of real users. There shouldn’t be any names in there you don’t recognise. In my example, I know the last three, but the first one ‘dev’ isn’t familiar to me. Note that unlike ‘w’, this command returns short user names, and that ‘dev’ looks very much like it’s the same account as ‘Developer’ that I saw earlier.

However, what we have so far is a list of users, not a list of hidden users. To see specifically if any accounts are hidden, we need a longer command:
defaults read /Library/Preferences/com.apple.loginwindow
Normally, when there are no hidden users, this will return the contents of a property list file that may look something like this:
{
GuestEnabled = 1;
OptimizerLastRunForBuild = 31898816;
OptimizerLastRunForSystem = 168494592;
SHOWFULLNAME = 1;
lastUser = loggedIn;
lastUserName = imackim;
}
That tells us that there’s no hidden users on this mac. How so? Because if there were it would return something very different, like this:
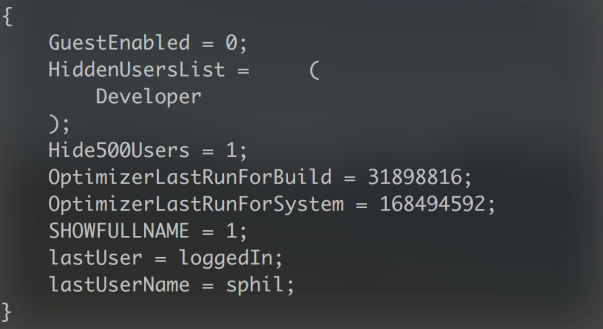
We can see not only the list of hidden users, but also that the preference for hiding users has been set to ‘1’ (in plist syntax, ‘1’ means true and ‘0’ means false). Note again that unlike the dscl command above, this returns the account’s full name, not the short user name.
If we’d like to ‘unhide’ that user, so the account appears in the login window GUI and in System Preferences’ ‘Users & Groups’ pane, we’ll need admin privileges. To do that, cut and paste the following into Terminal:
sudo defaults write /Library/Preferences/com.apple.loginwindow Hide500Users -bool NO
Supply an admin user password at the prompt and hit ‘return’, but type slowly as the display doesn’t register your key presses, which makes it easy to fat finger your password.
Next, we need to change the IsHidden key in dscl for that user, so
sudo dscl . -change /Users/dev IsHidden 1 0
In the above command, substitute my user’s shortname dev for the shortname of the user on your machine. The 1 0 is the old value (hidden) followed by the new value (unhidden). The line can be read as “change User dev’s IsHidden value from hidden to unhidden.”
For the more advanced
We can save ourselves some typing by putting much of this into a script so that we can run it whenever we want. If you’re not familiar with how to create and use bash scripts, take a look here.
Our script will basically do the same as all the commands we listed above (except changing the prefs for Hide500Users) in one fell swoop, and there’s a couple of little twists that I’ll leave as an exercise for the reader to figure out. To save on the typing, you can copy the whole script from my pastebin here.

The script’s output is illustrated in the shot at the top of this post.
Enjoy! 🙂
how to recover from OSX/Dok malware – updated

Last updated: May 10th, 2017 to include Dok.B variant.
There’s been a lot of drama the last few days over a new malware attack on macOS.
There’s FOUR steps to removing the malware.
1. Remove the installed files
Both my apps, DetectX and FastTasks 2 will detect this malware, and remove the appropriate files. For those of you that like to do things by hand, here’s the list of things to look for. You may find some and not others. Any you do find need to be removed:
~/Downloads/Dok.zip
~/Downloads/Dok/Dokument/Contents
~/Library/Containers/.bella/Bella
~/Library/Containers/.bella/bella.db
~/Library/LaunchAgents/com.apple.iTunes.plist
~/Library/LaunchAgents/com.apple.Safari.pac.plist
~/Library/LaunchAgents/com.apple.Safari.proxy.plist
/Library/Containers/.bella/Bella
/Library/Containers/.bella/bella.db
/usr/local/bin/SafariProxy
/Users/Shared/AppStore.app
You might also want to remove the dead ‘AppStore.app’ login item (if it’s still there) from System Preferences | Users & Groups | Login Items.
2. Remove the network proxy redirecting your internet traffic
Victims also need to remove the sneaky proxy that’s redirecting their internet traffic from System Preferences’ Network pane. While this can be done manually, it’s a lot of clicking, especially since you must do it for all services. Easier, then, to use this AppleScript. Note it will need an Admin password.
Get the script from my pastebin (if you copy and paste from a webpage like this and the script won’t compile, get the source from pastebin).
###########################################################
-->> ABOUT
###########################################################
(*
Phil Stokes — 2017
applehelpwriter.com
sqwarq.com
*)
###########################################################
–>> DESCRIPTION
###########################################################
(*
Turn off the Automatic Proxy Configuration in Network System Preferences.
*)
###########################################################
–>> USAGE
###########################################################
(*
Requires Admin password.
This script was developed primarily as part of a remedy for victims of OSX/Dok malware.
*)
###########################################################
–>> COMMANDS
###########################################################
set services to paragraphs of (do shell script “networksetup -listallnetworkservices”)
set autoproxyURL to ” 0.0.0.0″
set autoproxySERVICE to “”
repeat with i from 2 to (count of services)
set autoproxySERVICE to item i of services as text
do shell script (“networksetup -setautoproxyurl ” & (quoted form of autoproxySERVICE) & autoproxyURL) with administrator privileges
do shell script (“networksetup -setautoproxystate ” & (quoted form of autoproxySERVICE) & ” off”) with administrator privileges
end repeat
###########################################################
#EOF
If you’re not comfortable running AppleScripts, you can do it manually as shown in the screenshot below, but remember you need to go through and do the procedure for every one of your services (Ethernet, Wi-Fi, Bluetooth Pan, etc) individually.

3. Remove the fake certificate
Thirdly, you’ll want to get rid of the fake certificate in the System keychain. In Terminal, search to see if the ‘cert.der’ certificate file still exists:
cd /tmp; ls -alF
If you see ‘cert.der’ listed, then issue the following command in the Terminal window:
security remove-trusted-cert -d /tmp/cert.der
Then, go back to Terminal and do
rm /tmp/cert.der
If not, then try both this
security remove-trusted-cert -D
and check in Keychain Access.app by searching for ‘Comodo’ and looking for a certificate that has the fake Comodo serial number:00 EB 08 6A 4F 53 BE BA 4D.
4. Remove permissive admin access set by the malware
Back to Terminal for this one, and mind your typing. You don’t want to make any mistakes here…
At the command line prompt, type
sudo visudo
and provide an Admin user name. You won’t be able to see what you type, so type slowly, but at least you get 3 goes at it.
When you’ve got that in correctly, you should see the sudoers file, it’ll look something like this:
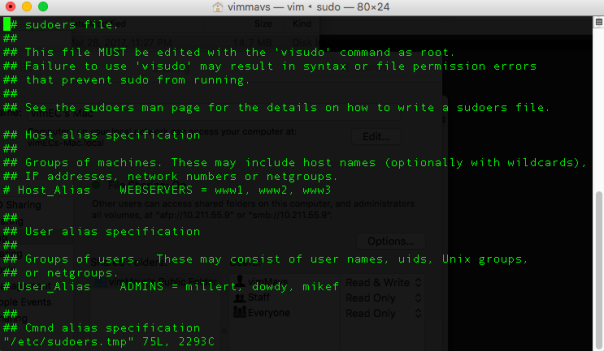
Use the arrow key to move the cursor down to the beginning of the line that says
%USER_NAME_HERE% ALL=(ALL) NOPASSWD: ALL
On your keyboard hit the ‘d’ key twice (i.e, type dd). The line should magically disappear*.
Finally, type
:wq!
(that’s a semi-colon, a lowercase w, lowercase q and an exclamation mark) to save your changes and quit. That’s it!
And with that, you should be done with OSX/Dok malware! 🙂
*If anything went wrong in visudo, you can press the u key once to undo your last action (the ‘u’ key only undoes the last keyboard action, so if you press it twice it’ll undo the undo = redo, so beware!)
how to recover Safari from a browser hijack

The quickest way to get out of a persistent popup that won’t go away (unless you do what it demands!) is to quit or force quit* the browser then restart Safari holding down the ‘Shift’ key.
Holding down Shift allows Safari (or any other app) to restart without resuming its last state.
While this is a great, fast way to solve the problem, it can be annoying if you had other tabs open, and you don’t want to loose those too (or any unsaved data they may contain).
Here’s how you get rid of these kinds of Javascript hijacks without losing your other tabs.
1. Go to Terminal and paste this command (it’s all one line):
defaults write com.apple.safari "com.apple.Safari.ContentPageGroupIdentifier.WebKit2JavaScriptEnabled" 0; killall Safari
This turns off Javascript and quits Safari.
2. Reopen Safari
You’ll get all your tabs back including the hijacked tab, but the pop up won’t appear, and you can now close the hijacked tab.
3. Go to Safari Preferences and reenable JavaScript in the Security prefs
(alternatively you can do that in Terminal).
Don’t forget this step, or you’ll think the web is broken!
More sophisticated or persistent adware and malware attacks can be mitigated by using apps like my free App Fixer or DetectX.
*You can force quit an app by pressing the following keys in combination on your keyboard <command><option><esc> then choosing the app you want to quit.


