Category Archives: Mavericks
how to create a bootable macOS installer

If you are preparing to install macOS on multiple computers, one of the things that can make your life simpler (and the waiting shorter) is a bootable USB installer.
The idea of the installer is that you only need to download the macOS Installer.app from the App Store once. Usually, when you run the installer after downloading it, it’ll delete itself and you have to go through the whole download process again on each machine or disk that you want to install macOS onto. By making a bootable USB drive, you simply plug the drive in to your mac, launch the installer app and tell it where to install the OS. You can repeat this as many times as you like as the installer will remain safe on your USB.
There are various ways to make a bootable USB installer, but they all involve the same process:
1. Download the macOS Installer from the App Store.
2. Run the createinstallmedia command from the Terminal, an AppleScript or a helper app.
3. Reboot your mac, choosing the newly created USB as the startup disk.
4. Run the installer.app from the USB.
Step 2 is where the fun is. The createinstallmedia command can be tricky to get right, particularly if you’re not familiar with working on the command line. For those of you that are, follow Apple’s instructions here.
For a little more convenience, I wrapped all that inside an AppleScript which will first ask you for the location of the installer, then ask you to choose the USB target.
For maximum convenience, I also wrote a free little Swift app I’ve dubbed ‘Boot Buddy‘ (cos “Create bootable macOS Installer Drive.app” just didn’t quite have the right ring to it..!) that will present the whole thing in a neat little user interface. Three clicks, more or less, and you’re done.
Boot Buddy doesn’t require an admin password to install, but you do need to provide an admin password to actually create the bootable installer as the createinstallmedia process has to be run as root. Boot Buddy doesn’t see or use this in any way whatsoever other than to start the createinstallmedia process or to cancel it (if you choose to do so); authorisation is handed off to macOS to take care of.

Boot Buddy requires macOS 10.11 or higher and can create bootable USBs from Mavericks, Yosemite, El Capitan, Sierra and High Sierra installer apps.

Share and enjoy! 🙂
App Fixer beta now available! 💥

I’ve just released the first beta 0.1 version of App Fixer over on my software distribution site, Sqwarq.com.
App Fixer aims to help you remove corrupt preference files and window Saved States that can sometimes cause apps to crash on launch or during normal operation. Traditionally, we have to go hunting through the user library hoping to identify the correct files to remove. Now, App Fixer does it for you.
If you have an app that won’t launch or that’s behaving badly, or you just want to start with a clean slate by removing user defaults/preferences (I’m looking at you Photoshop!), App Fixer will do it for you in a click.
Grab a free copy of the beta from here: http://sqwarq.com/appfixer
🙂
how to troubleshoot your mac with FT2
Macs are famously reliable beasts, but we often make changes to our machines that can cause unexpected behaviours such as the dreaded spinning “beachball” (i.e., slow response times), excessive fan noise, and crashes.
This is where Apple Support Communities comes in handy, a place where I spent the best part of my spare time for 2 years helping thousands of people solve problems with their macs. With a few rare exceptions of internal hardware malfunction, the majority of problems I’ve encountered with macs involve changes made to the mac by installing or removing third-party software (sometimes unwittingly).
There was a time when people seeking help on ASC were first told to go through a lengthy process of collecting arcane information from various deep and mysterious places on their computer before ASC support volunteers could help determine the problem. Fortunately, there’s now a number of free utilities available that will collect some or all of that information for you automatically, including my own FastTasks 2 and DetectX.
In this post, I’m going to assume you’re using FastTasks 2, for a couple of reasons (aside from the obvious one that its my own app!). First, aside from having a system profiler, FT2 provides other functions that are useful in troubleshooting, whose use I’ll indicate below. Secondly, unlike other analysers, FT2 not only profiles your system configuration at the time you run it, it can also show you what’s changed over time (see Step 5 below), making detection of new problems even faster and easier. For that reason, it’s a good idea to run FT2 when your system is trouble-free so that you have a log of a known ‘good’ configuration. However, I’m going to assume for most of this post that you don’t have a log of a known good state, and walk you through a series of steps that you can use to trackdown troublemakers.
To get started, download FT2 from here, and then proceed to Step 1.
*Note if your problem is with Safari, you can go straight to Step 10.
If your problem is with internet connections / networking, that’s a vast issue too large for this post, but try the advice here first. If that doesn’t work, the FT2’s Profile view contains a lot of information about your network configuration. Click the FT2 menu, choose ‘Analyser > Check now’, and click the Profile tab. Then follow the general advice in Step 11 below.
If your problem involves unusual behaviour of system hardware (keyboard lights, fans, system volume, etc) follow Step 3 of this post first.
Step 1. Put a block behind the rear wheel…
The first rule of troubleshooting is not ‘You don’t talk about troubleshooting’ but ‘You don’t do anything until you have a backup stashed away’. Fat fingers and a hasty desire for a cure can lead all of us to make mistakes when following procedures, and the last thing you want to do is accidentally delete some file or resource that is irreplaceable. So, back up first, and cure yourself of the tendency to rush for a solution. Troubleshooting takes time, and troubleshooting without a backup is like changing a wheel on your car without putting a block behind the rear wheel. Don’t get crushed by your own rush to get back on the road!
Step 2. Start with the obvious…
Launch FastTasks and wait for the system analyser to finish loading. You’ll see the analyser presents you with an ‘Issues’ page. This page lists any files or apps that are installed on your computer which have, in my experience, been known to cause problems for some users. If your system is clean of these files or apps, the page will be empty, like mine:

If anything is listed in the ‘Issues’ page, your first step is to deal with these as detailed below. If not, you can go straight to Step 3 now.
Depending on the issue, (click on an item in the FT2 window and press the ‘Info’ button), uninstall, delete or move to a temporary folder on your Desktop any items listed in the Issues page. You can open each item in the Finder either by double-clicking it in the FT2 window, or selecting it and clicking the ‘Reveal’ button.
If anything listed in the Analyser as a ‘Performance’ issue has been installed from outside of the App Store, check the Developer’s web pages to see if there is an uninstaller and, if so, use that. If not, move the App or files to the Trash, but do not empty it. At the end of this step, if it turns out that app or file is not the culprit, and you still want to use it for some reason, you can drag it back out of the Trash.
After dealing with anything in the ‘Issues’ list, restart your mac and see if the problem behaviour is solved.
Step 3. Wipe the board…
If you didn’t have any issues, click the FT2 icon in the menu bar and note the system information in the lower half of the menu. Look at the ‘Uptime’ stat. This shows how long since you last rebooted your machine. If the problem behaviour has only been noticed since the last reboot, then restart your machine now, and test again.

More often than not, most unexpected or strange behaviour that comes out of nowhere can be solved by a system reboot.
Step 4. Check the disk
Click the FT2 icon and note the system information in the lower half of the menu. Look at the empty/full icon and the stats below it on disk usage (you can choose to have one of these shown in the menu bar all the time if you wish, as well as change the color of the icon. In the menu, choose Preferences > Menu Bar Icon). You should have got a warning from FT2 if your disk is gettting critically full, but even if your disk is only 70% or so full, you could find your machine slowing down when Spotlight is indexing or if you’re doing any operation that requires a lot of disk activity. My recommendation for a speedy machine is to keep disk usage below 60% if possible (I rarely let my own disk ever get above 50%).
While we’re thinking about the disks, let’s just check the S.M.A.R.T status of the Internal boot disk. With the FT2 window open (if not, click ‘Analyser > Check now’), click the ‘Profile’ tab. Scroll down right to the bottom of the page and check that the S.M.A.R.T status says ‘verified’. If it doesn’t, there’s your problem: you need to replace your hard disk ASAP.

Step 5. Reverse gear…
If you’ve ran FT2 before, anything that’s changed since the last time you ran it will be highlighted in the view (you’ll also see the yellow warning triangle at the top).

For example, in the screenshot above, note how FT2 records that the Ghostery extension has installed an update of itself in the background!
If you haven’t run FT2 before, go to Step 6. If you’ve run FT2 before but no changes are indicated, look through the logs by using the back and forward arrows on either side of the ‘Run’ button. For convenience, you can click the ‘Console’ button, then type ‘added’ into Console’s search bar, making a note of anything shown, then type ‘removed’, again making a note of any changes.
Whether you find changes in the Console, logs, or indicated in FT2’s current Profile view, the process is the same. For any change indicated, you need to reverse it. That means, anything added should be removed, and anything removed should be replaced from a backup. However, it’s important to be methodical, so deal with one change at a time, restarting the system and checking for the problem again after reversing each change. If that doesn’t solve it, move on to the next change and repeat.
There’s such a high chance that you’ll discover the cause of the problem this way that its the best argument for running FT2 on a regular basis and before you hit trouble. Trouble always starts with some change…
If you’re still encountering problems, go to Step 6.
Step 6. The root of all Evil…
Well, maybe not all, but without doubt the overwhelming cause of problems I’ve dealt with on ASC were caused by login items. These are things that automatically run when you log in to your account. Any app or script that’s in your Login Items that causes problems to your system will affect your system from the start of your session and often right through till you log out (often regardless of whether you quit the app in mid-session).
With FT2’s Analyser window open, click the ‘Profile’ tab. At the very top of the page, check what and how many items are in your Login Items. You really don’t want more than four or five items in here in any case, or you’ll notice a real lag betweeen when you log in and when your system is ready to be used. Keep only the essential things in here (yes, I’d say FT2 is one of them, see the end of this Step).
However, even one app can cause problems if it’s the wrong app. To troubleshoot Login Items, click the FT2 menu and choose ‘Login Items > Remove All’. Click ‘OK’ to confirm. When you see the notification that Login Items are empty, restart your mac and test for the problem.

If the problem is not solved, go to Step 7. If the problem is solved, you can try adding each of your login items back in one at a time to ascertain which item caused the problem. Better still, just keep your login items empty and enjoy faster start up times.
The exception to the above advice is to consider keeping FT2 in your Login Items. The reason is that every time you login in, FT2 will run a background profile check and store that in its logs. That’s a vital tool for solving troubleshooting problems in the future (see Step 5 above), and one of FT2’s most useful features (however, if you don’t want FT2 to start on login, choose ‘Preferences > Start at Login’ and click to remove the tick).
Step 7. Digging deeper…
First, a note about .DS_Store files: In this and the remaining steps, you can ignore any file called .DS_Store shown in the profiler. These are hidden files generated by the Finder and can be ignored (likewise, you can delete them, the system will just recreate them when it needs to).
If you’ve got this far and your problem persists, it’s time to start looking further down the profile list. The next item in the profile view is User Launch Daemons. Notice that FT2 handily shows you where you can find this directory. To use that info, highlight the path shown (omit the closing bracket), then control-click, and choose ‘Services > Reveal in Finder’, to open the directory.
I do NOT recommend deleting files from here directly. Instead, you need to identify which apps these files belong to and uninstall them. After uninstalling, check back in Launch Agents to see if the uninstaller has cleaned up the file. If it hasn’t, you can then delete it (but be sure you’re deleting the correct file).
If the file doesn’t appear to belong to an app or you’re in doubt about its parentage, then move it (don’t delete it) to your Desktop. As with Login Items in the previous step, you need to be methodical here, and test each item after you remove or uninstall it with a reboot. Doing so means you can firmly determine which apps and files are OK and which are suspect.
Step 8: and deeper…
If your problems remain after working through all the User Launch Daemons, scroll much further down the list until you find Domain Library Launch Agents and Domain Library Launch Daemons and Domain Library StartUpItems. For each, you need to follow the procedure in Step 7: in other words, start by identifying the parent app of the file in the directory, uninstall it, check its cleaned up the file in the directory (if not, move it to your desktop) and re-test.
Step 9: Problems, problems, problems…
Still not got to the bottom of it? Then we need some more info. The best thing to do right now is determine whether the problem only affects your user account or all users on your system. Knowing this will provide a better focus for continued efforts.
To do that, go to > System Preferences > Users & Groups and click the padlock and supply an Admin password to open it. You’ll now be able to click the little ‘+’ button just above the padlock and create an extra Admin account.
After creating the account, restart the mac, log in to the new account and see if the problem affects that account too. Once you’ve determined that, log back into your normal account and go to Step 11 below.
Step 10: Safari and the internet
Problems with Safari and internet connections are a realm all to themselves and too vast to be discussed here except in general terms.
If the problem appears to be peculiar to Safari, then the first thing to do is open FT2 Analyser and click on the ‘Profile’ page. Scroll down to Safari Extensions and take a look at what’s in there. Anything you don’t recognize or anything new since things were hunky dory? If so, focus on that first.
To deal with Extensions, don’t delete things from the directory itself. Instead, open Safari, and from the menu bar choose “Safari > Preferences” and navigate to the ‘Extensions’ tab.
Start by disabling ALL extensions. Now restart Safari. Problem solved? If yes, then start turning one extension back on at a time, until you discover which one is causing the problem. Uninstall the culprit.
If the problem persists after disabling all extensions, go back to FT2’s Profile view and scroll down till you get to User Library Internet Plug-Ins. If there is anything in here (you can ignore .DS_Store), then select the path shown for the directory (omiting the word ‘path:’ and the closing bracket), right-click and choose ‘Services > Reveal in Finder’. Move anything in the folder to your Desktop. Restart the mac and test.
If the problem is solved, try moving each item back to the Internet Plug-Ins folder, one at a time, restarting and testing after each move until you determine the culprit.
If the problem is not solved, return any items you moved to the Desktop back to the Internet Plug-Ins folder. Then, check to see whether other browsers are affected (if you don’t have it already, it’s always a good idea to keep a copy of Firefox on you mac, just to use as a control for Safari tests if nothing else). Make a note of the answer, then follow the instructions in Step 9 above, then go to Step 11 below.
Step 11: What to do next…
I hope this post has helped solve your problems, but if it hasn’t don’t panic. Your best resource is Apple Support Communities. Though I’m no longer active there (my spare time is used for software development these days), there are many hands on deck and people with all sorts of specialist knowledge about different areas frequent the boards. The key is to make sure you describe the problem as fully as you can and to post information from FT2’s system profiler (use the ‘Copy’ button). Be sure to mention the results of your tests so that people have got enough information to help you.
Also, please be polite to those who respond to you – ASC is staffed by volunteers, not Apple employees, just spending time to help others out. Finally, please don’t email troubleshooting problems to me personally. You’ll get a faster and better response by using the full resources of the support community.
Good luck!🙂
how to fix the “Shellshock” security flaw

Apple have today released updates to Bash for Lion, Mountain Lion and Mavericks. All users are recommended to update to Bash version 3.2.53(1) to patch the recently found “Shellshock” exploit.
At the time of writing the update for 10.9 wasn’t coming through OS X’s built in ‘Software Update’. The updates are available for download and install here:
http://support.apple.com/kb/DL1767 – OS X Lion
http://support.apple.com/kb/DL1768 – OS X Mountain Lion
http://support.apple.com/kb/DL1769 – OS X Mavericks
FastTasks 2 update available 💥
I’ve just released an incremental update for FastTasks 2. Update 1.3 adds the ability to quickly see whether TRIM is currently on or off for your SSD disks. Since TRIM support for non-Apple SSDs requires editing a kernel extension, TRIM is regularly disabled on non-Apple SSDs every time users update or upgrade OS X. FastTasks 2 v1.3 now lets you see TRIM status in the information section of the menu.

Get the latest release of FastTasks 2 by going directly to the FastTasks support page, or if you already have FastTasks 2 running, you can use the Preferences > Check for Update > Check now menu item.
🙂
FastTasks version 1.18 released! 💥

I’ve just posted an incremental update to my free system utility, FastTasks. The update fixes a bottleneck in the launch code that caused FastTasks to take excessively long to load. I’ve also added the System Uptime, which you can also refresh with the new keyboard shortcut, ‘command-U’.
FastTasks saves you having to role up your sleeves and get mired in the exotic world of Terminal’s command line for a number of common tasks. FastTasks v1.18 offers you system info down the left side of the panel, all of which can be updated by the shortcuts displayed on the panel, and access to some common Terminal commands on the right.
If you haven’t tried FastTasks yet (or got tired of the slow launch times with the old version), this is a great time to grab a free copy of v1.18 as I’ll soon be replacing the app by FastTasks 2.0, a paid-for app with a whole new interface and extra functions. Nevertheless, support for FastTasks 1 will continue and bug fixes will still be forthcoming as necessary. Grab it while you can, folks!🙂
Download FastTasks v1.18 from here…
Note: FastTasks requires OS X 10.6.8 or higher
run Terminal commands from any app
In this post I’m going to show you how you can select a piece of text in any app and have it run in Terminal simply by hitting a hotkey. The trick is especially useful for running commands you find on websites (like this one!) in a browser like Safari or Firefox.
This 20-second clip demonstrates running a command from a Firefox browser and another one from TextEdit, but you can also do it from an AppleScript editor window (and indeed any app that has selectable text), which can be useful for testing the formatting of your ‘do shell script’ commands and the like:
The first thing you’re going to need is to create an Automator workflow, add an AppleScript action and insert some code. Really? Nah, just kidding. I did it for you. 🙂 Just download, unzip and double-click the .workflow file to install the completed Service:
Download Run in Terminal.workflow.zip
Click through the various dialog boxes and choose ‘Install’ on the last one* (note for Snow Leopard users: the service will open directly in Automator; just do ‘command-shift-S’ to name it and save it).

All you need to do now is set the hotkey. Open > System Preferences.. > Keyboard | Shortcuts and click ‘Services’ in the sidebar. Scroll down the window till you see the ‘Run in Terminal’ command. Click on the far right to add a shortcut of your choice. The one I used in the video is ‘command-option-control-T’ (‘T’ for ‘Terminal’ helps me remember the shortcut).
To use the Service, just highlight any Terminal command by triple clicking it and pressing your hotkey. Try this one,
cd ~/Desktop; ls -alF
which lists all the visible and invisible files on your Desktop, as a test.
You can also get to the Service from both the contextual menu (right-click > Services) and the application menu bar at the top (e.g., Safari > Services).
As a bonus, try out your new Service on the Terminal command in this post, and now you’ll be able to run Terminal commands even from Quick Look previews in Finder!
Enjoy! 🙂
Carbon Copy Cloner: see last back up date
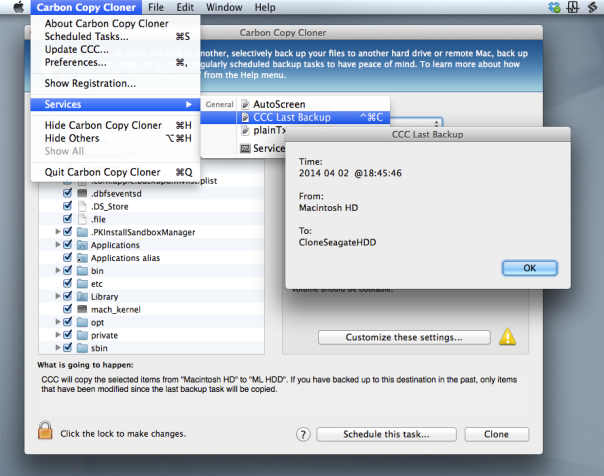
If you’re a user of Bombich Software’s excellent Carbon Copy Cloner but you’re not doing backups as scheduled tasks, you may wish there was a way to find out the last time you successfully completed a backup task.
Unfortunately, CCC doesn’t provide an easy way for users to see this information natively, but in this post we’re going to add it through a bit of AppleScript and Automator magic.
As it turns out, CCC does keep a log of all your past backup details stashed away in a CCC.log file buried in your local domain’s Library folder. You can view this file in Console, but it’s a bit of a pain. Wouldn’t it be nicer if you could just hit a hotkey like ‘Command-Control-C’, say (you know, for ‘CCC’🙂 ), and get a dialog box like this:

If you think so too, then download my Automator workflow:
For Lion, Mountain Lion and Mavericks:
Download for 10.7.5 thru 10.9.2 
For Snow Leopard:
Download for 10.6.8 
Double-click on the .zip file and double click again on the unzipped workflow file. You’ll get a warning message saying that you’ve downloaded the file from the internet (from me, actually!). After clicking ‘Open’ to dismiss the warning, for all users except 10.6, click ‘Install’ on the the following dialog box:
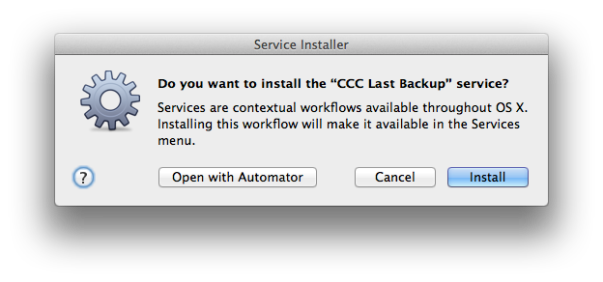
After clicking ‘Install’, click ‘Done’ to dismiss the confirmation dialog box that pops up.
For those of you running Snow Leopard (10.6.8), after clicking ‘Open’ the workflow should open in Automator. Hit ‘command-S’ to save it as a Service.
For all users, if you now click up to any application name next to the Apple near the top left of your screen (see the screenshot at the top of this post) and scroll down to ‘Services’ you should see the new Service already there. If you don’t, try logging out and logging back in to your user account.
Once you can see the workflow in the Services menu, go ahead and give it a click to test it out. 🙂
A couple of notes on usage:
Carbon Copy Cloner does not have to be open for the Service to work.
The date format display is YYYY-MM-DD.
If you want to add a shortcut key as suggested earlier, open up System Preferences > Keyboard and click the ‘Shortcuts’ tab. Down the sidebar you should see ‘Services’. Click on that and scroll way down to the bottom till you see the name of the Service. Click ‘Add Shortcut’ and hit the keys you want to use. I like ‘command-control-C’ as it’s an easy mnemonic for ‘Carbon-Copy-Cloner’.
check for security flaw in OS X and iOS
Update: Mavericks users can now update to 10.9.2 which fixes the flaw. 🙂
News is just breaking of a flaw in Apple’s implementation of SSL security, which could affect anyone using iOS and 10.9 OSX over public/open access wifi ‘hotspots’.
If you’re using iOS, please ensure you do Software Update immediately as a patch has already been released by Apple.
No word from Apple on OS X at time of writing. You can test to see if you have the problem by clicking the following link. Basically, if SSL is working properly you shouldn’t be able to read the message on this page:
https://www.imperialviolet.org:1266
If you can read the message on that website from your Mac computer, the best advice to date is to stay off public/open access wifi networks until we hear something more from Apple.
Ars Technica have more information on the security flaw here.
how to correct the external monitor resolution

A problem that’s been bugging me since at least Mountain Lion is that sometimes when I connect my external monitor to my Macbook Pro, the display resolution is incorrect. The problem is pretty annoying as it often occurs on wake if the MBP goes to sleep even when the external monitor hasn’t been disconnected.
There are a number of solutions to this problem, and I’ve used them all. Some are less irritating than others, but in this post I’ll give you a run down of the options.
1. The old fridge magnet trick
As I often use a tiny magnet to put my MBP display to sleep while keeping the lid open, normally putting the magnet on and then taking it off again will cause the displays to reset. But this method is annoying both because I’m often connecting to external monitors away from home and because I often misplace that tiny magnet! The other problem with this method is it doesn’t always work… 😦
2. Put the external monitor to sleep with a Hot Corner
Go into System Preferences > Mission Control, and set one of the Hot Corners to ‘Put Display to Sleep’ (not ‘Start Screen Saver’). When your mac wakes up and the monitor is in the wrong resolution, move the cursor to the Hot Corner, wait a couple of seconds, and move the cursor back to the centre of the screen.
3. Activate ‘Detect Displays’
Ok, two ways to do this. The manual way is that you open System Preferences, hold down the ‘option’ key and hit the ‘Detect Displays’ button at the bottom of the window. Note that you won’t see this button unless you’re holding down the ‘option’ key. After the display resets properly, quit System Preferences. My main beef with this method is it’s totally disruptive to my workflow, so much in fact that it makes me angry every time I use it!
Fortunately, you can lower the inconvenience with the second way, which is an AppleScript that does the same thing automagically.
Update Jan 2015:
Partly in response to this problem, I’ve written an app called DisplayDroid which detects when a monitor is connected or disconnected and automatically runs a script in response. The script below is built into DisplayDroid as one of the presets that you can choose!
Find out more about DisplayDroid…
trytell application "System Preferences" to quit
end trydelay 1tell application "System Preferences"
activate
reveal pane "com.apple.preference.displays"
end tell
tell application "System Events"
tell process "System Preferences"
set frontmost to true
try
key down option
delay 0.2
click button "Detect Displays" of window 1
delay 0.2
key up option
on error
key up option
end try
end tell
end tell
tell application "System Preferences" to quit
You might want to save this in your scripts menu or make it into a Dock-able app for convenience. Don’t forget you’ll need to allow the AppleScript editor permission to use Assistive Devices.
4. A free screen utility
Unhappy with a GUI scripting solution, I started researching how to change the displays in Cocoa or from the BASH command line so that I could avoid the overhead of System Preferences popping open and closed, which is an ugly solution at best. I didn’t get far in my research before I found that someone else had already beaten me to the punch, and had even offered the code up for free. Y’gotta love the heroes of the programming community! Download the free RDM.app, which lets you change the screen resolution on any of your monitors from the status bar on your desktop. Move it from your Downloads folder into your /Applications folder. I’ve even got it in my login items for maximum convenience!

Although the app is probably slightly slower than the Hot Corner solution when I’m at home, I like it because I regularly connect my mac to all sorts of other monitors and projectors and the mac doesn’t always choose the best display. The RDM.app lets you slide through the available options much more efficiently than the System Preferences panel, too. Big respect to Paul Griffin at http://www.phoenix-dev.com for this!
5. Trash old prefs
No matter how well or otherwise any of these techniques work, the question remains: why is the resolution setting being forgotten in the first place? I haven’t nailed this down as a cert yet, but ever since I did this to solve a different problem, my monitor’s been behaving itself, too.
1. Go to
Hard Disk/Library/Preferences/System Configuration
Now make sure you’re at the right place because there’s another ‘System Configuration’ folder at /Library/System Configuration, and you definitely don’t want to be messing with that one. Also, this is the Library folder at the root of your hard disk and NOT your user account library (i.e, the path is /Library, not ~/Library). Check that path. Here it is again
Hard Disk/Library/Preferences/System Configuration
2. OK, click on that folder, and copy it over to your Desktop. Now go back and delete it from /Library/Preferences (or hold down ‘option’ while you drag to do a ‘move’. I prefer the first way; it’s safer, if slower).
3. Restart and test.
Hopefully, if you’ve been venting at the ears like me over the external display problem, one or more of these options will help lower the frustration!
🙂
Related Posts:
DisplayDroid from Applehelpwriter

