Category Archives: Time Machine
how to track your clones

Last week I was asked whether I could produce a script that would keep track of Carbon Copy Cloner backup tasks so that a user could tell which of many, multiple backups of the same source disks were the most recent.
Of course, CCC has its own Task History and Disk Center functions to provide information, but these turn out to be insufficient in common scenarios. To see why, let’s consider a hypothetical task set-up and recovery situation.
In this situation, let’s suppose I’m keeping 2-hourly, daily and weekly clones of my mac’s internal disk. While I’m logged in to my mac, I can of course check CCC’s Task History to see when the last back up was, the destination, and whether it was successful or not.

However, suppose the internal disk fails – just the situation for which I keep my CCC backups on a regular schedule. Which disk contains my latest backup? The information from CCC’s history task is on the failed internal disk, so it is not now available to me. Of course, each backup contains CCC’s earlier History too, but there’s several problems here. First, these cloned task histories do not contain the history from the *last* task (that’s only written to the source disk after the last backup completes). Second, to compare them, I’d have to boot each clone individually – a time-consuming and not terribly convenient process. Third, CCC’s ‘Disk Center’ only provides backup information about connected disks if the current startup disk was used to run the backup task. Thus, if I backup Disk B from Disk C, that information won’t be available to me when I startup my mac with Disk A.
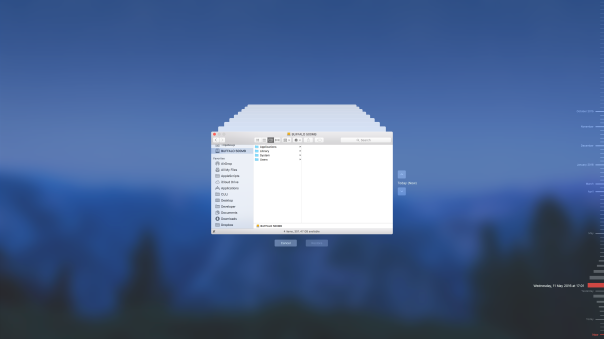
Before I discuss the solution to this, let me just complicate the scenario further. I have two other macs – two 13″ MacBook Pros that have been going strong since 2009 – each of which I backup to individual clones. There’s no way for me to see all the backup dates from all my macs with CCC. Further, we don’t need to consider only disk failure as a reason to need comparative backup history. Since some files are shared or swapped across my three macs, there’s no way to find out from CCC’s Task History or Disk Center when the latest backup of any particular one of those files was made, or on which backup disk I can find it. For example, the connected disk ‘MBP Z Clone’ is a scheduled task on my MBP, but looking at this disk when connected to my iMac gives me no information about its backup history:

Fortunately, CCC has two features which make our problems solvable. First, each source disk keeps detailed logs of the backups it has run (from which the Task History and Disk Center info is constructed); secondly, CCC allows us to run a shell script after each task has completed.
These two little features are going to allow us to build a shell script that will write a special log file to the destination after each task completes, and then retrieve it and compare it against both the current source and other disks. That means we’ll be able to get CCC backup data from any disk we connect to any mac, since the data will be stored on the destination disk itself thanks to our shell script (for the technically minded: to avoid permissions problems, the script writes to /Users/Shared/ if it’s a bootable clone, or to the root of a disk that isn’t).

That’s the outline of the problem and the solution. What started out as a simple AppleScripting task soon blossomed into a full-blown app. Although much of the background work I’ve outlined above is achievable via AppleScript, displaying the data effectively is rather cludgy, even if one uses some of the excellent scripting libraries like Shane Stanley’s ‘Myriad Tables’ to improve on the stock AppleScript offerings.
Accordingly, after about a week or so of wrestling with an acceptable solution, I finally came up with the Disk Inspector.app to solve all these problems in one go and add a few niceties on top. 😉
Whatismore, since it’s Christmas :D, I’m publishing this as a free utility on my software site, Sqwarq.com. Check out Disk Inspector’s support and download page here: https://sqwarq.com/disk-inspector
Here’s a quick overview of the main features:
1. See dates of all connected disks that have been backed up via CCC*
2. See the latest backup and (if available) Time Machine backup for the current source disk
3. See the OS Version and Build Number on connected, bootable drives
4. Open any disk’s root folder in the Finder by double-clicking its name in DI’s main view
5. See an estimate of the total and available space on each disk (rounded to the nearest GB)
6. Save all the data to a log file for easy record keeping of your backups
* after completing Disk Inspector’s set up procedure
Usage:
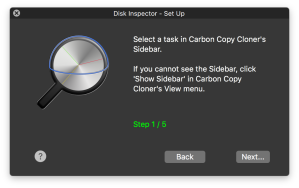
For full instructions refer to the Support page, but the basic idea is that on first launch, you run the ‘Set Up’ wizard to configure your tasks in Carbon Copy Cloner. Disk Inspector’s ‘Set Up’ wizard walks you through 5 simple steps to accomplish all this.
Once you’ve completed the set up procedure and each of your scheduled CCC tasks has run, you’ll start to see information for each backup disk in Disk Inspector’s main view on any mac (or on the same mac booted from a different drive) that you subsequently connect those disks to.
Disk Inspector runs on 10.10 and higher.
Enjoy, and Happy holidays to all!😀
how to see what Time Machine has and will backup
If you find Time Machine’s taciturn silence on what it has and will do a bit frustrating at times, the command line utility tmutil can offer you a bit more insight.
In particular, if you’d like to see what Time Machine is going to back up just before it’s about to run, execute the following command in the Terminal:
tmutil compare
That will compare the machine as it is now against the last backup (See the man page for more options on the output). It took about 5 minutes on my mac, but I have a small hard drive. It could take somewhat longer depending on how much data you’ve got to trawl through. Remember that you’re doing a diff on a moving target, so the less you can use the machine for other tasks while this command is running the faster it’ll complete.
On the other hand, you might want to know more about what Time Machine has just done after a backup. Which files did, or did not, get changed, added or removed?
You can find out what got backed up after the task finishes by comparing the most recent snapshot (the one that’s just completed), with the previous one (this is much faster, took about 35 seconds here). You can do that in Terminal, too, but the syntax can be a bit tricky. To make it easier, here’s a handy AppleScript that will do it for you. Just pop it into the (Apple)Script Editor.app and hit the ‘Run’ ▶︎ button.
# This script compares the most recent backup to the previous one
# indicating what was changed, added or removed
set backupList to paragraphs of (do shell script "tmutil listbackups")
if (count of backupList) < 2 then
display dialog "Sorry, couldn't find anything to compare. Try again after the next backup"
else
set path1 to quoted form of item -2 of backupList
set path2 to quoted form of item -1 of backupList
do shell script "tmutil compare " & path1 & " " & path2 & " | open -f"
end if
how to stop ransomware infecting a backup disk

If you use a scheduled backup task such as Time Machine or Carbon Copy Cloner, any ransomware infection of your internal drive could soon propagate to your scheduled backup.
To help ameliorate that, I’ve produced a script that will abort a scheduled backup task using Carbon Copy Cloner if a user-defined percentage of changes have occurred in a designated ‘Canary’ folder.
Here’s how it works. In order to be successful, ransomware must change a large percentage, if not all, of your personal files in your Home folder by encrypting them. That means we can determine if a folder has been encrypted by looking for an unusual amount of changes or additions since the last backup.
A Canary folder is a folder that we use to warn us of precisely that. It should be a folder that contains some random dummy files (.doc, .png, .xls files etc), and/or a folder which you don’t make large changes to from one backup to the next. The script itself will change the folder slightly each time it runs, to ensure that the Canary folder does not look like it’s ‘stale’ (which might cause an attacking script to ignore it).
The key to the Canary is that the percentage of files changed or added on each scheduled backup is less than the threshold you set in the script. The default is set to no more than 10%. If the number of files changed or added is higher than that, then the backup aborts. You can of course change the default to a bit higher if you use a ‘real’ folder that you don’t change often, but remember we’re only talking changes between one scheduled backup and another, so it will also depend on how frequently your backups are scheduled.
For example, I have a 2-hour scheduled backup and I use my ‘Documents’ folder as the Canary. Since I only use that folder for long-term archives, it is actually rarely changed, and certainly never as much as 10% within 2 hours, and that makes it a perfect choice as a Canary. You can pick any real, rarely used folder or you can set up a complete dummy folder if you prefer.
If you do pick a real folder, keep in mind its size. The larger the folder, the longer it’s going to take the script to determine the differences between it and the last backup of it. A couple of thousand files is OK, but once you get into the tens of thousands you might find the script takes several minutes to complete. With only a few hundred files in my Documents folder, it takes literally a second or two.
Here’s a sample output from the log file the script produces in the ‘Canary’:
Destination /Volumes/Backup Disk/Users/phil/Documents has 360 files in the folder. There are 3 changes between it and the source /Users/phil/Documents. The threshold for aborting the task is 10 percent, or 30 changes. Result: task will run.
For our strategy to be successful, we need to ensure the attacking script doesn’t ignore the Canary and does try to encrypt the Canary before the next backup is scheduled. For that reason, if you opt for a complete dummy folder, you might like to give it a name so that it’s somewhere near the beginning (alphabetically) of your Home folder. Since the Canary folder will be slightly modified each time the script runs, it should get hit early if the attack is looking either for recently modified files or just starts trawling your home folder in ascending name order (and I know what you’re thinking: what about descending order? Sure, you could add another Canary at the end, and modify the script to check both ;)).
Note that this script is for use only with a regular, scheduled backup task, and only for use with Carbon Copy Cloner (version 4). We’ll be posting about Time Machine strategies later.
Another note of caution is that while this script should stop your scheduled CCC task from infecting a backup drive, it won’t stop an attacking script from attempting to encrypt any mounted drives it finds by itself. That really depends on the sophistication of the attack. To that end, we’ll soon be posting a general strategy for detecting a ransomware attack on your internal drive using multiple Canaries and a bit of Folder Action script magic. Stay tuned for that.
In the meantime, here’s the script. Due to the vagaries of WordPress.com formatting, I’ve hosted it over on my pastebin. Please read the extensive comments, which also explain how to set it up and how to use it. Any questions, drop a comment below. 

Picture Credits: ‘Caged Egg’ by Marije Berting
Carbon Copy Cloner: see last back up date
If you’re a user of Bombich Software’s excellent Carbon Copy Cloner but you’re not doing backups as scheduled tasks, you may wish there was a way to find out the last time you successfully completed a backup task.
Unfortunately, CCC doesn’t provide an easy way for users to see this information natively, but in this post we’re going to add it through a bit of AppleScript and Automator magic.
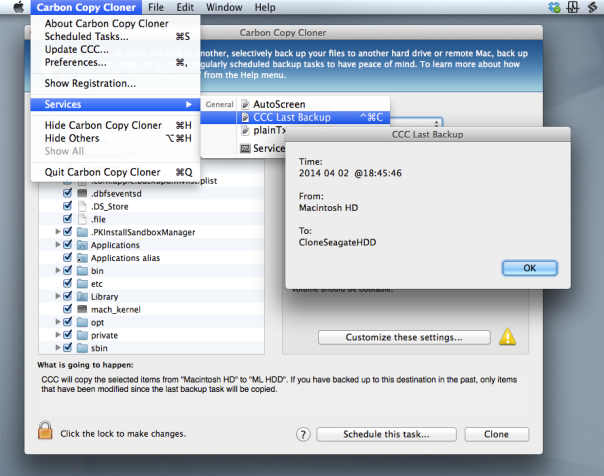
As it turns out, CCC does keep a log of all your past backup details stashed away in a CCC.log file buried in your local domain’s Library folder. You can view this file in Console, but it’s a bit of a pain. Wouldn’t it be nicer if you could just hit a hotkey like ‘Command-Control-C’, say (you know, for ‘CCC’🙂 ), and get a dialog box like this:

If you think so too, then download my Automator workflow:
For Lion, Mountain Lion and Mavericks:
Download for 10.7.5 thru 10.9.2 
For Snow Leopard:
Download for 10.6.8 
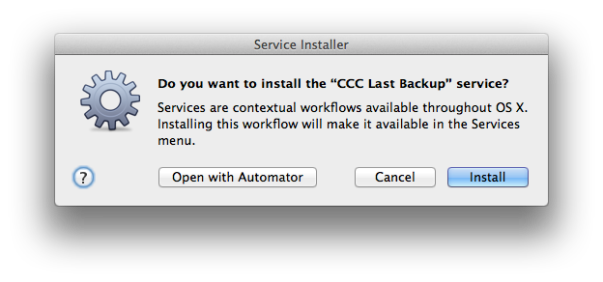
Double-click on the .zip file and double click again on the unzipped workflow file. You’ll get a warning message saying that you’ve downloaded the file from the internet (from me, actually!). After clicking ‘Open’ to dismiss the warning, for all users except 10.6, click ‘Install’ on the the following dialog box:
After clicking ‘Install’, click ‘Done’ to dismiss the confirmation dialog box that pops up.
For those of you running Snow Leopard (10.6.8), after clicking ‘Open’ the workflow should open in Automator. Hit ‘command-S’ to save it as a Service.
For all users, if you now click up to any application name next to the Apple near the top left of your screen (see the screenshot at the top of this post) and scroll down to ‘Services’ you should see the new Service already there. If you don’t, try logging out and logging back in to your user account.
Once you can see the workflow in the Services menu, go ahead and give it a click to test it out. 🙂
A couple of notes on usage:
Carbon Copy Cloner does not have to be open for the Service to work.
The date format display is YYYY-MM-DD.
If you want to add a shortcut key as suggested earlier, open up System Preferences > Keyboard and click the ‘Shortcuts’ tab. Down the sidebar you should see ‘Services’. Click on that and scroll way down to the bottom till you see the name of the Service. Click ‘Add Shortcut’ and hit the keys you want to use. I like ‘command-control-C’ as it’s an easy mnemonic for ‘Carbon-Copy-Cloner’.
eject all your disks at once

Here’s a simple AppleScript one-liner that can be useful if, like me, you have several disks connected to your laptop at home or the office and you need to get up and go quickly.
1. Open the AppleScript Editor.app by typing Apples in the Spotlight search bar and hitting ‘return’.
2. Copy the following code into the editor window:

3. Hit ‘Command-K’ to compile and ensure you didn’t make any mistakes. Fix any typos if it doesn’t compile and try again. Save the script to your Desktop as ‘EjectAll.scpt’

4. If you don’t already have the Scripts menubar icon visible in your menu bar, hit ‘command ,’ (that’s the Command key and the comma key) and check the ‘Show Script menu in menu bar’ item in the General pane of AppleScript’s Preferences window.
5. From the Scripts menu, choose ‘Open Scripts Folder > Open Computer Scripts Folder’ and drag ‘EjectAll.scpt’ from the Desktop to the Computer Scripts Folder. You’ll need to authenticate with an Admin password to complete the move.
And that’s it. Now whenever you want to eject every disk with one simple operation, just hit the Script menu icon and click on ‘EjectAll’. 🙂
how to remove a boot.efi file from Trash
Click on the Trash can on the Dock, hold down the ‘option’ key and click the ‘Empty’ button over there on the left side of the window. If this doesn’t do it, the file may be in the .Trash folder of your Time Machine (TM) or some other disk.
To find out if that’s so, follow this procedure:
1. Open Terminal.app, copy and paste the following command into the Terminal window
defaults write com.apple.finder AppleShowAllFiles TRUE; killall Finder
Then press ‘Return’.
2. Open a Finder window. Navigate to the TM disk starting from its icon in the left hand column. You should see some greyed out folders called .Trash and .Trashes. Click on these and have a look for the boot.efi file that we’re hunting down.
To remove the boot.efi file from the hidden trash, try the following:
3. Go back to Terminal and copy and paste the following:
sudo rm -rf
Do NOT press ‘Return’. Instead, press the Spacebar once, then use your cursor to drag the boot.efi file from the hidden folder in Step 2 and drop it in the Terminal window. Now press ‘Return’. You will be asked for an administrator password and given a warning which you can ignore. Type in your password, but notice that your typing will be invisible, so type carefully.
Press ‘Return’.
4. If you typed your password incorrectly, repeat step 3. If you typed it correctly, hopefully, your Trash is empty. 🙂
5. The last thing is to hide all the hidden files again, so copy and paste this:
defaults write com.apple.finder AppleShowAllFiles FALSE; killall Finder
Then press ‘Return’.
You can close Terminal now.
Good luck!
how to back up your Mac – the best way!

iCloud? Time Machine? Noooo……! We’re talking about the best way to backup your precious data, not the most convenient way…
What’s wrong with using the cloud? The fact that you need an internet connection, a password to be accepted, to act in accordance with the T&C of your cloud provider, the fact that someone – government, corporation, hacker – could interfere with your data, lose it or just add unwanted stuff to it. Also, if you want to backup your whole system then the various free storage offers are not going to be big enough to do the job, and you’re going to end up paying a lot more than if you backup your system properly.
How about Time Machine? Yes, it’s simple and convenient and pretty much automatic, but its not secure. TM has three major problems. First, it doesn’t allow proper archiving so anything you delete from your HDD will eventually get deleted from TM. Second, it doesn’t tell you what it’s doing before it does it, meaning you are at the mercy of its automated decisions. Third, it’s not bootable. If your whole system crashes or your HDD just fails, Time Machine won’t help you. You’ll have to restore the system or replace the HDD before you can use your machine again.
But there is a much better way, and aside from you providing the hardware (a couple of external hard disks), one that’s also free. The most secure system is to run an hourly or daily scheduled cloner on one disk, and a weekly cloner on the other. You can use SuperDuper or, my own favourite, Carbon Copy Cloner.
If you want to read up on and understand the various backup options and what they entail, you can’t do better than to read this superb post by Apple Discussions member ds store.
Time Machine – anywhere, anytime!

One of the nice new features of OS X Lion is that you can access your Time Machine backups even when you are disconnected from the drive such as on the commute to work or even while on holiday. The downside is it takes up a chunk of your HD that you might not want to give up. Fortunately, you can turn this feature on or off (it’s on by default in Macbook’s, but off by default in iMac/Mac Pro).
When the feature is on, local snapshots of the last few days’ Time Machine backups are stored on a local drive called MobileBackups. If your time machine backup disc should get corrupted for any reason, these can also serve as a second line of defence. Be careful though, these backups get replaced and updated without warning, so don’t rely on them for anything more than the last couple of days saves.

You can access these from the regular Time Machine icon. Alternatively, find them by clicking on the computer name at the bottom of the left-hand column in any Finder window, and then navigating to the MobileBackups drive.
If you want this option on your iMac/Mac Pro, you’ll have to enable it through Terminal. Open the Terminal application and paste in the following command:
sudo tmutil enablelocal
followed by your admin password and a return-key stroke (don’t expect to see anything when you type the password).
If Terminal returns to the prompt you should be good to go. Check by opening Time Machine preferences, which should now display the message that “Time machine keeps local snapshots as space permits and…” followed by the Time Machine backup schedule. If it hasn’t worked, it’ll just say “Time machine keeps:” and then the schedule.
If you wish to disable local snapshots to save disk space (mine takes up about 8GB), then just type:
sudo tmutil disablelocal

followed by your password. Don’t forget to quit Terminal straight after you’ve verified everything’s working. Enjoy!
Time Machine Preferences:

