Monthly Archives: June 2018
reduce unwanted alerts in DetectX Swift
If you’re a regular user of DetectX Swift (DTXS), you’ll be familiar with the Folder Observer function. Although DetectX has always been and will remain an on-demand search tool in principle (i.e., it doesn’t do anything unless you launch it), the Folder Observer adds the capability to alert you and optionally launch DTXS if any items are added or removed from your Launch folders.
This is a useful feature which removes the need, for example, to set Folder Actions or other scripting solutions on the folders which are most likely to be written to in the event of an adware or malware attack. However, as some users (and even myself!) have noticed, the Folder Observer can, at times, be a little irritating.
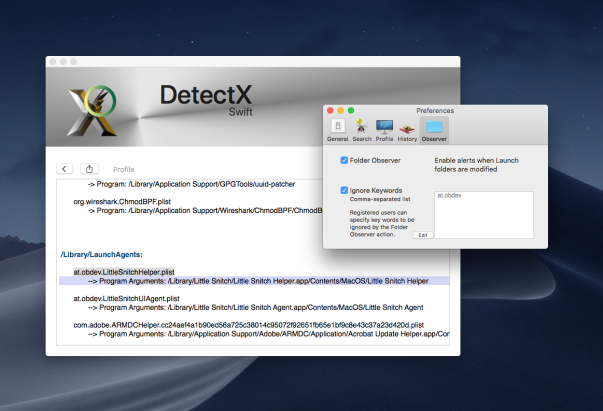
For example, here at sqwarq I have Little Snitch installed, which puts daemons and agents in both of the local domain Launch folders. The annoyance occurs whenever Little Snitch requires an update. When that happens, the daemon and agents will get written to, and DTXS will dutifully throw me an alert:

Great, except that I don’t really want alerts for software I already trust. I only really want to know about stuff that I don’t know is already in those folders. Of course, I can uncheck the preference for the Folder Observer entirely to stop all alerts, but that then deprives me of the security of being warned of things that I do want to be informed about.
Fortunately, there’s a simple solution that will allow you to tame DTXS and customise the alerts to your personal needs.
1. Go to DetectX Swift > Preferences and click the ‘Observer’ tab.
2. Click the ‘Ignore Keywords’ checkbox (you need to be a registered or licensed user).
3. Click the ‘Edit’ button, and add the launch label of each item you want to ignore in a comma-separated list.
4. Click the ‘OK’ button to finish.
You can get the launch label either by reading it from each of the property lists that you want to ignore, or directly from DetectX Swift’s Profiler. The linked video shows one way you can do that.
Enjoy! 🙂
browsers’ anti-phishing protections easily defeated

While troubleshooting a user’s mac the other day, I happened to come across a curious line in one of the logs:

After a bit of digging, it occurred to me that this and the other flags being sent in the process command were possibly Preferences or Settings in the Chrome.app. Looking at chrome://settings/privacy revealed, of course, Google’s phishing and malware protection setting, ‘Protect you and your device from dangerous sites’.
Here it is set to ‘On’, which is the default setting:

A quick test proved that setting it to ‘Off’ produced the `—disable-client-side-phishing-detection’ flag in the browser’s process output. Setting it back to ’On’ and relaunching the browser produced no output, confirming my theory.

A quick message to my user also confirmed that he wasn’t aware that phishing protection had been disabled, and to the best of his memory, had not been disabled by himself.
A simple preference setting
That got me to wondering whether that setting could be turned off programmatically by another, possibly malicious, process. To my surprise, it turns out that it’s trivial to do so.
All Chromium browsers have a Preferences file located in their Application Support folder. Usually this is within another folder called ‘Default’, but not always. Chrome and Vivaldi, for example, have it there, but Opera (and Opera Developer) store the Preferences file at the root level of their respective support folders.
The file contains the setting for whether the Phishing protection should be enabled or not. To determine how the preference was encoded in the file, I made a copy of the current Preferences file, toggled the setting, then made another copy. BBEdit’s ‘Find Differences’ function quickly told me the name of the key (if you don’t have BBEdit, you can also use Xcode’s FileMerge to run diffs, though it isn’t as pretty or as full-featured):

Again, there are differences among browsers. As shown above, Opera uses the key “fraud_protection_enabled” which takes a boolean. Chrome and Vivaldi, on the other hand, use a “safebrowsing” key which takes an array of key-value pairs, with the first item of the array being the key “enabled:”, and taking a bool for its value, like this:
Vivaldi:
"safebrowsing":{"enabled":true,"unhandled_sync_password_reuses":{}}
Chrome:
"safebrowsing":{"enabled":true,"scout_group_selected":true,"unhandled_sync_password_reuses":{}}
With this information, it’s a pretty simple thing for another process running under your username to write to the Preferences file and turn off the built-in protections.
What about Safari?
Safari isn’t vulnerable to quite the same tactic as it doesn’t store its preferences in the same way. However, it’s even easier to defeat Safari’s ‘Warn when visiting a fraudulent website’ setting:

Apple hardened some of Safari’s preferences (like setting the Home page) some time ago to stop adware from making unauthorised changes, but this one is still unprotected in the current public release of macOS High Sierra. A one-liner in Terminal removes the preference:
defaults write com.apple.Safari WarnAboutFraudulentWebsites 0

What can you do?
The ease with which these protections can be surreptitiously turned off in all major browsers is a worry. And let’s face it, who would notice if this setting was quietly turned off? In both Chrome and Safari, the change takes effect immediately and does not even require a restart of the browser.
Fortunately, my shareware app DetectX Swift will warn you if browsing protection is off when you run a search and prompt you to turn it back on. To ensure that all insecure pages have been removed after turning the setting back on, DetectX Swift will continue to show the warning until you restart the browser and execute another search.

The protection covers all the browsers mentioned above. If you’re running some other browser and would like to know if it’s similarly vulnerable, drop a line in the Comments or contact Sqwarq Support and request support for your browser to be added.
Stay safe, folks! 😀
Featured pic: Nature by PichieArt
Xcode 10: where did snippets go?

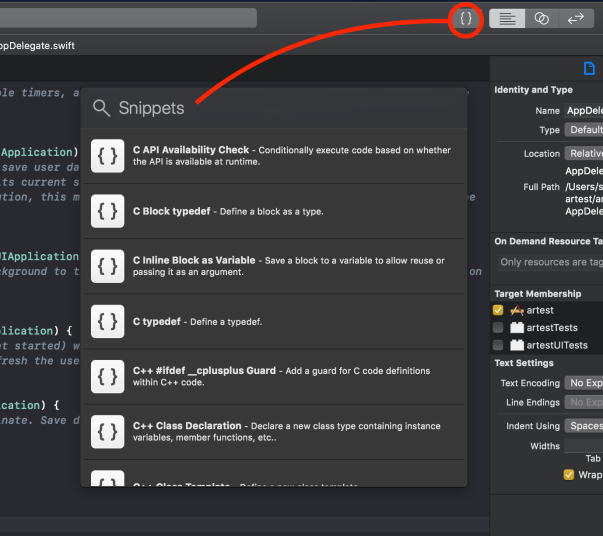
Xcode 10 beta has got some nice new touches (as well as the return of some old favourites, hello again the code folding ribbon!), but one that might disorientate you at first is the absence of the Snippets, Objects and Media libraries that typically live in the bottom right corner of IB in the Utilities sidebar.
I’ve always found this position and size to be somewhat awkward, so I’m overjoyed to find that Apple have now given the libraries their own floating panel. You can access the libraries either with the keyboard shortcut Command-Shift-L, or by clicking the button that’s now in the top-right of the toolbar, just to the left of the editor buttons.
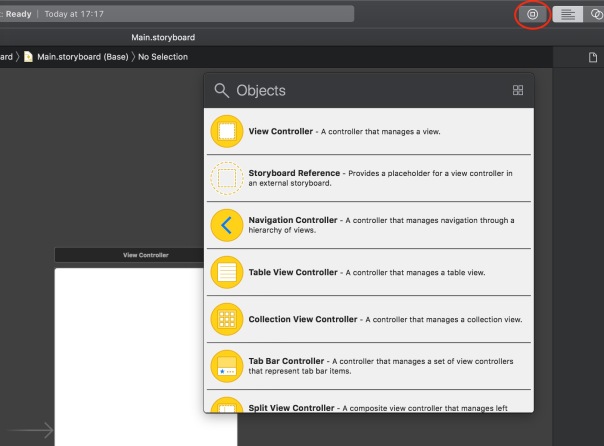
The new button is context-sensitive, so you’ll notice you can’t access code snippets when in Interface Builder, and you can’t access the Objects library when you’re in the text editor. Makes sense to me!
Enjoy! 😀

