Monthly Archives: May 2017
how to display wifi name (ssid) in menu bar

If you’re one for visiting coffee shops and other places with public networks, you might have an interest in today’s Hammerspoon tip.
This little code added to your config file will display the name (SSID) of the currently connected Wifi network in your menu bar. Whenever the Wifi network changes, the name will automatically update so you can always see at a glance that you’re connected to the Wifi network that you think you are.
Playing around with that unusually long number (between 2147483644 and …647) will move the SSID name along the icon bar. Set it to the default ‘1000’ if you want macOS to decide where it should be.
wifiWatcher = nilfunction ssidChanged()local wifiName = hs.wifi.currentNetwork()if wifiName thenwifiMenu:setTitle(wifiName)elsewifiMenu:setTitle("Wifi OFF")endendwifiMenu = hs.menubar.newWithPriority(2147483645)ssidChanged()wifiWatcher = hs.wifi.watcher.new(ssidChanged):start()

Enjoy! 🙂
Further Reading
More fun with Hammerspoon
Get automated with Hammerspoon
more fun with Hammerspoon

For anyone using Hammerspoon and folder ‘watchers’ to alert them to changes to a given folder, I’ve updated the watcher function I wrote about here
The problem with the simple alert I demonstrated last time is that it only hangs around for a second or two (much less than a Folder Action alert, which takes a couple of minutes to time out). In this updated function, it now also writes a list of the file changes to a (by default) file on the Desktop. The write is an append: if the file doesn’t exist it will create it before writing; if it does exist, it will append the latest changes and date to the file. This way, even if you miss the alert, you’ll always have a record of what files have been added, deleted or modified in your watched folder.
In this example, the folder being watched is ~/Library/LaunchAgents since we want to be aware of any adware, malware or other unsavoury processes being surreptitiously added by, for example, apps we download from the internet. Although there are, of course, many legitimate reasons for apps placing items in here, this folder is prime real estate for attackers as it is one of the locations that can launch processes at log in time without the user’s interaction (or knowledge).
Here’s the code, also available from my pastebin here. A code walkthrough follows.
function writeStringToFileWithMode(aString, aPath, aMode)local this_filethis_file = io.open(aPath, aMode)this_file:write(aString)this_file:close()endfunction myFolderWatch(files)local str = "Launch Agents folder was modified on " .. os.date() .. " :\n\t"local this_path = os.getenv("HOME") .. "/Desktop/LaunchFolderModified.txt"local ignore = "DS_Store"local count = 0for _,file in pairs (files) docount = count + 1i = string.find(file, ignore)if not i thenstr = str .. file .. "\n\t"elseif count == 1 thenstr = "\n"endendendstr = str .. "\n"writeStringToFileWithMode(str, this_path, "a")if string.len(str) > 2 thenhs.alert.show("Launch Agents folder was modified.")endendlocal aWatcher = hs.pathwatcher.new(os.getenv("HOME") .. "/Library/LaunchAgents/", myFolderWatch):start()
Code walkthrough
The first function, ‘writeStringToFileWithMode’ is just a convenience function. Hopefully the clue is in the name. The ‘aMode’ parameter is either “w” for write(over) or “a” for write(append).
The myFolderWatch function starts off by declaring some local variables.
‘str’ includes the initial line that we want to write to our output file and interpolates the time of the change by calling os.date().
‘this_path’ defines the path that we want to write our list of file names too.
The ‘ .. ‘ in both these assignments is a string concatenator (i.e., like ‘&’ in AppleScript or ‘stringByAppendingString’ in Obj-C).
‘ignore’ is a string that will help us to exclude .DS_Store files from triggering the alert or appearing in the list of file changes.
The ‘count’ variable is an internal var we need in order to eliminate .DS_Store changes when it’s the only change. Lua doesn’t have an easy way to count entries in tables, so we bascially iterate a variable each time through the loop to achieve the same effect.
After that, we have the ‘for’ loop. For loops in Lua are weird (at least for me), as you’ll see that they have this structure for a,b in pair (aPair). I won’t go into why, other than to say its a result of Lua’s table data structure. The '_' here is just a dummy variable for the first parameter. The ‘files’ in parentheses are the list of file names (not file specifiers, you AppleScripters!) that were added, deleted, or modified in the watched folder.
The loop begins by incrementing the count, then checks for the ignore file (.DS_Store). If the ignore file is not found, we then append the filename to the str variable.
If it is found, we check the count. If the count is ‘1’ (i.e., the only change was .DS_Store) we discard the entire str var and replace it with new line character. If the count is more than 1 we don’t do anything to ‘str’. We just ignore adding anything to it all.
At the end of the for loop we add another new line to the string just so our outputted text file looks nice and neat.
Then we call the write function mentioned above, passing ‘a’ (append) for the mode.
Finally, we fire the UI alert on the condition that the string has got more than 2 characters in it (if it didn’t it was just the “\n\n” string from ignoring the DS.Store file).
After the function definition, the aWatcher variable sets up the watcher on the path we want to observe and tells the watcher to start monitoring. It tells the watcher to call our myFolderWatch function when anything happens.
Deploying the code
After editing the config file, remember there’s two steps: i. save the file and ii. choose ‘Reload Config’ from the Hammerspoon menu.
Further Reading:
More details are available about Hammerspoon from the official site here.
My beginners guide with the original simple watcher function is here.
how to reveal hidden users

With malware big in the news again, and evidence that at least one malware variant that targets macOS creates hidden users on the victim’s system, here’s a timely tip on how to check for unwelcome guests.
For this tip, we’re going to use the Terminal, which you can find in the /Applications/Utilities folder. If you’re not a frequent visitor to the land of the command line, you might want to see my 3-part series “Learning the Terminal”.
Regardless, the first thing we’re going to do in Terminal is about the simplest command you’ll ever type: w. Yep, type a single ‘w’ at the prompt and press return.

The w utility is a very quick way to see who’s currently logged on to your system and to ensure that there’s no surprises. You should see a couple of entries for yourself: one as ‘console’ and one as ‘s***’. The first represents a login through the usual Desktop GUI login window; the second is there because you just logged into Terminal. Anybody else logged in either via the command line (like a potential remote user) or the GUI will show up here. Notice that on my machine, there’s another user called ‘Developer’ who hasn’t logged in using the GUI, but is logged in via a command line interface. Note that ‘w’ returns the full user name, not the short one.
While the w utility will tell you if a hidden user is currently logged on, what if there’s a hidden user that isn’t active at the particular time you check? To look for those, we have a couple of options. First, we can use the dscl utility to list all users, and you might be surprised at how many there are:
dscl . -list /Users
Look to the end of that list where the names that don’t begin with an underscore start. ‘Daemon’, ‘Nobody’, ‘Root’ and ‘Guest’ are all standard system accounts, as are all those entries that begin with an underscore. Don’t worry about those. However, aside from those, you should only see names that you recognise. To make things a little easier, we can add another command to the dscl command to filter that list. Try this
dscl . -list /Users | grep -vE ‘_|root|nobody|daemon|Guest’
That should now only return the names of real users. There shouldn’t be any names in there you don’t recognise. In my example, I know the last three, but the first one ‘dev’ isn’t familiar to me. Note that unlike ‘w’, this command returns short user names, and that ‘dev’ looks very much like it’s the same account as ‘Developer’ that I saw earlier.

However, what we have so far is a list of users, not a list of hidden users. To see specifically if any accounts are hidden, we need a longer command:
defaults read /Library/Preferences/com.apple.loginwindow
Normally, when there are no hidden users, this will return the contents of a property list file that may look something like this:
{
GuestEnabled = 1;
OptimizerLastRunForBuild = 31898816;
OptimizerLastRunForSystem = 168494592;
SHOWFULLNAME = 1;
lastUser = loggedIn;
lastUserName = imackim;
}
That tells us that there’s no hidden users on this mac. How so? Because if there were it would return something very different, like this:
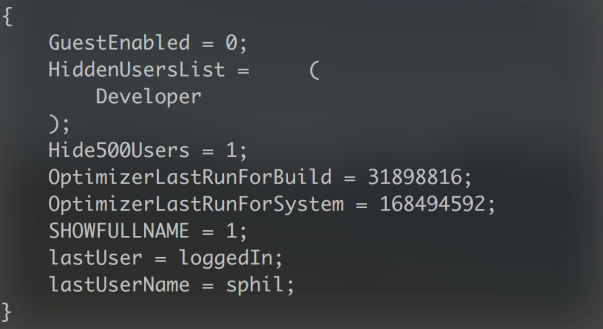
We can see not only the list of hidden users, but also that the preference for hiding users has been set to ‘1’ (in plist syntax, ‘1’ means true and ‘0’ means false). Note again that unlike the dscl command above, this returns the account’s full name, not the short user name.
If we’d like to ‘unhide’ that user, so the account appears in the login window GUI and in System Preferences’ ‘Users & Groups’ pane, we’ll need admin privileges. To do that, cut and paste the following into Terminal:
sudo defaults write /Library/Preferences/com.apple.loginwindow Hide500Users -bool NO
Supply an admin user password at the prompt and hit ‘return’, but type slowly as the display doesn’t register your key presses, which makes it easy to fat finger your password.
Next, we need to change the IsHidden key in dscl for that user, so
sudo dscl . -change /Users/dev IsHidden 1 0
In the above command, substitute my user’s shortname dev for the shortname of the user on your machine. The 1 0 is the old value (hidden) followed by the new value (unhidden). The line can be read as “change User dev’s IsHidden value from hidden to unhidden.”
For the more advanced
We can save ourselves some typing by putting much of this into a script so that we can run it whenever we want. If you’re not familiar with how to create and use bash scripts, take a look here.
Our script will basically do the same as all the commands we listed above (except changing the prefs for Hide500Users) in one fell swoop, and there’s a couple of little twists that I’ll leave as an exercise for the reader to figure out. To save on the typing, you can copy the whole script from my pastebin here.

The script’s output is illustrated in the shot at the top of this post.
Enjoy! 🙂

