Category Archives: Swift
reduce unwanted alerts in DetectX Swift
If you’re a regular user of DetectX Swift (DTXS), you’ll be familiar with the Folder Observer function. Although DetectX has always been and will remain an on-demand search tool in principle (i.e., it doesn’t do anything unless you launch it), the Folder Observer adds the capability to alert you and optionally launch DTXS if any items are added or removed from your Launch folders.
This is a useful feature which removes the need, for example, to set Folder Actions or other scripting solutions on the folders which are most likely to be written to in the event of an adware or malware attack. However, as some users (and even myself!) have noticed, the Folder Observer can, at times, be a little irritating.
For example, here at sqwarq I have Little Snitch installed, which puts daemons and agents in both of the local domain Launch folders. The annoyance occurs whenever Little Snitch requires an update. When that happens, the daemon and agents will get written to, and DTXS will dutifully throw me an alert:

Great, except that I don’t really want alerts for software I already trust. I only really want to know about stuff that I don’t know is already in those folders. Of course, I can uncheck the preference for the Folder Observer entirely to stop all alerts, but that then deprives me of the security of being warned of things that I do want to be informed about.
Fortunately, there’s a simple solution that will allow you to tame DTXS and customise the alerts to your personal needs.
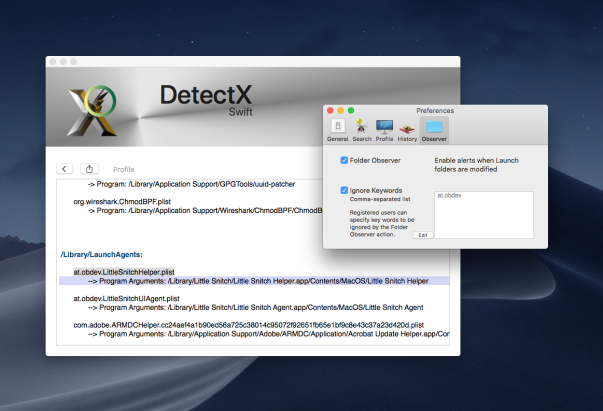
1. Go to DetectX Swift > Preferences and click the ‘Observer’ tab.
2. Click the ‘Ignore Keywords’ checkbox (you need to be a registered or licensed user).
3. Click the ‘Edit’ button, and add the launch label of each item you want to ignore in a comma-separated list.
4. Click the ‘OK’ button to finish.
You can get the launch label either by reading it from each of the property lists that you want to ignore, or directly from DetectX Swift’s Profiler. The linked video shows one way you can do that.
Enjoy! 🙂
What’s the difference between DetectX and DetectX Swift?

Since releasing DetectX Swift back in January, a lot of people have been asking me how the new ‘Swift’ version differs from the older one, aside from requiring 10.11 or higher (the original will run on 10.7 or higher).
Well sure, it’s written in Swift — and it’s much swifter, literally, but of course there’s a lot more to it than that.
I’ve finally had a spare moment to enumerate the feature list and create a comparison chart. Although the image above is essentially the same as the one you’ll see at the link address at the moment, there’s still a bunch of features to be added as we go through development of version 1. Thus, be sure to check the latest version of the chart to get the most up-to-date info.
Of course, if you have any questions drop me a comment below, or email me either at Sqwarq or here at Applehelpwriter.
Enjoy 🙂
how to protect your app from hijacking
I was lucky enough to get a great tip from MalwareBytes’ Thomas Reed this week on the possibilities of code hijacking.
Thomas was kind enough to share details of a talk he gave at MacTech last year, in which he demonstrated how some 3rd party apps are susceptible to having their binaries replaced by a fake binary even when the original application is properly code signed with a valid developer’s signature.
The vulnerability lies not so much in the code signing itself, but in the mechanism for when and why it gets checked. In short, code signing is checked when an app is first launched, but after that, except in a few special situations, macOS’s security mechanisms pretty much ignore it. That means once an app has passed GateKeeper, it’s a ripe target for attackers to come in and replace the binary with one of their own.
In order to ensure the app on disk is still in fact the app that was downloaded and first launched, developers need to implement a check on each launch.
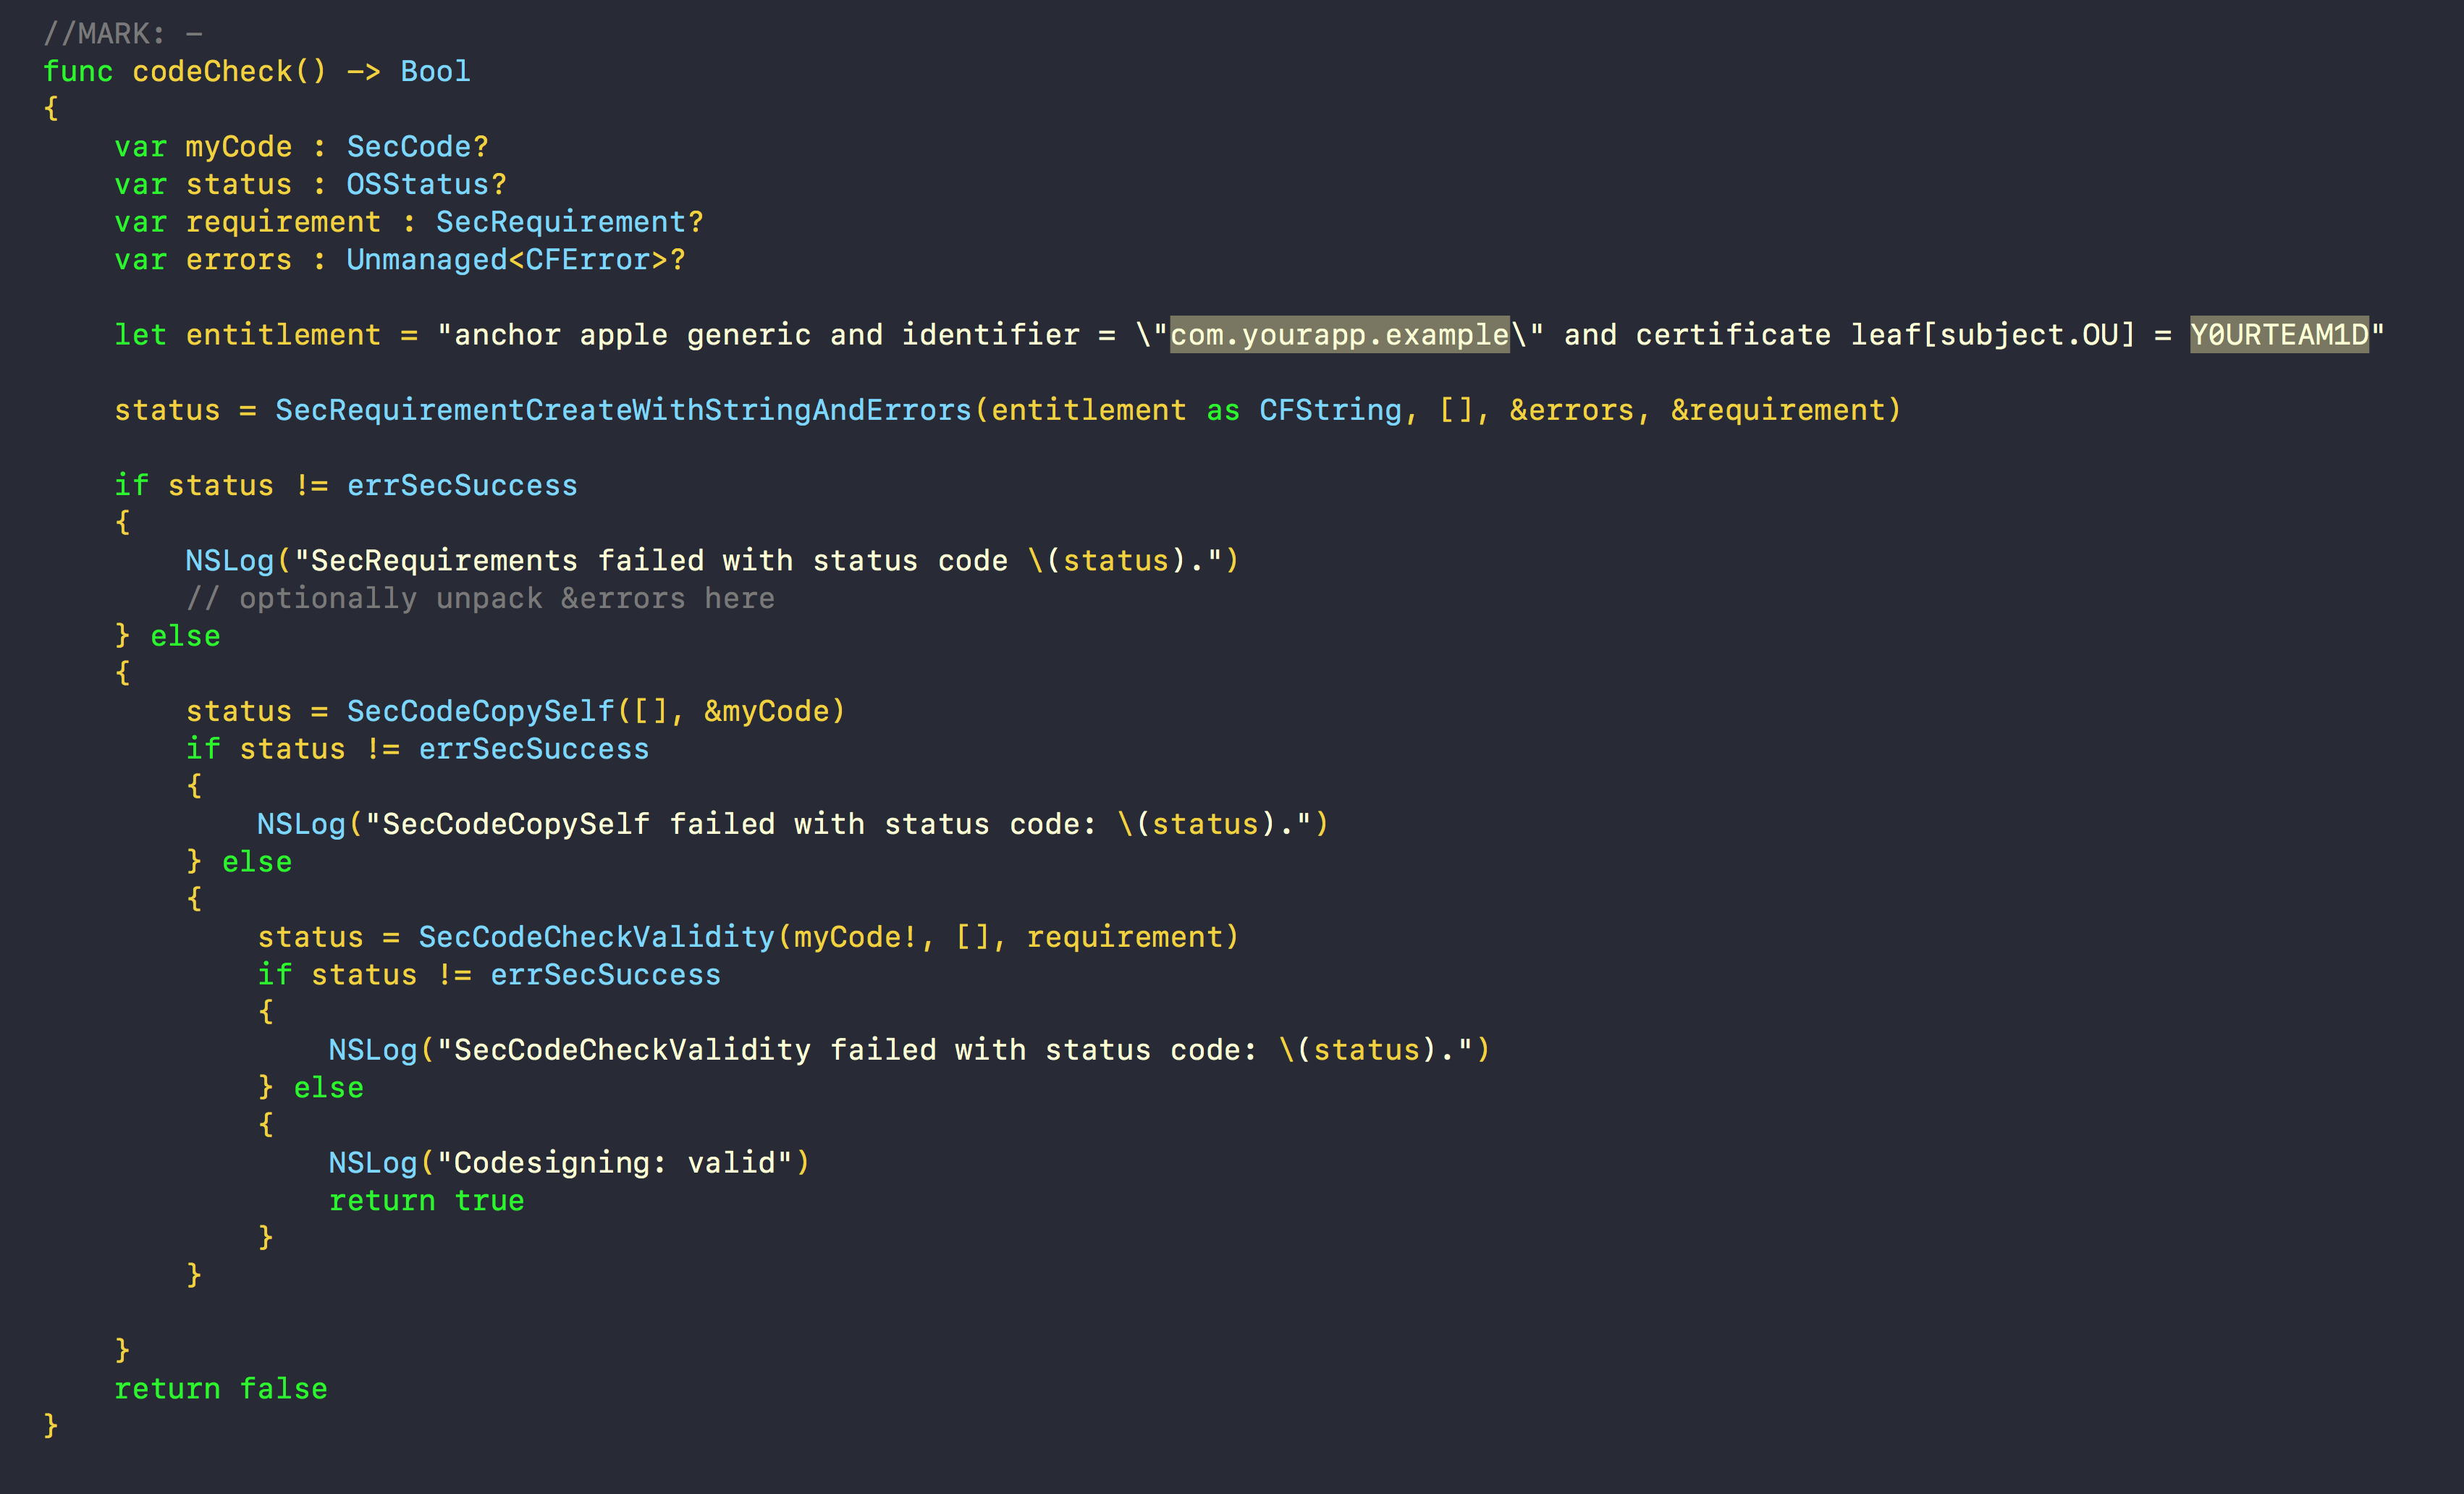
If you’re using Swift, some example code for doing that (pictured above) is available from my pastebin here. I’ve also got a version for Objective-C, adapted from here.
The key to it is what you specify in the entitlement constant. In this example, I’ve specified three things: that the code is signed by Apple, that is has the app’s bundle identifier and that it has the developer’s Team ID. Don’t forget to change my dummy values for your real ones in the code! You can get all these details for your app by running this in Terminal:
codesign --display -r- <path to your app>
With that information, the function verifies that the application in memory meets the requirements specified in the entitlement.
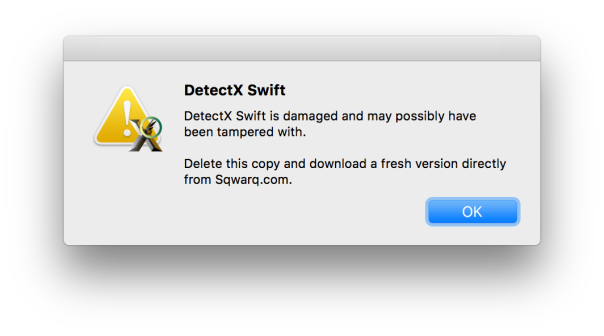
Call the function at some point after launch (e.g, when your main nib has loaded) and handle the boolean result appropriately. For example, if the function returns false, you might throw an alert like this one from DetectX Swift telling the user that the app is damaged and needs to be re-downloaded, and then terminate the app when they hit “OK”:
Let’s keep our code (and users!) safe everybody. 🙂
DetectXmas: get a free home registration key

From now till Boxing Day, Sqwarq is giving away DetectX home registration keys for anyone that joins the DetectX Swift beta Slack group and who answers a simple question about the beta version.
We’ll try to get keys to you within 24 hours of receiving your correct answer, but bear in mind, it is Xmas, so delays may be possible while we digest our roast potatoes, parsnips and carrots!
Enjoy! 🙂
DetectX Swift beta has arrived

It’s been unusually quiet on Applehelpwriter these past few months, and the reason is that I’ve been devoting all my time and efforts to the new version of DetectX. The new version is called DetectX Swift because (yeah, you guessed it) I wrote it in Swift and because it’s considerably faster than its older sibling.
DetectX Swift’s got a new interface, but there’s far more going on under the hood. The Search uses some fancy heuristics as well as hard-coded and live update search definitions to ensure it provides the very best in security threat scanning.
The new Profile view employs some super cool dynamic highlighting and lets you inspect the contents not only of directories but also of scripts, plists and other files that could execute troublesome code on your mac.
There’s changes in the History view, too, both in the display and functions. One of the coolest things I like about the new History function is that you can run a diff on any previous run against the latest run, immediately seeing how they differ.
There’s tons more to DetectX Swift, but the best way to find out about it is just to try it. The beta version is free to use for both Home and Commercial users, so just head off over to its home page and grab yourself a copy!
Don’t forget to keep us informed of how it goes. The beta is still in an early stage and more features are slated as it develops, but feel free to tell us about anything that you feel could be done better or things that you’d like to see added.
Share and enjoy! 🙂
getting ready for DetectX Swift

Pretty soon now I’ll be releasing the first beta of DetectX Swift. Lots more details will be forthcoming over the next few days and weeks, but here’s a quick 1-minute look at how the new Profiler function works and some of the cool things you can do with it.
how to quickly toggle Swift Compiler warnings

I thought I’d share this little AppleScript for anyone working with Xcode 8.3.3 and using Swift.
One of the things I find intrusive are the constant Swift Compiler warnings while I’m actually in the middle of writing a block of code (e.g, ‘…value was never used consider replacing…’). Well, yeah, it’s not been used *yet* …grrr!
However, turning off compiler warnings isn’t something I want to do either. It’s too easy to go into the build settings, turn them off, do a bit of coding, take a break, do a bit more coding…oh, three thousand lines later and I suddenly realize why Xcode hasn’t been correcting my mistakes all afternoon!
This script allows you to quickly and easily toggle the warnings from a hotkey, and just gives you a gentle reminder as to what you’ve done. Of course that won’t stop you forgetting, but assigning a hotkey for this script makes it painless to just turn warnings off and back on again as soon as you’ve got past whatever bit of code the compiler was complaining about.

Xcode unfortunately doesn’t have its own scripts menu, so in order to assign the script a hotkey, you’ll need to either make it into a Service with Automator or use a script runner like Red Sweater’s FastScripts.
#starton sendNotification(aVal)display notification "Suppress Warnings was set to " & aVal with title "Swift Compiler - Warnings Policies"end sendNotificationtell application id "com.apple.dt.Xcode"tell its front documenttell its front projecttell its front targettell its build configuration "Debug"set b to build setting "SWIFT_SUPPRESS_WARNINGS"if b's value is "NO" thenset b's value to "YES"elseset b's value to "NO"end ifmy sendNotification(b's value)end tellend tellend tellend tellend tell#EOF
If copying the code above doesn’t build, get the raw source from my pastebin here. Here’s how it looks in Script Debugger 6:

Enjoy!🙂
how to create a bootable macOS installer

If you are preparing to install macOS on multiple computers, one of the things that can make your life simpler (and the waiting shorter) is a bootable USB installer.
The idea of the installer is that you only need to download the macOS Installer.app from the App Store once. Usually, when you run the installer after downloading it, it’ll delete itself and you have to go through the whole download process again on each machine or disk that you want to install macOS onto. By making a bootable USB drive, you simply plug the drive in to your mac, launch the installer app and tell it where to install the OS. You can repeat this as many times as you like as the installer will remain safe on your USB.
There are various ways to make a bootable USB installer, but they all involve the same process:
1. Download the macOS Installer from the App Store.
2. Run the createinstallmedia command from the Terminal, an AppleScript or a helper app.
3. Reboot your mac, choosing the newly created USB as the startup disk.
4. Run the installer.app from the USB.
Step 2 is where the fun is. The createinstallmedia command can be tricky to get right, particularly if you’re not familiar with working on the command line. For those of you that are, follow Apple’s instructions here.
For a little more convenience, I wrapped all that inside an AppleScript which will first ask you for the location of the installer, then ask you to choose the USB target.
For maximum convenience, I also wrote a free little Swift app I’ve dubbed ‘Boot Buddy‘ (cos “Create bootable macOS Installer Drive.app” just didn’t quite have the right ring to it..!) that will present the whole thing in a neat little user interface. Three clicks, more or less, and you’re done.
Boot Buddy doesn’t require an admin password to install, but you do need to provide an admin password to actually create the bootable installer as the createinstallmedia process has to be run as root. Boot Buddy doesn’t see or use this in any way whatsoever other than to start the createinstallmedia process or to cancel it (if you choose to do so); authorisation is handed off to macOS to take care of.

Boot Buddy requires macOS 10.11 or higher and can create bootable USBs from Mavericks, Yosemite, El Capitan, Sierra and High Sierra installer apps.

Share and enjoy! 🙂
UITableView doesn’t immediately reload data

Here’s a little problem and solution I ran into the other day while using UITableView. I wanted to have a master-detail set up in which the UITableView was segued to after an initial home screen.
The problem occurred whenever I added or deleted something in the UITableView, segued back to the home page and then returned to the table view. Sometimes the table would not update. Going out and back into the view a second time, however, would finally reload my data and show me the changes. Why was my app needing to load the view twice before the table would show any changes?
Logging showed me that something even weirder was going on: Every time I segued into the table view, the viewDidLoad method was being called not once, but twice. So basically, to get my updated data to show, I was actually calling viewDidLoad four times!
I worked through a whole bunch of stackexchange posts related to various problems and solutions with the reloadData method — adding delays, removing it from any edit- or insert- methods and so on, calling it on the main thread — but the problem stubbornly remained.
Then I noticed something else. In my awakeFromNib method, the call to super had somehow got pushed to the end of the method, after a bunch of other set up calls. I’m not sure how it got there, but I did remember seeing a WWDC 2014 Swift video pointing out that one difference between Objective-C and Swift was that calls to super need to be made after doing any initial set up in Swift’s case, but before for Objective-C. Since this was an Obj-C project, what was my call to super doing at the end of the method?
And as if by magic, moving [super awakeFromNib] to the beginning of my awakeFromNib method resulted in viewDidLoad only being called once, and my table view updating correctly.
Though I found quite a few threads with people having a similar problem with UITableView’s needing two calls before updating, I haven’t come across this particular solution to (or cause of) the problem. Hopefully, this post will save someone else a few hours of head scratching!

