Monthly Archives: October 2014
App Fixer beta now available! 💥

I’ve just released the first beta 0.1 version of App Fixer over on my software distribution site, Sqwarq.com.
App Fixer aims to help you remove corrupt preference files and window Saved States that can sometimes cause apps to crash on launch or during normal operation. Traditionally, we have to go hunting through the user library hoping to identify the correct files to remove. Now, App Fixer does it for you.
If you have an app that won’t launch or that’s behaving badly, or you just want to start with a clean slate by removing user defaults/preferences (I’m looking at you Photoshop!), App Fixer will do it for you in a click.
Grab a free copy of the beta from here: http://sqwarq.com/appfixer
🙂
change the Dock position

One of Yosemite’s minor irritations is the removal of the Dock position menu item from the Apple menu.
Now we’re supposed to go hunting around on the Dock for the tiny Dock item separator and control-click it to get the menu, or open up System Preferences > Dock. All too fiddly for my taste.
The following script will rotate the Dock position through left, bottom and right. Just copy the code below and paste straight into a Script Editor document. Hit the Run button to see it in action. Then, save the script to your ~/Library/Scripts folder. Use FastScripts or set up a Service with Automator (example here) to create a hotkey.
Now you can change the Dock position with ease. 🙂
tell application "System Events" tell dock preferences set x to screen edge if x is left then set properties to {screen edge:bottom} else if x is bottom then set properties to {screen edge:right} else set properties to {screen edge: left} end if end tellend tell
how to remove Dropbox green blobs

UPDATE: this method should no longer be necessary. See the Comments below for the latest.
If like me, you’re not impressed with Dropbox drawing huge green blobs all over your Finder windows without even asking, here’s a great tip from Zackary Corbett for getting rid of them. Run the following line in Terminal:

pluginkit -e ignore -i com.getdropbox.dropbox.garcon
And you’ll be blessed with some visual peace and quiet:
If you want to reverse the effect and enjoy the green blobs again, use this line:
pluginkit -e use -i com.getdropbox.dropbox.garcon
Thanks Zachary 🙂
how to troubleshoot your mac with FT2
Macs are famously reliable beasts, but we often make changes to our machines that can cause unexpected behaviours such as the dreaded spinning “beachball” (i.e., slow response times), excessive fan noise, and crashes.
This is where Apple Support Communities comes in handy, a place where I spent the best part of my spare time for 2 years helping thousands of people solve problems with their macs. With a few rare exceptions of internal hardware malfunction, the majority of problems I’ve encountered with macs involve changes made to the mac by installing or removing third-party software (sometimes unwittingly).
There was a time when people seeking help on ASC were first told to go through a lengthy process of collecting arcane information from various deep and mysterious places on their computer before ASC support volunteers could help determine the problem. Fortunately, there’s now a number of free utilities available that will collect some or all of that information for you automatically, including my own FastTasks 2 and DetectX.
In this post, I’m going to assume you’re using FastTasks 2, for a couple of reasons (aside from the obvious one that its my own app!). First, aside from having a system profiler, FT2 provides other functions that are useful in troubleshooting, whose use I’ll indicate below. Secondly, unlike other analysers, FT2 not only profiles your system configuration at the time you run it, it can also show you what’s changed over time (see Step 5 below), making detection of new problems even faster and easier. For that reason, it’s a good idea to run FT2 when your system is trouble-free so that you have a log of a known ‘good’ configuration. However, I’m going to assume for most of this post that you don’t have a log of a known good state, and walk you through a series of steps that you can use to trackdown troublemakers.
To get started, download FT2 from here, and then proceed to Step 1.
*Note if your problem is with Safari, you can go straight to Step 10.
If your problem is with internet connections / networking, that’s a vast issue too large for this post, but try the advice here first. If that doesn’t work, the FT2’s Profile view contains a lot of information about your network configuration. Click the FT2 menu, choose ‘Analyser > Check now’, and click the Profile tab. Then follow the general advice in Step 11 below.
If your problem involves unusual behaviour of system hardware (keyboard lights, fans, system volume, etc) follow Step 3 of this post first.
Step 1. Put a block behind the rear wheel…
The first rule of troubleshooting is not ‘You don’t talk about troubleshooting’ but ‘You don’t do anything until you have a backup stashed away’. Fat fingers and a hasty desire for a cure can lead all of us to make mistakes when following procedures, and the last thing you want to do is accidentally delete some file or resource that is irreplaceable. So, back up first, and cure yourself of the tendency to rush for a solution. Troubleshooting takes time, and troubleshooting without a backup is like changing a wheel on your car without putting a block behind the rear wheel. Don’t get crushed by your own rush to get back on the road!
Step 2. Start with the obvious…
Launch FastTasks and wait for the system analyser to finish loading. You’ll see the analyser presents you with an ‘Issues’ page. This page lists any files or apps that are installed on your computer which have, in my experience, been known to cause problems for some users. If your system is clean of these files or apps, the page will be empty, like mine:

If anything is listed in the ‘Issues’ page, your first step is to deal with these as detailed below. If not, you can go straight to Step 3 now.
Depending on the issue, (click on an item in the FT2 window and press the ‘Info’ button), uninstall, delete or move to a temporary folder on your Desktop any items listed in the Issues page. You can open each item in the Finder either by double-clicking it in the FT2 window, or selecting it and clicking the ‘Reveal’ button.
If anything listed in the Analyser as a ‘Performance’ issue has been installed from outside of the App Store, check the Developer’s web pages to see if there is an uninstaller and, if so, use that. If not, move the App or files to the Trash, but do not empty it. At the end of this step, if it turns out that app or file is not the culprit, and you still want to use it for some reason, you can drag it back out of the Trash.
After dealing with anything in the ‘Issues’ list, restart your mac and see if the problem behaviour is solved.
Step 3. Wipe the board…
If you didn’t have any issues, click the FT2 icon in the menu bar and note the system information in the lower half of the menu. Look at the ‘Uptime’ stat. This shows how long since you last rebooted your machine. If the problem behaviour has only been noticed since the last reboot, then restart your machine now, and test again.

More often than not, most unexpected or strange behaviour that comes out of nowhere can be solved by a system reboot.
Step 4. Check the disk
Click the FT2 icon and note the system information in the lower half of the menu. Look at the empty/full icon and the stats below it on disk usage (you can choose to have one of these shown in the menu bar all the time if you wish, as well as change the color of the icon. In the menu, choose Preferences > Menu Bar Icon). You should have got a warning from FT2 if your disk is gettting critically full, but even if your disk is only 70% or so full, you could find your machine slowing down when Spotlight is indexing or if you’re doing any operation that requires a lot of disk activity. My recommendation for a speedy machine is to keep disk usage below 60% if possible (I rarely let my own disk ever get above 50%).
While we’re thinking about the disks, let’s just check the S.M.A.R.T status of the Internal boot disk. With the FT2 window open (if not, click ‘Analyser > Check now’), click the ‘Profile’ tab. Scroll down right to the bottom of the page and check that the S.M.A.R.T status says ‘verified’. If it doesn’t, there’s your problem: you need to replace your hard disk ASAP.

Step 5. Reverse gear…
If you’ve ran FT2 before, anything that’s changed since the last time you ran it will be highlighted in the view (you’ll also see the yellow warning triangle at the top).

For example, in the screenshot above, note how FT2 records that the Ghostery extension has installed an update of itself in the background!
If you haven’t run FT2 before, go to Step 6. If you’ve run FT2 before but no changes are indicated, look through the logs by using the back and forward arrows on either side of the ‘Run’ button. For convenience, you can click the ‘Console’ button, then type ‘added’ into Console’s search bar, making a note of anything shown, then type ‘removed’, again making a note of any changes.
Whether you find changes in the Console, logs, or indicated in FT2’s current Profile view, the process is the same. For any change indicated, you need to reverse it. That means, anything added should be removed, and anything removed should be replaced from a backup. However, it’s important to be methodical, so deal with one change at a time, restarting the system and checking for the problem again after reversing each change. If that doesn’t solve it, move on to the next change and repeat.
There’s such a high chance that you’ll discover the cause of the problem this way that its the best argument for running FT2 on a regular basis and before you hit trouble. Trouble always starts with some change…
If you’re still encountering problems, go to Step 6.
Step 6. The root of all Evil…
Well, maybe not all, but without doubt the overwhelming cause of problems I’ve dealt with on ASC were caused by login items. These are things that automatically run when you log in to your account. Any app or script that’s in your Login Items that causes problems to your system will affect your system from the start of your session and often right through till you log out (often regardless of whether you quit the app in mid-session).
With FT2’s Analyser window open, click the ‘Profile’ tab. At the very top of the page, check what and how many items are in your Login Items. You really don’t want more than four or five items in here in any case, or you’ll notice a real lag betweeen when you log in and when your system is ready to be used. Keep only the essential things in here (yes, I’d say FT2 is one of them, see the end of this Step).
However, even one app can cause problems if it’s the wrong app. To troubleshoot Login Items, click the FT2 menu and choose ‘Login Items > Remove All’. Click ‘OK’ to confirm. When you see the notification that Login Items are empty, restart your mac and test for the problem.

If the problem is not solved, go to Step 7. If the problem is solved, you can try adding each of your login items back in one at a time to ascertain which item caused the problem. Better still, just keep your login items empty and enjoy faster start up times.
The exception to the above advice is to consider keeping FT2 in your Login Items. The reason is that every time you login in, FT2 will run a background profile check and store that in its logs. That’s a vital tool for solving troubleshooting problems in the future (see Step 5 above), and one of FT2’s most useful features (however, if you don’t want FT2 to start on login, choose ‘Preferences > Start at Login’ and click to remove the tick).
Step 7. Digging deeper…
First, a note about .DS_Store files: In this and the remaining steps, you can ignore any file called .DS_Store shown in the profiler. These are hidden files generated by the Finder and can be ignored (likewise, you can delete them, the system will just recreate them when it needs to).
If you’ve got this far and your problem persists, it’s time to start looking further down the profile list. The next item in the profile view is User Launch Daemons. Notice that FT2 handily shows you where you can find this directory. To use that info, highlight the path shown (omit the closing bracket), then control-click, and choose ‘Services > Reveal in Finder’, to open the directory.
I do NOT recommend deleting files from here directly. Instead, you need to identify which apps these files belong to and uninstall them. After uninstalling, check back in Launch Agents to see if the uninstaller has cleaned up the file. If it hasn’t, you can then delete it (but be sure you’re deleting the correct file).
If the file doesn’t appear to belong to an app or you’re in doubt about its parentage, then move it (don’t delete it) to your Desktop. As with Login Items in the previous step, you need to be methodical here, and test each item after you remove or uninstall it with a reboot. Doing so means you can firmly determine which apps and files are OK and which are suspect.
Step 8: and deeper…
If your problems remain after working through all the User Launch Daemons, scroll much further down the list until you find Domain Library Launch Agents and Domain Library Launch Daemons and Domain Library StartUpItems. For each, you need to follow the procedure in Step 7: in other words, start by identifying the parent app of the file in the directory, uninstall it, check its cleaned up the file in the directory (if not, move it to your desktop) and re-test.
Step 9: Problems, problems, problems…
Still not got to the bottom of it? Then we need some more info. The best thing to do right now is determine whether the problem only affects your user account or all users on your system. Knowing this will provide a better focus for continued efforts.
To do that, go to > System Preferences > Users & Groups and click the padlock and supply an Admin password to open it. You’ll now be able to click the little ‘+’ button just above the padlock and create an extra Admin account.
After creating the account, restart the mac, log in to the new account and see if the problem affects that account too. Once you’ve determined that, log back into your normal account and go to Step 11 below.
Step 10: Safari and the internet
Problems with Safari and internet connections are a realm all to themselves and too vast to be discussed here except in general terms.
If the problem appears to be peculiar to Safari, then the first thing to do is open FT2 Analyser and click on the ‘Profile’ page. Scroll down to Safari Extensions and take a look at what’s in there. Anything you don’t recognize or anything new since things were hunky dory? If so, focus on that first.
To deal with Extensions, don’t delete things from the directory itself. Instead, open Safari, and from the menu bar choose “Safari > Preferences” and navigate to the ‘Extensions’ tab.
Start by disabling ALL extensions. Now restart Safari. Problem solved? If yes, then start turning one extension back on at a time, until you discover which one is causing the problem. Uninstall the culprit.
If the problem persists after disabling all extensions, go back to FT2’s Profile view and scroll down till you get to User Library Internet Plug-Ins. If there is anything in here (you can ignore .DS_Store), then select the path shown for the directory (omiting the word ‘path:’ and the closing bracket), right-click and choose ‘Services > Reveal in Finder’. Move anything in the folder to your Desktop. Restart the mac and test.
If the problem is solved, try moving each item back to the Internet Plug-Ins folder, one at a time, restarting and testing after each move until you determine the culprit.
If the problem is not solved, return any items you moved to the Desktop back to the Internet Plug-Ins folder. Then, check to see whether other browsers are affected (if you don’t have it already, it’s always a good idea to keep a copy of Firefox on you mac, just to use as a control for Safari tests if nothing else). Make a note of the answer, then follow the instructions in Step 9 above, then go to Step 11 below.
Step 11: What to do next…
I hope this post has helped solve your problems, but if it hasn’t don’t panic. Your best resource is Apple Support Communities. Though I’m no longer active there (my spare time is used for software development these days), there are many hands on deck and people with all sorts of specialist knowledge about different areas frequent the boards. The key is to make sure you describe the problem as fully as you can and to post information from FT2’s system profiler (use the ‘Copy’ button). Be sure to mention the results of your tests so that people have got enough information to help you.
Also, please be polite to those who respond to you – ASC is staffed by volunteers, not Apple employees, just spending time to help others out. Finally, please don’t email troubleshooting problems to me personally. You’ll get a faster and better response by using the full resources of the support community.
Good luck!🙂
make your own Trash Watcher utility
So twice in the last couple of weeks, I’ve found that something funny has been going on with Xcode, source control and Dropbox. The weird behaviour is that both times a whole load of my Xcode projects got moved to the Trash without my knowledge or permission. Fortunately, I noticed in both cases, and while I haven’t got to the bottom of the problem yet, I thought the first thing I’d better do is a bit of defensive scripting!
With that in mind, I created this little Trash Watcher utility to warn me anytime something is moved to the Trash. It’s quick and easy to make, and you can customise it to do various other things apart from give a warning if you like (for example, you could make it delete files of a certain kind, size or date automatically).
Start by opening the AppleScript editor (or Script Editor on 10.10), and paste the following lines into it:
on adding folder items to this_folder after receiving added_items
set listOfFiles to {}
repeat with i from 1 to the count of added_items
set a_file to item i of added_items as text
set stripTrashPath to offset of “Trash” in a_file
set a_file to text (stripTrashPath + 6) thru -1 of a_file
set a_file to a_file & “
“
set end of listOfFiles to a_file
end repeat
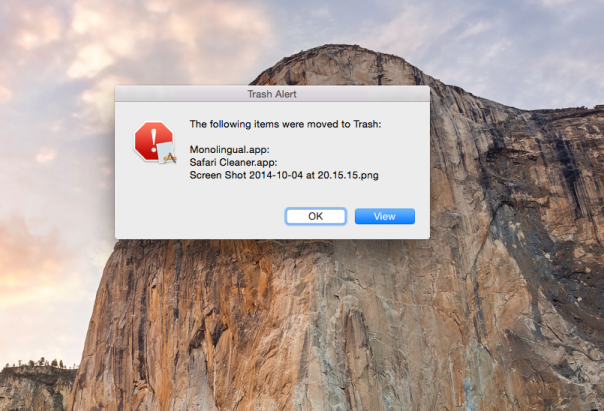
display dialog "The following items were moved to Trash: " & return & return & listOfFiles buttons {"OK", "View"} default button "View" cancel button {"OK"} with title "Trash Alert" with icon 0
set btn to button returned of the result
if (btn = "View") then
tell application "Finder" to open the trash
end if
end adding folder items to
Here’s what the code does. The first and last lines define a Folder actions handler, where the variables ‘this_folder’ and ‘added_items’ will be replaced by the name of the folder you attach this script too (we’ll do that in a minute), namely the Trash folder, and the items that have been moved to the Trash.
The next line, declares an empty list, so that we can populate it later with just the names of the items, rather than their full path adddress.
Then comes the repeat block. This first determines how many items there are to be added and then iterates over them, applying the five ‘set’ commands on each file. Those five commands are all doing one thing: stripping the path from the item name down to just the item name itself so that we can display it nicely in the display dialog command that follows.
Note that the display dialog command adds a couple of buttons, and collects the result as to which button you pressed. Notice that “OK” (typically an action button) is used to dismiss or cancel the dialog. “View” opens the Trash folder in the event that you want to check or remove the items that have been added.
With the Script editor active, make sure your script compiles by pressing ‘Command-K’, but don’t try to run it yet. We need to attach save the script in the right place first, and then attach it to the Trash folder.
With Script editor still active, press ‘Command-S’ to bring up the ‘Save’ dialog box. Give it a descriptive name like ‘TrashWatcher.scpt’ or similar. Do not click ‘Save’, but instead press, ‘Command-Shif-G’ on your keyboard and enter this location into the box that pops up:
~/Library
and click ‘Go’. In the resulting window, scroll down to the Scripts folder and look inside it. If there is already a folder called ‘Folder Action Scripts’ then save the script in there. If not, click ‘New Folder’ in the bottom left of the window, and create a ‘Folder Action Scripts’ folder (be sure to get the name exactly right).
With the script saved in ~/Library/Scripts/Folder Action Scripts/, right click on any folder in a Finder window and choose ‘Services > Folder Action Setup’ from the contextual menu.

This will open a new dialog box with a list of scripts to choose from. Choose the TrashWatcher.scpt (or whatever you happened to call it) and click “Attach”. In the remaining panel, make sure the Trash folder is selected and no other.

That’s pretty much it; your TrashWatcher folder is set up, so move something to the Trash and make sure it fires. Everything OK? Hmm, maybe, but we need a few refinements. For one thing, every now and again OS X will move the .DS_Store files to the Trash, and we don’t want to know about these. Also, it would be good if the file name actually indicated whether it was file or a folder that was being moved. In fact, it does so already (Folders are indicated by a colon), but it would perhaps be clearer and more orthodox if folders were followed by a forward slash, as they are usually indicated that way in path names. To achieve both of these, refine the script above to look as follows, remembering to compile, save and test it (by moving something to the Trash, not from running in the Script Editor).
Finally, with a bit of imagination and experimentation, you could add various other conditions to this script. For example, you could have it immediately delete files that are of a certain size or certain kind as soon as they are placed in the trash (tip: you’ll need to use Finder’s “empty the Trash” command after testing each file for whatever criterion you want to use). I’ll leave those as exercises for the reader, but feel free to post your scripts in the comments if you’re particularly pleased with some variation you’ve come up with!
Happy Scripting!

