Monthly Archives: October 2013
Transmission – Port is closed
I don’t often get into 3rd-party software or non-Mac hardware issues, but here’s a little trick I discovered today that could prevent a situation that adversely affects Safari and other network software.
Not so long ago I bought a new router, and everything was working fine. However, when I recently fired up Transmission, I found that not only were my downloads not so fast as I’d normally expect, but that all internet browsing was completely throttled. Basically, Safari would just get stuck half way into loading a page and eventually timeout. Killing Transmission would immediately restore Safari’s connectivity.
Looking in Transmission’s preferences ‘Network’ pane revealed that the port was either closed (red button) or the port could not be checked (yellow button). Now there are a number of reasons this can happen, but since I knew nothing had changed except my router since the last time Transmission was successfully used, I decided to go check out some of the router’s settings.
To do this, quit Transmission if it’s running, then enter your router’s IP address in Safari’s search bar. Typically, this will be something like 192.168.1.1, but if you’re not sure, you can find your router’s IP using my free utility ‘FastTasks‘.
Once you’re in your router’s admin pages, look for Advanced network settings. In my router, I found a bunch of firewall and network protocols (see the first screenshot below). Neither disabling NAT nor UPnP had any effect (those were my first thoughts about the likely culprit), but turning off the ipSec PassThrough option sure did, with the upshot that Safari and Transmission are not only playing nicely together again, but Transmission’s download speeds have markedly improved. 🙂
Here’s the settings I used to get back up and running; see if you can find similar options if you’re experiencing the same problem.

Turning off ‘ipSec PassThrough’ in my Router’s Advanced Settings:

Transmission’s Network Preferences pane:
the new Merge All Windows command

One of my favourite new commands in Mavericks is Finder’s ‘Merge All Windows’. You can find this in the Finder’s menu bar Window menu, but note that it’ll be greyed out if you only have one Finder window open (one of my other new favourites is ⌘ ^ space. Try it in Text Edit or Safari’s search bar, but I digress…:p).
To see ‘Merge All Windows’ in action, open up two or more Finder windows. Throw one or two on different Desktop spaces for good measure, then hit the ‘Merge All Windows’ command.
Yes, you get all your open windows from wherever they’re distributed slamdunked into one window with multiple tabs. If, like me, you work across multiple monitors and have multiple desktop spaces on each, Finder windows can rapidly start to multiply and this command is a real boon.
In fact, I like the ‘Merge All Windows’ command so much I even made a shortcut for it in System Preferences > Keyboard > Shortcuts (see the screenshot at the top of the page)
One final trick while we’re on the subject of tabs in Finder windows, note that you can open any folder item in your Sidebar into a new tab automatically by holding down the ⌘ ‘Command’ key and clicking on the Sidebar folder item.
🙂
Mavericks failed to download

Quite a lot of traffic going through Apple’s servers with the announcement that everyone with Snow Leopard or later can download Mavericks for free yesterday (the list of compatible machines is the same as for Mountain Lion, see here to check if yours qualifies).
This can be quite annoying as the download can go right up until the final few minutes and then return the error.
Alas, if you keep getting the ‘failed to download’ message, the only advice is to sit and wait it out till traffic subsides a little, I’m afraid. If you haven’t done so already, use the time to make a backup of your system and clear out your login items (System Preferences > Users & Groups (or Accounts for SL users) | Login Items. For more general advice on what to do to ensure a smooth upgrade, read the tips here.
Note: if you’re getting the ‘This copy of Mavericks can’t be verified’ message while using an USB installer, have a look here for a likely explanation and solution.
🙂
the end of “tell”?

With all the excitement over Mavericks’ fancy new apps, memory compression and Finder enhancements, perhaps one of the most revolutionary changes to go largely unnoticed is to the venerable (yes, it’s 20 years old, this year!) programming language AppleScript.
Apple have quietly introduced a new command to the AppleScript language called ‘use’. In effect, ‘use’ replicates the preprocessor ‘import’ directive familiar to Objective C users or the ‘include’ directive known to C programmers. This is likely to have a radical effect on how people learn and write AppleScripts.
Although ‘use’ seems primarily intended as a means to turbo-boost AppleScript by making available Objective C methods to scripters, it can also be used to import the scripting language of any app on your system. With that power, the whole concept (and limitations) of the ‘tell’ block are done away with. To see how this works in practice, take a look at this short script for toggling Bluetooth depending on your power source that I wrote pre-Mavericks, using tell statements and blocks:

Compare that with how we will do it now in 10.9 with the ‘use’ statement*:

Not a ‘tell’ in sight! Note the three ‘use’ declarations at the beginning of the script. The first one tells the script editor to include terms from System Events scripting dictionary. The second one does something similar with terms from System Preferences, but you’ll notice the syntax is slightly different. In the second declaration, I’ve taken advantage of the optional means to define a global text substitution for the expression “application System Preferences”. If you’re familiar with the #define directive in Objective C, or with using global properties in AppleScript of old, you’ll understand how this works. If you’re not, the short version is that we’ve declared a global variable of the sort which allows us to use the expression SysPrefs wherever we would normally have used the string application "System Preferences".
Don’t overlook the third ‘use’ statement in my example script above. Using ‘use’ effectively disables scripting additions (that includes all your familiar ‘display dialog’, ‘clipboard’, ‘path to’ and other essential expressions). In short, if you include any ‘use’ statements, be sure to also add the ‘use scripting additions’ statement, too.
There’s a lot more to using ‘use’ (you can read the full documentation here), but overall I think this is a positive change. However, if you’re fond of ‘tell’ don’t despair. At least for now, there’s no sign that ‘tell’ is being deprecated and you can carry on using it just as before.
🙂
*Note that there are other changes in the Mavericks version of the Bluetooth toggle script (in the ‘if…else’ blocks) due to the fact that Mavericks has changed the Bluetooth system prefs pane.
enabling Assistive Devices in 10.9
In Mavericks, Accessibility for Assistive Devices is no longer a global setting, but has to be turned on explicitly on an app-by-app basis. That setting has now moved to the Security & Privacy pane in System Preferences.
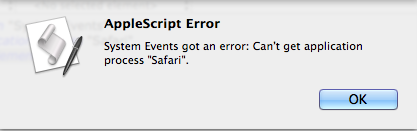
If you’re running System Events in AppleScript, Automator or using apps like BetterTouchTool that require Assistive Devices, you’re likely to come up against an error message. For example, a simple script like this:
tell application “System Events”
tell application process “Safari”
UI elements
end tell
end tell
will return an error message like this:
The first time this happens, you should get prompted with another dialogue box that looks like this:

Click the button ‘Open System Preferences’. If you accidentally hit ‘Deny’, just go to System Preferences in the normal way and choose the ‘Security & Privacy’ panel.

Click the padlock at the bottom left, enter your admin password, and check the boxes in the panel for the app that’s requesting access.
🙂
enable TRIM with FastTasks v1.17

Update: how to enable TRIM (for Yosemite 10.10.4+)
FastTasks has been updated to version 1.17 to support users who have installed their own SSD drives.
FastTasks now makes it simple to check the current TRIM status of your disk, and to either enable or disable it with a simple click, particularly useful if you find that TRIM has been turned off by an OS X software update or upgrade.
Note that you need to restart your mac after using the radio buttons to change the TRIM status in order to complete the process.
🙂
change between debug and release build

If you’ve been wondering how you create a Release build or switch between Release and Debug in Xcode 5, look in the Product menu in the menu bar at the top of your screen.
Choose ‘Scheme >Edit Scheme’, click on ‘Run in the sidebar, and click the ‘Info’ tab in the main panel.
You should now see the drop-down menu that allows you to switch between ‘Debug’ and ‘Release’.
🙂

