Category Archives: High Sierra
fastest way to reboot your mac

If you need to teardown your current login session and get your mac up and running in a hurry, here’s a neat little trick that should take you from login to logout and back again in as little as 10 seconds. And I’m not talking about SSD-only Macbook*’s either. That’s the time I achieved on a clunky late-2014 iMac with a sluggish old mechanical 1TB Fusion drive.
Forget the Apple menu and the ‘Restart…’ menu option and don’t worry about how many login items or startup scripts you’ve got either, this method will slice through them all.
We’re going to leverage a little-known command in the launchctl command line tool that will teardown and rebuild your login sessions in an instant. To see for yourself, execute this in Terminal:
sudo launchctl reboot userspace
I was astonished at just how fast the reboot is. What’s even nicer is you don’t lose any unsaved data either. This command restores all current window sessions (similar to checking the ‘Reopen windows when logging back in…’ option in the normal Restart dialog) but without the delay of the standard restart procedure.
See the man launchctl page for more options on using its reboot command.
Enjoy. 🙂
featured picture: Steampunk boots by Imp0s5ible
What’s the difference between DetectX and DetectX Swift?

Since releasing DetectX Swift back in January, a lot of people have been asking me how the new ‘Swift’ version differs from the older one, aside from requiring 10.11 or higher (the original will run on 10.7 or higher).
Well sure, it’s written in Swift — and it’s much swifter, literally, but of course there’s a lot more to it than that.
I’ve finally had a spare moment to enumerate the feature list and create a comparison chart. Although the image above is essentially the same as the one you’ll see at the link address at the moment, there’s still a bunch of features to be added as we go through development of version 1. Thus, be sure to check the latest version of the chart to get the most up-to-date info.
Of course, if you have any questions drop me a comment below, or email me either at Sqwarq or here at Applehelpwriter.
Enjoy 🙂
how to add a window switcher

command tab Application switcher, you might enjoy adding a window switcher to your list of keyboard hotkeys. The window switcher allows you to jump between different windows, both those of other apps and the same app with a hotkey like option tab, which sits nicely next to command tab in my muscle memory!
This is particularly useful if you have a couple of windows open in several applications, and it is much faster and neater than first using command tab and then command backtick to cycle through an app’s windows. Another advantage here is that the window switcher will include full screen and non-full screen windows in multiple spaces, which command backtick typically does not handle well, something I find particularly frustrating when using Xcode.
Adding a window switcher is easy and doesn’t require any hacking. It does require Hammerspoon, however. But if you’re a regular reader of this blog, you’ll already have installed Hammerspoon after reading my earlier posts on it here and here and here. 🙂
With Hammerspoon up and running, adding the window switcher is just a case of cutting and pasting some code into your config file, saving it then reloading. You can use the default code in hs.window.switcher docs or use mine below. The default code is a bit ugly for my liking. Instead, I use the code below, which sets up the switcher’s ui as seen in the screenshots here with option tab and option-shift tab for shortcuts, but you can modify the appearance to suit your taste. As ever, the Hammerspoon docs are wonderfully clear and easy to follow (take a lesson, Apple!).

-- set up your windowfilter
switcher = hs.window.switcher.new() -- default windowfilter: only visible windows, all Spaces
switcher.ui.highlightColor = {0.4,0.4,0.5,0.8}
switcher.ui.thumbnailSize = 112
switcher.ui.selectedThumbnailSize = 284
switcher.ui.backgroundColor = {0.3, 0.3, 0.3, 0.5}
switcher.ui.fontName = 'System'
switcher.ui.textSize = 14
switcher.ui.showSelectedTitle = false
-- bind to hotkeys; WARNING: at least one modifier key is required!
hs.hotkey.bind("alt","tab",function()switcher:next()end)
hs.hotkey.bind("alt-shift","tab",function()switcher:previous()end)
--EOF
Adjust values such as shortcut bindings as you please, and that’s it. For two minutes work, you just added a very useful window switcher to macOS!
Enjoy! 😀
how High Sierra updater leaves behind a security vulnerability

Some time shortly after the release of High Sierra public betas last year, I started noticing a lot of user reports on Apple Support Communities that included something odd: an Apple Launch Daemon called com.apple.installer.cleanupinstaller.plist appeared, but oddly its program argument, a binary located at /macOS Install Data/Locked Files/cleanup_installer was missing.
An ‘etrecheck’ report on ASC
Being an Apple Launch Daemon, of course, the cleanupinstaller.plist is owned by root:
-rw-r--r-- 1 root wheel 446 Oct 10 06:52 com.apple.installer.cleanupinstaller.plist
After discussion with a few colleagues about this oddity, I decided to see if I could catch a copy of the missing program argument. After rolling back to an earlier version first, I found that the macOS Install Data folder is created when a user runs the Upgrade installer (along with the Launch Daemon plist). A clean install with the full installer does not appear to create either the properly list or the program argument.
The Locked Files folder indicated in the program argument path is hidden in the Finder, but revealed in Terminal.

Inside the Locked Files folder is the cleanup_installer binary. The binary is 23kb, and the strings section contains the following, giving some indication of its purpose:

Upon a successful upgrade, the /macOS Install Data/ folder is removed, but the Launch Daemon is not, and therein lies the problem.
Let’s have a look at the plist:

The ‘LaunchOnlyOnce’ and ‘RunAtLoad’ keys tell us the program argument will be run just once on every reboot. It’ll execute whatever is at the program argument path with root privileges. With the executable missing as noted in numerous ASC reports, that leaves open the possibility that a malicious process could install its own executable at the path to aid in persistence or re-infection if the original infection were to be discovered or removed.
To test this hypothesis, I threw a quick script together that included a ‘sudo’ command.
#! /bin/bash
sudo launchctl list > /Users/phil/Desktop/securityhole.txt
The legacy command ‘launchctl list’ produces different results when it’s run with sudo and when it’s not. Without sudo, it’ll just list the launchd jobs running in the user’s domain. With sudo prepended, however, it’ll instead list the launchd jobs running in the system domain. This makes it easy for us to tell from the output of our script whether the job ran with privileges or not.
Having created my script, I created the path at /macOS Install Data/Locked Files/ and saved the script there as ‘cleanup_installer’. It’s worth pointing out that writing to this path requires admin privileges itself, so this issue doesn’t present any kind of ‘zero day’ possibility. The attacker needs to have a foothold in the system already for the danger to be real, so I’ll repeat that the vulnerability here is the possibilty of the attacker hiding a very subtle root persistence mechanism within a legitimate Apple Launch Daemon, making it all the more difficult to detect or remediate if otherwise unknown.
The final step was to chmod my script to make it executable, and then restart the mac. Sure enough, after reboot and without any other intervention from myself, the script was executed and my Desktop contained a text file with a nice list of all the system launchd jobs!
Of course, that’s a trivial script, but here’s the tl;dr:
Anything – including code to reinstall malware – can be executed with root privs from that path every time a High Sierra install containing the Apple
cleanupinstaller.plistreboots.
Remediation
If you’re already beyond your second reboot since updating and your /LaunchDaemons folder contains this property list, the obvious thing to do is to remove it (as High Sierra should have done when it completed the reinstall). It appears to serve no purpose once the program argument has been removed, other than to offer a way for malware to seek persistence.
Secondly, you should be able to safely remove the /macOS Install Data/ folder if you find that exists. This is usually removed after a successful update, but it can also be left behind if a user cancels out of an update half way through. If you do find this still lurking on your system, you can check that it is what it’s supposed to be by copying and pasting this into Terminal:
strings -a /macOS\ Install\ Data/Locked\ Files/cleanup_installer
and confirm you get the same or similar as listed earlier in this post. On my system here, the file also gives a checksum of 945203103c7f41fc8a1b853f80fc01fb81a8b3a8. You can produce that on the command line with:
shasum -a 1 /macOS\ Install\ Data/Locked\ Files/cleanup_installer
However, it’s entirely possible that Apple either already have or may in the future make changes to that binary since I captured it, so a varying checksum alone should be treated with caution.
Of course, even after having removed these items, there’s nothing to stop an attacker that’s already compromised a machine from recreating both of those (as indeed, there’s nothing to stop a privileged attacker creating anything else on your system!). Thus, it’s always a good idea to keep track of what changes occur on your system on a regular basis. My free/shareware tools DetectX and DetectX Swift are designed to do exactly this. In DetectX, after running a search, the log drawer will tell you if the /macOS Install Data/ exists:

NOTES:
1. This issue was reported to Apple Product Security in August 2017.
scan for malware on the command line
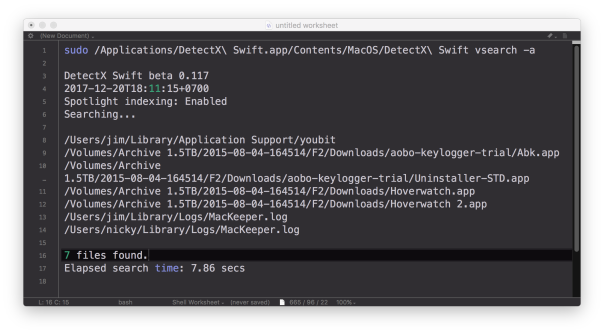
DetectX Swift now has the ability to do command line searches for issues on your mac like malware, keyloggers, browser hijacks and potentially dangerous software, and there’s a number of extra options that are not available when using the user interface. In this post, I’m going to give you a quick tour of the CLI (Command Line Interface) tool with some examples of how to use it (if you haven’t yet grabbed a free copy of DetectX Swift you might want to do that first to play along).
1. Basic scan
Let’s start with a basic scan. To use the CLI search, you need to specify the full path to the app executable. In this example, let’s suppose that the app is in /Applications folder. In that case, you’d need to execute this on the command line:
/Applications/DetectX\ Swift.app/Contents/MacOS/DetectX\ Swift search
Since that’s a bit of a handful, even using tab completion, you might want to edit your .bash_profile to include a shortcut alias. Here’s mine:
sphil@sphils-iMac-5:~$ cat .bash_profile
alias sudo='sudo '
alias detectx='/Applications/DetectX\ Swift.app/Contents/MacOS/DetectX\ Swift'
Note the sudo line (and note the extra space in the value). We’re going to need that so that we can pass the alias to sudo when we want to pass certain options to the search. Like…
2. Scan other users
Probably the most important benefit you gain with scanning on the command line rather than from the app’s interface is the ability to scan all, or selected, other users. You can search all users by using sudo and the -a option:
sudo detectx search -a
If you want to restrict the search to one or more users, the -u option allows you to specify a list of shortuser names (comma-delimited):
sudo detectx search -u alice,bob
3. Go deep
If you’d like more verbose output, including how long the search took, try either the vsearch or vvvv commands:
sudo detectx vvvv -a
4. Save the results
You can specify a path to output the results, either in regular text:
sudo detectx vvvv -a ~/Desktop/searchtest.txt
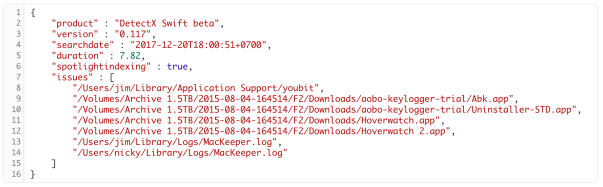
or, by passing the extra -j option, in JSON format:
sudo detectx search -aj ~/Desktop/searchtest.json
Here’s an example of what the formatted JSON file looks like:
5. Anything else?
There’s a help command that will output the documentation to the command line, and also if you get into the habit of regularly running command line checks, don’t forget to launch the app from time to time in the Finder. Like its predecessor, DetectX, DetectX Swift does a lot of other stuff besides searching that can help track down and remediate problems with your mac, and a large part of that revolves around the way it tracks changes to your system every time you launch it. The CLI tool runs independently of that and won’t give you that kind of feedback or record those changes.
Finally, note that in the release version of DetectX Swift, the CLI tool is only available for a limited period to Home and Unregistered users. Unlimited acccess to the CLI tool requires a Pro or Management license.
Enjoy! 🙂
how to remove MyCouponize adware

MyCouponize is an aggressive adware infection that simultaneously installs itself in Safari, Chrome and Firefox, It hijacks the user’s search and page loads, redirecting them to multiple web sites that advertise scamware and other unwanted junk.
You can remove it easily with DetectX Swift (a free/shareware utility written by myself) as shown in this video. If you prefer reading to watching, here’s the procedure:

1. Run the search in DetectX.
2. Click on the [X] button.
You’ll find this button just above the results table to the right, between the search count and the tick (whitelist) button. It will turn red when you hover over it. When it does so, click it.
Then hit ‘Delete’ to remove all the associated items.
You’ll need to enter a password as some of the items are outside of your user folder.
Press the esc key or click the ‘Cancel’ button on any pop up dialogs that appear.
3. Go to the Profiler
Here we’ll unload the launchd processes that belong to MyCouponize.

Navigate to the user launchd processes section and move the cursor over the item com.MyMacUpdater.agent
Click the ‘Remove x’ button that appears when the line is highlighted.
Wait for the profiler to refresh and then go back to the same section and remove the second process called com.MyCouponize.agent


4. Quit the mediaDownloader.app
This item has already been deleted in step 1, but its process may still be running in memory. If its icon appears in the Dock, right click on it and choose ‘Quit’ from the menu.
4. Finally, go to Safari Preferences’ Extensions tab
Click the uninstall button to remove the MyCouponize extension.
After that, Safari should be in good working order. If you have Chrome, Firefox or possibly other browsers installed, make sure you remove the extensions or Add Ons from those, too.
DetectX and DetectX Swift are shareware and can be used without payment, so go grab yourself a copy over at sqwarq.com.
what is rapportd?

Since early November, I’ve been seeing reports of High Sierra users being presented with a dialog box from the Firewall asking whether the user wants to accept incoming network connections to rapportd.
This is causing some confusion among troubleshooters as there’s a fairly notorious process with the same name associated with IBM’s (badly-performing) Trusteer software. This latter often causes system slow downs and the general recommendation is to remove it unless you absolutely can’t live without it.
However, the rapportd process responsible for the dialog has nothing to do with IBM’s Trusteer and is, in fact, an Apple daemon introduced in 10.12. According to the man page, Apple’s rapportd is a daemon providing support for the Rapport connectivity framework. Although rapportd is bundled with 10.12, it appears to have only become active in 10.13.
Issuing
lsof -i -P | grep -i rapport
at the command line doesn’t return any hits on my 10.12 machine, but High Sierra reveals that Apple’s rapportd process is listening for network connections on port 49158. Further investigations have found that rapportd is connected to Apple’s HomeKit framework, a home automation platform for controlling smart home products with iOS apps and Siri voice commands, and is likely related to Airplay 2.
To verify which rapportd process you’re dealing with, jump into Terminal and paste this command:
ps aux | grep rapportd
Alternatively, if you’re a DetectX Swift user, you can search for it in the Profiler view (Command-F evokes the Find inspector bar):

If the search or find reveals a process address as /usr/libexec/rapportd, that’s your Apple friend and you can safely allow the connection. Searches for rapportd also might produce any of the following paths, all of which are legitimate:
/System/Library/LaunchDaemons/com.apple.rapportd.plist
/System/Library/Sandbox/Profiles/com.apple.rapportd.sb
/usr/libexec/rapportd
/usr/share/man/man8/rapportd.8
On the other hand, if you see a path address for
/Library/Rapport/bin/rapportd.app/Contents/MacOS/rapportd
or searches reveal
/Library/LaunchAgents/trusteer.rapport.rapportd.plist
that’s the IBM app you’re looking at. Whether you want to allow that or uninstall that will depend on both your mac’s performance and whether you need the software or not.
Hope that helps to clear up some of the confusion!
🙂
yes, enable the root user if you’re on High Sierra
Update: There’s a security update available in the App Store now that mitigates this risk. It should be applied by all High Sierra users as a matter of urgency.
Today has been all about a monumental security flaw in High Sierra which allows anyone to log in to a mac and immediately become the root user without a password at all.
If you haven’t yet seen the news, check out the 30-second video above. If you’re not on High Sierra, no need to worry.
Although there are conflicting reports of exactly under what conditions the exploit can be triggered, it seems that in most cases two attempts are required to escalate user privileges. The first time enables the root user with the password that you do or do not put in the password field (i.e., it’ll accept a blank password). The second time is using those credentials to unlock whatever it is you want to unlock (in the video, only 1 attempt is shown as I had already ran the exploit once prior to making the video). There also seems to be conflicting reports about whether the flaw can be exploited remotely. What does seem certain is that malicious 3rd party applications could programmatically use it to escalate privileges for themselves, so it’s important to make sure you take the proper precautions to deal with this flaw until Apple patches it with an update.
Alas, with so much excitement, it seems some people are getting confused about exactly what needs to be done to avoid falling victim to this security flaw. The answer is not, as has been mistakenly suggested in some quarters, to disable the root user, but quite the reverse: you need to enable it.
The one thing that stops the flaw from being exploited is having the root user already enabled and set with a strong password.
By default, macOS ships with the root user disabled, so unless you (or someone who administrates your mac) has enabled it at some point, it won’t be set. If you’re not sure, this AppleScript will quickly tell you the status of the root user:

Update: further testing on 10.13 shows that the root user may be enabled without writing a ShadowHash entry to dscl. In that case, the script would incorrectly indicate root was disabled. Thus, to be certain, the best way to check is to follow the instructions in the apple support article linked to below.
If you find the root user is disabled, then go and enable it by following Apple’s instructions here:
https://support.apple.com/en-us/HT204012
Be sure to use a strong password of at least 14 characters or more. You can save the password if you want, but it doesn’t really matter much if you forget it. There’s really never any need for an admin user to require the root user at all, and there are other ways to get root privileges safely through the Terminal if needs be.
learning the Terminal : Part Four

One of the obstacles in becoming a command line guru is actually figuring out not just what’s available (see learning the Terminal: part Three) but how to use it. That just got a whole lot easier thanks to a (relatively) new tool called tldr.
Most command line (CLI) utilities come with either a man page or a help command, invoked either by man or </path/to/tool> --help, respectively. That’s traditionally the way we learn all the ins-and-outs of a given tool. If you’re lucky, there will be some examples at the end of the man page, and if you’re luckier still, there’ll be an example of exactly what you want to do with the tool there, too.
But what if you’re not lucky? Some CLI tools come with very few or no examples, some come even without a help command or man page. When that happens, prior to tldr your best bet was to go on an internet search or ask a friendly CLI expert if you knew one.
Now, tldr provides a third, and perhaps better, option. Unlike traditional man pages, tldr just spits out some basic examples of the CLI tool you specify, and that (more often than not) may be all all you need to get going (see the screenshots for examples).
If you have brew installed, you can get tldr easily with the command
brew install tldr
If not, either install homebrew first, or see the tldr homepage for other ways to install.
Using it is simple. Try some of these for fun:
tldr find
tldr awk
tldr sed
tldr cut
and so on. Here’s the output for tldr grep:

The one thing tldr doesn’t seem to have built in that I can find is a list of the commands it knows about. There is a workaround, though. You can search through the tldr pdf to see what’s available. Alternatively, we can us a bit of command-line magic to do it for us:
find ~/.tldrc -path '*common*' -or -path '*osx*' | cut -d"/" -f8 | cut -d"." -f1 | sort
If you’d like to make that into a nice little function that you can call simply with something like tldr_list, review the first post in this series on how to make and add functions to your .bash_profile.
As tldr is a community-based program, it is likely to be added to quite regularly (I have a few I’m planning to contribute myself), so we can only hope that the pdf is updated regularly and/or that tldr gains a proper introspective list function.
Speaking of updates, if you try tldr on itself, i.e,
tldr tldr

you’ll note the ‘update’ command. It’s probably worth remembering to run that from time to time. tldr also comes, of course, with its own man page, too!
Enjoy! 🙂
Related Posts
learning the Terminal – Part One
learning the Terminal – Part Two
learning the Terminal – Part Three
Apple’s keyboard shortcut to show hidden files

Time was this would take a trip to the Terminal, but if you’re running Sierra or above there’s a handy new keyboard shortcut.
Just activate the Finder and hold down shift-command-period. Repeat to toggle invisible files off again.
This works not only in save and open dialog sheets, but in regular Finder windows also.
Magic! 🙂

