Category Archives: Automator
how to quickly toggle Swift Compiler warnings

I thought I’d share this little AppleScript for anyone working with Xcode 8.3.3 and using Swift.
One of the things I find intrusive are the constant Swift Compiler warnings while I’m actually in the middle of writing a block of code (e.g, ‘…value was never used consider replacing…’). Well, yeah, it’s not been used *yet* …grrr!
However, turning off compiler warnings isn’t something I want to do either. It’s too easy to go into the build settings, turn them off, do a bit of coding, take a break, do a bit more coding…oh, three thousand lines later and I suddenly realize why Xcode hasn’t been correcting my mistakes all afternoon!
This script allows you to quickly and easily toggle the warnings from a hotkey, and just gives you a gentle reminder as to what you’ve done. Of course that won’t stop you forgetting, but assigning a hotkey for this script makes it painless to just turn warnings off and back on again as soon as you’ve got past whatever bit of code the compiler was complaining about.

Xcode unfortunately doesn’t have its own scripts menu, so in order to assign the script a hotkey, you’ll need to either make it into a Service with Automator or use a script runner like Red Sweater’s FastScripts.
#starton sendNotification(aVal)display notification "Suppress Warnings was set to " & aVal with title "Swift Compiler - Warnings Policies"end sendNotificationtell application id "com.apple.dt.Xcode"tell its front documenttell its front projecttell its front targettell its build configuration "Debug"set b to build setting "SWIFT_SUPPRESS_WARNINGS"if b's value is "NO" thenset b's value to "YES"elseset b's value to "NO"end ifmy sendNotification(b's value)end tellend tellend tellend tellend tell#EOF
If copying the code above doesn’t build, get the raw source from my pastebin here. Here’s how it looks in Script Debugger 6:

Enjoy!🙂
get automated with Hammerspoon

I recently discovered a neat little extra automation tool on top of the familiar ones of AppleScript, Automator, and script runners like FastScripts and Keyboard Maestro. Meet Hammerspoon, which differs significantly in not using Apple Events to do many of its automation tasks. Instead, Hammerspoon bridges directly to Apple APIs using the lua scripting language, and that allows you to do some interesting things.
Here’s a good example. One of the ‘danger zones’ on your mac – by which I mean one of the favourite places for adware, malware and other assorted badwares to infect – is your LaunchAgents folders. Apps like my DetectX and FastTasks 2 keep an eye on these areas by design, warning you in the Changes and History logs when files have been added or removed from them – but Hammerspoon can add an extra little ‘canary’ warning for you too. With only a few lines of code in Hammerspoon’s config file, you can set up an alert that will fire whenever the LaunchAgents folder is modified.
It has been possible to rig up something similar for a long time with Apple’s built-in Folder Actions, but there’s a couple of reasons why I prefer Hammerspoon for this task. One, despite Apple’s attempt to improve Folder Actions’ reliability, I’m still not convinced. I get inconsistent reports when asking System Events to check whether Folder Actions is enabled even on 10.11 and 10.12. Second, Folder Actions is limited in what it will respond to. By default, only if an item is added. With a bit of effort, you can rig it up to watch for items deleted, too, but that’s pretty much it. With Hammerspoon, it’ll alert you whenever the folder or its contents are modified in any way whatsoever. The final reason for preferring Hammerspoon for this particular task is ease of use. It really is as simple as pasting this code into the config file:
function myFolderWatch()
hs.alert.show("Launch Agents folder was modified")
end
function canaryFolderWatch()
hs.alert.show("Canary folder was modified")
end
local aWatcher = hs.pathwatcher.new(os.getenv("HOME") .. "/Library/LaunchAgents/", myFolderWatch):start()
local bWatcher = hs.pathwatcher.new(os.getenv("HOME") .. "/_Acanary/", canaryFolderWatch):start()
And what’s the config file you ask? Nothing complicated! Just launch Hammerspoon, click its icon and choose ‘open config’.

That will launch your default text editor, and all you do is paste your code into there, save it (no need to tell it where, Hammerspoon already knows) and then go back to the Hammerspoon icon and click ‘Reload config’. That’s it. Less than a minute’s work!
There’s a lot, lot more you can do with Hammerspoon, so if you’re interested head off and check out the Getting Started guide. One of the nice things is that you can even call AppleScripts with it, so you really do have a world of automation options to choose from!
DisplayDroid – limited free betas available

The first beta of DisplayDroid is, for a limited time, freely available to anyone interested in testing (requires Yosemite, 10.10). DisplayDroid executes an AppleScript or JavaScript whenever you connect or disconnect an external monitor, primarily with the intent of automatically setting up the environment depending on your display status. DisplayDroid includes its own script editor and a number of presets (i.e., built-in scripts) to get beginners started.

Full details of DisplayDroid can be found here: http://sqwarq.com/displaydroid/ To get a free beta copy of the app, please register for the Community forum here: http://displaydroid.proboards.com and I will email you a beta copy of the app in the next few days.
OS X Messages character counter
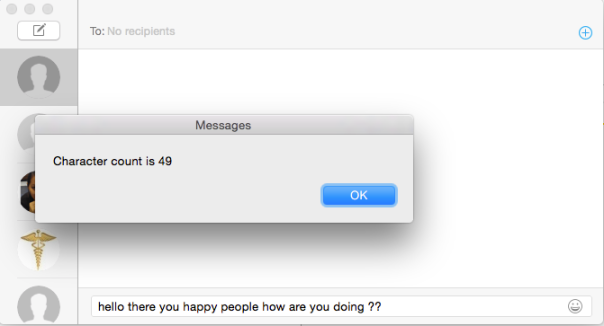
With OS X’s Messages app now able to send SMS, some might find it useful to have an idea of how many characters have been typed in the message field.
Here’s a bit of AppleScript and Automator magic that will do that for you. Assign it a hotkey to make it a Service, and you can quickly get a character count with the stroke of a key (alternatively, you can invoke it from the Services menu).
Download ⬇︎.
After downloading, click through to install (it’s code signed, so it should pass GateKeeper’s default settings). For the hotkey, you’ll need to set that up in System Preferences > Keyboard > Shortcuts > Services, like so:

When you run it for the first time, you may be asked to allow Automator and/or Messages access to System Events in Accessibility here, too:

how to easily encrypt your files
Keep the spooks and data thieves out of your personal data with this easy-to-use, drag-and-drop 128-bit AES encryption applet. It’s a simple 1-2-3 process:
1. Download EncryptMe, copy to your Applications folder and drag the icon to your Dock.
2. Select the files you want to encrypt and drop them onto EncryptMe’s Dock icon.

3. Choose a password and you’re done!

That’s really all there is to it, but let’s take a moment to go over the details of Step 2 and 3.
How does it all work?
First of all, note that EncryptMe is an Automator “droplet” app. That means you use it by dropping files on it, not by clicking or double-clicking the icon (which will just produce an error message). If you want to know how EncryptMe works (or make your own), just open up Automator.app and take a look a the ‘New Disk Image’ action. EncryptMe sizes the disk image to fit the files you drop on its icon as long as you have enough free space on your drive.

Secondly, take a moment to pause and think about the password options. You can use OS X’s built-in password generator or make one up of your own. However, be careful. This encryption won’t just keep the bad guys out; it’ll keep you out too if you forget the password!
For that reason, you’ll need to think carefully about whether you’re going to tick the ‘Remember password in my Keychain‘ checkbox or not. Doing so gives you far more insurance against losing the password. The flipside is that anyone will be able to access your encrypted files if they gain access to your computer while you’re logged in. Leaving the box unchecked is more secure: the password you set here will have to be supplied every time an attempt to open the files is made even when you’re logged in. The bad news? Forget the password, and you’ll be in the same boat as the spooks and the data thieves, locked out of your data forever. So choose carefully here.

how to save and print email attachments
I was recently asked for a script that would automatically save and print all the pdfs from one particular client’s emails. Since this is quite a common use case (think invoices from a particular supplier, for example) and involves a fair bit of complexity, I thought I’d share the answer for any others out there that have the same need.
We’re going to need to do three things; install a script, set up a mail rule, and set up folder actions. Here we go!
Part 1: Install Script
Copy and paste the script you see below from here:

Save this script with a name like ‘CopyAttachments’ in
~/Library/Application Scripts/com.apple.mail
(note: ~/Library means your user library. You can find it by triple-clicking the path above, then control-click on the highlighted text and choose Services > Reveal in Finder)
Part 2: Set up Mail Rule
Open Mail.app. Click on your Inbox in the sidebar. Click ‘Mail > Preferences… > Rules > Add Rule’
Under ‘Description’ give the rule a name (e.g., ‘Copy attachments’)
Set ‘If ANY of the following conditions are met’:
to
‘From contains’
and the email address of the person whose attachments you want to target.
(note: You can add more than one person’s email if you wish, but you do so by hitting the ‘+’ key and adding a new condition, not by adding more than one address in the text field. Each text field must contain only one condition, i.e., email address or keyword).
Next, set ‘Perform the following actions:’
to
‘Run AppleScript’
Click the ‘No Script Selected’ button and choose ‘CopyAttachments’
Click ‘OK” and in the following dialog click ‘Apply’.
3. Create & Set up a Folder Action
Open Automator.app. From the open panel choose ‘Folder Action’.
In the large, empty panel at the top you’ll see
‘Folder Action receives files and folders added to’ Choose folder
Click the Choose folder menu, choose Other. Select the folder you want the attachments to be saved in.
In the filter/search bar on the left of the Automator window, type ‘print images’. Drag the ‘Print Images’ selection from the results list into the middle of the empty workflow and release.
You can set some options here if you like (‘scale to fit’ might be useful).
You can choose either ‘Default Printer’ or click to select your actual printer. If your actual printer is the default, it won’t make any difference.
Press ‘command-S’ on your keyboard to save. Supply a name (e.g. Print PDFs) and hit ‘OK’. You do not choose a save location.
Quit Automator.
Open a Finder window and navigate to the folder where the attachments are going to be saved.
Hold down the ‘control’ key on your keyboard and click the attachments folder. From the contextual menu, go to Services > Folder Actions Setup… and click to open the dialog box.
Navigate down the list of scripts till you see the name of the Automator action you saved above and select it. Click ‘Attach’.
In the parent dialog box, check the box at the top that says ‘Enable Folder Actions’ and ensure that in the list on the left the attachments folder is listed and checked. Check that on the right, the ‘Print PDFs.workflow’ is checked.
If all is in order, close the dialog box. The procedure is complete and the workflow is installed.
Testing
It’d be wise to test the script as soon as possible. If it fails to work, double check that you’ve entered the correct path in the AppleScript as that’s the most likely point of failure. Let’s suppose your hard disk is called ‘Macintosh HD’, your user name is “Mack” and the folder you want to save the attachments in is “Invoices From Acme”, then the set attachmentsFolder line should look like this:
set attachmentsFolder to "Volumes:Macintosh HD:Users:Mack:Invoices From Acme:" as rich text
You must ensure you’ve already created the folder ‘Invoices From Acme’ before running the script. Also, be sure you don’t forget the trailing colon at the end of the path and that you have a matching pair of opening and closing quotes around the path name.
Any problems, drop me a comment below and I’ll try to help you out. Good luck and enjoy! 🙂
run Terminal commands from any app
In this post I’m going to show you how you can select a piece of text in any app and have it run in Terminal simply by hitting a hotkey. The trick is especially useful for running commands you find on websites (like this one!) in a browser like Safari or Firefox.
This 20-second clip demonstrates running a command from a Firefox browser and another one from TextEdit, but you can also do it from an AppleScript editor window (and indeed any app that has selectable text), which can be useful for testing the formatting of your ‘do shell script’ commands and the like:
The first thing you’re going to need is to create an Automator workflow, add an AppleScript action and insert some code. Really? Nah, just kidding. I did it for you. 🙂 Just download, unzip and double-click the .workflow file to install the completed Service:
Download Run in Terminal.workflow.zip
Click through the various dialog boxes and choose ‘Install’ on the last one* (note for Snow Leopard users: the service will open directly in Automator; just do ‘command-shift-S’ to name it and save it).

All you need to do now is set the hotkey. Open > System Preferences.. > Keyboard | Shortcuts and click ‘Services’ in the sidebar. Scroll down the window till you see the ‘Run in Terminal’ command. Click on the far right to add a shortcut of your choice. The one I used in the video is ‘command-option-control-T’ (‘T’ for ‘Terminal’ helps me remember the shortcut).
To use the Service, just highlight any Terminal command by triple clicking it and pressing your hotkey. Try this one,
cd ~/Desktop; ls -alF
which lists all the visible and invisible files on your Desktop, as a test.
You can also get to the Service from both the contextual menu (right-click > Services) and the application menu bar at the top (e.g., Safari > Services).
As a bonus, try out your new Service on the Terminal command in this post, and now you’ll be able to run Terminal commands even from Quick Look previews in Finder!
Enjoy! 🙂
Carbon Copy Cloner: see last back up date
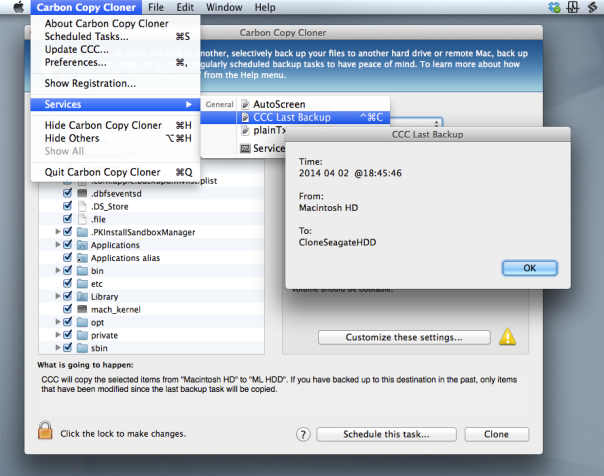
If you’re a user of Bombich Software’s excellent Carbon Copy Cloner but you’re not doing backups as scheduled tasks, you may wish there was a way to find out the last time you successfully completed a backup task.
Unfortunately, CCC doesn’t provide an easy way for users to see this information natively, but in this post we’re going to add it through a bit of AppleScript and Automator magic.
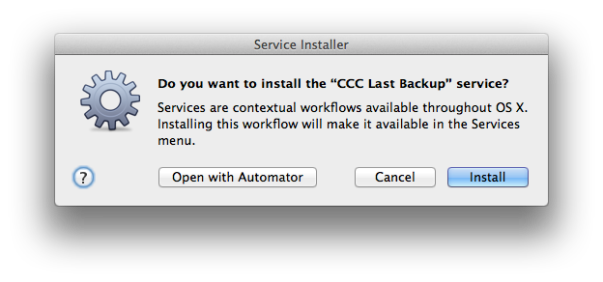
As it turns out, CCC does keep a log of all your past backup details stashed away in a CCC.log file buried in your local domain’s Library folder. You can view this file in Console, but it’s a bit of a pain. Wouldn’t it be nicer if you could just hit a hotkey like ‘Command-Control-C’, say (you know, for ‘CCC’🙂 ), and get a dialog box like this:

If you think so too, then download my Automator workflow:
For Lion, Mountain Lion and Mavericks:
Download for 10.7.5 thru 10.9.2 
For Snow Leopard:
Download for 10.6.8 
Double-click on the .zip file and double click again on the unzipped workflow file. You’ll get a warning message saying that you’ve downloaded the file from the internet (from me, actually!). After clicking ‘Open’ to dismiss the warning, for all users except 10.6, click ‘Install’ on the the following dialog box:
After clicking ‘Install’, click ‘Done’ to dismiss the confirmation dialog box that pops up.
For those of you running Snow Leopard (10.6.8), after clicking ‘Open’ the workflow should open in Automator. Hit ‘command-S’ to save it as a Service.
For all users, if you now click up to any application name next to the Apple near the top left of your screen (see the screenshot at the top of this post) and scroll down to ‘Services’ you should see the new Service already there. If you don’t, try logging out and logging back in to your user account.
Once you can see the workflow in the Services menu, go ahead and give it a click to test it out. 🙂
A couple of notes on usage:
Carbon Copy Cloner does not have to be open for the Service to work.
The date format display is YYYY-MM-DD.
If you want to add a shortcut key as suggested earlier, open up System Preferences > Keyboard and click the ‘Shortcuts’ tab. Down the sidebar you should see ‘Services’. Click on that and scroll way down to the bottom till you see the name of the Service. Click ‘Add Shortcut’ and hit the keys you want to use. I like ‘command-control-C’ as it’s an easy mnemonic for ‘Carbon-Copy-Cloner’.
enabling Assistive Devices in 10.9
In Mavericks, Accessibility for Assistive Devices is no longer a global setting, but has to be turned on explicitly on an app-by-app basis. That setting has now moved to the Security & Privacy pane in System Preferences.
If you’re running System Events in AppleScript, Automator or using apps like BetterTouchTool that require Assistive Devices, you’re likely to come up against an error message. For example, a simple script like this:
tell application “System Events”
tell application process “Safari”
UI elements
end tell
end tell
will return an error message like this:
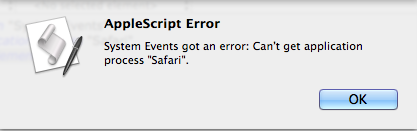
The first time this happens, you should get prompted with another dialogue box that looks like this:

Click the button ‘Open System Preferences’. If you accidentally hit ‘Deny’, just go to System Preferences in the normal way and choose the ‘Security & Privacy’ panel.

Click the padlock at the bottom left, enter your admin password, and check the boxes in the panel for the app that’s requesting access.
🙂


Xcode: wrap code in comment tags
Nov 29
Posted by philastokes
While AppleScript’s Script Editor has long had a built-in function for wrapping or unwrapping code with comment tags, for some reason this seems to be missing in Xcode.
Not to worry, nothing a bit of AppleScript and Automator can’t sort out. This will work in most text editors as well as in Xcode. Here’s what it does:
Install the Service by double-clicking on the downloaded .workflow file and clicking through the dialog boxes. When it’s installed, you can assign it whatever hotkey you want in System Preferences | Keyboard | Shortcuts.
Download Toggle Comments for Selection workflow.zip
If you want to use it for languages that have different comment tags you can adjust the code in Automator. Likewise, it would be fairly simple to have the script detect a number of different tags and respond appropriately, but here I’ve just stuck with the /* …. */ tags.
A note on usage: when uncommenting, it’s best to ensure that the selection begins at the leading forward slash and ends at the trailing forward slash (in other words that there’s no whitespace at either end of the selection). I have built in some attempt to strip leading and trailing whitespace, but an accurate selection will always be the most reliable.
Download Toggle Comments for Selection workflow.zip
Enjoy 🙂
Share this:
Posted in AppleScript, Automator, Developer, Xcode 6
Leave a comment
Tags: comment, comment blocks, comment tags, comments, hotkey, keyboard, keychord, shortcuts, Xcode