Monthly Archives: March 2013
eject all your disks at once

Here’s a simple AppleScript one-liner that can be useful if, like me, you have several disks connected to your laptop at home or the office and you need to get up and go quickly.
1. Open the AppleScript Editor.app by typing Apples in the Spotlight search bar and hitting ‘return’.
2. Copy the following code into the editor window:

3. Hit ‘Command-K’ to compile and ensure you didn’t make any mistakes. Fix any typos if it doesn’t compile and try again. Save the script to your Desktop as ‘EjectAll.scpt’

4. If you don’t already have the Scripts menubar icon visible in your menu bar, hit ‘command ,’ (that’s the Command key and the comma key) and check the ‘Show Script menu in menu bar’ item in the General pane of AppleScript’s Preferences window.
5. From the Scripts menu, choose ‘Open Scripts Folder > Open Computer Scripts Folder’ and drag ‘EjectAll.scpt’ from the Desktop to the Computer Scripts Folder. You’ll need to authenticate with an Admin password to complete the move.
And that’s it. Now whenever you want to eject every disk with one simple operation, just hit the Script menu icon and click on ‘EjectAll’. 🙂
read two Kindle books at the same time

One of my favourite apps is Kindle for Mac, but if you’re doing any kind of research or study, the fact that you can only have one book open at a time can be a serious impediment to your workflow. Here’s a few ways round this:
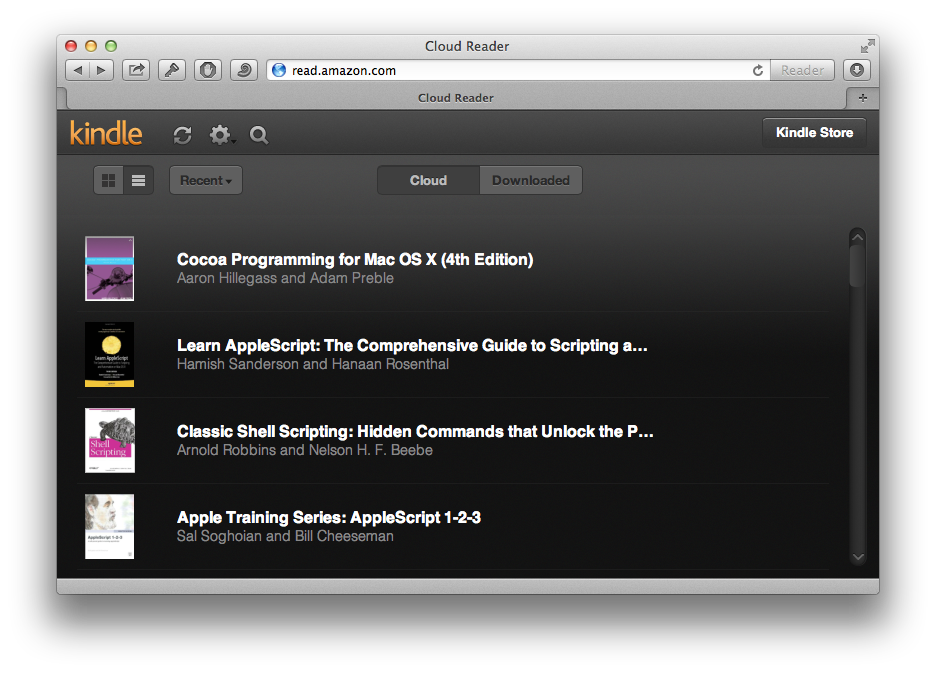
1. Kindle Cloud Reader
Probably the easiest and most effective solution is to read your second book in Safari by way of the Kindle Cloud Reader. Go to read.amazon.com and get set up in moments with a few simple steps.
2. Calibre.app.
Another good choice, particularly if you’re not always wired to the net, is to get Calibre (an open-source e-reader). You can use this app to copy all your Kindle content into a format that Calibre can read, allowing you to have Kindle open on one desktop and Calibre on another. If any of your Kindle books are DRM’d (i.e., have software protections that mean they will only open in Kindle), use this free resource to un-DRM them.

3. Fast User Switching
My least favourite solution, but if 1. or 2. don’t appeal to you, set up a new user on your mac and register your Kindle for Mac app to that account also. This is a useful solution if the internet is unavailable or you are not comfortable with removing DRM on your Kindle purchases. The downside is that it’s slow and can be awkward to keep simultaneous notes (one solution here is to enable Dropbox on both user accounts, and save your notes in a file in your Dropbox).
🙂
Featured picture: Kindle by Wreathe
5 things you never knew about TextEdit

Although Apple’s oddball TextEdit.app has a variety of good formatting options, the chances are if you do any kind of word processing, you have one or more of the heavy duty apps like Pages, LibreOffice or Ms Word. If, on the other hand, you’re a coder or scripter who needs a plain text editor, you likely use Tincta, Sublime Editor 2, BBEdit, Coda or one of the many other full-featured editors that can do things like syntax colouring, snippet saving, script execution and so on that TextEdit can only dream of. Indeed, Apple have strangely forsaken giving their homegrown editor even a ‘line numbers’ option (though see tip 5 below), making it all but unusable for scripting.
Given its limitations, you might feel you haven’t been missing much by leaving TextEdit unloved and untouched in the Applications folder. However, here’s at least 5 reasons to think again.
1. Easiest way to create an audiobook.
I started off by calling TextEdit an ‘oddball’ app and here’s the first reason: name me another ostensibly “text editing” program that can make audio books? Dump any old text into a TextEdit window, and from the menu at the top choose ‘Edit > Speech > Start Speaking’. Plug in the headphones, sit back and relax! Works great with long online articles (but be sure to strip out any meta text and pictures first!). Also, don’t forget you can change the system voice in ‘System Preferences > Dictation & Speech’, and as I’ve pointed out elsewhere, foreign language learners can download optional voices and listen to foreign language text to improve their listening skills. For the parents among us, this one can also be great for the kids (both for them to listen to and create their own). 😉
To turn a TextEdit file into an audio book, select the entire text and from the menubar choose ‘TextEdit > Services > Add to iTunes as a Spoken Track’

2. Easy way to read, edit or save lengthy Terminal output
You can add
| open -f
to the end of any Terminal command, and (assuming TextEdit is your default editor) the output will be piped to a TextEdit window. This makes it easy to search, save or just scroll the output. This is particularly useful for reading and saving man pages. However, be aware that for some bizarre reason, man pages in particular tend to duplicate a number of characters in certain fields, which can affect readability. To prevent this here or with any other output you encounter that does the same, use
| col -b | open -f
after the Terminal command.
For example, if you enjoy hunting down defaults tricks, try this in Terminal. Type
defaults read | col -b | open -f
3. Easy way to get a file path
You can drag and drop any item from a Finder window into a TextEdit window to reveal that item’s path. This is a very handy trick if you need to quickly copy a file path to the clipboard. You can also drag urls from Safari’s address bar into a TextEdit window, or just drop them onto its Dock icon to get the same effect.
4. Easily share TextEdit content or files
Although TextEdit lacks the ‘Share’ icon in the menubar that was introduced to many apps in Mountain Lion, you can still access the ‘Share’ feature through the contextual (‘right/control click’) menu. Another oddity of TextEdit lurks here though: make sure the cursor in the TextEdit window is not on an empty line, or you won’t see the ‘Share’ option in the menu.

5. (not so) Easy way to get line numbers!
This one is for the coders among you. We all know TextEdit suffers from the lack of a ‘View line numbers’ option (come on, Apple – ridiculous!). There’s a few tips here. First, if you don’t know already, you can use the hotkey ‘command-L’ to go to any given line number. You can also find the total number of lines by using the ‘Find’ feature. Hit ‘control-F’ first, then click the spotlight in the filter bar. Choose ‘Insert Pattern’ and search for line breaks. You’ll see the total number of line breaks in the far right of the filter bar:

You can add pseudo (see below for why I call them ‘pseudo’) line numbers with a bit of Awk magic. Open Terminal.app and paste this into the window:
awk '{print FNR "\t" $0}'
Next drag and drop the file you want to add line numbers to into the Terminal window. Don’t worry, nothing you do here will change the original file. Apply your new found skill from Tip 2 above, typing a space and then a pipe onto the end of the command:
| open -f
so the whole thing might look something like this
awk '{print FNR "\t" $0}' ~/Desktop/myfile.txt | open -f
and hit ‘return’. Hey presto, you have a TextEdit file with “line numbers”.

Now, here’s the catch. I called these ‘pseudo’ line numbers because unlike real line numbers, the numbers are actually part of the text. That means if you select some portion of the text that spans line numbers, the numbers will be selected and copied too. In other words, you can’t properly copy and paste text, so be sure to keep your original version of the file for future editing purposes (*EDIT: see a workaround for this provided by Caroline in the Comments below).
So yes, TextEdit is an oddball program; it is like no other I know of for containing a bizarre mix of unrelated yet strangely powerful features coupled with the inexplicable absence of basic functionality that any other program would be handicapped without. Nonetheless, I hope this post has given you some ideas of how you can use TextEdit to better effect in your work and play. 🙂
Featured picture: Purple Glass Text Edit Icon by ~Drawder
how to merge PDF files in OS X

How to merge PDFs into one file is something I have frequently been asked ever since Preview 6 made combining and saving PDFs a little more torturous than it needs to be (see here for the gory details). There are also various little apps that you can buy that will do this for you, but this is the kind of functionality I was talking about here that you can easily do for yourself with a bit of AppleScript magic.
Open up the AppleScript Editor by clicking on the Spotlight icon and typing Apples. Click on the AppleScript code below and copy the code from the pastebin page that opens up:

Paste the copied code into the AppleScript Editor, hit ‘Compile’ in the toolbar (or press ‘Command-K’) and save as either a .scrpt file or .app as I described in getting to grips with AppleScript.
Click on the script or app and enjoy merging those files to your hearts content (and for free)! 🙂
Featured picture: sliver by *ether
getting to grips with AppleScript

Learning AppleScript is probably the second most productive thing you can do (the first is learning the Terminal) to improve your Mac experience. You know all those utilities that you see in the Mac App Store, on MacUpdate and so on, with developers charging anything from 99 cents to $20? Well, many of those are just doing simple jobs that you can actually script yourself for free with a little learning of OS X’s unique scripting language (and, indeed, some of those apps have been built in exactly this way).
To keep this post short and practical, I’m going to leave aside the wider discussion of what AppleScript is (and isn’t), what it can (and can’t) do and all manner of other interesting but theoretical things, and instead give you a taste of what you can do with it. I’ll give you some references at the end where you can find out more and learn everything you need.
Let’s get straight to it. Open up the AppleScript Editor by opening the Spotlight search bar and typing Apples. Hit ‘return’ and you’ll be faced with a new editor window. Let’s type something in it.
tell application "Finder"
display dialog "What's your name?" default answer "" with icon note
set myName to the text returned of the result
delay 0.5
display dialog "Hi there, " & myName & "! Welcome to AppleScript!" with icon note
end tell
You could just copy and paste this into the editor, but I’m going to recommend that you don’t. There’s a good reason to take the tedious route and type it in yourself. Like learning a human language, learning a computer language requires using it, and using it repetitively. As you type in the language, you’ll get a feel for its syntax that you won’t get if you just copy and paste. And, unlike a real human language, learning a computer language’s syntax is pretty much the whole battle of mastering it.
After you’ve finished typing, press ‘Command-K’ on the keyboard. If you typed everything correctly, you see the script change into a multi-colored jamboree, like this:

If you weren’t so lucky, examine what you typed against what’s on the page here. Part of the frustration of any computer language is rooting out typos! Eventually, you get a feel for it and start to learn where to look first, based on the error messages you see. For now, you’ll have to peck and hunt (if you get really fed up, you can always go the cut-and-paste route!).
Assuming you’ve got your script to compile, now it’s time to run it and see what it does. Hit ‘Command-R’ (you can of course use the icons in the toolbar for compiling and running, too) and you should get this:

So go ahead, type your name!
OK, you’re getting the idea. Let’s try something different. Press Control-N to open up a clean editor window and enter this:
say "What's your name?" using "Vicki"
display dialog "My name is " default answer ""
set myName to the text returned of the result
say "His name is " & myName using "Vicki"
say "Welcome to AppleScript, " & myName using "Alex"
As before, press ‘Command-K’ to compile and ‘Command-R’ to run.
As you can see (or hear!), you can even have your computer continue a dialogue (with or without you!) using OS X’s many voices.
It’s worth noting that this feature is extremely useful if you’re learning a foreign language.
The Voices options in System Preferences > Dictation & Speech | Text to Speech | System Voice include many optional voices that you can download that will speak foreign text. You can paste the target text into a dialog box (like the ones you just created), and then listen and practice your language skills as repetitively as you desire. For those wanting to learn Thai, for example, download the voice “Narisa”. You can paste Thai script from the web or from the Dictionary.app (if you have the Thai extension installed) into a dialog box and have “Narisa” say it in a very passable Thai accent. Great for learning!
One last one. How about your own screencapture program? Tired of remembering those shortcut keybindings, or having to fire up Preview or SnagIt for the occasional screen grab? Why not have your own app in the Dock that captures the screen with a single click? Here’s how:
Open a new editor window and enter this (in this case, you might want to copy and paste it, for reasons I’ll explain shortly):
do shell script "screencapture -x ~/Desktop/" & time string of (current date) & ".png"
Do the Command-K thing, but then this time do Command-S instead of Command-R. From the resulting save box, change the File Format near the bottom of the box from ‘Script’ to ‘Application’. Give it a fancy name (ScreenGrab, say?) and save it in your Applications folder.

Once that’s all done, go to your Apps folder, grab the ScreenGrab.app and drag it to the Dock. Clicking on it puts a timestamped screenshot on your Desktop. If you’ve got multiple spaces open, flip between them clicking the ScreenGrab app. That’s one easy way to get a record of your entire set up! Cool, huh? (Don’t forget you can easily change the icon in the Dock for something more to your taste, as I explain here. Also, if you don’t like the / delimiters in the file name, use this version for your app.)
That last little script demonstrates one of AppleScript’s most powerful features: the ability to run other scripts (and apps). The command in the last script (and the reason why I suggested you paste it) was actually a Bash shell command (aka Terminal command), and we know those are very easy to mistype! AppleScript can actually run the commands of many apps from within its own scripts, putting the power of those apps at your disposal (and that includes some apps you’re very likely familiar with, like Word and Excel).
I hope this short intro has given you a taste for exploring AppleScript and finding out more. It’s an incredibly powerful language that you can use to enormous advantage, and profit. In order to do that, you’ll need to go on a learning adventure, but I promise, the following sources will make that relatively painless!
If you’re absolutely brand new to AppleScript, then the must-have starter’s book is
Once you’ve got through that you’ll be able to pretty much teach yourself the rest, picking it up from sources like
Other references you should consult once you’re up and running are
and don’t forget Apple’s own free guide:
AppleScript Language Guide which you can also download as a PDF for offline use.
Finally, my Mac OS X Technologies User Tip contains some of the above links as well as others that may be of interest.
Happy scripting! 🙂
Featured picture: wall and paper stencil by -endlesshate
how to recover disappearing Notes

There appears to be a bug in Apple’s Notes.app in OS X 10.8 that sometimes causes notes to disappear. If you need to recover the text of any note that’s gone missing on your mac, try pasting this into Terminal.app. It’s all one line, so copy and paste it as a whole, then hit ‘return’:
cd ~/Library/Containers/com.apple.Notes/Data/Library/Notes; strings NotesV1.storedata | grep body | open -f
The resulting TextEdit window can be searched or scrolled through for your missing text.
Due to this problem, a lot of people are giving up using Notes.app altogether and switching to alternatives like Evernote or nvALT. However, if for some reason you either want or need to keep using Notes, you might try saving that command above as its own little App that you can keep in the Dock (beats having to dig out or remember the Terminal code all the time).
To do so, we’re going to use the Applescript Editor. It lives in the /Applications/Utilities folder, but you can access it simply by clicking on Spotlight and typing Apples.
With the Editor open, paste this into the window (note, this is slightly different from the command above, as we have to tell AppleScript how to use the code):
do shell script "cd ~/Library/Containers/com.apple.Notes/Data/Library/Notes; strings NotesV1.storedata | grep body | open -f"
Press ‘Command-K’ to compile the script. If there are no errors, hit ‘Command-R’ to run it. If everything checks out fine, then hit ‘Command-S’ to bring up the ‘Save’ box. Change the ‘File Format:’ option at the bottom to ‘Application’, give the app a snappy name (‘findNotes’ ??), then choose your Applications folder as the destination before hitting ‘Save’.

The last thing to do is to go to your Applications folder and drag the icon to the Dock. Now, you can simply click the icon to produce the TextEdit window whenever a Note goes missing.
(Final tip: by the way, if you don’t like the Applescript icon in your Dock, you can always change it to an icon of your own! 🙂 ) )
Related posts:
getting to grips with AppleScript
sync notes between mac and android
FastTasks – download the free OS X utility from Applehelpwriter

