Blog Archives
how to find when the login password was last changed
Sometimes it can be useful to know when the user’s password was last changed. For example, you might want to enforce a policy of having users (or yourself!) change login passwords after a given period. Alternatively, if you or one of your users is experiencing login difficulties, you might want to check that the password hasn’t been changed unbeknownst to (or unremembered by) the user.
We can accomplish this from the command line (aka by using the Terminal.app) with the following one-liner (a raw text version is also available from my pastebin here):
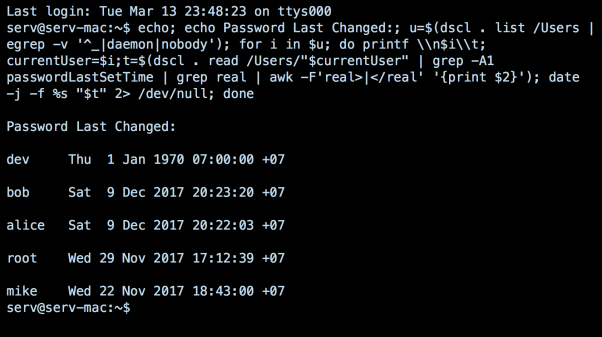
echo; echo Password Last Changed:; u=$(dscl . list /Users | egrep -v '^_|daemon|nobody'); for i in $u; do printf \\n$i\\t; currentUser=$i;t=$(dscl . read /Users/"$currentUser" | grep -A1 passwordLastSetTime | grep real | awk -F'real>|</real' '{print $2}'); date -j -f %s "$t" 2> /dev/null; done
Note the odd entry belonging to user ‘dev’ in the screenshot: the 1970 date is the start of unix time, and its appearance here indicates that the password hasn’t been changed since time began!…or, more seriously, that this password hasn’t been changed since the user account was created.
Enjoy! 🙂
how to reveal hidden users

With malware big in the news again, and evidence that at least one malware variant that targets macOS creates hidden users on the victim’s system, here’s a timely tip on how to check for unwelcome guests.
For this tip, we’re going to use the Terminal, which you can find in the /Applications/Utilities folder. If you’re not a frequent visitor to the land of the command line, you might want to see my 3-part series “Learning the Terminal”.
Regardless, the first thing we’re going to do in Terminal is about the simplest command you’ll ever type: w. Yep, type a single ‘w’ at the prompt and press return.

The w utility is a very quick way to see who’s currently logged on to your system and to ensure that there’s no surprises. You should see a couple of entries for yourself: one as ‘console’ and one as ‘s***’. The first represents a login through the usual Desktop GUI login window; the second is there because you just logged into Terminal. Anybody else logged in either via the command line (like a potential remote user) or the GUI will show up here. Notice that on my machine, there’s another user called ‘Developer’ who hasn’t logged in using the GUI, but is logged in via a command line interface. Note that ‘w’ returns the full user name, not the short one.
While the w utility will tell you if a hidden user is currently logged on, what if there’s a hidden user that isn’t active at the particular time you check? To look for those, we have a couple of options. First, we can use the dscl utility to list all users, and you might be surprised at how many there are:
dscl . -list /Users
Look to the end of that list where the names that don’t begin with an underscore start. ‘Daemon’, ‘Nobody’, ‘Root’ and ‘Guest’ are all standard system accounts, as are all those entries that begin with an underscore. Don’t worry about those. However, aside from those, you should only see names that you recognise. To make things a little easier, we can add another command to the dscl command to filter that list. Try this
dscl . -list /Users | grep -vE ‘_|root|nobody|daemon|Guest’
That should now only return the names of real users. There shouldn’t be any names in there you don’t recognise. In my example, I know the last three, but the first one ‘dev’ isn’t familiar to me. Note that unlike ‘w’, this command returns short user names, and that ‘dev’ looks very much like it’s the same account as ‘Developer’ that I saw earlier.

However, what we have so far is a list of users, not a list of hidden users. To see specifically if any accounts are hidden, we need a longer command:
defaults read /Library/Preferences/com.apple.loginwindow
Normally, when there are no hidden users, this will return the contents of a property list file that may look something like this:
{
GuestEnabled = 1;
OptimizerLastRunForBuild = 31898816;
OptimizerLastRunForSystem = 168494592;
SHOWFULLNAME = 1;
lastUser = loggedIn;
lastUserName = imackim;
}
That tells us that there’s no hidden users on this mac. How so? Because if there were it would return something very different, like this:
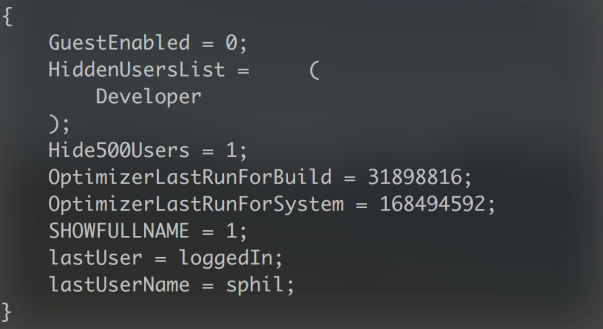
We can see not only the list of hidden users, but also that the preference for hiding users has been set to ‘1’ (in plist syntax, ‘1’ means true and ‘0’ means false). Note again that unlike the dscl command above, this returns the account’s full name, not the short user name.
If we’d like to ‘unhide’ that user, so the account appears in the login window GUI and in System Preferences’ ‘Users & Groups’ pane, we’ll need admin privileges. To do that, cut and paste the following into Terminal:
sudo defaults write /Library/Preferences/com.apple.loginwindow Hide500Users -bool NO
Supply an admin user password at the prompt and hit ‘return’, but type slowly as the display doesn’t register your key presses, which makes it easy to fat finger your password.
Next, we need to change the IsHidden key in dscl for that user, so
sudo dscl . -change /Users/dev IsHidden 1 0
In the above command, substitute my user’s shortname dev for the shortname of the user on your machine. The 1 0 is the old value (hidden) followed by the new value (unhidden). The line can be read as “change User dev’s IsHidden value from hidden to unhidden.”
For the more advanced
We can save ourselves some typing by putting much of this into a script so that we can run it whenever we want. If you’re not familiar with how to create and use bash scripts, take a look here.
Our script will basically do the same as all the commands we listed above (except changing the prefs for Hide500Users) in one fell swoop, and there’s a couple of little twists that I’ll leave as an exercise for the reader to figure out. To save on the typing, you can copy the whole script from my pastebin here.

The script’s output is illustrated in the shot at the top of this post.
Enjoy! 🙂
how to fix a ‘file in use’ problem

Sometimes when you try to eject a disk, unmount a volume or empty the Trash, you get caught out by some app or process that’s using the file and won’t release it. This is usually signalled by a warning dialog telling you the said file is “in use” or is “locked”.
Part of the difficulty of dealing with this problem is that the warning message may not actually tell you which process is hanging on to the file or give you any options on what to do next to solve the problem.
Sounds like a job for a quick bit of bash scripting then!
We’ll write a one-stop script that leverages a few different command line utilities to help us out here. First, our script will call fuser to report the processes using the file. Then it’ll use ps to get those processes’ ID numbers and, after asking us to confirm what we want to do, it’ll feed those to the kill command to quit them and release the file.
The whole script is available here.
To use it, save the script as a plain text file in the root of your home folder (alternatively, save it in an /sbin folder. You can do echo $PATH on the command line to get a list of places you can save it to if you’re not sure).
Secondly, give it executable permissions with
chmod +x <script name>
When the problem strikes, jump into Terminal and type
./<script name>
Add a space, then type or drag the file from Finder onto the command line and hit ‘return’ if necessary. The script will do the rest.
In the image below, I first gave my script (named ‘releaseFile’) exec permissions. Then I called it and chose ‘a’ to quit all processes holding on to the file (in this case, only one process).

Hope that helps. Enjoy! 🙂
how to fix the “Shellshock” security flaw

Apple have today released updates to Bash for Lion, Mountain Lion and Mavericks. All users are recommended to update to Bash version 3.2.53(1) to patch the recently found “Shellshock” exploit.
At the time of writing the update for 10.9 wasn’t coming through OS X’s built in ‘Software Update’. The updates are available for download and install here:
http://support.apple.com/kb/DL1767 – OS X Lion
http://support.apple.com/kb/DL1768 – OS X Mountain Lion
http://support.apple.com/kb/DL1769 – OS X Mavericks
learning the Terminal – Part Two

In the last post, we learned how to see all the contents of a folder – invisible and visible files – in the Terminal. However, most of us prefer working in the GUI, so this post is going to show you how to work a bit of Terminal magic to easily turn on and off your invisible files and folders in Finder and the desktop.
Open Terminal, and type or copy/paste the following to the command prompt:
defaults write com.apple.finder AppleShowAllFiles TRUE; killall Finder
(note that all commands in these posts should always be assumed to be case-sensitive).
Press Return.
Now switch out of Terminal and have a look at Finder or your desktop. You should see some ‘hidden’ files now in a sort of greyed-out 50% opacity (files like .DS_Store). If you can’t see such files, go back and check that you typed or copied the entire command correctly.
Assuming you can now see your invisible files in Finder, switch back to Terminal. Press the up arrow key on your keyboard. Notice that the last command you typed reappears.
That’s a handy trick to remember. You can move between your previous commands with the up arrow and down arrow keys to save time re-typing or modifying commands.
In this case, we want to use the last command again, but we also want to modify it. Use the left arrow key to move the cursor back to “True” and then use delete to remove “True”. Leave the cursor where the letter ‘T” was and type FALSE. Make sure the semi-colon ; is still there.
Press Return — you don’t need to move the cursor to the end of the line as you would with a word processor. You can hit Return no matter where the cursor is in the command line and it will execute (or try to) whatever is typed on the whole of the command line.
Now, if you switch back to Finder or the desktop, you should see that all your hidden files have disappeared again.
OK, now that we have tested these commands to check that they work, let’s do something a bit more useful with them.
Switch back to Terminal. Type
^FALSE^TRUE
and press Return.
Wow! Did you see what just happened? You substituted the word “FALSE” from the last command with the word “TRUE” and executed the entire command. In other words, you just made your hidden files visible again! Go and look at the desktop and you’ll see that your invisible files just returned. Try it again. Switch back to Finder and type
^TRUE^FALSE
to replace the word “TRUE” in the last command with the word “FALSE”. Hit Return to execute it.
Using the pattern ^error^correction is a great way to both correct commands you type incorrectly and to run two commands one after the other that have only one term or option different.
Back in Terminal, hit the up arrow to bring the last command back onto the command line. This time, I want you to hit control-A on your keyboard. Notice that this brings the cursor to the start of the command line, which is what we want as we’re going to type in a new command before the “defaults…” part.
With the cursor at the beginning of the line, type
echo
and a space. Then type a double quotation mark right next to the ‘d’ of ‘defaults, so the beginning part looks like this
echo “defaults…
(the ellipsis or ‘…’ is used here just to show that the command continues and should not be in your actual command line)
On the keyboard, press control-E.
This takes the cursor to the end of the command line (remember: control-A to go to the start, control-E to go to the end).
Type another double-quotation mark right after the word ‘Finder’ so the ending looks like this
… ; killall Finder”
Now hit the spacebar once, and type a double right angle-bracket
>>
Hit the spacebar again and type
.bash_profile
The entire command should look like this:
echo “defaults write com.apple.finder AppleShowAllFiles FALSE; killall Finder” >> .bash_profile
Now press Return. Type
^FALSE^TRUE
and press Return one more time.
What did we just do?
To see what you did, type
emacs .bash_profile
As you can see, after testing those two commands on the command line, we’ve now sent them to the .bash_profile file, saving us the job of typing them out again (and possibly making an error when we do so). However, we can’t leave the commands like that – if we do, then they will run every time we log into the Terminal. Rather, we want to use these commands to define functions, just like we did last time with ‘show’ and ‘up’.
To do that, press control-L on the keyboard, then use the down arrow key to bring the cursor to the beginning of the first line with a ‘defaults’ command on it.
Press Return. Press the up arrow once, then type
function hide_all
Press Return and in the new line created type
{
Use the down arrow key to move the cursor down to the line below the “Defaults…FALSE” line and press Return.
In the new line created type
}
Then press Return. Type
function show_all
Press Return and type
{
Use the down arrow key to move the cursor below the “Defaults…TRUE” command. (If you can’t go below the last typed line, then on the keyboard press control-E to move the cursor to the end of the line, the press Return).
Then type
}
Check that the whole thing looks like this:

Once you’re satisfied, hold down the control key while pressing first the x and then c keys. Press y when prompted to confirm the save. You should be returned to the command line. Type
exit
to logout. Then press command-W and command-N to close and reopen Terminal.
What did we do this time?
We just made some new, easy-to-remember commands to show and hide our hidden files in Finder and the desktop. On the way, we learned how to append commands to files using the >> function, as well as how to move the cursor to the beginning and end of a line using ‘control-A’ and ‘control-E’ respectively. We also learned how to recall previous commands on the command line using the arrow keys and how to correct or modify previous commands using the ^error^correction pattern.
Wow, you’ve come a long way in two short tutorials!
To test out what you just did, type
show_all
then press Return.
Switch to Finder and there’s all your hidden files! To make them invisible again, switch back to Terminal and type
hide_all
then Return.
From now on, whenever you want to see your hidden files, just use the show_all command in Terminal. Hide them again with hide_all. 😃
SUMMARY
control-A – places the cursor at the beginning of the command line (also works in emacs editor)
control-E – places the cursor at the end of the command line (also works in emacs editor)
control-L – on the command line, this clears the screen (equivalent to the ‘clear’ command); in emacs, this places the caret inside the editor allowing you to edit (=insert point)
up & down keyboard arrows – moves through history of commands
^error^correction – replaces the term after the first ^ with the term given after the second ^ in the previous command, then executes the entire command
echo – sends the following string or command to the specified file (if no file is specified, the string will output back to your terminal screen. In other words, if you type echo hello, the Terminal will print “Hello” on the next line; hence the term ‘echo’! )
Related Posts:
learning the Terminal – Part One
learning the Terminal – Part Three
learning the Terminal – Part Four
how to change all Desktop backgrounds
Fasttasks – a utility for ten common terminal tasks

