Blog Archives
how to log out another user without logging in – updated
Posted: 10th May, 2013
If you have multiple accounts on your mac, you may sometimes wish to log out one or more of those accounts without actually having to sign in to them first via the fast user switching menu. There’s a couple of ways to do this. First, if the issue is just that you want to shutdown the computer, you can log out all users by entering an Admin user name and password when this dialogue automatically appears after hitting ‘Shutdown’ (it won’t appear if no other users are logged on):

However, there are times when you may just want a quick way to log out users without shutting down and without wasting time logging in to their accounts first. Be aware that in killing a user’s process without logging in to the account first, any data in that user’s account that is not already saved (or autosaved) will be lost. If you’re sure that’s not a problem, then follow this short procedure manually or use the AppleScript version that follows:
1. Open up Activity Monitor (/Applications/Utilities/Activity Monitor.app)
2. Use the drop down menu in the Task bar to change the menu to ‘Other User Processes’ (note: you can use ‘All Processes’ in the menu if you wish, but that is less safe as it makes it possible to accidentally click on your own user process in step 4 below!).
3. In the filter bar, type loginwindow.

4. From the list of users that show up, for each one that you wish to log out:
- click on its row in the Activity Monitor pane to highlight the process
- press the ‘Quit Process’ icon in the Task bar above
- from the resulting dialogue window, click ‘Force Quit’
- supply an Admin password if requested.
Repeat for any further accounts that you wish to quit. (Tip: If you want to kill the ‘Guest User Account’, you’ll need to switch back to ‘All Processes’ and kill the loginwindow assigned to the ‘root’ user).
And that’s it. Your unwanted users are now logged out!🙂
Update 30th April, 2016: If you get tired of doing this manually, you can log out all other real users at once with this AppleScript:
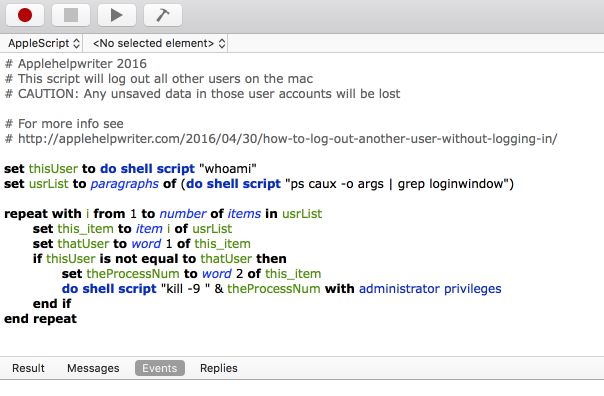
set thisUser to do shell script "whoami"set usrList to paragraphs of (do shell script "ps caux -o args | grep loginwindow")repeat with i from 1 to number of items in usrListset this_item to item i of usrListset thatUser to word 1 of this_itemif thisUser is not equal to thatUser thenset theProcessNum to word 2 of this_itemdo shell script "kill -9 " & theProcessNum with administrator privilegesend ifend repeat
taming Versions…sort of

If you’re working with large files in Keynote, Pages, Numbers or other Versions-supported programs, and making multiple changes at regular intervals, Versions could just be eating up your hard disk and causing a big-slow down in your work.
If you want to reclaim all that space and speed things back up, go delete the .documentrevisions-V100 folder in the root directory of your hard disk, the place where Lion stores all your document versions. Be aware that this means you will lose ALL Version history for ALL your Version-supported applications. If you are comfortable with that, read on…
You need to do four things: enable the root user, show hidden files, change the permissions on the folder and finally check the folder’s contents and delete it. Here’s how:
1. Show hidden files
In Terminal (Applications > Utilities) type
defaults write com.apple.finder AppleShowAllFiles YES
Press ‘Return’, then type
killall Finder
2. Enable root user
Go to > System Preferences…Users & Groups
Click ‘Login Options’
Click ‘Network Account Server: Join’
In the resulting dialogue box, ignore the text input and click the button below, ‘Open Directory Utility’
Click the padlock at the bottom of the next box and enter your admin password.
At the top menu bar of Directory Utility, choose the ‘Edit’ menu > Enable Root User
If you are requested to set a password for it, set the same one as your Admin password (this ensures you won’t forget it).
Log out through > Log out (username), then log back in with user ‘root’ and the password you just enabled.
3. Change Permissions
Now go look in the root directory of your hard disk.
You should see a greyed out folder called ‘DocumentRevisions-V100’. If it has a ‘no entry’ icon on it, click the folder and press ‘Cmd-i’ on the keyboard (or right click the folder and choose ‘Get info’).
Scroll down to the bottom of the box, click the padlock, and enter your root password if necessary. Change all the permissions to ‘read & write’, and click on the ‘gear wheel/cog’ and choose ‘Apply to enclosed items’ if it appears.
Choose ‘OK’ in the warning dialogue box.
4. Deleting Versions history
Now you are ready to go and look inside the Versions directory. I recommend you have a nosey about and check the file sizes both of the folder itself and of the individual contents. Now, here’s a warning: you can’t just delete some of the contents in the folder. If you do, in about 24hrs Lion will see that the folder is corrupt and mark the whole thing as ‘bad’ and make a new Versions (.DocumentRevisions-V100) folder. What this means is that you will lose access to Versions in the UI, but you won’t get your disk space back as it won’t delete the ‘bad’ folder.
The only option is to either lock the thing back up and leave it alone, OR delete the entire .DocumentRevisions-V100 folder with all its contents.
Restart your computer logging in as your usual user.
Lion will make a new, empty DocumentRevisions-V100 folder to replace the one you deleted and start filling it up with versions you make from then on. You’ll have reclaimed your disk space (and removed all your previous versions), but you’ll need to keep doing the same process at regular intervals.
NOTES
a. No, this does not affect your original saves or any duplicates. Only the versions.
b. Messing about as a root user can have serious consequences if you mess with other stuff. Do as the instructions say and nothing else unless you know what you’re doing. After you’ve deleted the Versions folder and emptied the Trash, go back to Directory Utility > Edit and disable the root user.
c. To stop seeing the hidden files, type the same command as given in 1. above into Terminal, but change ‘YES’ to ‘NO’. Don’t forget to do the ‘killall’ command afterwards.
d. If you have trouble saving documents without re-booting after deleting .DocumentRevisions-V100, try this script from Apple Discussions user Yvan. This will recreate a clean (i.e., empty) Versions folder every time you reboot, saving you the hassle of regularly cleaning out the .DocumentRevision-V100 folder (as well as preventing any ‘Save’ issues.)

