Blog Archives
how to log out another user without logging in – updated
Posted: 10th May, 2013
If you have multiple accounts on your mac, you may sometimes wish to log out one or more of those accounts without actually having to sign in to them first via the fast user switching menu. There’s a couple of ways to do this. First, if the issue is just that you want to shutdown the computer, you can log out all users by entering an Admin user name and password when this dialogue automatically appears after hitting ‘Shutdown’ (it won’t appear if no other users are logged on):

However, there are times when you may just want a quick way to log out users without shutting down and without wasting time logging in to their accounts first. Be aware that in killing a user’s process without logging in to the account first, any data in that user’s account that is not already saved (or autosaved) will be lost. If you’re sure that’s not a problem, then follow this short procedure manually or use the AppleScript version that follows:
1. Open up Activity Monitor (/Applications/Utilities/Activity Monitor.app)
2. Use the drop down menu in the Task bar to change the menu to ‘Other User Processes’ (note: you can use ‘All Processes’ in the menu if you wish, but that is less safe as it makes it possible to accidentally click on your own user process in step 4 below!).
3. In the filter bar, type loginwindow.

4. From the list of users that show up, for each one that you wish to log out:
- click on its row in the Activity Monitor pane to highlight the process
- press the ‘Quit Process’ icon in the Task bar above
- from the resulting dialogue window, click ‘Force Quit’
- supply an Admin password if requested.
Repeat for any further accounts that you wish to quit. (Tip: If you want to kill the ‘Guest User Account’, you’ll need to switch back to ‘All Processes’ and kill the loginwindow assigned to the ‘root’ user).
And that’s it. Your unwanted users are now logged out!🙂
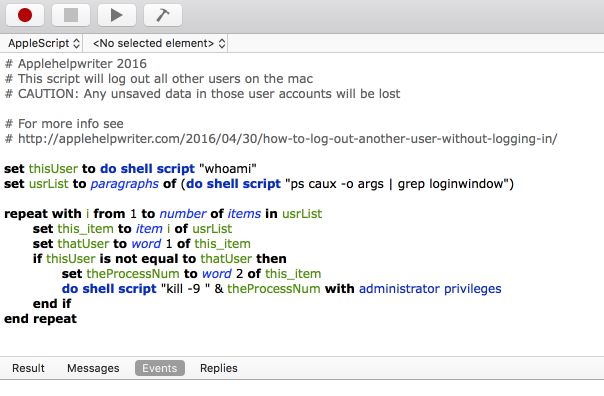
Update 30th April, 2016: If you get tired of doing this manually, you can log out all other real users at once with this AppleScript:
set thisUser to do shell script "whoami"set usrList to paragraphs of (do shell script "ps caux -o args | grep loginwindow")repeat with i from 1 to number of items in usrListset this_item to item i of usrListset thatUser to word 1 of this_itemif thisUser is not equal to thatUser thenset theProcessNum to word 2 of this_itemdo shell script "kill -9 " & theProcessNum with administrator privilegesend ifend repeat
‘delete’ doesn’t send files to Trash

If you find deleting a file deletes it immediately without sending it to the Trash first, you may need to fix permisssions on your Trash folder.
Open Terminal (Applications > Utilities > Terminal.app) and type
ls -alF
Scroll up if necessary to the beginning of the list and you should see a couple of folders whose names begin with a dot.
.Trash
.Trashes
Ignore .Trashes, but look at the permissions on .Trash, they should read like this (also see the pic above):
drwx- – – – – – <your_username> staff (size) (date) .Trash/
Ignore the numbers, but if the permissions are different or the username is not your account username, then do the following:
At the Terminal command prompt, type the following, replacing ‘your_username’ with (yep, you guessed it…) your username.
sudo chown -R your_username .Trash
For example, if my user name is ‘SnowLpd’ I would type
sudo chown -R SnowLpd .Trash
Then press ‘Return’. You will need to enter your password, which will be invisible when you type it (so type carefully). Now go and test your ‘delete’ function to see if the problem is cured. 🙂
Related Posts

