Blog Archives
how to log out another user without logging in – updated
Posted: 10th May, 2013
If you have multiple accounts on your mac, you may sometimes wish to log out one or more of those accounts without actually having to sign in to them first via the fast user switching menu. There’s a couple of ways to do this. First, if the issue is just that you want to shutdown the computer, you can log out all users by entering an Admin user name and password when this dialogue automatically appears after hitting ‘Shutdown’ (it won’t appear if no other users are logged on):

However, there are times when you may just want a quick way to log out users without shutting down and without wasting time logging in to their accounts first. Be aware that in killing a user’s process without logging in to the account first, any data in that user’s account that is not already saved (or autosaved) will be lost. If you’re sure that’s not a problem, then follow this short procedure manually or use the AppleScript version that follows:
1. Open up Activity Monitor (/Applications/Utilities/Activity Monitor.app)
2. Use the drop down menu in the Task bar to change the menu to ‘Other User Processes’ (note: you can use ‘All Processes’ in the menu if you wish, but that is less safe as it makes it possible to accidentally click on your own user process in step 4 below!).
3. In the filter bar, type loginwindow.

4. From the list of users that show up, for each one that you wish to log out:
- click on its row in the Activity Monitor pane to highlight the process
- press the ‘Quit Process’ icon in the Task bar above
- from the resulting dialogue window, click ‘Force Quit’
- supply an Admin password if requested.
Repeat for any further accounts that you wish to quit. (Tip: If you want to kill the ‘Guest User Account’, you’ll need to switch back to ‘All Processes’ and kill the loginwindow assigned to the ‘root’ user).
And that’s it. Your unwanted users are now logged out!🙂
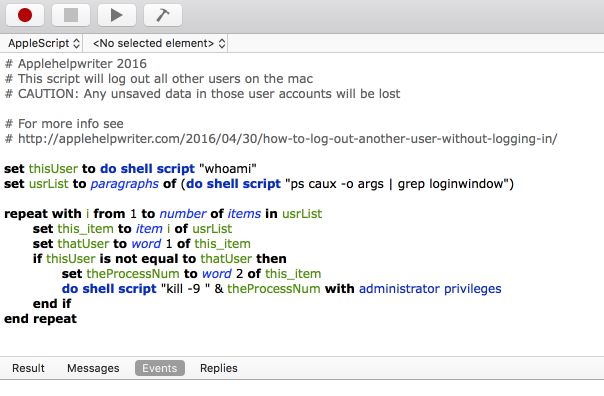
Update 30th April, 2016: If you get tired of doing this manually, you can log out all other real users at once with this AppleScript:
set thisUser to do shell script "whoami"set usrList to paragraphs of (do shell script "ps caux -o args | grep loginwindow")repeat with i from 1 to number of items in usrListset this_item to item i of usrListset thatUser to word 1 of this_itemif thisUser is not equal to thatUser thenset theProcessNum to word 2 of this_itemdo shell script "kill -9 " & theProcessNum with administrator privilegesend ifend repeat
how to recover disappearing Notes

There appears to be a bug in Apple’s Notes.app in OS X 10.8 that sometimes causes notes to disappear. If you need to recover the text of any note that’s gone missing on your mac, try pasting this into Terminal.app. It’s all one line, so copy and paste it as a whole, then hit ‘return’:
cd ~/Library/Containers/com.apple.Notes/Data/Library/Notes; strings NotesV1.storedata | grep body | open -f
The resulting TextEdit window can be searched or scrolled through for your missing text.
Due to this problem, a lot of people are giving up using Notes.app altogether and switching to alternatives like Evernote or nvALT. However, if for some reason you either want or need to keep using Notes, you might try saving that command above as its own little App that you can keep in the Dock (beats having to dig out or remember the Terminal code all the time).
To do so, we’re going to use the Applescript Editor. It lives in the /Applications/Utilities folder, but you can access it simply by clicking on Spotlight and typing Apples.
With the Editor open, paste this into the window (note, this is slightly different from the command above, as we have to tell AppleScript how to use the code):
do shell script "cd ~/Library/Containers/com.apple.Notes/Data/Library/Notes; strings NotesV1.storedata | grep body | open -f"
Press ‘Command-K’ to compile the script. If there are no errors, hit ‘Command-R’ to run it. If everything checks out fine, then hit ‘Command-S’ to bring up the ‘Save’ box. Change the ‘File Format:’ option at the bottom to ‘Application’, give the app a snappy name (‘findNotes’ ??), then choose your Applications folder as the destination before hitting ‘Save’.

The last thing to do is to go to your Applications folder and drag the icon to the Dock. Now, you can simply click the icon to produce the TextEdit window whenever a Note goes missing.
(Final tip: by the way, if you don’t like the Applescript icon in your Dock, you can always change it to an icon of your own! 🙂 ) )
Related posts:
getting to grips with AppleScript
sync notes between mac and android
FastTasks – download the free OS X utility from Applehelpwriter
will Mountain Lion work on my old mac?

If you’re wondering whether your machine can be upgraded to run OS X 10.8 Mountain Lion, you can check the full list of supported models below.
To find out which model of mac you’ve got, hold down the option key on your keyboard and select
> About This Mac
Check the ‘Model Identifier’ against this list:
MacBookPro4,1
Macmini5,3
Macmini5,2
Macmini5,1
MacBookPro5,1
MacPro4,1
MacBookPro5,2
iMac8,1
MacBookPro5,4
MacBookAir4,2
iMac11,1
iMac11,2
iMac11,3
MacBookPro8,2
MacBookPro3,1
MacPro5,1
iMac9,1
Macmini3,1
MacBookPro6,1
iMac12,2
iMac12,1
MacBook5,1
MacBook5,2
iMac10,1
MacBookPro7,1
MacBookAir4,1
MacBookPro5,3
MacBookPro6,2
MacBookPro5,5
MacBookAir3,1
MacBookAir3,2
Macmini4,1
Xserve3,1
MacBookAir2,1
MacBookPro8,1
MacBook7,1
MacBookPro8,3
iMac7,1
MacBook6,1
MacPro3,1
Of course, just because your machine’s listed, it doesn’t mean it will necessary meet all the specifications, so be sure to check the tech specs too.
🙂
Mountain Lion’s hidden wallpapers

If you’ve been enjoying Mountain Lion’s beautiful new Screensaver images, like National Geographic, Aerial and Cosmos, you might like to have some of those images as wallpapers for your Desktops in Mission Control.
First, from a Finder window, navigate all the way to here:
[Macintosh HD] > System > Library > Frameworks > Screensaver.framework > Versions > A > Resources > Default Collections
Select the four folders inside and then press ‘command’ and ‘c’ on the keyboard. Navigate to your Pictures folder from any Finder window’s sidebar and press ‘command’ and ‘v’ to copy the folders and images.
You can now add them to your collection of available Desktop pictures by clicking the Desktop tab in
> System Preferences… > Desktop & Screensaver
and clicking the plus ‘+’ button in the box underneath the list of folders on the left. From the window that pops up, choose ‘Pictures > National Geographic-1’and hit ‘Choose’.
Repeat for any of the others (Aerial, Cosmos, Nature Patterns) that you want to add. 🙂
Related Posts
get ready for Mountain Lion

With the last seven days of July upon us, the suspense is just killing some people waiting for the release of Apple’s latest version of OS X, 10.8 Mountain Lion. While rumours abound for just about every conceivable day left being the ‘official’ release date (with the 25th being the most popular, it seems), the sensible are making sure they’re prepared. So here’s a few things to do both before and on the big day:
1. Check the tech specs
Check out the tech specs for Mountain Lion and the list of supported machines to make sure you can run it on your current system. If you are upgrading from Snow Leopard, you should also check out will my old apps work with Lion?.
2. Run Software Update
Make sure you have the latest version of everything by running
> Software Update
before you upgrade. This will help to cut down any compatibility problems when installing Mountain Lion.
3. Backup your current install
Without a doubt the biggest cause of trouble and frustration with every OS release is among users who didn’t backup their systems before trying to install the new one. Like Lion, Mountain Lion will be delivered as a download from the App Store, and while this method is certainly convenient, corrupted downloads are not uncommon. Moreover, even when the install proceeds as expected, you want to be able to get back to your previous system if you find things are not to your liking. An OS installation is like performing major surgery on your computer and the chances of complications are always a significant risk. As the old boy scout saying goes ‘Be Prepared’. Backup, backup, backup.
4. Remove everything from your Login Items.
For Lion users, that’s
> System Preferences…> Users & Groups | Login Items
If you’re upgrading from Snow Leopard 10.6.8, go to
> System Preferences…> Accounts | Login Items
There’s a couple of reasons for doing this, but mainly it’s to ensure that you can log in without difficulty. Login Items are one of the main causes of OS problems at the best of times, but with a major upgrade like this, you don’t want any incompatible software choking the system from booting up. See Steps 8 & 9 below about re-activating your Login Items after the installation.
5. Uninstall AV software & other utilities
If you have Sophos, VirusBarrier, iAntiVirus, F-Secure, or similar uninstall these prior to upgrading. After upgrading, if you must use them, look for updates. Uninstall MacKeeper, Little Snitch, LogMeIn or any other 3rd party utility that runs prior to user login.
6. Be prepared for slow download times
Apple’s servers will be hotter than a forest fire on release day, so you can expect download times to be pretty poor. At the very least, connect your computer to your router via ethernet cable rather than wifi – that’ll at least help push things along a bit faster at your end. If you can do it from the office or somewhere else that has a lot more bandwidth than the usual home connection, do so.
7. Save the installer
After the download completes the installer will run automatically. Do NOT click ‘Install’, but instead quit it. Then go to your Applications folder and copy the ‘Install OS X Mountain Lion .app’ and save it to your Downloads folder or somewhere else. Then you can run the installer in your Applications folder.
The reason for doing this is that when you install Mountain Lion the Install app in your Applications folder will self-delete. If the install shouldn’t work for some reason the first time round, you won’t have to go through the whole tiresome wait of a download from the App store again if you save a copy to your Downloads folder.
8. Update 3rd-party apps
Assuming Mountain Lion boots up just fine, the first thing you’re going to want to do (after having a nose around, of course!) is update your 3rd party apps. Start off by opening the App store to see if any that you’ve sourced from there have updates waiting for you. After that, start up all the main apps that you normally use and use their ‘Check for Updates’ option (usually in the Apps main menu), or contact the developers through their websites. If you use Parallels 7, you will need to update that before trying to run your virtual machines.
9. Test your Login Items apps
In particular, you’re going to want to test out the apps that you want to put back in your Login Items, before you put them back in there. Run each app and play around with the system for a couple of hours before deciding to put it back in your Login Items list. If you notice any weird behaviour with Finder, the Dock or Desktop backgrounds, problems with wifi or graphics, chances are one or more of your 3rd party apps needs updating to work with Mountain Lion. If there is no update yet, stop using that app till one becomes available or find an alternative. In general, it’s always best to keep Login Items down to a bare minimum. Running apps at login is a sure fire way to slow down boot up times.
10. Check back with Applehelpwriter.com
As always, I’ll be here with tips on how to get the most out of OS X and how to solve some common problems. See you then!🙂
Camtasia 2 reviewed

I’ve been a long time user of TechSmith’s Camtasia screen capture software, primarily for two reasons: ease of use combined with a rich set of editing features. Camtasia for Mac 2 strengthens this product in a number of significant ways although there are still some usability issues that need addressing, as well as room for further improvements in the feature set. In this review, I’ll walk you through what Camtasia has to offer as well as indicate the kind of uses where it excels as an aid to the technical communicator. Read the review…
how to get Spaces and Expose on Lion

(Note: If you’ve just installed Mountain Lion, be sure to run ‘Check for Updates’ by clicking on the Total Spaces icon in the menubar)
Yes, it’s possible to bring back most of those beloved Snow Leopard features that Apple unwisely did away with in Lion, and – if you get them now – for free with 3rd-party apps. I’ve been hunting down a way to get rid of all the Mission Control behaviour on my trackpad, to return the app-switcher trackpad gesture, the 2-dimensional Spaces grid and, of course, Expose.
OK, so here’s how I finally got all those lovely Snow features back to Lion. You’re going to need two free tools (free for now, so don’t hang around…), namely:
Total Spaces from http://totalspaces.binaryage.com
Better Touch Tool from http://blog.boastr.net
Once you’ve downloaded these you’re half way there, but you’ve got to complete the job by setting them up properly. In the remainder of this post, I’ll walk you through how I’ve got them set up. Try it this way first, then once you’ve got the hang of it, you can tweak it to your own style. 🙂
1. Total Spaces > Preferences:

</p?


In BetterTouchTool Preferences:

In > System Preferences > Trackpad:


Finally, disable the Mission Control hotkeys in > System Preferences > Keyboard | Keyboard Shortcuts:

With this configuration, you change spaces by holding down ‘option’ and any of the arrow keys to move round a grid of 9 spaces (you can have more or less if you want in TotalSpaces prefs).
You see all spaces (like the screenshot at the top of the page) by holding down ‘command-option-left_arrow’.
You bring up Expose with a 4-finger downward swipe on the trackpad (note: Expose is unavailable while an app is in Full Screen mode), and the App Switcher with a 3-finger tap.
Oh, and Mission Control? Drag it off the Dock to about centre screen and release. Should you ever need it you can always go and double-click on it in your Applications folder, but otherwise you’ll soon forget it ever existed.
And that’s it — proper Spaces, Expose, and Trackpad functionality restored! 🙂
‘delete’ doesn’t send files to Trash

If you find deleting a file deletes it immediately without sending it to the Trash first, you may need to fix permisssions on your Trash folder.
Open Terminal (Applications > Utilities > Terminal.app) and type
ls -alF
Scroll up if necessary to the beginning of the list and you should see a couple of folders whose names begin with a dot.
.Trash
.Trashes
Ignore .Trashes, but look at the permissions on .Trash, they should read like this (also see the pic above):
drwx- – – – – – <your_username> staff (size) (date) .Trash/
Ignore the numbers, but if the permissions are different or the username is not your account username, then do the following:
At the Terminal command prompt, type the following, replacing ‘your_username’ with (yep, you guessed it…) your username.
sudo chown -R your_username .Trash
For example, if my user name is ‘SnowLpd’ I would type
sudo chown -R SnowLpd .Trash
Then press ‘Return’. You will need to enter your password, which will be invisible when you type it (so type carefully). Now go and test your ‘delete’ function to see if the problem is cured. 🙂
Related Posts

