how to fix permissions (Permissions Pt 2)
Posted by philastokes
(This post continues from here on file permission problems.)
Did you know there are two levels of permissions on your mac? User level and system level. Most discussions of fixing permissions only discuss the latter, but you may also need to fix the former (also sometimes called ‘ACLs’) for some problems caused by upgrading Lion on top of Snow Leopard.
4. System Level Permissions
You can safely repair your system level permissions at any time, and doing it once in a while is a good maintenance activity even if you’re not experiencing any problems. It’s also the first thing to do as soon as you notice any problems with apps launching, file access problems, or your computer seems to be running unusually slow.
How to do it:
— 1. Go to Applications > Utilities > Disk Utility.app and double click the app to open it.
— 2. Click your HDD icon in the left column (if you have more than one, click the one that contains your startup disk).
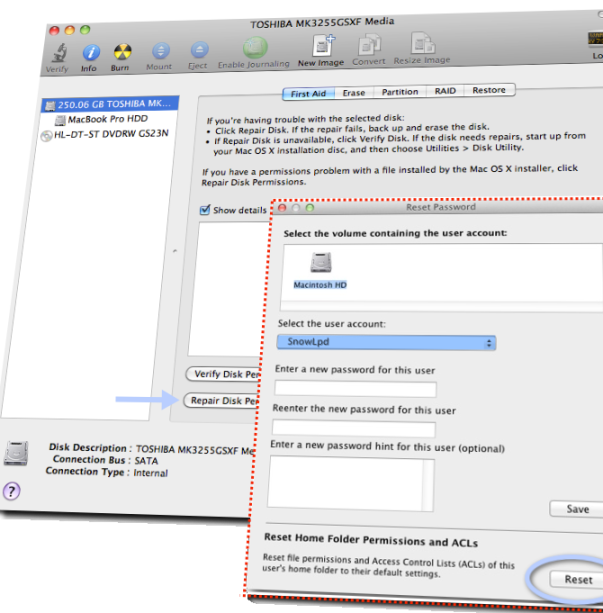
— 3. If it is not already selected, click on the ‘First Aid’ tab. Choose the ‘Repair Disk Permissions’ button near the bottom of the window (see the larger of the two windows in the screenshot above).
— 4. Wait for the process to finish (it could take ten minutes or more), then quit Disk Utility. You can ignore most of the error messages that appear unless they’re in red.
5. User Level Permissions (ACLs)
These permissions apply only to your ‘Home’ folder and its contents, and if you have more than one user you will need to do this procedure for any user experiencing a problem. However, unlike system level permissions, repairing ACLs isn’t something you should do unless there is a specific issue to be solved. Problems that this repair might help with include permission conflicts inherited from an earlier Snow Leopard or Leopard installation, such as Finder always asking for your password when you try to delete, move or copy a file.
To reset the ACLs in Lion: (To reset the ACLs in Leopard/Snow Leopard have a look here.)
— 1. Remove the current ACLs by opening Terminal.app (Applications > Utilities > Terminal.app) and copy and pasting this command:
sudo chmod -RN ~
Press return. You’ll be asked for your password. Notice that when you type it in you won’t see anything on the screen. Press return again. If you get an error message, you probably didn’t type in your password correctly. Repeat this step till its accepted. It will take some time to complete. Then paste this command into Terminal also:
sudo chown -R `id -un` ~
and press return. Enter your password again if necessary.
— 2. Press the Power button on the computer and choose ‘Restart’. When the screen goes blank, hold down the ‘command’ and ‘R’ keys on the keyboard until you hear the start up chime. In the menu bar at the top, choose Utilities > Terminal
— 3. At the Terminal prompt type
resetpassword
Then hit ‘Return’
— 4. Forget about resetting your password; what you’re looking for is your hard disk icon at the top. Hit that, and then from the drop-down menu select your user account.
— 5. Go to the bottom of the dialogue window – leaving all password fields blank – and choose ‘Reset’ under ‘Reset Home Folder Permissions and ACLs’ (see the smaller of the two windows in the screenshot above, inside the red dotted line).
— 6. When the process finishes, quit everything and restart your Mac. 🙂
Related Posts
How to Troubleshoot Your Mac with FT2
can’t create kext cache error
FastTasks – download the free OS X utility app from Applehelpwriter
About philastokes
Independent Software Developer, Technical Writer and Researcher at SentinelOne. Explaining the unexplainable with images, video and text. Scripting anything imaginable in AppleScript, Bash, Python and Swift.Posted on November 29, 2011, in Mobile and tagged ACL, admin, ask, can't, cannot, copy, delete, finder, fix, move, password, permissions, problem, reset, trash, why. Bookmark the permalink. Leave a comment.


Leave a comment
Comments 0