Blog Archives
ejecting some, all or just specified disks

We posted this one liner some time ago in response to the fact that you can’t actually get the Finder to eject all volumes on multiple drives at the same time.
However, I thought it’d be good to have a slightly more useful version. In this version, you can choose individual volumes or all volumes from a list. Optionally, you could also include collections.

Suppose for example you wanted to eject one volume from one physical drive along with one from another and two from a third? To do that, just uncomment these two lines and supply your own volume names in the collection_1 list:
--if you want to create an item that groups some volumes together uncomment the following two lines:# set collection_1 to {"Archive 1.5TB", "BUFFALO 500GB", "This disk", "That disk", "Another disk"} -- supply as many disks names you want to group together here# set diskList to {"All Disks", "Disk Group 1"}
Then, when you run the script, choose ‘Disk Group 1’ to eject that collection of volumes. You could of course adapt the script to include more than one collection.
You can get the full script from my pastebin here.
Enjoy! 🙂
how to deal with the Finder bugs in El Capitan

A number of 3rd party apps, including my own DetectX and FastTasks 2, offer a GUI way to hide/reveal invisible files in the Finder.
The standard method for doing this, either in Terminal or in code (via NSTask) has always been
defaults write com.apple.finder AppleShowAllFiles -bool true; killall Finder.
In every version of OS X from 10.6 thru to 10.10 this works as expected. In 10.11 I see a reproducible though not always consistent bug when using any GUI-wrapped app to toggle this Finder setting. The bug basically ends up with Finder showing the opposite of both what the app shows and what ‘defaults read’ shows (see image above; the value should be ‘1’ when invisible files are visible).
We believe a related bug is that Finder sometimes fails to show the new version of an app in the Finder preview after the app has been updated.
In both cases, there’s a couple of ways to deal with it (albeit temporary until Apple applies a proper cure):
i. log out then log in
ii. issue a ‘killall Finder’ on the command line
iii. purge the RAM then toggle the setting again in whatever app you’re using to toggle invisible files.

If you’re running FastTasks 2, you can purge the RAM from the FT2 menu, avoiding a trip to the Terminal. For DetectX, use the ‘Reset Hidden Files’ function located in the Preferences.
🙂
the new Merge All Windows command

One of my favourite new commands in Mavericks is Finder’s ‘Merge All Windows’. You can find this in the Finder’s menu bar Window menu, but note that it’ll be greyed out if you only have one Finder window open (one of my other new favourites is ⌘ ^ space. Try it in Text Edit or Safari’s search bar, but I digress…:p).
To see ‘Merge All Windows’ in action, open up two or more Finder windows. Throw one or two on different Desktop spaces for good measure, then hit the ‘Merge All Windows’ command.
Yes, you get all your open windows from wherever they’re distributed slamdunked into one window with multiple tabs. If, like me, you work across multiple monitors and have multiple desktop spaces on each, Finder windows can rapidly start to multiply and this command is a real boon.
In fact, I like the ‘Merge All Windows’ command so much I even made a shortcut for it in System Preferences > Keyboard > Shortcuts (see the screenshot at the top of the page)
One final trick while we’re on the subject of tabs in Finder windows, note that you can open any folder item in your Sidebar into a new tab automatically by holding down the ⌘ ‘Command’ key and clicking on the Sidebar folder item.
🙂
move selection

It should be a simple thing to select a few files and sling them into your chosen folder. But OS X requires that you have to first open a Finder window, select the destination, then go all the way back to the location of the files you want to move and drag them in.
Wouldn’t it be much simpler if you could just select the files you want to move first, then choose the location without all the kerfuffle? Sure it would!
🙂
If you agree, then this is the script for you. I use it to move screenshots (of which I take a lot) from the Desktop to whatever location I want to store them in with a simple hotkey command (set up in Services or via FastScripts), control-command-M (‘M’ for move, of course!).
--start
tell application "Finder"
try
get selection
if selection is not equal to {} then
move selection to (choose folder)
else
display dialog "Nothing selected to move!" buttons {"OK"} default button "OK" with icon 2
end if
on error
set selection to {}
end try
end tell
--eof
🙂
Featured Picture: cul-de-sac by ~MichalTokarczuk
how to see recently accessed files

While professional troubleshooters will use software like fseventer or the Instruments.app that comes as part of Xcode, there’s an easy way for anyone to see which files have recently been accessed on their Mac.
1. Open any Finder window and hit ‘command-F’.
2. Click the ‘Kind’ button and choose ‘Other’ at the bottom of the menu:

3. Next, scroll down the list till you see ‘System files’ and check the box and hit ‘OK’.
4. Change the button that says ‘aren’t included’ to ‘are included’.
5. Now hit the little ‘+’ button over on the right side of the window.
6. Again, change ‘Kind’, this time to ‘Last Modified’ and change ‘within last’ to ‘today’.

7. Finally, go to Finder > View menu at the top and choose ‘Arrange By > Date Last Opened’.
You can save the search in the Sidebar for convenience. Give it a more useful name like ‘latest changes’ or ‘fs events’ (“fs” stands for filesystem) and click on it whenever you need to check what’s just happened to your Mac! 🙂

eject all your disks at once

Here’s a simple AppleScript one-liner that can be useful if, like me, you have several disks connected to your laptop at home or the office and you need to get up and go quickly.
1. Open the AppleScript Editor.app by typing Apples in the Spotlight search bar and hitting ‘return’.
2. Copy the following code into the editor window:

3. Hit ‘Command-K’ to compile and ensure you didn’t make any mistakes. Fix any typos if it doesn’t compile and try again. Save the script to your Desktop as ‘EjectAll.scpt’

4. If you don’t already have the Scripts menubar icon visible in your menu bar, hit ‘command ,’ (that’s the Command key and the comma key) and check the ‘Show Script menu in menu bar’ item in the General pane of AppleScript’s Preferences window.
5. From the Scripts menu, choose ‘Open Scripts Folder > Open Computer Scripts Folder’ and drag ‘EjectAll.scpt’ from the Desktop to the Computer Scripts Folder. You’ll need to authenticate with an Admin password to complete the move.
And that’s it. Now whenever you want to eject every disk with one simple operation, just hit the Script menu icon and click on ‘EjectAll’. 🙂
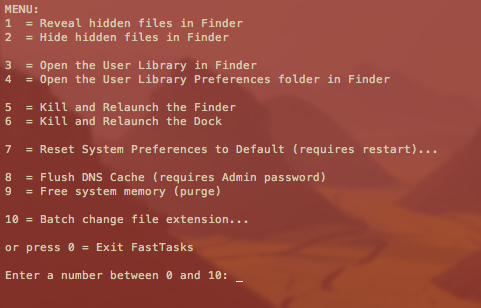
FastTasks – a utility for ten common terminal tasks
Update: I’ve since written a nice GUI version in AppleScript-ObjectiveC which you can download for free here»
If you find you only ever go into Terminal to perform a small number of tasks that can’t be done (easily or at all) in the OS X graphical user interface, this little utility could be for you. It allows you to run a number of common tasks such as
reveal and hide hidden folders
batch change the extension on multiple files
purge system free memory
flush the DNS cache
restore system preferences to defaults
without having to bother looking up the commands. You will, however, have to do a little Terminal ‘dirty work’ to initially get the utility up and running (it’s a shell script which you need to turn into an executable file), but step by step instructions are all provided. 😉
Here’s what you do:
1. Copy or download the entire script from here FastTasks code and paste it into a text editor (TextEdit or Tincta, my favourite, will do).
2. Save the file as plain text onto your desktop with the name ‘FastTasks’
3. Open Terminal.app and paste this command:
sudo chmod 755 ~/Desktop/FastTasks
and press ‘return’ on your keyboard. You’ll be asked for you Admin password which will be invisible when you type it. If you’re wondering what you’ve just done, you’ve just changed that plain text file into an executable program.
4. Paste the next line into Terminal.app
cp ~/Desktop/FastTasks /etc/bin/FastTasks
then press ‘return’ on your keyboard.
As a result of that last command, you can now use the script by typing ‘FastTasks’ in a Terminal window or by double-clicking ‘FastTasks’ in Finder or on the Desktop.
5. By the way, if the Terminal window remains open after FastTasks has completed, change the following settings in Terminal’s Preferences:
Preferences > Settings > Shell > When the shell exits…
and change the dropdown menu from ‘Don’t close the window’ to ‘Close if the shell exited cleanly’.
And that’s it. You can now run any of the tasks in the menu without having to know the commands! 🙂
Fast tips for using FastTasks
1. FastTasks is actually quickest to run by using Spotlight and Terminal.
If you have the Spotlight hotkey set up (usually cmd-space by default), simply open Spotlight, and type ‘Term’ and hit ‘return’ on the keyboard. At the Terminal prompt type ‘fasttasks’ and hit ‘return’.2. Running it this way has another benefit. If you want to run FastTasks again after performing one task, just hit the ‘up’ arrow on the keyboard (hitting the ‘up’ arrow repeatedly will take you through previous commands entered at the Terminal prompt. Use the ‘down’ arrow to go forward), then ‘return’ when you see ‘fasttasks’ on the command line.
‘delete’ doesn’t send files to Trash

If you find deleting a file deletes it immediately without sending it to the Trash first, you may need to fix permisssions on your Trash folder.
Open Terminal (Applications > Utilities > Terminal.app) and type
ls -alF
Scroll up if necessary to the beginning of the list and you should see a couple of folders whose names begin with a dot.
.Trash
.Trashes
Ignore .Trashes, but look at the permissions on .Trash, they should read like this (also see the pic above):
drwx- – – – – – <your_username> staff (size) (date) .Trash/
Ignore the numbers, but if the permissions are different or the username is not your account username, then do the following:
At the Terminal command prompt, type the following, replacing ‘your_username’ with (yep, you guessed it…) your username.
sudo chown -R your_username .Trash
For example, if my user name is ‘SnowLpd’ I would type
sudo chown -R SnowLpd .Trash
Then press ‘Return’. You will need to enter your password, which will be invisible when you type it (so type carefully). Now go and test your ‘delete’ function to see if the problem is cured. 🙂
Related Posts
how to fix permissions (Permissions Pt 2)

(This post continues from here on file permission problems.)
Did you know there are two levels of permissions on your mac? User level and system level. Most discussions of fixing permissions only discuss the latter, but you may also need to fix the former (also sometimes called ‘ACLs’) for some problems caused by upgrading Lion on top of Snow Leopard.
4. System Level Permissions
You can safely repair your system level permissions at any time, and doing it once in a while is a good maintenance activity even if you’re not experiencing any problems. It’s also the first thing to do as soon as you notice any problems with apps launching, file access problems, or your computer seems to be running unusually slow.
How to do it:
— 1. Go to Applications > Utilities > Disk Utility.app and double click the app to open it.
— 2. Click your HDD icon in the left column (if you have more than one, click the one that contains your startup disk).
— 3. If it is not already selected, click on the ‘First Aid’ tab. Choose the ‘Repair Disk Permissions’ button near the bottom of the window (see the larger of the two windows in the screenshot above).
— 4. Wait for the process to finish (it could take ten minutes or more), then quit Disk Utility. You can ignore most of the error messages that appear unless they’re in red.
5. User Level Permissions (ACLs)
These permissions apply only to your ‘Home’ folder and its contents, and if you have more than one user you will need to do this procedure for any user experiencing a problem. However, unlike system level permissions, repairing ACLs isn’t something you should do unless there is a specific issue to be solved. Problems that this repair might help with include permission conflicts inherited from an earlier Snow Leopard or Leopard installation, such as Finder always asking for your password when you try to delete, move or copy a file.
To reset the ACLs in Lion: (To reset the ACLs in Leopard/Snow Leopard have a look here.)
— 1. Remove the current ACLs by opening Terminal.app (Applications > Utilities > Terminal.app) and copy and pasting this command:
sudo chmod -RN ~
Press return. You’ll be asked for your password. Notice that when you type it in you won’t see anything on the screen. Press return again. If you get an error message, you probably didn’t type in your password correctly. Repeat this step till its accepted. It will take some time to complete. Then paste this command into Terminal also:
sudo chown -R `id -un` ~
and press return. Enter your password again if necessary.
— 2. Press the Power button on the computer and choose ‘Restart’. When the screen goes blank, hold down the ‘command’ and ‘R’ keys on the keyboard until you hear the start up chime. In the menu bar at the top, choose Utilities > Terminal
— 3. At the Terminal prompt type
resetpassword
Then hit ‘Return’
— 4. Forget about resetting your password; what you’re looking for is your hard disk icon at the top. Hit that, and then from the drop-down menu select your user account.
— 5. Go to the bottom of the dialogue window – leaving all password fields blank – and choose ‘Reset’ under ‘Reset Home Folder Permissions and ACLs’ (see the smaller of the two windows in the screenshot above, inside the red dotted line).
— 6. When the process finishes, quit everything and restart your Mac. 🙂
Related Posts
How to Troubleshoot Your Mac with FT2
can’t create kext cache error
FastTasks – download the free OS X utility app from Applehelpwriter

