Blog Archives
hello, applescript 3: (don’t?) tell me to run
Continuing where we left off at the end of User In, User Out, let’s build on our knowledge of getting user input and using conditionals.
Script 7
In this script, we’re going to query the user for some information, and if that information meets a certain test, we’ll give the user one answer, if it doesn’t we’ll give them another. Kind of like a mini-quiz game program. There’s lots of new stuff in this script, but don’t be put off. Just bang it out on the keyboad, fix any typos if it won’t compile, and run it. Run it at least three times choosing a different button each time. We’ll go through it line by line after you’ve had a play around with it.

Line 1 assigns a string literal (the lovely “Loser”) to a variable, heReply. We’re doing two things here. We’re first declaring a variable that we’ll want to use later in the script, and we’re also initialising it with a default value. “Loser” is one of two possible values we’ll want this variable to have later, so we’ll set this as the default now, which means the variable will always have this value when we use it unless we change it later in the script.
Most of Line 2 should be familiar to you now, except that we’ve added a third button and a default value for the answer. We’ve also added a default button, in this case 3. To understand what the default button parameter does run the script with value 1, and then again with value 2.
As you will notice, the number refers to one of the buttons defined in the buttons list, where 1 is the first item in the list and the left most button, and 3 is the last item in the list and the right most button. The parameter determines which button has focus (and therefore responds to the return key on the keyboard).

If you’ve already tried experimenting with 4 buttons, you’ll see that the compiler complains that a maximum of 3 buttons is allowed. That’s not strictly true, but we’ll save that trick for later in the series.
Note: Lists in AppleScript, unlike most other modern programming languages, are not zero-indexed. The first item is item 1, not item 0 as it would be in Python, C, Swift and so on.
If you prefer you can also refer to buttons by their name instead of their index. This helps improve readability of your code and makes it clearer which button was intended as the default. To refer to the button by name, you would write the parameter like this:
default button "Sure?"Line 3 should be familiar to you, but refer back to Script 6 in the previous post if you need a reminder.
Line 4 begins an if statement block that contains another if statement block (again, see Script 6), but there’s also something new here: the else condition. This says that if our condition in Line 4 isn’t met, do whatever’s in the else block starting at Line 10.
If the condition in Line 4 is met, however, then Line 6 offers a further condition: if the user typed in “Phil”, then Line 7 says change the value of the variable theReply from “Loser” to “Winner”. Note, particularly, that if this condition is not met, then the value of theReply will be “Loser” when it’s called later in the script.
Line 8 ends the inner if statement block.
Line 9 now says: display the dialog to the user, showing them the value of whatever theReply is currently set to (either “Winner” or the default “Loser”). Note that the same value is used to set the title.
Line 10 starts the else block. This will be triggered if the user doesn’t choose either “Cancel” – which would end the script – or “Sure?” – which would trigger the first condition – when Line 2 is executed.
We don’t need to put in a specific test for “Cancel” because “Cancel” will automatically end the script with
error -128. However, as we’ll see later in the series, sometimes it can be useful to catch “Cancel” in theifblock too, in order to execute certain commands before the script quits.
Line 11 may look a bit mysterious; this is your first introduction to AppleScript’s most pervasive control statement. tell is how you send a command to a particular object in AppleScript. If you’ve ever done any Object-oriented programming, another way of expressing the same idea is to say tell allows you to target a message toward an object. In this case the object is me — a built-in AppleScript keyword that refers to the script itself. So,
tell me to runsays “send the run message to the script”.
There’s an easy (and inaccurate) way to understand what that means, and a hard (and accurate) way. For now, we’re going to go easy so that the learning curve doesn’t get too steep. In this context, we will say that run means “go back to Line 1 and begin execution of the script again”.
Every time you choose “Try Again”, the script goes back to Line 1 and repeats itself until you choose one of the other answers.
Where we are: so far!
In this post, we’ve been introduced to AppleScript’s list class, consolidated our knowledge of display dialogs and if statements, and had our first taste of tell, me, and run. These concepts will require more elucidation and, most importantly, more practice, all of which are coming up!
In the next post hello applescript 4: shelling out, we’ll work with these concepts some more and build on them to produce our first practical scripts. Be sure to follow Applehelpwriter to be notified when the post is published.
See you there! 
For extra credit:
This week’s extras
1. Modify Script 7’s inner if statement so that if the text returned contains your name, theReply is “Winner”; if the text contains “Phil”, theReply is set to “Runner Up”. Any other name should produce the default reply “Loser”.
There are in fact two ways to solve this challenge, see if you can produce both. For help, look up else if in the Control Statements Reference section of the AppleScript documentation.
Solutions from last time
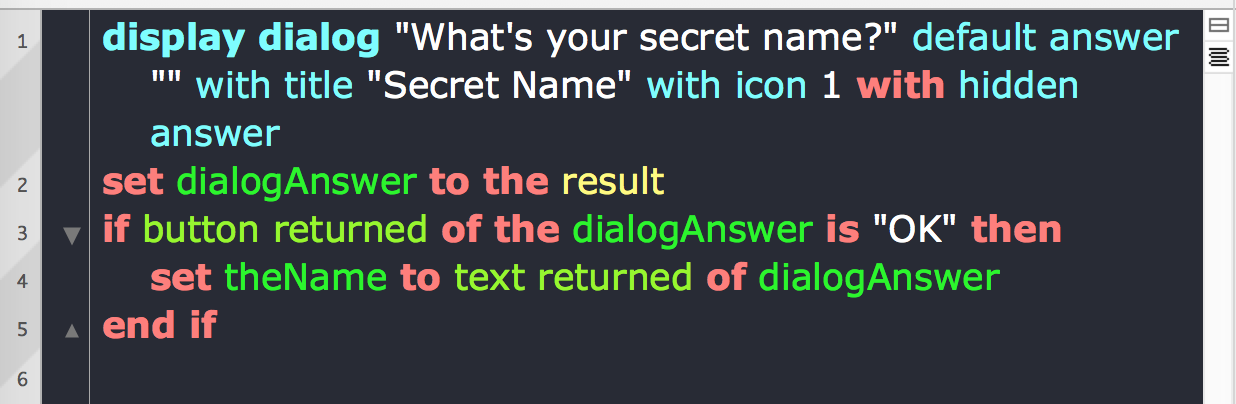
1. Use the hidden answer parameter:
2. In the second exercise, we posed a number of questions. The easiest way to find out about the parameters for a command is to use Script Debugger’s Dictionary viewer, which you can access by clicking on the Window menu (not, confusingly, the Dictionary menu!) and choosing ‘Dictionary’.

Also, don’t forget to use the AppleScript documentation, which I’ve linked to multiple times in this and earlier posts. It’s a great source of information, hampered somewhat by the lack of an effective search feature on Apple’s site. An older, pdf version of the doc which you can search can be downloaded by clicking this link, and is also available from here. Bear in mind, though, that Apple’s online docs contain some information that the older pdf doesn’t.
We’ll leave the other questions open for now, as they’ll be coming up in later posts!
hello, applescript: what’s the use?

In the first of a series of AppleScript tutorials, this post explains why you might want to consider learning AppleScript.
What’s the use?
If you’re not sure whether you want to invest time in learning AppleScript, this post is for you. Here I’ll outline four good reasons to learn AppleScript. I’m sure they’re not the only ones, but they’re the main ones that come to my mind as a daily user of the language. If, after reading this post, you want to give it a try, be sure to follow this series, as we’ll be quickly moving on with hands-on examples and detailed explanations that will rapidly turn you into an AppleScript power user! At the end of this post, I’ll briefly discuss tools, so that you’re ready to get started when the next in this series, User In, User Out, is published.
1. Automation
First of all, AppleScript can interact with other applications. That means it can get one app to perform a function and pipe the result to another app to perform a different function that the first app didn’t have. There’s no limit to the number of apps and functions you can chain together in this way (other than your computer’s resources). Why would you want to chain apps together like that?
To achieve things that none of those apps can do on their own.
Imagine this scenario (scripts for this appear later in this series of posts): Suppose you run a small business and customer orders come in via email. With an AppleScript, you can have those emails automatically scanned, the customers’ order details extracted, and your Excel or Numbers spreadsheet updated accordingly. You could then have the product details forwarded to another person (Packaging?) and the customer details forwarded to a third (Marketing?). Your script could tell Word, or Pages, to print out a label, and tell Mail to now send an automated response back to the customer. There is no one program on your computer that can accomplish all that, but you can, with AppleScript.

Once set up, none of this requires any interaction on your part. You build the script, test it, and add it as a Mail rule. The rest happens automatically when the mail arrives in your Inbox; you don’t need to monitor it. You can go on holiday. This ability to automate is what makes AppleScript so unique.
2. Integration
AppleScript’s ability to chain or pipe application functions together is similar to the Unix command line ability to pipe utilities together, only it allows you to do it with full-blown applications. But you can use it to connect those applications to command line utilities, too. This is the second thing that makes AppleScript unique: integration across the entire macOS environment. You can even chain it to other programming languages.

For example, I could have AppleScript run some Python code, take the result and run that through a Perl script, and take the result of that and display it to the user (or myself) in a dialog box or notification (or send an email, or a Chat message, etc). And I can do that without having to mess about worrying how to create graphical user interface elements like you might do with Tcl/Tk (if you know what that is; if you don’t, forget it!).
The relationship between AppleScript and the shell is symbiotic. If you’re a shell diehard, you’ll be happy to know that you can actually create and execute AppleScripts in .sh files without ever going near an AppleScript editor.
3. Power
AppleScript can not only harness the power of other scripting languages, it can harness the power of macOS itself. The AppleScript-ObjectiveC bridge means you could, if you wanted to – and many programmers do – create full on native macOS Cocoa apps without ever getting into the intricacies of Xcode projects and workspaces. You can even code sign your AppleScript apps from within the script editor.

4. God-mode
Finally, AppleScript can drive the user interface and even drive apps that haven’t been specifically made to support AppleScript. If you find yourself repeatedly doing the same actions in the UI to achieve a task, you can cut-out the middle-man (you!) and tell AppleScript to click those buttons, move those windows or copy that text from Safari and paste it into Pages instead of laboriously and repeatedly doing it yourself. This creates an eery effect not unlike those old-time pianolas.
Look no hands!

Where’s the catch? To achieve the level of automation and time-saving we’ve been discussing, you’re going to have to invest some time up front learning how to script. It won’t always be easy, and you won’t always be happy that it’s not easy, but that’s the price of investing in learning anything.
If you’re ready to learn this amazing, unique language, let’s get tooled up!
Tools
I’ll keep this short. You can learn AppleScript the hard way using the built-in Script Editor, or you can learn AppleScript the easier way by using the free 3rd-party editor Script Debugger.
Script Debugger gives you a full-featured trial for 20 days, and after that if you don’t want to buy it you lose some of the more advanced features but you can use the rest indefinitely anyway. It works in rather the same way as BBEdit’s trial does, if you’re familiar with that.
If you save scripts in Script Debugger (so long as they’re not debug scripts, more on that later), you can run (and edit) them in Script Editor and vice versa. In other words, you’re not locked in to a proprietary tool.
I’m not even going to consider that you’d choose to learn AppleScript the hard way since the easier way is free, so all the examples in this series of posts will use Script Debugger. However, unless otherwise marked as SD-only or SD-paid-only, you can do all of the examples in the series in either tool.
Don’t worry, at this point, about how to use either Script Editor or Script Debugger. We’ll get into that in the next post: hello, applescript 2: User In, User Out. Follow Applehelpwriter to be notified when a new post is published.
🙂
how to add a hotkey for the ‘About’ menu

I often need to check version numbers of apps I’m using from the ‘About’ menu. However, unlike ‘Preferences’, ‘Hide’ and ‘Quit’, the About menu doesn’t have a default hotkey.
Normally, it’s no problem to add a menu hotkey through System Preferences > Keyboard > Shortcuts, but you can’t do that for the ‘About’ menu. That’s because the Shortcuts requires an exact menu name, and the ‘About’ menu is actually postfixed with the name of each app, so there’s no way to specify the menu universally.
However, we can solve the problem with a little AppleScript, which we can then make into a Service (via Automator) or add to a script runner like FastScripts.
The script is quite simple, but does require System Events, and that means you need to make sure that System Events itself or the app that’s going to run the script has Assistive Access allowed in System Preferences’ Privacy pane.

The raw text for the script is available from my pastebin here.
Enjoy! 🙂
BBEdit: remove whitespace with one click
I often need to process lists of ‘dirty text’ which can contain lots of whitespace, new lines and so on. Fortunately, BBEdit allows you to run AppleScripts directly from its Script menu, which means we can define lots of useful little text processing scripts and have them ready to hand. I’ve got several that I’ll share over the next few posts, but probably the most oft-used of them is this one for removing whitespace.
Here’s what the script looks like. You can download the source from my pastebin here.


And here’s a little giffy showing it at work:
Share and enjoy! 🙂
how to script with Objective-C

Is it me, or is AppleScript experiencing something of an Indian Summer? It seems everywhere I go, people are talking more about macOS automation, AppleScript and even Apple’s curious hybrid syntax AppleScriptObjC (ASObjC).
Of course, some people have suffered miserably at the hands of AppleScript in the past, and even though the thought of scripting with access to Cocoa APIs through Objective-C is tempting, they fear the AppleScript side of it.
If that’s you, bear in mind that AppleScriptObjC isn’t really “AppleScript + Objective-C” at all. It is actually just a dialect of Objective-C that will be accepted in the (Apple)Script Editor and can be run by an instance of the AppleScript component. In plainer English, you can use Objective-C in an AppleScript without any AppleScript whatsoever!
The point of doing so would be that one could package Objective-C code in a .scpt file (or scptd bundle or AppleScript .app), and also mix whatever scripting language you prefer with calls to Cocoa’s APIs.*
The problem that using ASObjC presents anyone familiar with Objective-C is how to translate ‘pure’ Objective-C into the dialect that Script Editor (and other applescript runners like FastScripts, Keyboard Maestro, Automator, etc) can understand. If you use LateNight Software’s Script Debugger for scripting, you’ll already know that the work is done for you by the app’s built-in code completion. If you’re battling on in Apple’s default Script Editor, you’ll need to do the translation manually.
By way of example, then, here’s some original Objective-C, and below it, a translation that would work in Script Editor:
Objective CNSString *aString = @"hello";NSString *bString = @" world";
aString = [aString stringByAppendingString:bString];
NSUserNotification *notif = [[NSUserNotification alloc] init];notif.informativeText = aString;[[NSUserNotificationCenter defaultUserNotificationCenter] deliverNotification:notif];
AppleScriptObjCset aString to NSString's stringWithString:"hello"set bString to NSString's stringWithString:" world"
set aString to aString's stringByAppendingString:bString
set notif to NSUserNotification's alloc's initset notif's informativeText to aStringNSUserNotificationCenter's defaultUserNotificationCenter()'s deliverNotification:notif
As you can see, there’s a direct 1-to-1 correspondence, with the 6 statements in Objective-C paralleled by the 6 statements in AppleScriptObjC.
The main peculiarity is the use of possessive word forms and that variable attribution is done by using "set X to Y" rather than "X = Y". Type declaration is done via the idiom 'set <var> to <NSObject>'s <class init method>', which returns an instance of the object just as it would normally. You call instance methods by putting the instance in front of the method just as you would in regular Objective-C (e.g, see line 3 of the examples).
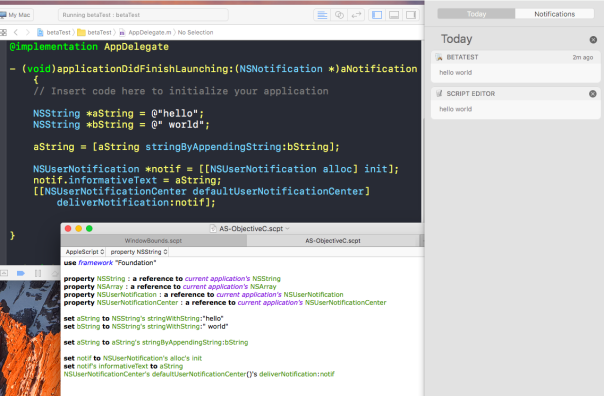
As you can see in the screenshot below showing Xcode and Script Editor, they work in the same way. You’ll notice in Script Editor there is a 'use' statement (equivalent to Objective-C’s ‘import’), and there’s also a whole load of property statements. These latter are peculiar to the ASObjC translation, and don’t have a counterpart in pure Objective-C. All you need to know about these is for each kind of Objective-C object you want to use (NSString, NSArray, whatever*), you’ll want a property statement for it at the beginning of the script. The statement always has the same form:
property <NSObject> : a reference to current application's < NSObject>
I think the best way to think of ASObjC was recently summed up by Sal Saghoian, when he said that ASObjC is “…the ultimate duct tape. You can do anything you want with ASObjC. You own the computer.”
Enjoy! 🙂
*not all Cocoa frameworks nor all Objective-C objects can be bridged to, but pretty much all the most useful ones are available.
Further reading:
– Applehelpwriter’s review of Script Debugger 6
– how to quickly toggle Swift Compiler warnings
Picture credits: Top image adapted from MilleniumBirdge by lesogard
Navigation markers added to SD6
The recent update to Script Debugger 6 added a subtle, but much-needed new feature.
Now, scripters can take advantage of the same kind of navigation markers familiar to users of Xcode (pragma marks) to quickly navigate to user-defined sections of the script.
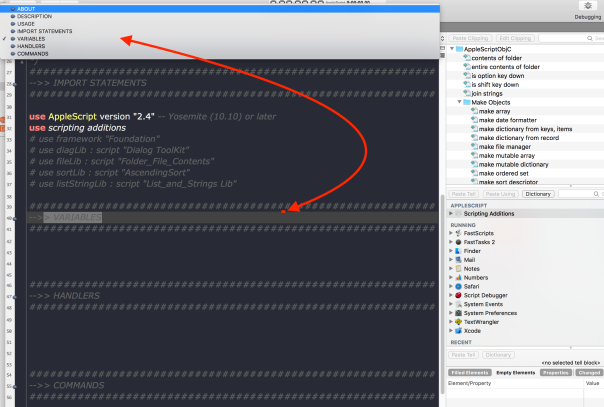
Scripters can now create a marker with a double-dash and double arrow marker, followed by whatever label they choose.
-->> myMarker here!
For me, this is a great boon, and I’ve changed all the section headings in my templates to the new navigation marker syntax, meaning I can easily jump to the various sections from the Navigation bar at the top of the script.
Nice! 🙂
applescript: remove characters from a string

One of the things I’m often finding myself doing is trying to remove characters from strings, particularly html codes and other markdown clutter. Rather than laboriously messing around with offsets and the like, we can make our lives simpler by making a quick handler that leverages Cocoa’s stringByReplacingOccurrencesOfString method.
For example, suppose you’ve got a sourceString containing something like this

We can strip all the tags out by calling our handler like this, once for the opening tags and again for the closing tags. Note how the variable names have changed in the second call:

The beauty of this is it doesn’t just remove one instance of the tag, it removes all occurrences of them, so this handler is a real life-saver when you’ve got a whole page of markdown to clean.
To achieve this you’ll need to add a couple of declarations to the top of your script, as well as the handler:
Here’s the declarations you’ll need:
use scripting additionsuse framework "Foundation"property NSString : a reference to current application's NSString
Here’s the code for the handler:
on remove:remove_string fromString:source_stringset s_String to NSString's stringWithString:source_stringset r_String to NSString's stringWithString:remove_stringreturn s_String's stringByReplacingOccurrencesOfString:r_String withString:""end remove:fromString:
Enjoy! 🙂
ejecting some, all or just specified disks

We posted this one liner some time ago in response to the fact that you can’t actually get the Finder to eject all volumes on multiple drives at the same time.
However, I thought it’d be good to have a slightly more useful version. In this version, you can choose individual volumes or all volumes from a list. Optionally, you could also include collections.

Suppose for example you wanted to eject one volume from one physical drive along with one from another and two from a third? To do that, just uncomment these two lines and supply your own volume names in the collection_1 list:
--if you want to create an item that groups some volumes together uncomment the following two lines:# set collection_1 to {"Archive 1.5TB", "BUFFALO 500GB", "This disk", "That disk", "Another disk"} -- supply as many disks names you want to group together here# set diskList to {"All Disks", "Disk Group 1"}
Then, when you run the script, choose ‘Disk Group 1’ to eject that collection of volumes. You could of course adapt the script to include more than one collection.
You can get the full script from my pastebin here.
Enjoy! 🙂
Script Debugger 6: the complete review

It feels like cheating. When you’ve spent pretty much your entire AppleScripting life behind the wheel of Apple’s austere Script Editor application, taking Script Debugger 6 out for a 20-day spin feels like someone’s let you in on a secret you’re not supposed to know. Hurdles you’ve taught yourself to clear – through considerable effort, frustration and no small amount of bloody-minded tenacity – are removed before you get to them; obstacles you’ve habitually steered around or avoided have disappeared, and dark holes of AppleScript mystery appear, in the light shone on them by SD6, to be not the menacing entities you once feared but new friends that offer ways to do things faster and more effectively. The secret that Script Debugger seems to lay bare is that AppleScripting doesn’t have to be as painful as we’ve been conditioned to believe. And that does feel like a cheat. Read the full review…

