Blog Archives
Xcode 10: where did snippets go?

Xcode 10 beta has got some nice new touches (as well as the return of some old favourites, hello again the code folding ribbon!), but one that might disorientate you at first is the absence of the Snippets, Objects and Media libraries that typically live in the bottom right corner of IB in the Utilities sidebar.
I’ve always found this position and size to be somewhat awkward, so I’m overjoyed to find that Apple have now given the libraries their own floating panel. You can access the libraries either with the keyboard shortcut Command-Shift-L, or by clicking the button that’s now in the top-right of the toolbar, just to the left of the editor buttons.
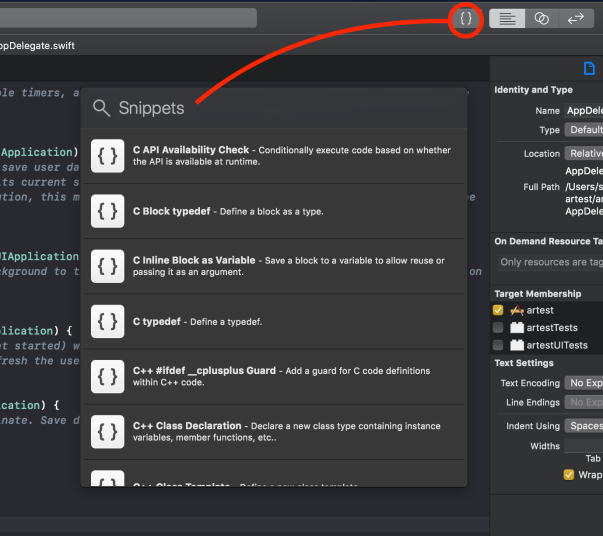
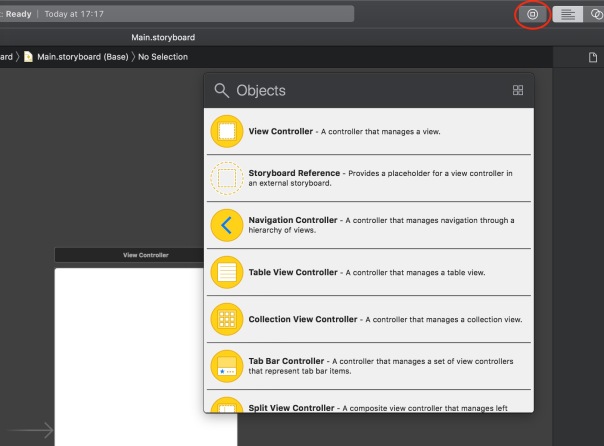
The new button is context-sensitive, so you’ll notice you can’t access code snippets when in Interface Builder, and you can’t access the Objects library when you’re in the text editor. Makes sense to me!
Enjoy! 😀
how to quickly toggle Swift Compiler warnings

I thought I’d share this little AppleScript for anyone working with Xcode 8.3.3 and using Swift.
One of the things I find intrusive are the constant Swift Compiler warnings while I’m actually in the middle of writing a block of code (e.g, ‘…value was never used consider replacing…’). Well, yeah, it’s not been used *yet* …grrr!
However, turning off compiler warnings isn’t something I want to do either. It’s too easy to go into the build settings, turn them off, do a bit of coding, take a break, do a bit more coding…oh, three thousand lines later and I suddenly realize why Xcode hasn’t been correcting my mistakes all afternoon!
This script allows you to quickly and easily toggle the warnings from a hotkey, and just gives you a gentle reminder as to what you’ve done. Of course that won’t stop you forgetting, but assigning a hotkey for this script makes it painless to just turn warnings off and back on again as soon as you’ve got past whatever bit of code the compiler was complaining about.

Xcode unfortunately doesn’t have its own scripts menu, so in order to assign the script a hotkey, you’ll need to either make it into a Service with Automator or use a script runner like Red Sweater’s FastScripts.
#starton sendNotification(aVal)display notification "Suppress Warnings was set to " & aVal with title "Swift Compiler - Warnings Policies"end sendNotificationtell application id "com.apple.dt.Xcode"tell its front documenttell its front projecttell its front targettell its build configuration "Debug"set b to build setting "SWIFT_SUPPRESS_WARNINGS"if b's value is "NO" thenset b's value to "YES"elseset b's value to "NO"end ifmy sendNotification(b's value)end tellend tellend tellend tellend tell#EOF
If copying the code above doesn’t build, get the raw source from my pastebin here. Here’s how it looks in Script Debugger 6:

Enjoy!🙂
how to view nib files as xml (or not)

Xcode being the vast IDE that it is, it’s sometimes the simplest things that flummox you. It’s rare that I ever want to look at the XML code for any of my interface files, unless I’m copying one from one project to another or hunting down some forgotten outlet that’s throwing a warning. But when I do, I invariably forget how to get back to IB view.

If that’s you, fortunately it’s easy to return to the Interface Builder view from the source code view. Just right-click (aka ‘Control click’) on your nib file in the project navigator sidebar and choose “Open as…” and “Interface Builder XIB Document”. Unlike myself, you’ll remember that for next time, too (me, I’ll be looking for this post again in six months time! 🙂 ).
Xcode: adding source control

If you’re not yet using source control with your Xcode projects, it’s something you want to seriously consider before a project you’re working on hits serious trouble. Setting up source control is easy when you create a new project (just tick the box in the project set up window), but figuring out how to add it to projects you’ve already created is a bit more challenging. In this post we’ll look at the ‘why’ and the ‘how’ of adding source control to an existing project.
Why?
In most normal applications, ‘Command-S’, Versions, Time Machine or other back up will save your hide when you either lose a document or realise a whole bunch of recent changes are something of a disaster. Recovering or reverting a document are mechanisms Apple has put a lot of time and effort into since Lion first appeared (changes I haven’t always been a fan of…).
However, these mechanisms do not work well with Xcode due to the complex and deep links between files in an Xcode build. If you’ve ever tried to go back to an earlier version of an Xcode project or undo some change from last week, and ended up with a headache, you’ll know what I’m talking about.
That’s what snapshots are for, you say? Yes, maybe. When they work. But in my experience snapshots themselves get lost, corrupted, or simply fail to restore.
Moreover, source control has other benefits aside from recovery and reversion that neither snapshots or any other mechanism provide. It’s primary purpose is to allow you to develop parallel but different versions of your project at the same time (a process known as ‘forking’). What if you want to experiment with adding some new feature, but don’t want to risk making changes right across your code that would be needed to try it out? What if you want to create one version of your project for one set of users and another one for others, or one version for an earlier OS X iteration and another for the current release?
How?
Let’s get down to the nitty gritty. Let’s assume you’re convinced you want to add source control to your current project. The first thing you’ll need to do is install git if you haven’t already. If you’re not sure, open Terminal and enter
git --version
If you get back a version number, continue on to the next step. If not, you’ll need to install git first. Follow the instructions for doing that here and then return to this post.
Once git is installed, here’s the steps for adding source control to your existing repository:
1. Locate the project folder
Select the project in the sidebar on the right, and click the little ‘Open in Finder’ arrow on the right.

Once you’ve got the parent folder open in ‘Finder’, quit Xcode.
2. Open Terminal and switch to the project’s parent folder
Click on the project’s parent folder icon in Finder and drag it to a Terminal.app window. Hit ‘control-A’ on your keyboard to move the cursor to the beginning of the line and type ‘cd’. Press ‘return’ to complete the command.
I always like to do a quick ‘ls’ to double check I’m in the folder I think I am, and that it contains what I think it does.

3. Initialize, Add, & Commit
Next, we’re going to hit a series of Terminal commands, one after the other. Press ‘return’ on your keyboard after each one:
git initgit add .git commit -m "Initial commit"
Notice that there’s a period after a space on the end of the second command. Don’t forget to include it.
4. Confirm your local repository
Reopen Xcode, and hit the ‘Source Control’ menu. You should now see the options are active.

Congratulations! You just added a local repository to your project. You can now go ahead and start creating branches (‘forking’) by choosing the Source Control > master > menu item.
You’ll notice that when you make changes in your Xcode project, an ‘M’ (‘modified) will appear next to the files that have been changed. When you’re happy that these are changes that you’re going to keep, use Source Control > Commit. Full documentation on how to use the various features of source control are available in Xcode’s documentation.
5. Add a remote repository
Local repositories are great, and may be enough for your needs, but for ultimate protection (such as against disk loss or failure), you might want to add remote back up. To do that, you’ll need an account with a service like GitHub or Bitbucket. My own personal preference is Bitbucket, largely because they allow you to have private repositories on a free account. Steps for adding your existing project to a remote repository can be found on your chosen service’s website. If you’re using Bitbucket, the general method is first create a new repository on the Bitbucket site and copy the link. Then, enter each of the following in Terminal, replacing the dummy text in square brackets with your actual values (remove the square brackets, too).
cd [path to your repo]git remote add origin [url to your repository]git push -u origin --allgit push -u origin --tags
After that, re-open your project in Xcode and you should be all set up. Check by ensuring the remote path is shown in Source Control > –> master > Configure…
change between debug and release build

If you’ve been wondering how you create a Release build or switch between Release and Debug in Xcode 5, look in the Product menu in the menu bar at the top of your screen.
Choose ‘Scheme >Edit Scheme’, click on ‘Run in the sidebar, and click the ‘Info’ tab in the main panel.
You should now see the drop-down menu that allows you to switch between ‘Debug’ and ‘Release’.
🙂
how to master Cocoa & Objective-C

It’s been quiet on Applehelpwriter this month, largely because we’re all waiting for OS X Mavericks to come out, and I’ve been rather busy helping out with the beta testing. I’ll have plenty to tell you when the public release finally comes around, but for now I’m under strict orders from Apple’s NDA (Non-Disclosure Agreement) to keep schtumm.
Xcode 5 was released for Mountain Lion last week, and that brought up a couple of questions about how to develop competency in creating apps for Mac OS X. I wrote something about this sometime ago, but the truth is I’ve been through a bit of a learning curve myself since then. So, while we wait for Mavs (10.9) and explore the new features of Xcode 5, this seems like the perfect time to share some of my coding experience. Although this might seem a little diaristic, the aim of this post – like pretty much all others on APH – is purely tutorial. 🙂
So, let me go back about a year or so. I’d been working my way through the 4th edition of Aaron Hillegass and Adam Preeble’s widely-acclaimed ‘Cocoa Programming for Mac OS X‘ quite nicely till I hit the ‘challenge’ at the end of Chapter 5. Although I’d followed all the previous chapters quite carefully and with little trouble, the challenge seemed totally beyond me. Indeed, as I read and re-read the earlier material, I couldn’t see anything in the book that would help me solve the core problem of the challenge.
The challenge said: “when the user types in a string and clicks the button, change the message text to display the input string and the number of characters“.

Building the interface was easy, but at that time I had no idea how to go about measuring the string length (despite the mention offered on the next page about the -(NSUInteger) length method.)
After struggling with the problem for some while and not being able to resolve it, I came to an impasse: either I moved on to the next chapter, hoping that I’d learn more and be able to solve this challenge at a later date, or I gave up on the book completely. I wrestled with this for a while, until eventually deciding that I needed to postpone going any further into the book ( a different strategy from ‘giving up’!), and instead learn more about the underlying programming language behind Cocoa, namely Objective-C.
I should point out at this point that the authors are quite clear at the beginning that you really should know your way around Objective-C before tackling Cocoa, but since the early chapters – and even the chapter that reviews Objective-C itself – are fairly light, I fell into the mistake of thinking that I could get by with what they provided, a little background knowledge, and some judicious internet browsing to fill in the gaps.
Alas, that was far from the truth. I put aside the Hillegass book and turned instead to Stephen Kochan’s primer on Objective C, the excellent ‘Programming in Objective-C 2.0‘. In fact, I’d already read a couple of chapters of this in the past, (that’s the “little background knowledge” I mentioned in the last paragraph), but it was clear that I needed to work through it in far more detail if I hoped to master Cocoa.
Kochan begins his book by saying you don’t need to know C to read it, and indeed it’s true (in retrospect…) that he does a good job of surreptitiously teaching your the heart of the C programming language under the guise of teaching you Objective-C. When I say “surreptitious” that’s not a criticism: Objective-C is an extension of the C programming language, and in fact it isn’t really that much different from it once you re-orient your idea of what a program is and how it works. It’s kind of like those black and white gestalt pictures in psychology ( you know, “do you see a rabbit or an old lady”?). Once you switch your perspective, it becomes fairly clear, but until then though, the other point of view can seem as obscure as mud.
Well, I got through about six or seven chapters of Kochan and again got stumped. It occurred to me then that despite his claim that you didn’t need C to learn Objective-C, I…well…needed to learn C before I could learn Objective-C!
So I embarked on a mission to first learn C, which I did through a couple of excellent books: first, with Dave Mark’s ‘Learn C on the Mac‘ and then with the classic ‘The C Programming Language‘ by Kernighan and Ritchie (K&C). If you have trouble finding a reasonably priced version of this venerable book in hardcopy, do as I did and try your local public or university library, both of which are sure to have it. In my earlier post, I also suggested you look at ‘C for Dummies‘ (another book I was reading concurrently with my first attempt at Kochan back then), but in retrospect, that book doesn’t cover enough ground and takes too long to cover what it does deal with, so I think now I’d say give that one a miss.
In any case, six months after working my way through the Dave Mark and the K&C books, I approached Kochan again, and found myself working through it like a hot knife through butter. After that, I finally went back to Hillegaas. And guess what? Not only did that challenge at the end of Chapter 5 seem trivial in Objective-C, I actually knew how to solve it even more efficiently in C without even using Objective-C at all!
(Even more efficiently? Well, only to computer programmers, who count spaces as ‘characters’, does the string “This is only a test” have 19 characters. To normal people, it’s only got 15. An early lesson in K&C will teach you how to count the characters without including any white space.😉 ).
Now I said this would be a tutorial, and indeed it is, for the moral of the story is an old one: learn to walk before you run. Do not believe the many claims that are often touted that you can learn how to create great apps for Mac OS X (or iOS) just by reading a book or two on Xcode or Cocoa (or anything else). Instead, get your foundations sorted out before you start trying to tackle Cocoa or even Objective-C.
And that means: learn C, the ‘grandfather’ of all modern OOP languages, which will not only make the rest of the learning curve a relatively easy glide, but will equip you with a far deeper understanding of what you’re doing and a far greater ability to tackle harder problems. You’ll learn how to create more complex apps than you ever could have with just a superficial knowledge of the ‘higher-level’ languages. Like the tortoise and the hare, it might seem like you’re the slow coach at first, but before you get to the end of the track, you’ll find you’re leagues ahead of the competition. 🙂
Related Posts:
Get the free utility app from Applehelpwriter
how to become an Apple app developer
Developing apps for iPhone, iPod, iPad, and Mac OS seems like the California gold-rush of the 21st century — the press are full of reports of the riches to be had in this amazing land, stories of “little people” making “big bucks”. Anyone can be an app developer, they say, but what’s the truth behind the hype, and how do you actually learn how to do it?
Last I heard, there were currently something like 600,000 apps on the Apple App store (for iPhone/iPad) and some 100,000 or so on the App store for Mac OS. Apple have paid out (i.e., passed on customer payments after taking their 30% cut) literally billions of dollars to developers. That’s a lot of cash! The question is, can you get a slice of it too?
In theory, there’s no reason why not. As I’ll detail below, the route to becoming an app developer is not particularly hard, nor is it particularly costly. But that doesn’t guarantee success. Anyone can write a book, but writing a killer book that’ll sell like Harry Potter is not so easy, and writing a killer app that will sell like Angry Birds is every bit as difficult.
The analogy holds for success in both cases: you need a great idea, you need to execute it well, and you need to market it properly. Did I mention those 600,000 apps on the App store? How, exactly, are you going to make your fortune if your app is buried in a pile like that? Well, I’ll save ideas and marketing for a future post. In this one, I want to focus on the things that we know we can achieve and only have to depend on ourselves for: developing the skills needed to turn that great idea into an actual piece of software that will run on Apple machines.

Learn the language
If you want to write a killer novel, the first thing you have to do is learn the language that you want to write the novel in, be it French, Chinese, or English. If you want to write a killer app, the same goes. Visual Basic? Visual C++? Java? Yes, that kind of thing except…if you’re developing for iOS (the iPhone/iPad operating system) or Mac OS (Mac computer operating system) you have to learn the Apple language, not any of those common ones associated with lesser machines!
So what is the Apple language? It’s called ‘Objective-C’, and it runs in a programming environment called ‘Cocoa’. You’ll need to learn ‘Cocoa’, but in order to learn that you’ll need to learn ‘Objective-C’, and to learn that, you’ll need to learn the basics of the standard (Ansi) C programming language. Oh my!
And once you’ve got a hold on all that, you’ll then need to learn Xcode, which isn’t a language or a programming environment at all, but a very sophisticated development tool (in fact, Xcode is itself an app!), in which you do all your Apple programming. You’re probably now thinking that it’d be easier to write that next Harry Potter novel and are already hunting around for the back of an envelope to start scratching down your ideas, but wait…
I know it sounds disheartening, but there is some good news. After all, it can’t be that hard if so many other people are doing it, right? (Well, actually, yeah it can, there’s a lot of dedicated programming geeks out there!). But look, I’ve been down this road too, and while I haven’t produced any killer apps (still waiting for that great idea…), I have gone from knowing next to nothing about programming to being able to put together an application that does what I tell it to and doesn’t crash my system.
(OK, not entirely true that I didn’t know anything about programming: in the 1980s, I once learned how to get a monochrome computer screen to print “Hello World” in BBC BASIC, which basically involved nothing other than typing >Print “Hello World”; it seemed so ridiculously pointless in 1982 that it turned me off programming for the next thirty years! Other than that, I’m a newbie 🙂 ).
And the good news gets better: most all of the documentation you need to learn how to be an app developer is available free from Apple. Truly, and I mean this with no trace of irony, it is hugely generous of Apple to put the amount of free material they have online for anyone to use. Want to be a Windows developer? Find your local bookstore and start shelling out one heck of a lot of $$$!! The cynical, of course, will say that Apple only do the giveaway to benefit themselves; others might say that giving away free training justifies their 30% cut.
I think of it as a symbiotic relationship: would-be developers who aren’t in computer science departments or big companies could never afford to buy all the material. Likewise, Apple could never have built an App store with such a huge number and wide variety of programs to Wow! their users if they had only had universities and commercial software developers to rely on. This way, both the little people, that’s me (and — I’m assuming — you), and Apple get to win.
I’ll tell you how to get started in a minute, but before I do let me point out that the ride is not entirely free. There’s probably a point at the beginning and certainly one at the end where you will need to lay out some of your hard-earned. So let’s deal with that now.
What you need
Right off, you’re going to need a Mac computer. Sorry, if you don’t already have one, you’re going to have to buy one; a low-range Macbook Air or Mac Mini will do, anything that can run OS X Lion. You can’t develop Mac apps on your iPhone or iPad, I’m afraid (but it does work the other way too: you don’t need an iPad or iPhone to develop apps for these devices. More on this below).
And what about if you have a good-spec PC? Yes, you could get a Mac emulator (VMmare) or mess around with OSx86, but frankly, these options are likely to cause you more grief than they’re worth; you could end up with apps that don’t build properly, and/or which breach Apple’s licensing conditions.
I’m not saying don’t do it, that’s your choice; I am saying your chances of successfully building an app, making it stable, and getting it accepted into the App store by Apple are significantly reduced if you go that route. Given the price of a basic Mac Mini on Ebay, you could well end up spending more money (as well as time) trying to avoid buying a Mac than just buying a cheap one.
The other expense you might need to lay out for is a basic ‘Intro to C’ book. There’s plenty of web offerings, but really a good ‘idiots’ book like the Dummies or Absolute Beginners should be enough and has the benefit of being reasonably likely to get you to the level of proficiency you need in the shortest amount of time. After that, you learn the rest for free (Objective-C, Cocoa, Xcode) from Apple. At the end of the process, when your app is built and you want to submit your app to the App store, you’ll have to register with Apple for a licence as an app developer and vendor; current cost $99.
Take the first step
“Sign me up”, you say, “where do I start?” The first thing to do is to sign up to Apple’s developer community: this is free (don’t confuse it with the Developer Program or Licensing, which costs $99 and which you don’t need till you’ve built an app you want to upload to the App store).
Once you’re in the Developer Community, download Xcode 4, Apple’s development environment (a different thing from a programming environment, but don’t worry, you’ll get the hang of all this terminology easily enough once you start reading the docs). This is a 4GB monster of a program – bigger than your average operating system, so make sure you have the space – and it is also free. Xcode comes with free iPhone and iPad simulators and in itself, this is a piece of software that’s probably worth a couple of thousand dollars. So smile: you’re already making a profit even though you bought that Mac Mini! This is also the reason why you don’t need, and in fact can’t use, your own iPad or iPhone to test your apps: everything has to be done in Xcode, and this monster app only runs on Mac OS X.
Once you’ve downloaded Xcode, you can play around with it if you want, but unless you’ve worked with an IDE (integrated development environment) before, it’s pretty complicated, so it’s best to wait till you work through the tutorials. It’s not the kind of software you can learn through serendipitous exploration.
Instead, go to the documentation resources and start with the tutorial Your First Mac Application.
By the time you get through this, you’re going to realise why you need to learn Ansi C, Objective-C and Cocoa. So put Xcode away for now, and start on the path of learning to speak Apple’s language. When you get there, just add 1 great idea + 1 great marketing strategy, and you’re on your way to California!
The short guide:
1. Get a Mac
2. Learn C, learn Objective-C, learn Cocoa, learn Xcode
3. Come up with an idea for a great app and plan it out carefully
4. Build and test your app
5. Pay the licensing fee and submit your app to Apple
6. Once it’s been through the review process and accepted, implement your marketing strategy
7. Watch the millions role in and retire.
😃


Xcode: wrap code in comment tags
Nov 29
Posted by philastokes
While AppleScript’s Script Editor has long had a built-in function for wrapping or unwrapping code with comment tags, for some reason this seems to be missing in Xcode.
Not to worry, nothing a bit of AppleScript and Automator can’t sort out. This will work in most text editors as well as in Xcode. Here’s what it does:
Install the Service by double-clicking on the downloaded .workflow file and clicking through the dialog boxes. When it’s installed, you can assign it whatever hotkey you want in System Preferences | Keyboard | Shortcuts.
Download Toggle Comments for Selection workflow.zip
If you want to use it for languages that have different comment tags you can adjust the code in Automator. Likewise, it would be fairly simple to have the script detect a number of different tags and respond appropriately, but here I’ve just stuck with the /* …. */ tags.
A note on usage: when uncommenting, it’s best to ensure that the selection begins at the leading forward slash and ends at the trailing forward slash (in other words that there’s no whitespace at either end of the selection). I have built in some attempt to strip leading and trailing whitespace, but an accurate selection will always be the most reliable.
Download Toggle Comments for Selection workflow.zip
Enjoy 🙂
Share this:
Posted in AppleScript, Automator, Developer, Xcode 6
Leave a comment
Tags: comment, comment blocks, comment tags, comments, hotkey, keyboard, keychord, shortcuts, Xcode