Blog Archives
how to get back your Dock preferences

As I noted in an earlier post, one of Yosemite’s annoying usability regressions is that Apple have removed the Dock Preferences from the menu.
I was so irritated by this that I thought I’d just slip them back in to the menu bar. 😉 Hence, FastTasks 2 from v1.6 onwards now lets you manage most Dock preferences from the menu bar again!
change the Dock position

One of Yosemite’s minor irritations is the removal of the Dock position menu item from the Apple menu.
Now we’re supposed to go hunting around on the Dock for the tiny Dock item separator and control-click it to get the menu, or open up System Preferences > Dock. All too fiddly for my taste.
The following script will rotate the Dock position through left, bottom and right. Just copy the code below and paste straight into a Script Editor document. Hit the Run button to see it in action. Then, save the script to your ~/Library/Scripts folder. Use FastScripts or set up a Service with Automator (example here) to create a hotkey.
Now you can change the Dock position with ease. 🙂
tell application "System Events" tell dock preferences set x to screen edge if x is left then set properties to {screen edge:bottom} else if x is bottom then set properties to {screen edge:right} else set properties to {screen edge: left} end if end tellend tell
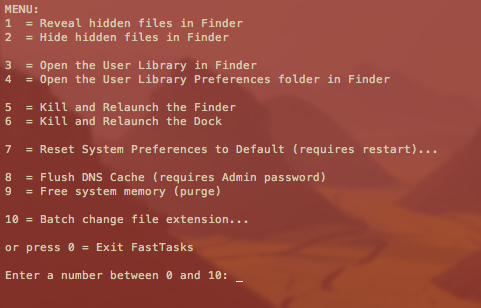
FastTasks – a utility for ten common terminal tasks
Update: I’ve since written a nice GUI version in AppleScript-ObjectiveC which you can download for free here»
If you find you only ever go into Terminal to perform a small number of tasks that can’t be done (easily or at all) in the OS X graphical user interface, this little utility could be for you. It allows you to run a number of common tasks such as
reveal and hide hidden folders
batch change the extension on multiple files
purge system free memory
flush the DNS cache
restore system preferences to defaults
without having to bother looking up the commands. You will, however, have to do a little Terminal ‘dirty work’ to initially get the utility up and running (it’s a shell script which you need to turn into an executable file), but step by step instructions are all provided. 😉
Here’s what you do:
1. Copy or download the entire script from here FastTasks code and paste it into a text editor (TextEdit or Tincta, my favourite, will do).
2. Save the file as plain text onto your desktop with the name ‘FastTasks’
3. Open Terminal.app and paste this command:
sudo chmod 755 ~/Desktop/FastTasks
and press ‘return’ on your keyboard. You’ll be asked for you Admin password which will be invisible when you type it. If you’re wondering what you’ve just done, you’ve just changed that plain text file into an executable program.
4. Paste the next line into Terminal.app
cp ~/Desktop/FastTasks /etc/bin/FastTasks
then press ‘return’ on your keyboard.
As a result of that last command, you can now use the script by typing ‘FastTasks’ in a Terminal window or by double-clicking ‘FastTasks’ in Finder or on the Desktop.
5. By the way, if the Terminal window remains open after FastTasks has completed, change the following settings in Terminal’s Preferences:
Preferences > Settings > Shell > When the shell exits…
and change the dropdown menu from ‘Don’t close the window’ to ‘Close if the shell exited cleanly’.
And that’s it. You can now run any of the tasks in the menu without having to know the commands! 🙂
Fast tips for using FastTasks
1. FastTasks is actually quickest to run by using Spotlight and Terminal.
If you have the Spotlight hotkey set up (usually cmd-space by default), simply open Spotlight, and type ‘Term’ and hit ‘return’ on the keyboard. At the Terminal prompt type ‘fasttasks’ and hit ‘return’.2. Running it this way has another benefit. If you want to run FastTasks again after performing one task, just hit the ‘up’ arrow on the keyboard (hitting the ‘up’ arrow repeatedly will take you through previous commands entered at the Terminal prompt. Use the ‘down’ arrow to go forward), then ‘return’ when you see ‘fasttasks’ on the command line.
how to uninstall MacKeeper – updated
Lees dan dit artikel in het Nederlands 
Lire cet article en français 
Last updated: June 16, 2018
If you’re unfamiliar with the reputation of MacKeeper but have come here because you downloaded it – or it downloaded itself after you were inadvertantly redirected to some unwanted website – and are now wondering whether you made a mistake, let me present you with a few facts.
MacKeeper is one of the most infamous pieces of software on the macOS platform. This post itself was first published in September 2011, and has since received over 2 million hits from people wishing to uninstall MacKeeper from their computers.
When I ran MacKeeper’s free trial version on a brand new clean install of macOS, it told me that my system was in ‘serious’ condition and that I needed to buy MacKeeper in order to solve all my problems.

It seems, then, that MacKeeper thinks macOS, freshly installed, is a poor piece of software engineering, but the feeling is mutual. macOS doesn’t like MacKeeper much either. macOS provides the following warning about MacKeeper:
MESSAGE FROM CONSOLE
12/05/2015 17:48:00.946 com.apple.xpc.launchd[1]: (com.mackeeper.MacKeeper.Helper) This service is defined to be constantly running and is inherently inefficient.
If you have installed MacKeeper and wish to remove it, read on.
Preparation:
i. If you have used MacKeeper’s encryption feature, be sure to unencrypt before you uninstall MacKeeper. You should also check whether any of your personal files are stored in /Documents/MacKeeper Backups.
Backups & other disks
ii. If you have any disks connected to your mac, including Time Machine, eject them before you start the uninstall procedure.
Trash
iii. If you have anything in the Trash, empty it now before you start.
You are now ready to uninstall MacKeeper.
The Easy Way
As I’ve been involved in helping people uninstall MacKeeper for over 5 years, I eventually got round to the task of automating the process so that folks who were not that technically proficient with computers could take advantage of the information on this page.
If that sounds like you, then the easiest way to uninstall MacKeeper is to use my app DetectX. This is a shareware that can be used for free 😀. You do not need to sign up to anything, subscribe to anything or give anyone your email address. Just download the app, run it, remove MacKeeper and be on your way.
After several years of testing and refining my app’s removal procedure, I now recommend using it even for proficient users as it is simply faster, more reliable and less prone to error than doing it any other way. The only people who should really consider the manual option are those that are running versions of macOS that are too old to run DetectX.
Please note also that the list of filepaths below is somewhat out of date. Follow the instructions, but consult my post here for the most recent update to the list of MacKeeper filepaths.
The Manual Way
If you need to remove MacKeeper manually then follow these instrutions carefully. They’ve been refined over the years by many people who contributed in the hundreds of comments that follow this post and have been proven to work without exception. However, bear in mind that the onus is on you to follow the instructions to the letter. For that reason, go slow, read carefully and don’t do anything if you’re not sure what you’re doing. If you have any doubts, post a question in the comments.
Here we go!
1. If MacKeeper is running, quit it. From the sidebar in any Finder window, choose your hard disk icon and go to your Library folder. Look in the Application Support folder for the folder inside it called ‘MacKeeper’:
/Library/Application Support/MacKeeper
Drag this folder to the Trash.
2. Still in Library, look for and trash any of these you find in the same way:
/Library/LaunchDaemons/com.zeobit.MacKeeper.AntiVirus
/Library/LaunchDaemons/com.zeobit.MacKeeper.plugin.AntiTheft.daemon
3. If you are using OS X Lion 10.7 or later, use the ‘Go’ menu in Finder’s menubar and hold down the ‘option’ key. Choose ‘Library’ from the menu (yes, this is a different Library folder from the one you were just in). If you are using Snow Leopard or Leopard, just click on the little ‘Home‘ icon in the Finder sidebar and navigate to the Library. Then trash any and all of these that you find:
~/Library/Caches/com.zeobit.MacKeeper
~/Library/Caches/com.zeobit.MacKeeper.Helper
~/Library/LaunchAgents/com.zeobit.MacKeeper.Helper
~/Library/LaunchAgents/com.zeobit.MacKeeper.plugin.Backup.agent
~/Library/Preferences/com.zeobit.MacKeeper.plist
~/Library/Preferences/com.zeobit.MacKeeper.Helper.plist
Be careful not to delete the wrong files: only those that have got the words ‘zeobit’, ‘MacKeeper’, ‘911’ or ‘911bundle’ should be trashed.
Update May 2015:
Due to recent changes in MacKeeper, the following files should also be searched for and removed:
~/Library/Application Support/MacKeeper Helper
~/Library/Caches/com.mackeeper.MacKeeper
~/Library/Caches/com.mackeeper.MacKeeper.Helper
~/Library/LaunchAgents/com.mackeeper.MacKeeper.Helper.plist
~/Library/Preferences/com.mackeeper.MacKeeper.Helper.plist
~/Library/Preferences/com.mackeeper.MacKeeper.plist
~/Documents/MacKeeper Backups
~/Library/Logs/MacKeeper.log
~/Library/Logs/MacKeeper.log.signed
/private/tmp/com.mackeeper.MacKeeper.Installer.config
/Library/Preferences/.3FAD0F65-FC6E-4889-B975-B96CBF807B78
The last item above will require removal in Terminal or turning on of invisible files in the GUI (various 3rd party apps can do this, including my own DetectX and FastTasks 2).
4. Go to Applications > Utilities > Keychain Access.app and double click on it. Notice the padlock in the window is up there on the left, rather than down the bottom. Click on it and enter your admin password. Now go through all the items in the ‘Keychains‘ list (such as Login, System, Root) with ‘All items’ selected in the ‘Category’ list. Anything you find related to ‘MacKeeper’ or ‘zeobit’, click on it, then choose Edit > Delete from the menu.
(Thanks to Al for also mentioning this point in the Comments below! 🙂 ).
5. Open the Activity Monitor utility (Applications>Utilities>Activity Monitor.app). In 10.10 Yosemite or later, select the View menu and choose ‘All Processes’. For earlier versions of macOS, select ‘All Processes from the drop down menu just over on the right of the dialogue box. Next, scroll down the list of items shown and see if any processes called ‘MacKeeper’, ‘zeobit’ or ‘911 bundle’ are still running. Older versions of MacKeeper may have a ‘WINE’ process running, so also look for ‘wine’. Anything you find, click on it and hit the ‘Quit Process’ or ‘X’ button (Yosemite) in the top left corner.
6. Go to your Applications folder from a Finder window and select MacKeeper. Then, hold down ‘command’ and press ‘delete’ once. If you assigned MacKeeper to be pinned in the Dock, be sure to also drag the icon off the Dock and release it anywhere over the desktop. It will, satisfyingly, disappear in the ‘poof’ of a cloud. 😀
7. When you’re done filling up your trash can with all this junk, click on the Finder> Empty Trash.
8. Go to
> System Preferences > Users & Groups (or ‘Accounts’ for Snow Leopard) | Login Items
If you see anything to do with MacKeeper in the list of items there, highlight it, then click the little minus ‘-‘ button near the bottom of the list.
9. Restart your Mac. Everything should be back to normal, but check the Activity Monitor one last time to be sure.
Supplementary: If you have a problem with MacKeeper pop-ups while using your browser, try clearing out the caches, like this:
In Safari menubar, choose ‘Safari > Reset Safari’. Make sure all the options are checked.
This will not only clear out your caches, but everything else stored by the browser. Don’t worry, it won’t affect your bookmarks, but it will reset your ‘top sites’ and history.
In Firefox menubar, choose ‘Tools > Clear Recent History…’ and choose ‘Everything’. Again, it’ll clear everything out but won’t delete your bookmarks.
Obviously, if you use any other browsers like Opera or something you’ll have to find the same options for those too.
Related Posts
Terminal tricks for defeating adware
block MacKeeper and other browser ads
protect your mac from malware viruses and other threats
FastTasks 2 – get Applehelpwriter’s free utility app from Sqwarq.com
NOTES
1. If you have any problems carrying out the steps, try starting your Mac up in Safe mode, and then running the procedure.
2. You can safely ignore any MacKeeper files that are in the BOM or Receipts folders.
3. If you have only downloaded the MacKeeper package but not ran the installer, you only need to send the .pkg file in your Downloads folder to the Trash. That’s it!
4. If you are seeing ads on this site, we recommend that you use an adblocker!
Acknowledgements
This post has been refined and improved over time thanks to suggestions and replies made in the Comments and on Apple Support Communities. Thanks especially to Al, Lyndon and Jack.

