Blog Archives
App Fixer beta now available! 💥

I’ve just released the first beta 0.1 version of App Fixer over on my software distribution site, Sqwarq.com.
App Fixer aims to help you remove corrupt preference files and window Saved States that can sometimes cause apps to crash on launch or during normal operation. Traditionally, we have to go hunting through the user library hoping to identify the correct files to remove. Now, App Fixer does it for you.
If you have an app that won’t launch or that’s behaving badly, or you just want to start with a clean slate by removing user defaults/preferences (I’m looking at you Photoshop!), App Fixer will do it for you in a click.
Grab a free copy of the beta from here: http://sqwarq.com/appfixer
🙂
make your own Trash Watcher utility
So twice in the last couple of weeks, I’ve found that something funny has been going on with Xcode, source control and Dropbox. The weird behaviour is that both times a whole load of my Xcode projects got moved to the Trash without my knowledge or permission. Fortunately, I noticed in both cases, and while I haven’t got to the bottom of the problem yet, I thought the first thing I’d better do is a bit of defensive scripting!
With that in mind, I created this little Trash Watcher utility to warn me anytime something is moved to the Trash. It’s quick and easy to make, and you can customise it to do various other things apart from give a warning if you like (for example, you could make it delete files of a certain kind, size or date automatically).
Start by opening the AppleScript editor (or Script Editor on 10.10), and paste the following lines into it:
on adding folder items to this_folder after receiving added_items
set listOfFiles to {}
repeat with i from 1 to the count of added_items
set a_file to item i of added_items as text
set stripTrashPath to offset of “Trash” in a_file
set a_file to text (stripTrashPath + 6) thru -1 of a_file
set a_file to a_file & “
“
set end of listOfFiles to a_file
end repeat
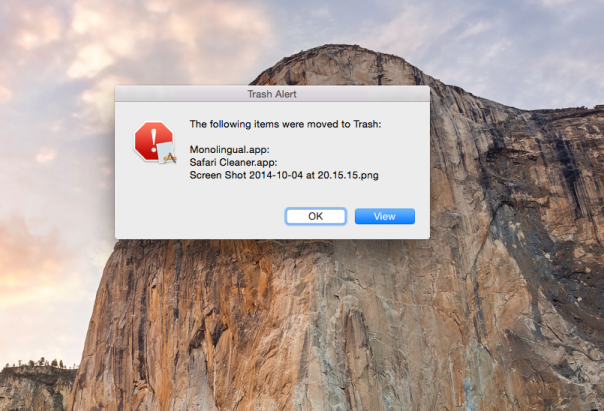
display dialog "The following items were moved to Trash: " & return & return & listOfFiles buttons {"OK", "View"} default button "View" cancel button {"OK"} with title "Trash Alert" with icon 0
set btn to button returned of the result
if (btn = "View") then
tell application "Finder" to open the trash
end if
end adding folder items to
Here’s what the code does. The first and last lines define a Folder actions handler, where the variables ‘this_folder’ and ‘added_items’ will be replaced by the name of the folder you attach this script too (we’ll do that in a minute), namely the Trash folder, and the items that have been moved to the Trash.
The next line, declares an empty list, so that we can populate it later with just the names of the items, rather than their full path adddress.
Then comes the repeat block. This first determines how many items there are to be added and then iterates over them, applying the five ‘set’ commands on each file. Those five commands are all doing one thing: stripping the path from the item name down to just the item name itself so that we can display it nicely in the display dialog command that follows.
Note that the display dialog command adds a couple of buttons, and collects the result as to which button you pressed. Notice that “OK” (typically an action button) is used to dismiss or cancel the dialog. “View” opens the Trash folder in the event that you want to check or remove the items that have been added.
With the Script editor active, make sure your script compiles by pressing ‘Command-K’, but don’t try to run it yet. We need to attach save the script in the right place first, and then attach it to the Trash folder.
With Script editor still active, press ‘Command-S’ to bring up the ‘Save’ dialog box. Give it a descriptive name like ‘TrashWatcher.scpt’ or similar. Do not click ‘Save’, but instead press, ‘Command-Shif-G’ on your keyboard and enter this location into the box that pops up:
~/Library
and click ‘Go’. In the resulting window, scroll down to the Scripts folder and look inside it. If there is already a folder called ‘Folder Action Scripts’ then save the script in there. If not, click ‘New Folder’ in the bottom left of the window, and create a ‘Folder Action Scripts’ folder (be sure to get the name exactly right).
With the script saved in ~/Library/Scripts/Folder Action Scripts/, right click on any folder in a Finder window and choose ‘Services > Folder Action Setup’ from the contextual menu.

This will open a new dialog box with a list of scripts to choose from. Choose the TrashWatcher.scpt (or whatever you happened to call it) and click “Attach”. In the remaining panel, make sure the Trash folder is selected and no other.

That’s pretty much it; your TrashWatcher folder is set up, so move something to the Trash and make sure it fires. Everything OK? Hmm, maybe, but we need a few refinements. For one thing, every now and again OS X will move the .DS_Store files to the Trash, and we don’t want to know about these. Also, it would be good if the file name actually indicated whether it was file or a folder that was being moved. In fact, it does so already (Folders are indicated by a colon), but it would perhaps be clearer and more orthodox if folders were followed by a forward slash, as they are usually indicated that way in path names. To achieve both of these, refine the script above to look as follows, remembering to compile, save and test it (by moving something to the Trash, not from running in the Script Editor).
Finally, with a bit of imagination and experimentation, you could add various other conditions to this script. For example, you could have it immediately delete files that are of a certain size or certain kind as soon as they are placed in the trash (tip: you’ll need to use Finder’s “empty the Trash” command after testing each file for whatever criterion you want to use). I’ll leave those as exercises for the reader, but feel free to post your scripts in the comments if you’re particularly pleased with some variation you’ve come up with!
Happy Scripting!
how to easily encrypt your files
Keep the spooks and data thieves out of your personal data with this easy-to-use, drag-and-drop 128-bit AES encryption applet. It’s a simple 1-2-3 process:
1. Download EncryptMe, copy to your Applications folder and drag the icon to your Dock.
2. Select the files you want to encrypt and drop them onto EncryptMe’s Dock icon.

3. Choose a password and you’re done!

That’s really all there is to it, but let’s take a moment to go over the details of Step 2 and 3.
How does it all work?
First of all, note that EncryptMe is an Automator “droplet” app. That means you use it by dropping files on it, not by clicking or double-clicking the icon (which will just produce an error message). If you want to know how EncryptMe works (or make your own), just open up Automator.app and take a look a the ‘New Disk Image’ action. EncryptMe sizes the disk image to fit the files you drop on its icon as long as you have enough free space on your drive.

Secondly, take a moment to pause and think about the password options. You can use OS X’s built-in password generator or make one up of your own. However, be careful. This encryption won’t just keep the bad guys out; it’ll keep you out too if you forget the password!
For that reason, you’ll need to think carefully about whether you’re going to tick the ‘Remember password in my Keychain‘ checkbox or not. Doing so gives you far more insurance against losing the password. The flipside is that anyone will be able to access your encrypted files if they gain access to your computer while you’re logged in. Leaving the box unchecked is more secure: the password you set here will have to be supplied every time an attempt to open the files is made even when you’re logged in. The bad news? Forget the password, and you’ll be in the same boat as the spooks and the data thieves, locked out of your data forever. So choose carefully here.

Carbon Copy Cloner: see last back up date
If you’re a user of Bombich Software’s excellent Carbon Copy Cloner but you’re not doing backups as scheduled tasks, you may wish there was a way to find out the last time you successfully completed a backup task.
Unfortunately, CCC doesn’t provide an easy way for users to see this information natively, but in this post we’re going to add it through a bit of AppleScript and Automator magic.
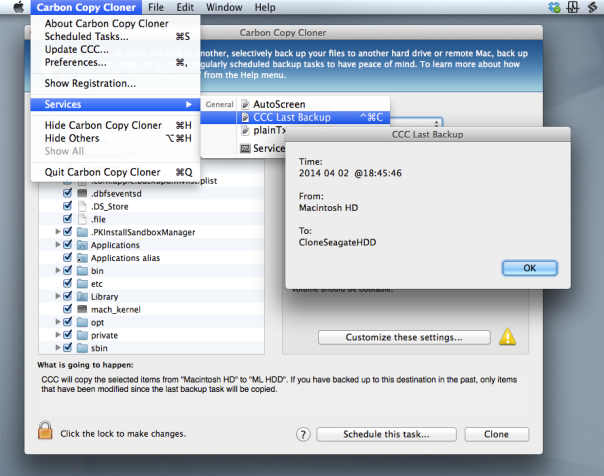
As it turns out, CCC does keep a log of all your past backup details stashed away in a CCC.log file buried in your local domain’s Library folder. You can view this file in Console, but it’s a bit of a pain. Wouldn’t it be nicer if you could just hit a hotkey like ‘Command-Control-C’, say (you know, for ‘CCC’🙂 ), and get a dialog box like this:

If you think so too, then download my Automator workflow:
For Lion, Mountain Lion and Mavericks:
Download for 10.7.5 thru 10.9.2 
For Snow Leopard:
Download for 10.6.8 
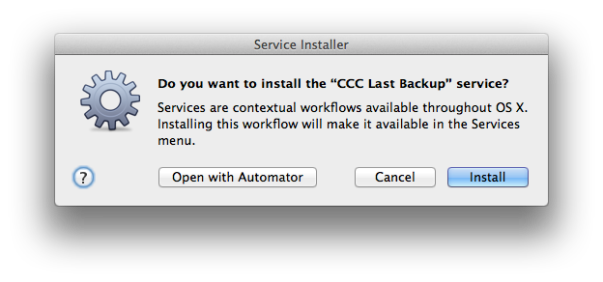
Double-click on the .zip file and double click again on the unzipped workflow file. You’ll get a warning message saying that you’ve downloaded the file from the internet (from me, actually!). After clicking ‘Open’ to dismiss the warning, for all users except 10.6, click ‘Install’ on the the following dialog box:
After clicking ‘Install’, click ‘Done’ to dismiss the confirmation dialog box that pops up.
For those of you running Snow Leopard (10.6.8), after clicking ‘Open’ the workflow should open in Automator. Hit ‘command-S’ to save it as a Service.
For all users, if you now click up to any application name next to the Apple near the top left of your screen (see the screenshot at the top of this post) and scroll down to ‘Services’ you should see the new Service already there. If you don’t, try logging out and logging back in to your user account.
Once you can see the workflow in the Services menu, go ahead and give it a click to test it out. 🙂
A couple of notes on usage:
Carbon Copy Cloner does not have to be open for the Service to work.
The date format display is YYYY-MM-DD.
If you want to add a shortcut key as suggested earlier, open up System Preferences > Keyboard and click the ‘Shortcuts’ tab. Down the sidebar you should see ‘Services’. Click on that and scroll way down to the bottom till you see the name of the Service. Click ‘Add Shortcut’ and hit the keys you want to use. I like ‘command-control-C’ as it’s an easy mnemonic for ‘Carbon-Copy-Cloner’.
how to correct the external monitor resolution

A problem that’s been bugging me since at least Mountain Lion is that sometimes when I connect my external monitor to my Macbook Pro, the display resolution is incorrect. The problem is pretty annoying as it often occurs on wake if the MBP goes to sleep even when the external monitor hasn’t been disconnected.
There are a number of solutions to this problem, and I’ve used them all. Some are less irritating than others, but in this post I’ll give you a run down of the options.
1. The old fridge magnet trick
As I often use a tiny magnet to put my MBP display to sleep while keeping the lid open, normally putting the magnet on and then taking it off again will cause the displays to reset. But this method is annoying both because I’m often connecting to external monitors away from home and because I often misplace that tiny magnet! The other problem with this method is it doesn’t always work… 😦
2. Put the external monitor to sleep with a Hot Corner
Go into System Preferences > Mission Control, and set one of the Hot Corners to ‘Put Display to Sleep’ (not ‘Start Screen Saver’). When your mac wakes up and the monitor is in the wrong resolution, move the cursor to the Hot Corner, wait a couple of seconds, and move the cursor back to the centre of the screen.
3. Activate ‘Detect Displays’
Ok, two ways to do this. The manual way is that you open System Preferences, hold down the ‘option’ key and hit the ‘Detect Displays’ button at the bottom of the window. Note that you won’t see this button unless you’re holding down the ‘option’ key. After the display resets properly, quit System Preferences. My main beef with this method is it’s totally disruptive to my workflow, so much in fact that it makes me angry every time I use it!
Fortunately, you can lower the inconvenience with the second way, which is an AppleScript that does the same thing automagically.
Update Jan 2015:
Partly in response to this problem, I’ve written an app called DisplayDroid which detects when a monitor is connected or disconnected and automatically runs a script in response. The script below is built into DisplayDroid as one of the presets that you can choose!
Find out more about DisplayDroid…
trytell application "System Preferences" to quit
end trydelay 1tell application "System Preferences"
activate
reveal pane "com.apple.preference.displays"
end tell
tell application "System Events"
tell process "System Preferences"
set frontmost to true
try
key down option
delay 0.2
click button "Detect Displays" of window 1
delay 0.2
key up option
on error
key up option
end try
end tell
end tell
tell application "System Preferences" to quit
You might want to save this in your scripts menu or make it into a Dock-able app for convenience. Don’t forget you’ll need to allow the AppleScript editor permission to use Assistive Devices.
4. A free screen utility
Unhappy with a GUI scripting solution, I started researching how to change the displays in Cocoa or from the BASH command line so that I could avoid the overhead of System Preferences popping open and closed, which is an ugly solution at best. I didn’t get far in my research before I found that someone else had already beaten me to the punch, and had even offered the code up for free. Y’gotta love the heroes of the programming community! Download the free RDM.app, which lets you change the screen resolution on any of your monitors from the status bar on your desktop. Move it from your Downloads folder into your /Applications folder. I’ve even got it in my login items for maximum convenience!

Although the app is probably slightly slower than the Hot Corner solution when I’m at home, I like it because I regularly connect my mac to all sorts of other monitors and projectors and the mac doesn’t always choose the best display. The RDM.app lets you slide through the available options much more efficiently than the System Preferences panel, too. Big respect to Paul Griffin at http://www.phoenix-dev.com for this!
5. Trash old prefs
No matter how well or otherwise any of these techniques work, the question remains: why is the resolution setting being forgotten in the first place? I haven’t nailed this down as a cert yet, but ever since I did this to solve a different problem, my monitor’s been behaving itself, too.
1. Go to
Hard Disk/Library/Preferences/System Configuration
Now make sure you’re at the right place because there’s another ‘System Configuration’ folder at /Library/System Configuration, and you definitely don’t want to be messing with that one. Also, this is the Library folder at the root of your hard disk and NOT your user account library (i.e, the path is /Library, not ~/Library). Check that path. Here it is again
Hard Disk/Library/Preferences/System Configuration
2. OK, click on that folder, and copy it over to your Desktop. Now go back and delete it from /Library/Preferences (or hold down ‘option’ while you drag to do a ‘move’. I prefer the first way; it’s safer, if slower).
3. Restart and test.
Hopefully, if you’ve been venting at the ears like me over the external display problem, one or more of these options will help lower the frustration!
🙂
Related Posts:
DisplayDroid from Applehelpwriter
discover 10 new OS X shortcuts

No matter how many times I visit this page, I always find something new that I hadn’t tried before. So the title of this post is more of a suggestion than a description. Why not take a poke around Apple’s shortcut list and discover ten that you don’t already know? I’m going to give a quick round up of ten shortcuts that I use on a regular basis.
1. ⌘ ⌃ Space
Command-Control-Space is a universal shortcut (i.e., you can use it no matter what application is currently active) for bringing up the character viewer (see the screenshot, top of page). In order for it to work, the cursor must be in a text field where character entry is possible, but you can use it literally anywhere: text documents, search fields, browser bars, save dialogs, etc. I used it heavily in creating this post!
2. ⌘ ⌃
Command-Control-Eject saves you having to trawl all the way up to the icon top left of your screen and choose ‘Restart…’. It’ll give you the chance to save any unsaved work or cancel the shutdown. This shortcut has a cousin, too: add the option key (⌘ ⌥ ⌃  ) to the mix and you get Shutdown instead of Restart.
3. ⌘ ⌫
One of my pet annoyances is continually being asked if I want to save ‘Untitled’ documents, those that I’ve never saved before, when trying to quickly quit an app. Having to take my fingers off the keyboard to move the cursor down to that ‘Delete’ button is time-consuming, and tabbing to it takes multiple hits of the tab key. Fortunately, ‘Command-Delete’ will let you discard the document immediately from the keyboard in one quick shot.

4. ⌘ G
Most people are familiar with invoking ‘Find’ on a page by using ‘Command-F’, but have you ever got annoyed by having to mouse up to those tiny little jump arrows in order to cycle through the hits?

Save your eyes and use Command G instead! Note that you have to invoke Find with ‘Command F’ first.
5. ⌃A, ⌃E, ⌃K
That’s three separate shortcuts not one! In any text field, Control-A moves the cursor to the beginning of the line; Control-E moves it to the end, while ⌃K deletes everything from the cursor to the end of the line. Old-hands of the Terminal and other command-line utilities will know these well, but even they may be surprised that these work across a wide-range of GUI apps, too. Particularly useful in Web browser address bars, search fields, Spotlight and so on.
6. ⌘ L
Command-L in Safari and other browser-based apps (including Xcode’s Documentation viewer  ) will immediately move the focus to the address bar/search bar and allow you to edit its contents. No clicking necessary!
7.⌘ ⌃ 1, ⌘ ⌃ 2, ⌘ ⌃ 3
Three commands new for Safari’s sidebar. Respectively, open the sidebar with Bookmarks showing, with Reading list showing, and with Shared links showing. Hitting the same shortcut again toggles the sidebar closed. Note that those are the numbers ‘1’, ‘2’ and ‘3’, not F1, F2, F3.
8. ⌘ ⇧ A, ⌘ ⇧ U, ⌘ ⇧ H, ⌘ ⇧ D
Again, that’s 4 different shortcuts, this time for the Finder. OK, hands up all those that switch to the Finder, hit Command-N to open a new window, and then click to their Desktop? Save yourself the grief (and the time), just activate Finder and hit Command-Shift-D. No need to open a window first, the shortcut will open a new window for you showing your Desktop folder. The others do the same thing but for different folders: Command-Shift-A opens your Applications folder, Command-Shift-U the Utilities folder, Command-Shift-H opens your Home folder.
9. ⌘ F1
This one’s for those of you with dual monitors or when your Mac is hooked up to a projector. Command-F1 toggles between mirroring and separate monitor views. Great for presentations.
10.(fn) ⌃ F8
Control-F8 activates the Status bar (top right row of icons on your screen). Use the left/right arrow keys to move along them, and the up/down arrows to select things in any menu. Hit ‘enter/return’ to perform the action. Note that on laptops you may need to invoke the fn ‘Function’ key, depending on your settings in Keyboard Preferences.
This is a great one for turning on/off Bluetooth, Wifi and checking Mavericks’ new Energy monitor in the Battery/Power icon. Mostly though, I use it for manually starting Time Machine backups or entering TM’s “star wars” interface (oh, and as a bonus…note that (fn) ⌃ F2 activates the other side of the menu bar (i.e., the menu). Enjoy!

Got your own favourite shortcuts? Tell us what you use most in the Comments! 🙂
FastTasks – free download

I’ve been planning this ever since I first wrote a shell script along the same lines. All it needed was a nice interface, and that’d be something I could use almost everyday. Well, it only took me 8 months to get round to it, but here it is. 😉

Download FastTasks»
FastTasks allows you to achieve a number of things that you would normally have to roll up your sleeves and do in Terminal or AppleScript.
The window consists of two columns: left-side for info, right-side for actions. Here’s a detailed breakdown of functions with possible uses.
–Left-side (Info):
OS X Version:
Displays your current OS Version and build number
Startup Disk:
Displays your boot volume
I sometimes forget which particular volume I’m booted into, so this is vital info for me and anyone who’s regularly booting in and out of different installations.
Router IP:
The IP address of your network router
This can be useful for troubleshooting or if you need to access your router’s Admin page.
Just select the address and paste it into Safari’s search bar.
Local IP:
Your node on the local network
Useful to copy and paste if you need your local IP/ network node.
External IP:
How the rest of the world sees you
Very useful if you’re using proxies and want to check whether they’re working.
Installed Ram:
Just a courtesy reminder, but the real value here is the summary of usage stats underneath. These are pretty good approximations to what AM shows on my 10.8, but there are discrepencies on some versions of OS X between what ‘top’ shows and what Activity Monitor shows. FastTasks uses the same information that you’d get if you used the ‘top’ command in Terminal.
By the way, there’s a refresh button (keyboard shortcuts shown) for both the memory usage and network addresses, as the displays do NOT update continuously. Using the refresh buttons does not CHANGE anything on your system: They just update the display to reflect the current state of the system.
–Right-side (Actions):
Show hidden files:
Reveal or hide the hidden files and folders in the Finder whose names begin with a period
This is probably the most useful function of the app as it provides a dead easy way to hide and unhide system files without messing around in Terminal.
Show User Library:
Reveal or hide the User Library in the Finder
Likewise, this hides or unhides the ~/Library folder in Finder. This is ‘hidden’ in a different way from files that begin with a period, and its setting can be manipulated independently of that setting, so you can have the User Library showing, but ‘hidden’ files still hidden.
Flush DNS Cache:
Flush the cache that resolves internet domain names into IP addresses
Flushing the DNS cache can sometimes help resolve problems when you can’t access certain websites. Depending on what system you’re running, you may or may not see a ‘Requires Admin password’ warning next to this button. If you see the warning, then when you press the button the system will ask you for your password. The password request is from OS X and it goes to OS X: It’s not called, seen or stored by the app itself.
Free Memory:
Purge the RAM of inactive memory
Again, depending on what system you’re running, you may or may not see a ‘Requires Admin password’ message. On Snow Leopard, this requires the Command Line Tools supplied with Xcode, so if you see a message telling you to install Xcode, you may have to live without it (availability of Xcode for Snow Leopard these days is a bit hit and miss). You’ll also see the information on the left-side refreshed under ‘Usage’ when you use the free memory function and it successfully completes.
NOTE: on some systems where both Flush DNS Cache and Free Memory display ‘Requires Admin password’, note that after supplying the password for one of those actions, the user will be able to perform the other action without authenticating for a period of around 5 minutes (unless the sudo timeout setting has been altered by an Admin user).
Lastly, at the bottom of the window you’ll see a tiny plea to donate if you find the app useful ;). Note that the underlined text ‘Applehelpwriter’ and ‘Donate’ are hotlinks that if clicked will launch Safari and load a tab with this site and a Paypal donate page, respectively.
I hope you enjoy using FastTasks. Please read the provided Licence and User Guide that are in the download. Thanks! 🙂
how to see recently accessed files

While professional troubleshooters will use software like fseventer or the Instruments.app that comes as part of Xcode, there’s an easy way for anyone to see which files have recently been accessed on their Mac.
1. Open any Finder window and hit ‘command-F’.
2. Click the ‘Kind’ button and choose ‘Other’ at the bottom of the menu:

3. Next, scroll down the list till you see ‘System files’ and check the box and hit ‘OK’.
4. Change the button that says ‘aren’t included’ to ‘are included’.
5. Now hit the little ‘+’ button over on the right side of the window.
6. Again, change ‘Kind’, this time to ‘Last Modified’ and change ‘within last’ to ‘today’.

7. Finally, go to Finder > View menu at the top and choose ‘Arrange By > Date Last Opened’.
You can save the search in the Sidebar for convenience. Give it a more useful name like ‘latest changes’ or ‘fs events’ (“fs” stands for filesystem) and click on it whenever you need to check what’s just happened to your Mac! 🙂

eject all your disks at once

Here’s a simple AppleScript one-liner that can be useful if, like me, you have several disks connected to your laptop at home or the office and you need to get up and go quickly.
1. Open the AppleScript Editor.app by typing Apples in the Spotlight search bar and hitting ‘return’.
2. Copy the following code into the editor window:

3. Hit ‘Command-K’ to compile and ensure you didn’t make any mistakes. Fix any typos if it doesn’t compile and try again. Save the script to your Desktop as ‘EjectAll.scpt’

4. If you don’t already have the Scripts menubar icon visible in your menu bar, hit ‘command ,’ (that’s the Command key and the comma key) and check the ‘Show Script menu in menu bar’ item in the General pane of AppleScript’s Preferences window.
5. From the Scripts menu, choose ‘Open Scripts Folder > Open Computer Scripts Folder’ and drag ‘EjectAll.scpt’ from the Desktop to the Computer Scripts Folder. You’ll need to authenticate with an Admin password to complete the move.
And that’s it. Now whenever you want to eject every disk with one simple operation, just hit the Script menu icon and click on ‘EjectAll’. 🙂
5 things you never knew about TextEdit

Although Apple’s oddball TextEdit.app has a variety of good formatting options, the chances are if you do any kind of word processing, you have one or more of the heavy duty apps like Pages, LibreOffice or Ms Word. If, on the other hand, you’re a coder or scripter who needs a plain text editor, you likely use Tincta, Sublime Editor 2, BBEdit, Coda or one of the many other full-featured editors that can do things like syntax colouring, snippet saving, script execution and so on that TextEdit can only dream of. Indeed, Apple have strangely forsaken giving their homegrown editor even a ‘line numbers’ option (though see tip 5 below), making it all but unusable for scripting.
Given its limitations, you might feel you haven’t been missing much by leaving TextEdit unloved and untouched in the Applications folder. However, here’s at least 5 reasons to think again.
1. Easiest way to create an audiobook.
I started off by calling TextEdit an ‘oddball’ app and here’s the first reason: name me another ostensibly “text editing” program that can make audio books? Dump any old text into a TextEdit window, and from the menu at the top choose ‘Edit > Speech > Start Speaking’. Plug in the headphones, sit back and relax! Works great with long online articles (but be sure to strip out any meta text and pictures first!). Also, don’t forget you can change the system voice in ‘System Preferences > Dictation & Speech’, and as I’ve pointed out elsewhere, foreign language learners can download optional voices and listen to foreign language text to improve their listening skills. For the parents among us, this one can also be great for the kids (both for them to listen to and create their own). 😉
To turn a TextEdit file into an audio book, select the entire text and from the menubar choose ‘TextEdit > Services > Add to iTunes as a Spoken Track’

2. Easy way to read, edit or save lengthy Terminal output
You can add
| open -f
to the end of any Terminal command, and (assuming TextEdit is your default editor) the output will be piped to a TextEdit window. This makes it easy to search, save or just scroll the output. This is particularly useful for reading and saving man pages. However, be aware that for some bizarre reason, man pages in particular tend to duplicate a number of characters in certain fields, which can affect readability. To prevent this here or with any other output you encounter that does the same, use
| col -b | open -f
after the Terminal command.
For example, if you enjoy hunting down defaults tricks, try this in Terminal. Type
defaults read | col -b | open -f
3. Easy way to get a file path
You can drag and drop any item from a Finder window into a TextEdit window to reveal that item’s path. This is a very handy trick if you need to quickly copy a file path to the clipboard. You can also drag urls from Safari’s address bar into a TextEdit window, or just drop them onto its Dock icon to get the same effect.
4. Easily share TextEdit content or files
Although TextEdit lacks the ‘Share’ icon in the menubar that was introduced to many apps in Mountain Lion, you can still access the ‘Share’ feature through the contextual (‘right/control click’) menu. Another oddity of TextEdit lurks here though: make sure the cursor in the TextEdit window is not on an empty line, or you won’t see the ‘Share’ option in the menu.

5. (not so) Easy way to get line numbers!
This one is for the coders among you. We all know TextEdit suffers from the lack of a ‘View line numbers’ option (come on, Apple – ridiculous!). There’s a few tips here. First, if you don’t know already, you can use the hotkey ‘command-L’ to go to any given line number. You can also find the total number of lines by using the ‘Find’ feature. Hit ‘control-F’ first, then click the spotlight in the filter bar. Choose ‘Insert Pattern’ and search for line breaks. You’ll see the total number of line breaks in the far right of the filter bar:

You can add pseudo (see below for why I call them ‘pseudo’) line numbers with a bit of Awk magic. Open Terminal.app and paste this into the window:
awk '{print FNR "\t" $0}'
Next drag and drop the file you want to add line numbers to into the Terminal window. Don’t worry, nothing you do here will change the original file. Apply your new found skill from Tip 2 above, typing a space and then a pipe onto the end of the command:
| open -f
so the whole thing might look something like this
awk '{print FNR "\t" $0}' ~/Desktop/myfile.txt | open -f
and hit ‘return’. Hey presto, you have a TextEdit file with “line numbers”.

Now, here’s the catch. I called these ‘pseudo’ line numbers because unlike real line numbers, the numbers are actually part of the text. That means if you select some portion of the text that spans line numbers, the numbers will be selected and copied too. In other words, you can’t properly copy and paste text, so be sure to keep your original version of the file for future editing purposes (*EDIT: see a workaround for this provided by Caroline in the Comments below).
So yes, TextEdit is an oddball program; it is like no other I know of for containing a bizarre mix of unrelated yet strangely powerful features coupled with the inexplicable absence of basic functionality that any other program would be handicapped without. Nonetheless, I hope this post has given you some ideas of how you can use TextEdit to better effect in your work and play. 🙂
Featured picture: Purple Glass Text Edit Icon by ~Drawder

