Yearly Archives: 2017
DetectX Swift beta has arrived

It’s been unusually quiet on Applehelpwriter these past few months, and the reason is that I’ve been devoting all my time and efforts to the new version of DetectX. The new version is called DetectX Swift because (yeah, you guessed it) I wrote it in Swift and because it’s considerably faster than its older sibling.
DetectX Swift’s got a new interface, but there’s far more going on under the hood. The Search uses some fancy heuristics as well as hard-coded and live update search definitions to ensure it provides the very best in security threat scanning.
The new Profile view employs some super cool dynamic highlighting and lets you inspect the contents not only of directories but also of scripts, plists and other files that could execute troublesome code on your mac.
There’s changes in the History view, too, both in the display and functions. One of the coolest things I like about the new History function is that you can run a diff on any previous run against the latest run, immediately seeing how they differ.
There’s tons more to DetectX Swift, but the best way to find out about it is just to try it. The beta version is free to use for both Home and Commercial users, so just head off over to its home page and grab yourself a copy!
Don’t forget to keep us informed of how it goes. The beta is still in an early stage and more features are slated as it develops, but feel free to tell us about anything that you feel could be done better or things that you’d like to see added.
Share and enjoy! 🙂
getting ready for DetectX Swift

Pretty soon now I’ll be releasing the first beta of DetectX Swift. Lots more details will be forthcoming over the next few days and weeks, but here’s a quick 1-minute look at how the new Profiler function works and some of the cool things you can do with it.
how to retrieve forgotten Wifi password

At our house, giving visitors the wifi password is always an exercise in frustration. Can’t remember? Oh, then I’ve got to either go trawling through Keychain Access or log in to the router, neither of which are particularly appealing.
Here’s an easier way. It’ll require an admin password (and you’ll need to supply it for as many passwords as you’re looking for – no ‘with administrator privileges’ will help here I’m afraid), but otherwise requires nothing more than a quick double-click of this saved script, once you’ve added your own SSID names in place of the dummy ones.
Just to be clear, you do NOT need to add the passwords to the script. So long as the mac that you run this script on already knows the Wifi password, the script will retrieve it.
Get the script from my pastebin
Enjoy!
how to remove “Plugins Button” from Chrome

Update: DetectX v2.75+ now deals correctly with the Plugins Button adware and the instructions below are now redundant. Just ‘Search’ and ‘Trash All…’ should be sufficient.
If you’re having trouble trying to remove the “Plugins Button” from Chrome because its ‘managed and cannot be removed or disabled’, then follow this procedure.
1. Launch DetectX and do a search. You should see at least 5 items. Do NOT click the Trash button yet.

2. Quit Chrome
3. In Terminal, execute this command* (you’ll need admin privileges)
sudo /usr/bin/profiles -P; sudo -K
If you see a single configuration profile installed with the profileIdentifier ‘org.superduper.extension’, then execute
sudo /usr/bin/profiles -D; sudo -K
to remove it.
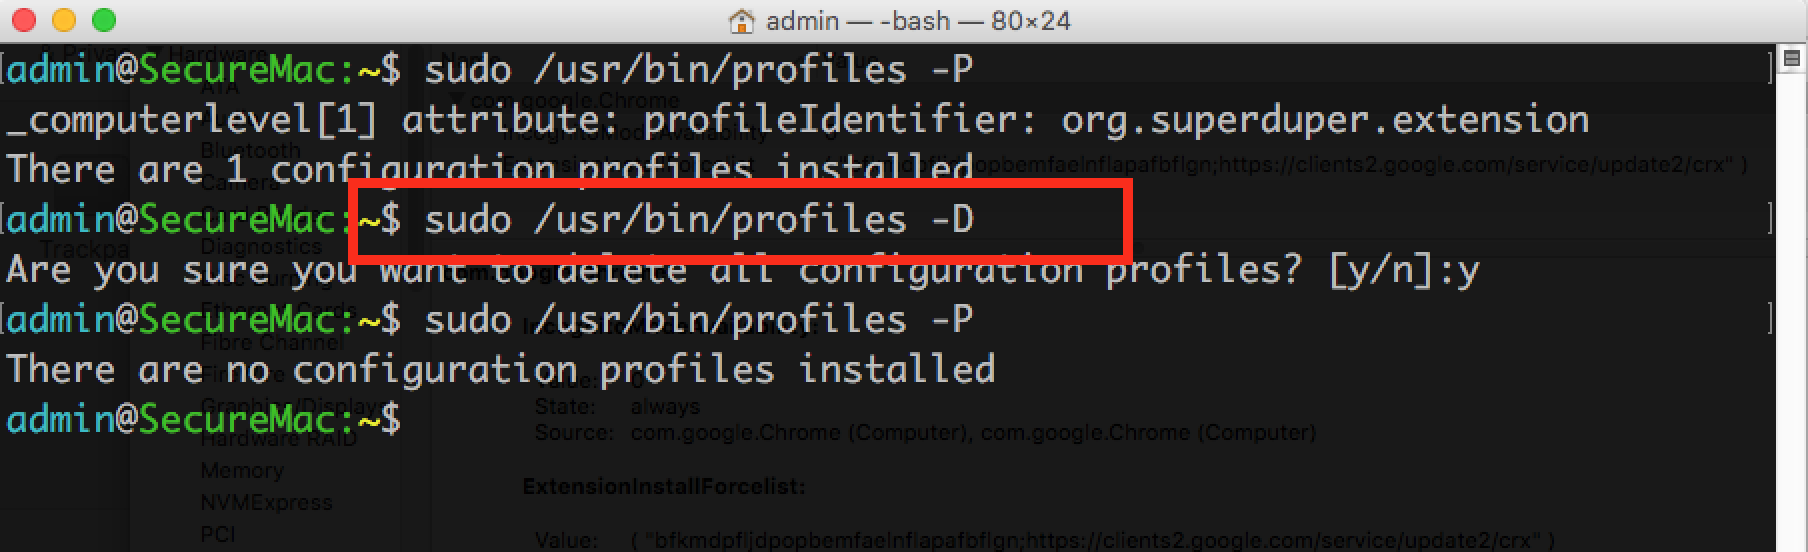
Type ‘y’ when prompted.
4. Read the caveats below, and then if appropriate, in DetectX, now click the ‘Trash All…’ button.
5. Relaunch Chrome and check that all is well.
Caveats
* If you or the machine’s administrator are using ‘Managed Preferences’ and have profiles other than the one mentioned above installed, then do NOT use the ‘-D’ switch in step 3. You’ll need to identify the correct profiles. Use the -P switch to list the installed profiles and only delete the one with ‘org.superduper.extension’ identifier. Likewise, do NOT use the Trash All… feature in DetectX, which will remove the Managed Preferences folder***. Instead, double-click the items in DetectX’s window to open them in Finder and remove them manually that way.
** You’ll need to authorise the deletions when macOS asks you as DetectX doesn’t have the permissions to do that (a safety feature).
*** Note that the ‘Managed Preferences’ folder is a perfectly legitimate folder for server admins that have knowingly installed managed preferences for their users, or for those using Parental Controls. An application update for DetectX will be released shortly to more accurately target this issue rather than flagging the entire Managed Preferences folder.
how to find the paths of all loaded kexts

Thanks to a tip from Erik Gomez, I’ve only just noticed that the kextfind utility restricts its default search to just the System and local Library Extensions folders (note to self: RTF man page!). While you can name specific folders in a custom search, kextfind doesn’t have a recursive option to trawl the whole system or even all children of a parent directory. You might bash your way around that, but it’ll be slow and take forever.
Instead Erik offers a python script that hooks into Objective-C to find both loaded and unloaded kexts. As my job mostly involves disarming currently running badware, I’m generally more concerned with what’s actually running on a user’s system at the time I’m troubleshooting it, i.e., kexts that are currently loaded, and I figured I could probably do a quicker-and-dirtier job of that on the command line without needing to actually write an executable script or doing a slow trawl with the find tool.
The problem is that while we can get kexts in /Library/Extensions and /System/Library/Extensions easily enough from kextfind, what about all those 3rd party extensions lurking in unknown places? The answer lies in part with the kextstat utility, but unfortunately that will only tell us what the loaded kexts are, not where they are located.
The rest of the answer is to take the bundle identifiers provided by kextstat and then coerce kextutil into supplying the paths. We’ll then do a merry dance with a few other utilities (that don’t begin with the word ‘kext…’) and a temp file to parse out the noise and spit out the paths that we wanted all along. Finally, we’ll clear up after ourselves by deleting the temp file we created.
Here’s the whole command, then I’ll walk through how it works:
t="Desktop/kx.txt"; kextArray=`kextstat -l | grep -v com.apple | awk '{print $6"@"$3}'`; for i in $kextArray; do kextutil -a "$i" >> ~/"$t" 2>&1; done; v=$(<~/"$t"); echo "$v" | cut -d" " -f1 | grep -iv warning | awk '/^\s*$/ {next;} {print $1}'; rm ~/"$t"
At this point I’ll apologise to the learned: a better shell scripter than I would surely do this with far more panache, and my lazy habit of defaulting to solving new problems through familiar tools is undoubtedly clumsy; for our purposes here, however, if it works it’ll serve (feel free to add your own better solutions in the comments!).
So we start with a variable that we’ll substitute in later for our temp file path. We next get a list of running kexts’ bundle identifiers from kextstat. This tells us what’s loaded, and we grep out any of the Apple ones. The awk command after that rearranges the output from kextstat to a format that kextutil will like, and the whole lot is saved in an array.
We next iterate over the array and write out the result to a text file, appending as we go. We’re redirecting both standard out and standard error to our file.
Now, kextutil isn’t really meant for looking up paths per se, but we can leverage its –address flag to get those out of a more verbose kext debugging message.
We now read the file back in, and pretty much everything after that is my mangled attempt at parsing out the extraneous (for our purpose) messaging that kextutil provided.
The result? On my machine this code produces what you see in the screenshot at the top of this post. Since these kexts are all in the default locations, I could have got them simply from kextfind, but what I know now that kextfind wouldn’t have told me is that there aren’t any other 3rd party kexts in any other places loaded on this particular machine, and if there were, this little script would have told us where to find them. For troubleshooting purposes, that info is well worth having!
Enjoy 🙂
Terminal tricks for defeating adware

So, your browser is acting up, redirecting you to scamsites, offers for MacKeeper and Mac Cleaner and other unwanted software. You have what is technically known as ‘an adware’ infection. It’s not a virus, it’s not a ‘trojan’ and it’s not a ‘worm’, but it is a nuisance and may well be associated with any of the above. What to do?
Here’s 10 Terminal tricks you can use to help identify and remove adware items. It won’t cover every situation: adware mutates faster than a flu virus on amphetamines, but it will catch 90% of the cases currently out there. For the ones it doesn’t, see the ‘Getting Help’ section at the end of this post.
I’m going to split this up into two phases, ‘Gathering Information’ and ‘Dealing with the Results’. After explaining the first half-dozen commands individually, I’ll then give you one ‘master’ or ‘mother’ command which combines them into a single execution, but you should read through the explanations first so that you know what you’re doing and what to expect.
Gathering Info
First, most adware wants to persist on your mac across logins and restarts, and that means it has to put an executable somewhere where macOS will look on start up. One place most users should be familiar with and check first is the Login Items in System Preferences ‘Users & Groups’ pane. A lot of adware will insert itself there for good measure, but most will almost certainly be in other, trickier to find places.
This is where our first Terminal trick comes in. This Terminal trick will output the contents of the main locations where adware typically hides:
1. List the contents of your Launch* folders:
ls -alF /Lib*/Launch*/ ~/Lib*/Launch*/
That’ll output the contents of three different directories, /Library/LaunchAgents, /Library/LaunchDaemons, and ~/Library/LaunchAgents. If you’re planning on getting help by publishing the results in a public forum like Apple Support Communities, then you might want to use this version, which will scrub your username out of the results:
2. Same trick, redacting personal info:
w=`id -un`;ls -alF /Lib*/Launch*/ ~/Lib*/Launch*/ | sed "s@$w@[redacted]@g"
The output of that command will have a load of files with names like ‘com.company.filename.plist’. To give you an example here’s what mine outputs (note, none of these are adware files; unsurprisingly, my Mac is adware free!).
Slipping a shell script into the /etc/ directory is a common adware trick, so let’s also run this one, which will output any files in /etc/ that have the .sh shell script extension:
3. Find shell scripts in /etc/:
ls -alF /etc/*.sh
(this one won’t contain your user name, so we don’t need to redact anything).
A lot of adware persists by running sneaky little AppleScripts from a shell script. We can detect if any of these are at work with this little spell:
4. List osascript processes targeting your browser:
ps -axo ppid,pid,command | grep 'osascript -e global' | egrep -i "if is_Firefox_running|if is_Safari_running|if is_Chrome_running" | grep -v "grep" | grep -v ' 1 ' | awk '{ print $1, $2}'
All this command outputs is two numbers, perhaps like this:
7783 7792
7783 7825
8978 8987
We’ll discuss what to do with those in the ‘Dealing with Results’ section below.
Next, we want to see what processes are actually running in the background. This will both confirm and possibly add to information we collected earlier. To do this, we need a little trick which looks like the same command twice, but which in fact operates on two different lists of processes:
5. List loaded background processes:
w=`id -un`; r="s@$w@[redacted]@g"; launchctl list | grep -v apple | sed "$r"; sudo launchctl list | grep -v apple | sed "$r"; sudo -K
When you run this one, a list of processes will be output, and then you’ll be asked to supply an Admin password on the command line (where even the key presses won’t be visible when you type). Supply the password and a second list will be produced. We will want to examine both later.
A file name common to a widespread family of adware is rec_script.sh, and this can be hidden anywhere in the user or local Library folders, so let’s run this one, too (here we will add the redacting again in case you’re posting the results in a public forum). You’ll need to supply an admin password for this though:
6. Find a common adware executable:
w=`id -un`; sudo find /Library ~/Library -name "*rec_script.sh*" | sed "s@$w@[redacted]@g"; sudo -K
This one may take a couple of seconds to complete.
That concludes the first step of our info gathering stage, but for convenience, I’m going give you them all again concatenated into one, single ‘mother of all commands’ 🙂 string. Even more conveniently, I’ve added code to output the results to a text file on your Desktop, called ‘adware_search.txt’, so after running the code below go look for ~/Desktop/adware_search.txt in Finder. If you’re posting to a public forum, it’s much easier to copy and paste the results from the text editor rather than from Terminal.
TL;DR
If you triple-click anywhere in the block of code below, you can copy and paste the whole block into Terminal and execute all of the commands given above in one fell swoop. Remember you’ll need a password.
7. The ‘Mother’ of all the above:
w=`id -un`; r="s@$w@[redacted]@g"; f="/Users/"$w"/Desktop/adware_search.txt"; ls -alF /Lib*/Launch*/ ~/Lib*/Launch*/ /Users/Shared /usr/local/bin | sed "$r" >> "$f"; printf "\n\n/etc:\n" >> "$f";ls -alF /etc/*.sh 2>/dev/null >> "$f"; printf "\n\n# osacript processes:\n" >> "$f"; ps -axo ppid,pid,command | grep 'osascript -e global' | egrep -i "if is_Firefox_running|if is_Safari_running|if is_Chrome_running" | grep -v "grep" | grep -v ' 1 ' | awk '{ print $1, $2}' | sed "$r" >> "$f"; printf "\n\n# User launchd:\n" >> "$f"; launchctl list | grep -v apple | sed "$r" >> "$f"; printf "\n\n# Root launchd:\n" >> "$f"; sudo launchctl list | grep -v apple | sed "$r" >> "$f"; printf "\n\n# Find rec_script.sh:\n" >> "$f"; sudo find /Library ~/Library -name "*rec_script.sh*" | sed "$r" >> "$f"; sudo -K
Interlude: Playing Safe
Before we move on to dealing with the results, I want to stress that you don’t want to be deleting files that you’re not sure of. Good practice is to move files to a temporary Quarantine folder, or at least move them to but don’t empty the Trash.
Even better practice is to make sure you have an up-to-date, bootable backup disk as well as a Time Machine backup, so that you can easily recover your system if you make a mistake and delete something you shouldn’t.
Dealing with the results
Looking at the output of the first Terminal command given above (Trick 1 or 2), how can you tell which are good and which are bad? In a lot of cases, you’ll recognise the app or developer name. TunnelBear, for example. “Sure, yeah, I’ve got that” and so on. Others, however, will look and sound weird, like these (all genuine adware file names):
com.glutting_Panagia.plistcom.pPHGASlN.plistcom.phellonic.plist
Google anything you’re not sure of, and see if it’s already been identified as adware. See ‘Getting Help’ at the end of this post if you’re not sure.
Walking up & down the tree
Assuming you’ve found some candidates for removal, the next job is to find the parent and child processes associated with each. We do that with a couple more Terminal tricks.
For the first one, we want to find any process that contains the same name as our suspected adware. For each suspect, take the unique part of the name for your search term. With this one we can put all our candidates in one command like so:
8. Search for your target’s family members:
w=`id -un`; ps -axo ppid,pid,command | egrep -i "glutting_Panagia| pPHGASlN | phellonic" | grep -v ' 1 ' | grep -v grep | sed "s@$w@[redacted]@g"
Note the part after egrep -i that’s inside quote marks. Each search term is separated between a vertical bar, aka the pipe character. Note that the terms themselves are not inside quote marks individually. One pair of double-quote marks is used to encapsulate all terms.
So to use the command above replace “glutting_Panagia| pPHGASlN | phellonic” with “search term 1 | search term 2 | search term 3”, where ‘search term n’ is your search term. Of course, you can have more or less than three search terms. Just add or remove as required.
When you examine the results, so long as the first number is not ‘1’ (it shouldn’t be if you executed the command correctly, as all those should have been excluded), follow the file path shown under the ‘Command’ column using either Finder or the Terminal. If you’re sure you’ve found a baddie, send it to the Trash or your quarantine folder! If you’re not sure, see ‘Getting Help’ below.
You will need to construct and run the next command separately for each suspect. The output will give you the path to the binary being executed by the plist. In many cases, you’ll have already found that from the previous commands, but in some cases – particularly if the plist has failed for some reason or if the binary isn’t running when you do your search – it won’t. This one’s the trickiest because you’re going to have to construct most of it yourself. Here’s an example (this is actually a legitimate file, but it will serve for our purposes):
cat /Library/LaunchAgents/com.razer.rzupdater.plist | grep -iA3 program
Let’s look at how that command is structured:
9. Find more children:
cat [path to file] | grep -iA3 program
You get the ‘path to file’ part from the results of your /Library/Launch* searches, and there’s no harm in practising this one on good files to get used to the output. For each item you search, it should return something that looks like this:

Here we see the path to the executable that the plist is launching. If this were a bad guy, I’d be straight over there to send him where he belongs, too.
After working through all your suspects with Trick 8, now take a look at the results of the command to output shell script file names from /etc/ (Trick 3). If there were any results at all (hopefully there wasn’t), you’re going to have to open that file in a text editor and determine whether it is malicious or not. This is the hardest part for the novice, because there’s certainly plenty of reasons to have a shell script in /etc/ depending on what 3rd party software you’re running. I can only repeat here what I have said above: see the ‘Getting Help’ section below if in any doubt.
Next, let’s take a look at the results for the osascript processes (Trick 4). Hopefully, you got no results, but if you had two sets of numbers outputted like this:
7783 7792
then the first number is the parent process ID, and the second number is the child ID. We want to find and eliminate both the parent (again, so long as this number is not ‘1’) and the child.
Take the first number and execute this in Terminal
10. More parents on the loose:
ps [number]
Take a note of the path that’s shown and ensure it doesn’t belong to a legitimate app that you recognise. Again, if in doubt, ask Google, or see ‘Getting Help’ below.
Now, do the same with the second number, the child process. Work through however many numbers were output, ‘quarantining’ as you go.
Almost there! Take a look at the output of the two launchd lists (Trick 5). You should have a good idea by now which ones are suspect and which are OK. You may have found the paths to any suspicious ones already, but if not, we’ll use the same command as we just used with the osascript processes. Here’s the output on my machine of the Trick 5 command (all legitimate) for comparison:

We’re only interested in the first number (the second one is status code). For any suspicious process, take the first number shown in the list, and use the Trick 10 command on these to find the parent file path (you know what to do with the ones that aren’t legitimate!).
If there is only a ‘-‘ dash instead of a number, it means that process is or was loaded but is not currently running. That dash may or may not be followed by another number that is not ‘0’. That number is just an error code and isn’t really relevant to us here. For any of your suspects that have failed like that, hopefully the info you gathered earlier will give you some clues (if not, see ‘Getting Help’ next).
Finally, anything found in the ‘find’ command (Trick 6) is almost certainly malware. Of course, be mindful that it’s entirely possible a legit’ script could accidentally have a name clash and be called rec_script.sh, but it’s highly unlikely and definitely should be examined closely. Also, if you see that the path is within an application bundle like this …Contents/MacOS/rec_script.sh, don’t hesitate to pull the trigger on that one.
Getting Help
I want to repeat that doing this safely and effectively takes practice and experience, and you should in no way be surprised that, if you don’t have that experience, you’re not sure whether something you’re looking at is good or bad, or that you go through all of this and still can’t find the problem. There’s some fairly obscure ways that adware and other malware can infest and persist on your mac that only experts will be able to advise you on. Throughout this post I’ve glossed over a few situations where you’ll draw a blank, and that’s because most of the other techniques for spotting malware require that experience.
To ameliorate this, I wrote an app called DetectX Swift to deal with this and many other things, and you can download it and use it without any requirement to pay. You can also use it to get personal, free-of-charge, help from me through the Help > Report a Problem to Sqwarq Support if your troubles persist.
Let me be clear why I don’t charge for this personal service: the payoff for me is I get to improve my app’s heuristics from what I learn about infections that DetectX doesn’t automatically detect. All information is kept strictly confidential and I do not sell or use your email address or other information for any marketing purposes whatsoever.
If you want to read more about me, also see the about page on DetectX’s parent site, Sqwarq.com.
Happy hunting! 🙂
Related Posts
scan for malware on the command line
how to quickly toggle Swift Compiler warnings

I thought I’d share this little AppleScript for anyone working with Xcode 8.3.3 and using Swift.
One of the things I find intrusive are the constant Swift Compiler warnings while I’m actually in the middle of writing a block of code (e.g, ‘…value was never used consider replacing…’). Well, yeah, it’s not been used *yet* …grrr!
However, turning off compiler warnings isn’t something I want to do either. It’s too easy to go into the build settings, turn them off, do a bit of coding, take a break, do a bit more coding…oh, three thousand lines later and I suddenly realize why Xcode hasn’t been correcting my mistakes all afternoon!
This script allows you to quickly and easily toggle the warnings from a hotkey, and just gives you a gentle reminder as to what you’ve done. Of course that won’t stop you forgetting, but assigning a hotkey for this script makes it painless to just turn warnings off and back on again as soon as you’ve got past whatever bit of code the compiler was complaining about.

Xcode unfortunately doesn’t have its own scripts menu, so in order to assign the script a hotkey, you’ll need to either make it into a Service with Automator or use a script runner like Red Sweater’s FastScripts.
#starton sendNotification(aVal)display notification "Suppress Warnings was set to " & aVal with title "Swift Compiler - Warnings Policies"end sendNotificationtell application id "com.apple.dt.Xcode"tell its front documenttell its front projecttell its front targettell its build configuration "Debug"set b to build setting "SWIFT_SUPPRESS_WARNINGS"if b's value is "NO" thenset b's value to "YES"elseset b's value to "NO"end ifmy sendNotification(b's value)end tellend tellend tellend tellend tell#EOF
If copying the code above doesn’t build, get the raw source from my pastebin here. Here’s how it looks in Script Debugger 6:

Enjoy!🙂
how to create a bootable macOS installer

If you are preparing to install macOS on multiple computers, one of the things that can make your life simpler (and the waiting shorter) is a bootable USB installer.
The idea of the installer is that you only need to download the macOS Installer.app from the App Store once. Usually, when you run the installer after downloading it, it’ll delete itself and you have to go through the whole download process again on each machine or disk that you want to install macOS onto. By making a bootable USB drive, you simply plug the drive in to your mac, launch the installer app and tell it where to install the OS. You can repeat this as many times as you like as the installer will remain safe on your USB.
There are various ways to make a bootable USB installer, but they all involve the same process:
1. Download the macOS Installer from the App Store.
2. Run the createinstallmedia command from the Terminal, an AppleScript or a helper app.
3. Reboot your mac, choosing the newly created USB as the startup disk.
4. Run the installer.app from the USB.
Step 2 is where the fun is. The createinstallmedia command can be tricky to get right, particularly if you’re not familiar with working on the command line. For those of you that are, follow Apple’s instructions here.
For a little more convenience, I wrapped all that inside an AppleScript which will first ask you for the location of the installer, then ask you to choose the USB target.
For maximum convenience, I also wrote a free little Swift app I’ve dubbed ‘Boot Buddy‘ (cos “Create bootable macOS Installer Drive.app” just didn’t quite have the right ring to it..!) that will present the whole thing in a neat little user interface. Three clicks, more or less, and you’re done.
Boot Buddy doesn’t require an admin password to install, but you do need to provide an admin password to actually create the bootable installer as the createinstallmedia process has to be run as root. Boot Buddy doesn’t see or use this in any way whatsoever other than to start the createinstallmedia process or to cancel it (if you choose to do so); authorisation is handed off to macOS to take care of.

Boot Buddy requires macOS 10.11 or higher and can create bootable USBs from Mavericks, Yosemite, El Capitan, Sierra and High Sierra installer apps.

Share and enjoy! 🙂
why malware loves auto login (and why you shouldn’t)

Whenever I talk to people about the dangers of having their mac set to login automatically without requiring a password, I’m often waved away as an old worryguts. “I’m the only user on my mac”, they say, and “My mac is unlikely to get stolen”.
These optimistic dismissals may turn out to be true or false, but aren’t really relevant to the main security issue. Auto login presents a threat to anyone connecting to the internet.
To see why this is so, let’s look at how auto login works. First of all, the user enables auto login through System Preferences’ ‘Users & Groups’ pane. Open the pane and click on the Login Options item at the bottom of the sidebar (see the screenshot above). Choose a user from the ‘Automatic login:’ pop-up menu. You’ll need to provide the account password.
Where it gets interesting is what macOS does next with that information. You might perhaps think it secures that information safely in your Keychain, but that wouldn’t work at all. Your Keychain needs a user password to unlock it, so auto login can hardly unlock your Keychain to get the stored password out. No, it needs to be stored somewhere else that can be accessed when the computer starts up.
That place is in the hidden folder /etc/, and specifically in a file called kcpassword. This is outside of any user’s Home directory, so the system doesn’t need a user password to access it.
However, if you try to open that file to read it yourself (we’ll do this shortly, hold on), you’ll find you can’t read it without providing your admin password (the boot process already runs as root, so it doesn’t have this problem). For reasons we’ll see in a moment, you’d be mistaken to take much comfort from that in terms of security, but lets stick with /etc/kcpassword for a while first.
Now here’s something anybody can do, with or without elevated privileges (and by ‘anybody’ here we also mean ‘any process’): test to see if /etc/kcpassword exists. The file is only created when auto login is enabled, and it’s deleted when it’s turned off; thus, existence of the file is a simple way to check whether a mac has auto login enabled without needing to go through a user’s System Preferences pane.
A malicious program, for example, might run some code like this to test whether a target system is set to auto login:

If the file does exist, then passwordExploit will be ‘TRUE’, and all the attacker has to do now is execute code to read and parse the file:

We can take a look at what the file contains easily enough from the command line. Assuming you have auto login enabled (or you could just enable it temporarily for fun if you want to play along), try
sudo cat /etc/kcpassword
As we’ve already seen, you’ll need a password to see the password, but this isn’t a problem that’s going to phase a malware author, and nor does it mean that the malware author won’t be interested in the prize. Again, hold those thoughts while we look at what’s inside the kcpassword file.
Here’s what mine contains:

Hmm, goobledygook, it seems. Encrypted nonsense that surely takes a lifetime to break, no? Far from it. Be ready to behold the masterpiece of wisdom, humour or nearest book title that is your password by pasting this into the command line:
sudo ruby -e'key=[125,137,82,35,210,188,221,234,163,185,31];
IO.read("/etc/kcpassword").bytes.each_with_index{|b,i|break if key.include?(b);
print [b^key[i%key.size]].pack("U*")}'
Tradaa! And here’s my inglorious password: k33p_out_th3_badi3z.

How is that possible? No, it’s not some secret new encryption breaking technique. The fact is the kcpassword is not encrypted at all, it’s XOR’d. To see the basic idea, take the first character, ‘?’. The asci code for ‘?’ is 63 (this is for demonstration purposes only; the actual XOR’ing is done in hexadecimal rather than the simpler decimal used in this example). That number in binary is 00111111. To XOR it, all I have to do is provide another binary number, lets say 84, which is 01010100, and apply the rule that for each equivalent bit in the two numbers, if the bits are the same we output a zero, and if they are different we output a 1. Thus, ‘?’ (63) ^ ’T’ (84) comes out like so:
00111111 (asci 63 = ‘?’ – encoded password character)
01010100 (asci 84 = ’T’ – XOR mask)
—————
01101011 (asci 107 = ‘k’ – plain text password character)
Now, if we go through each of the characters in my encoded (note, not ‘encrypted’) password, and apply the correct XOR mask for each, we can reveal the password — note the mask for the first character in my demo was 84, but each character is XOR’d with a different mask — and that’s precisely what the Ruby script we used above did (again, noting that the masks are in hex rather than decimal).
OK, now you may have some questions. 🙂 The first is probably: do Apple KNOW THIS!? Oh sure, of course! Nobody uses XOR for security, at least not like this, but you can’t blame Apple that much. It’s a reasonable assumption on their behalf that if a user sets their computer to auto login, security isn’t high on their priority list. The second reason why Apple probably feel unconcerned by this is that you need a password to see the password, so surely there’s no real danger?
That may have made sense 30 or 40 years ago when the only people who had admin passwords were, well, administrators, and when processes couldn’t easily exfiltrate data via the internet. It doesn’t make much sense nowadays in a computing environment where people download software from unknown sources which immediately asks the user for a password to install and then phones home. Users rarely say ‘no’ to such requests (after all, they downloaded the software because they wanted to run it, right?) and almost certainly have no idea what processes run with admin privileges as a result.
It would also be a mistake to believe that, in this scenario, a piece of malware that has just tricked the user into providing an admin password to install would not need or want to run the exploit against the kcpassword file. Far from it.
Usually, when apps ask for your password to install, they don’t get to see the password directly. Some malware will present a false dialog to do this, but most will take the easier (and less suspicious) route of letting macOS mediate the process. A legitimate password dialog box is actually from macOS, and it only grants privileges to the requesting app; it does not give them the password in plain text. But the plain text password is the holy grail of malware persistence: as powerful as elevated privileges are, they may also be temporary, limited, and revoked; they also can’t be stored or easily transferred.
To see why this matters, consider a piece of malware that gains elevated privileges through the OS in the way described, but not the password. If the malware is discovered, it can be removed. If the attacker wants to strike again, they have to fool the same person into the same trick of installing their software as they did before. In a world where we’re all increasingly ‘once-bitten twice shy’ when it comes to computer security, that’s not a trivial task.
On the other hand, if the attacker gains the plain-text password from the first attack, this can either be stored elsewhere on the victim’s computer (somewhere that doesn’t need privileges to be accessed) or even sent back to the attacker’s remote command and control server. In that case, even deleting the malware isn’t going stop the attacker (indeed the attacker may delete the malware themselves to avoid detection!). All they have to do is connect to your mac remotely, input your admin password and they’re straight back in again.
I hope it’s clear from this that due to the weak obfuscation of the kcpassword file, auto login is a tremendously bad idea. It doesn’t matter whether your mac is locked in a one-person vestibule with round-the-clock guards. It’s when your mac is in use that it’s vulnerable.
Moral of the tale: disable auto login, folks, especially those of you that just enabled it to play along with this post!
Acknowledgements:
Ruby script: http://osxnotes.net/passwords.html
Background info: OSX Incident Response – Jaron Bradley

