Blog Archives
scan for malware on the command line
DetectX Swift now has the ability to do command line searches for issues on your mac like malware, keyloggers, browser hijacks and potentially dangerous software, and there’s a number of extra options that are not available when using the user interface. In this post, I’m going to give you a quick tour of the CLI (Command Line Interface) tool with some examples of how to use it (if you haven’t yet grabbed a free copy of DetectX Swift you might want to do that first to play along).
1. Basic scan
Let’s start with a basic scan. To use the CLI search, you need to specify the full path to the app executable. In this example, let’s suppose that the app is in /Applications folder. In that case, you’d need to execute this on the command line:
/Applications/DetectX\ Swift.app/Contents/MacOS/DetectX\ Swift search
Since that’s a bit of a handful, even using tab completion, you might want to edit your .bash_profile to include a shortcut alias. Here’s mine:
sphil@sphils-iMac-5:~$ cat .bash_profile
alias sudo='sudo '
alias detectx='/Applications/DetectX\ Swift.app/Contents/MacOS/DetectX\ Swift'
Note the sudo line (and note the extra space in the value). We’re going to need that so that we can pass the alias to sudo when we want to pass certain options to the search. Like…
2. Scan other users
Probably the most important benefit you gain with scanning on the command line rather than from the app’s interface is the ability to scan all, or selected, other users. You can search all users by using sudo and the -a option:
sudo detectx search -a
If you want to restrict the search to one or more users, the -u option allows you to specify a list of shortuser names (comma-delimited):
sudo detectx search -u alice,bob
3. Go deep
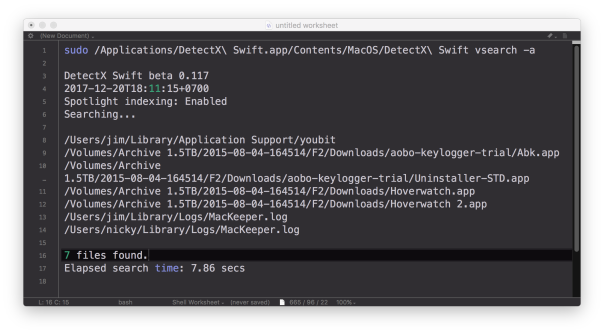
If you’d like more verbose output, including how long the search took, try either the vsearch or vvvv commands:
sudo detectx vvvv -a
4. Save the results
You can specify a path to output the results, either in regular text:
sudo detectx vvvv -a ~/Desktop/searchtest.txt
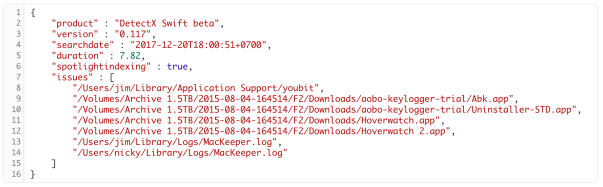
or, by passing the extra -j option, in JSON format:
sudo detectx search -aj ~/Desktop/searchtest.json
Here’s an example of what the formatted JSON file looks like:
5. Anything else?
There’s a help command that will output the documentation to the command line, and also if you get into the habit of regularly running command line checks, don’t forget to launch the app from time to time in the Finder. Like its predecessor, DetectX, DetectX Swift does a lot of other stuff besides searching that can help track down and remediate problems with your mac, and a large part of that revolves around the way it tracks changes to your system every time you launch it. The CLI tool runs independently of that and won’t give you that kind of feedback or record those changes.
Finally, note that in the release version of DetectX Swift, the CLI tool is only available for a limited period to Home and Unregistered users. Unlimited acccess to the CLI tool requires a Pro or Management license.
Enjoy! 🙂
Terminal tricks for defeating adware

So, your browser is acting up, redirecting you to scamsites, offers for MacKeeper and Mac Cleaner and other unwanted software. You have what is technically known as ‘an adware’ infection. It’s not a virus, it’s not a ‘trojan’ and it’s not a ‘worm’, but it is a nuisance and may well be associated with any of the above. What to do?
Here’s 10 Terminal tricks you can use to help identify and remove adware items. It won’t cover every situation: adware mutates faster than a flu virus on amphetamines, but it will catch 90% of the cases currently out there. For the ones it doesn’t, see the ‘Getting Help’ section at the end of this post.
I’m going to split this up into two phases, ‘Gathering Information’ and ‘Dealing with the Results’. After explaining the first half-dozen commands individually, I’ll then give you one ‘master’ or ‘mother’ command which combines them into a single execution, but you should read through the explanations first so that you know what you’re doing and what to expect.
Gathering Info
First, most adware wants to persist on your mac across logins and restarts, and that means it has to put an executable somewhere where macOS will look on start up. One place most users should be familiar with and check first is the Login Items in System Preferences ‘Users & Groups’ pane. A lot of adware will insert itself there for good measure, but most will almost certainly be in other, trickier to find places.
This is where our first Terminal trick comes in. This Terminal trick will output the contents of the main locations where adware typically hides:
1. List the contents of your Launch* folders:
ls -alF /Lib*/Launch*/ ~/Lib*/Launch*/
That’ll output the contents of three different directories, /Library/LaunchAgents, /Library/LaunchDaemons, and ~/Library/LaunchAgents. If you’re planning on getting help by publishing the results in a public forum like Apple Support Communities, then you might want to use this version, which will scrub your username out of the results:
2. Same trick, redacting personal info:
w=`id -un`;ls -alF /Lib*/Launch*/ ~/Lib*/Launch*/ | sed "s@$w@[redacted]@g"
The output of that command will have a load of files with names like ‘com.company.filename.plist’. To give you an example here’s what mine outputs (note, none of these are adware files; unsurprisingly, my Mac is adware free!).
Slipping a shell script into the /etc/ directory is a common adware trick, so let’s also run this one, which will output any files in /etc/ that have the .sh shell script extension:
3. Find shell scripts in /etc/:
ls -alF /etc/*.sh
(this one won’t contain your user name, so we don’t need to redact anything).
A lot of adware persists by running sneaky little AppleScripts from a shell script. We can detect if any of these are at work with this little spell:
4. List osascript processes targeting your browser:
ps -axo ppid,pid,command | grep 'osascript -e global' | egrep -i "if is_Firefox_running|if is_Safari_running|if is_Chrome_running" | grep -v "grep" | grep -v ' 1 ' | awk '{ print $1, $2}'
All this command outputs is two numbers, perhaps like this:
7783 7792
7783 7825
8978 8987
We’ll discuss what to do with those in the ‘Dealing with Results’ section below.
Next, we want to see what processes are actually running in the background. This will both confirm and possibly add to information we collected earlier. To do this, we need a little trick which looks like the same command twice, but which in fact operates on two different lists of processes:
5. List loaded background processes:
w=`id -un`; r="s@$w@[redacted]@g"; launchctl list | grep -v apple | sed "$r"; sudo launchctl list | grep -v apple | sed "$r"; sudo -K
When you run this one, a list of processes will be output, and then you’ll be asked to supply an Admin password on the command line (where even the key presses won’t be visible when you type). Supply the password and a second list will be produced. We will want to examine both later.
A file name common to a widespread family of adware is rec_script.sh, and this can be hidden anywhere in the user or local Library folders, so let’s run this one, too (here we will add the redacting again in case you’re posting the results in a public forum). You’ll need to supply an admin password for this though:
6. Find a common adware executable:
w=`id -un`; sudo find /Library ~/Library -name "*rec_script.sh*" | sed "s@$w@[redacted]@g"; sudo -K
This one may take a couple of seconds to complete.
That concludes the first step of our info gathering stage, but for convenience, I’m going give you them all again concatenated into one, single ‘mother of all commands’ 🙂 string. Even more conveniently, I’ve added code to output the results to a text file on your Desktop, called ‘adware_search.txt’, so after running the code below go look for ~/Desktop/adware_search.txt in Finder. If you’re posting to a public forum, it’s much easier to copy and paste the results from the text editor rather than from Terminal.
TL;DR
If you triple-click anywhere in the block of code below, you can copy and paste the whole block into Terminal and execute all of the commands given above in one fell swoop. Remember you’ll need a password.
7. The ‘Mother’ of all the above:
w=`id -un`; r="s@$w@[redacted]@g"; f="/Users/"$w"/Desktop/adware_search.txt"; ls -alF /Lib*/Launch*/ ~/Lib*/Launch*/ /Users/Shared /usr/local/bin | sed "$r" >> "$f"; printf "\n\n/etc:\n" >> "$f";ls -alF /etc/*.sh 2>/dev/null >> "$f"; printf "\n\n# osacript processes:\n" >> "$f"; ps -axo ppid,pid,command | grep 'osascript -e global' | egrep -i "if is_Firefox_running|if is_Safari_running|if is_Chrome_running" | grep -v "grep" | grep -v ' 1 ' | awk '{ print $1, $2}' | sed "$r" >> "$f"; printf "\n\n# User launchd:\n" >> "$f"; launchctl list | grep -v apple | sed "$r" >> "$f"; printf "\n\n# Root launchd:\n" >> "$f"; sudo launchctl list | grep -v apple | sed "$r" >> "$f"; printf "\n\n# Find rec_script.sh:\n" >> "$f"; sudo find /Library ~/Library -name "*rec_script.sh*" | sed "$r" >> "$f"; sudo -K
Interlude: Playing Safe
Before we move on to dealing with the results, I want to stress that you don’t want to be deleting files that you’re not sure of. Good practice is to move files to a temporary Quarantine folder, or at least move them to but don’t empty the Trash.
Even better practice is to make sure you have an up-to-date, bootable backup disk as well as a Time Machine backup, so that you can easily recover your system if you make a mistake and delete something you shouldn’t.
Dealing with the results
Looking at the output of the first Terminal command given above (Trick 1 or 2), how can you tell which are good and which are bad? In a lot of cases, you’ll recognise the app or developer name. TunnelBear, for example. “Sure, yeah, I’ve got that” and so on. Others, however, will look and sound weird, like these (all genuine adware file names):
com.glutting_Panagia.plistcom.pPHGASlN.plistcom.phellonic.plist
Google anything you’re not sure of, and see if it’s already been identified as adware. See ‘Getting Help’ at the end of this post if you’re not sure.
Walking up & down the tree
Assuming you’ve found some candidates for removal, the next job is to find the parent and child processes associated with each. We do that with a couple more Terminal tricks.
For the first one, we want to find any process that contains the same name as our suspected adware. For each suspect, take the unique part of the name for your search term. With this one we can put all our candidates in one command like so:
8. Search for your target’s family members:
w=`id -un`; ps -axo ppid,pid,command | egrep -i "glutting_Panagia| pPHGASlN | phellonic" | grep -v ' 1 ' | grep -v grep | sed "s@$w@[redacted]@g"
Note the part after egrep -i that’s inside quote marks. Each search term is separated between a vertical bar, aka the pipe character. Note that the terms themselves are not inside quote marks individually. One pair of double-quote marks is used to encapsulate all terms.
So to use the command above replace “glutting_Panagia| pPHGASlN | phellonic” with “search term 1 | search term 2 | search term 3”, where ‘search term n’ is your search term. Of course, you can have more or less than three search terms. Just add or remove as required.
When you examine the results, so long as the first number is not ‘1’ (it shouldn’t be if you executed the command correctly, as all those should have been excluded), follow the file path shown under the ‘Command’ column using either Finder or the Terminal. If you’re sure you’ve found a baddie, send it to the Trash or your quarantine folder! If you’re not sure, see ‘Getting Help’ below.
You will need to construct and run the next command separately for each suspect. The output will give you the path to the binary being executed by the plist. In many cases, you’ll have already found that from the previous commands, but in some cases – particularly if the plist has failed for some reason or if the binary isn’t running when you do your search – it won’t. This one’s the trickiest because you’re going to have to construct most of it yourself. Here’s an example (this is actually a legitimate file, but it will serve for our purposes):
cat /Library/LaunchAgents/com.razer.rzupdater.plist | grep -iA3 program
Let’s look at how that command is structured:
9. Find more children:
cat [path to file] | grep -iA3 program
You get the ‘path to file’ part from the results of your /Library/Launch* searches, and there’s no harm in practising this one on good files to get used to the output. For each item you search, it should return something that looks like this:

Here we see the path to the executable that the plist is launching. If this were a bad guy, I’d be straight over there to send him where he belongs, too.
After working through all your suspects with Trick 8, now take a look at the results of the command to output shell script file names from /etc/ (Trick 3). If there were any results at all (hopefully there wasn’t), you’re going to have to open that file in a text editor and determine whether it is malicious or not. This is the hardest part for the novice, because there’s certainly plenty of reasons to have a shell script in /etc/ depending on what 3rd party software you’re running. I can only repeat here what I have said above: see the ‘Getting Help’ section below if in any doubt.
Next, let’s take a look at the results for the osascript processes (Trick 4). Hopefully, you got no results, but if you had two sets of numbers outputted like this:
7783 7792
then the first number is the parent process ID, and the second number is the child ID. We want to find and eliminate both the parent (again, so long as this number is not ‘1’) and the child.
Take the first number and execute this in Terminal
10. More parents on the loose:
ps [number]
Take a note of the path that’s shown and ensure it doesn’t belong to a legitimate app that you recognise. Again, if in doubt, ask Google, or see ‘Getting Help’ below.
Now, do the same with the second number, the child process. Work through however many numbers were output, ‘quarantining’ as you go.
Almost there! Take a look at the output of the two launchd lists (Trick 5). You should have a good idea by now which ones are suspect and which are OK. You may have found the paths to any suspicious ones already, but if not, we’ll use the same command as we just used with the osascript processes. Here’s the output on my machine of the Trick 5 command (all legitimate) for comparison:

We’re only interested in the first number (the second one is status code). For any suspicious process, take the first number shown in the list, and use the Trick 10 command on these to find the parent file path (you know what to do with the ones that aren’t legitimate!).
If there is only a ‘-‘ dash instead of a number, it means that process is or was loaded but is not currently running. That dash may or may not be followed by another number that is not ‘0’. That number is just an error code and isn’t really relevant to us here. For any of your suspects that have failed like that, hopefully the info you gathered earlier will give you some clues (if not, see ‘Getting Help’ next).
Finally, anything found in the ‘find’ command (Trick 6) is almost certainly malware. Of course, be mindful that it’s entirely possible a legit’ script could accidentally have a name clash and be called rec_script.sh, but it’s highly unlikely and definitely should be examined closely. Also, if you see that the path is within an application bundle like this …Contents/MacOS/rec_script.sh, don’t hesitate to pull the trigger on that one.
Getting Help
I want to repeat that doing this safely and effectively takes practice and experience, and you should in no way be surprised that, if you don’t have that experience, you’re not sure whether something you’re looking at is good or bad, or that you go through all of this and still can’t find the problem. There’s some fairly obscure ways that adware and other malware can infest and persist on your mac that only experts will be able to advise you on. Throughout this post I’ve glossed over a few situations where you’ll draw a blank, and that’s because most of the other techniques for spotting malware require that experience.
To ameliorate this, I wrote an app called DetectX Swift to deal with this and many other things, and you can download it and use it without any requirement to pay. You can also use it to get personal, free-of-charge, help from me through the Help > Report a Problem to Sqwarq Support if your troubles persist.
Let me be clear why I don’t charge for this personal service: the payoff for me is I get to improve my app’s heuristics from what I learn about infections that DetectX doesn’t automatically detect. All information is kept strictly confidential and I do not sell or use your email address or other information for any marketing purposes whatsoever.
If you want to read more about me, also see the about page on DetectX’s parent site, Sqwarq.com.
Happy hunting! 🙂
Related Posts
scan for malware on the command line
learning the Terminal: Part Three
It’s been a while since we last posted about Terminal tips and tricks, but a question popped up today about how to discover what tools are available on the command line.
Most of the tools you use in Terminal are located in /usr/bin, and we can use a nifty little tool from there to find out about all its friends. The whatis tool gives you a one-liner description of what a tool does. If it looks interesting, you can find out more about the tool by typing man and the tool’s name on the command line to see its help manual.
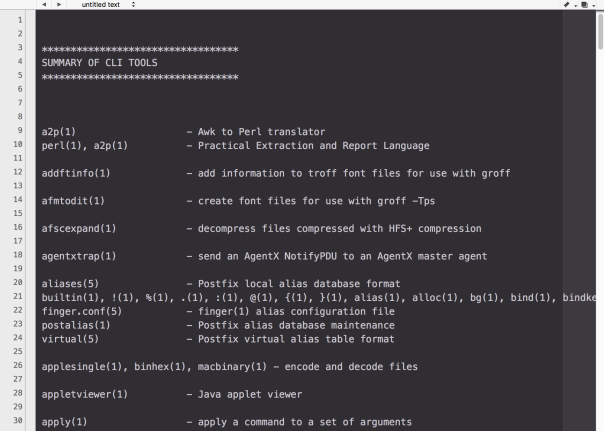
On my current machine, there’s over 1000 tools in /usr/bin, and life is just too short to go through them all doing whatis on each and every one, so we’ll combine a bit of command line power with some AppleScript magic, and produce a nice, easy-to-scroll output of all the summaries like the one in the screenshot above.
Copy the script below (or from my pastebin here) and paste it into the Script Editor (/Applications/Utilities/Script Editor.app). Click the ▶︎ button to run it.
This script took about 1m 30 seconds to run on my machine, but you only need to run it once then save the output. Browse or search through it at your own convenience. 🙂
The script will choose TextWrangler for display if you have it installed; if not, it’ll default to TextEdit. The display is much nicer in TextWrangler, but if you’re stuck with TextEdit, turning off ‘Check Spelling’ in TextEdit will aid readability.
# start
(*
This script produces a summary of all the CLI tools
in /usr/bin and displays it in a text document
*)
set noDocsList to {}
on extractDescription(aText)
repeat with i from 1 to count of items in aText
set this_item to item i of aText
if this_item contains "NNAAMMEE" then
set r to item (i + 1) of aText
try
set o to offset of "—" in r
set short_r to text (o + 1) thru -1 of r
set r to short_r
end try
return r
end if
end repeat
end extractDescription
set theDescriptions to return & return & "**********************************" & return & "SUMMARY OF CLI TOOLS (Version 2)" & return & "**********************************" & return & return & return
tell application "System Events"
set theItems to name of every file of folder "bin" of folder "usr" of startup disk
end tell
repeat with i from 1 to count of theItems
set this_item to item i of theItems
set n_item to length of this_item
try
set what_is to do shell script "whatis " & this_item
if text 1 thru n_item of what_is is this_item and what_is does not contain "nothing appropriate" then
set theDescriptions to theDescriptions & return & what_is & return
else
try
set getMan to paragraphs of (do shell script "man " & this_item)
set desc to extractDescription(getMan)
set what_is to this_item & tab & tab & tab & tab & desc
set theDescriptions to theDescriptions & return & what_is & return
on error
set end of my noDocsList to this_item & return
end try
end if
end try
end repeat
set theApp to "TextEdit"
tell application "Finder"
if exists POSIX file "/Applications/TextWrangler.app" then
set theApp to "TextWrangler"
end if
end tell
set theDescriptions to theDescriptions & return & return & return & "The following tools do not have any documentation: " & return & return & noDocsList
tell application theApp
activate
make new document
set front document's text to my theDescriptions
end tell
# EOF
Related Posts
learning the Terminal – Part One
learning the Terminal – Part Two
learning the Terminal – Part Four
FastTasks 2 update available 💥
I’ve just released an incremental update for FastTasks 2. Update 1.3 adds the ability to quickly see whether TRIM is currently on or off for your SSD disks. Since TRIM support for non-Apple SSDs requires editing a kernel extension, TRIM is regularly disabled on non-Apple SSDs every time users update or upgrade OS X. FastTasks 2 v1.3 now lets you see TRIM status in the information section of the menu.

Get the latest release of FastTasks 2 by going directly to the FastTasks support page, or if you already have FastTasks 2 running, you can use the Preferences > Check for Update > Check now menu item.
🙂
run Terminal commands from any app
In this post I’m going to show you how you can select a piece of text in any app and have it run in Terminal simply by hitting a hotkey. The trick is especially useful for running commands you find on websites (like this one!) in a browser like Safari or Firefox.
This 20-second clip demonstrates running a command from a Firefox browser and another one from TextEdit, but you can also do it from an AppleScript editor window (and indeed any app that has selectable text), which can be useful for testing the formatting of your ‘do shell script’ commands and the like:
The first thing you’re going to need is to create an Automator workflow, add an AppleScript action and insert some code. Really? Nah, just kidding. I did it for you. 🙂 Just download, unzip and double-click the .workflow file to install the completed Service:
Download Run in Terminal.workflow.zip
Click through the various dialog boxes and choose ‘Install’ on the last one* (note for Snow Leopard users: the service will open directly in Automator; just do ‘command-shift-S’ to name it and save it).

All you need to do now is set the hotkey. Open > System Preferences.. > Keyboard | Shortcuts and click ‘Services’ in the sidebar. Scroll down the window till you see the ‘Run in Terminal’ command. Click on the far right to add a shortcut of your choice. The one I used in the video is ‘command-option-control-T’ (‘T’ for ‘Terminal’ helps me remember the shortcut).
To use the Service, just highlight any Terminal command by triple clicking it and pressing your hotkey. Try this one,
cd ~/Desktop; ls -alF
which lists all the visible and invisible files on your Desktop, as a test.
You can also get to the Service from both the contextual menu (right-click > Services) and the application menu bar at the top (e.g., Safari > Services).
As a bonus, try out your new Service on the Terminal command in this post, and now you’ll be able to run Terminal commands even from Quick Look previews in Finder!
Enjoy! 🙂
how to show or hide hidden files with one click

Reveal is a one-click toggle switch to show/hide hidden files in the Finder. Unzip it, pop it in your Applications folder and drag it to your Dock for quick access. You may need to override your GateKeeper settings the first time you run it if you have those set to ‘App Store & Identified Developers’ or stricter. Don’t worry! So long as you download it from here, I personally guarantee it’s safe (I wrote it myself!). Best of all, it’s free, so enjoy!
learning the Terminal – Part Two

In the last post, we learned how to see all the contents of a folder – invisible and visible files – in the Terminal. However, most of us prefer working in the GUI, so this post is going to show you how to work a bit of Terminal magic to easily turn on and off your invisible files and folders in Finder and the desktop.
Open Terminal, and type or copy/paste the following to the command prompt:
defaults write com.apple.finder AppleShowAllFiles TRUE; killall Finder
(note that all commands in these posts should always be assumed to be case-sensitive).
Press Return.
Now switch out of Terminal and have a look at Finder or your desktop. You should see some ‘hidden’ files now in a sort of greyed-out 50% opacity (files like .DS_Store). If you can’t see such files, go back and check that you typed or copied the entire command correctly.
Assuming you can now see your invisible files in Finder, switch back to Terminal. Press the up arrow key on your keyboard. Notice that the last command you typed reappears.
That’s a handy trick to remember. You can move between your previous commands with the up arrow and down arrow keys to save time re-typing or modifying commands.
In this case, we want to use the last command again, but we also want to modify it. Use the left arrow key to move the cursor back to “True” and then use delete to remove “True”. Leave the cursor where the letter ‘T” was and type FALSE. Make sure the semi-colon ; is still there.
Press Return — you don’t need to move the cursor to the end of the line as you would with a word processor. You can hit Return no matter where the cursor is in the command line and it will execute (or try to) whatever is typed on the whole of the command line.
Now, if you switch back to Finder or the desktop, you should see that all your hidden files have disappeared again.
OK, now that we have tested these commands to check that they work, let’s do something a bit more useful with them.
Switch back to Terminal. Type
^FALSE^TRUE
and press Return.
Wow! Did you see what just happened? You substituted the word “FALSE” from the last command with the word “TRUE” and executed the entire command. In other words, you just made your hidden files visible again! Go and look at the desktop and you’ll see that your invisible files just returned. Try it again. Switch back to Finder and type
^TRUE^FALSE
to replace the word “TRUE” in the last command with the word “FALSE”. Hit Return to execute it.
Using the pattern ^error^correction is a great way to both correct commands you type incorrectly and to run two commands one after the other that have only one term or option different.
Back in Terminal, hit the up arrow to bring the last command back onto the command line. This time, I want you to hit control-A on your keyboard. Notice that this brings the cursor to the start of the command line, which is what we want as we’re going to type in a new command before the “defaults…” part.
With the cursor at the beginning of the line, type
echo
and a space. Then type a double quotation mark right next to the ‘d’ of ‘defaults, so the beginning part looks like this
echo “defaults…
(the ellipsis or ‘…’ is used here just to show that the command continues and should not be in your actual command line)
On the keyboard, press control-E.
This takes the cursor to the end of the command line (remember: control-A to go to the start, control-E to go to the end).
Type another double-quotation mark right after the word ‘Finder’ so the ending looks like this
… ; killall Finder”
Now hit the spacebar once, and type a double right angle-bracket
>>
Hit the spacebar again and type
.bash_profile
The entire command should look like this:
echo “defaults write com.apple.finder AppleShowAllFiles FALSE; killall Finder” >> .bash_profile
Now press Return. Type
^FALSE^TRUE
and press Return one more time.
What did we just do?
To see what you did, type
emacs .bash_profile
As you can see, after testing those two commands on the command line, we’ve now sent them to the .bash_profile file, saving us the job of typing them out again (and possibly making an error when we do so). However, we can’t leave the commands like that – if we do, then they will run every time we log into the Terminal. Rather, we want to use these commands to define functions, just like we did last time with ‘show’ and ‘up’.
To do that, press control-L on the keyboard, then use the down arrow key to bring the cursor to the beginning of the first line with a ‘defaults’ command on it.
Press Return. Press the up arrow once, then type
function hide_all
Press Return and in the new line created type
{
Use the down arrow key to move the cursor down to the line below the “Defaults…FALSE” line and press Return.
In the new line created type
}
Then press Return. Type
function show_all
Press Return and type
{
Use the down arrow key to move the cursor below the “Defaults…TRUE” command. (If you can’t go below the last typed line, then on the keyboard press control-E to move the cursor to the end of the line, the press Return).
Then type
}
Check that the whole thing looks like this:

Once you’re satisfied, hold down the control key while pressing first the x and then c keys. Press y when prompted to confirm the save. You should be returned to the command line. Type
exit
to logout. Then press command-W and command-N to close and reopen Terminal.
What did we do this time?
We just made some new, easy-to-remember commands to show and hide our hidden files in Finder and the desktop. On the way, we learned how to append commands to files using the >> function, as well as how to move the cursor to the beginning and end of a line using ‘control-A’ and ‘control-E’ respectively. We also learned how to recall previous commands on the command line using the arrow keys and how to correct or modify previous commands using the ^error^correction pattern.
Wow, you’ve come a long way in two short tutorials!
To test out what you just did, type
show_all
then press Return.
Switch to Finder and there’s all your hidden files! To make them invisible again, switch back to Terminal and type
hide_all
then Return.
From now on, whenever you want to see your hidden files, just use the show_all command in Terminal. Hide them again with hide_all. 😃
SUMMARY
control-A – places the cursor at the beginning of the command line (also works in emacs editor)
control-E – places the cursor at the end of the command line (also works in emacs editor)
control-L – on the command line, this clears the screen (equivalent to the ‘clear’ command); in emacs, this places the caret inside the editor allowing you to edit (=insert point)
up & down keyboard arrows – moves through history of commands
^error^correction – replaces the term after the first ^ with the term given after the second ^ in the previous command, then executes the entire command
echo – sends the following string or command to the specified file (if no file is specified, the string will output back to your terminal screen. In other words, if you type echo hello, the Terminal will print “Hello” on the next line; hence the term ‘echo’! )
Related Posts:
learning the Terminal – Part One
learning the Terminal – Part Three
learning the Terminal – Part Four
how to change all Desktop backgrounds
Fasttasks – a utility for ten common terminal tasks
kernel_task at 103%!!

Overheating on MacBook Pro’s is a rare problem, usually down to nothing more than new users mistakenly thinking the aluminium casing is supposed to feel cool to the touch. However, you know something’s wrong when the glass touchpad feels warm and the fan’s not even stirring…
When Finder and other apps start crashing, what might have been a small concern now starts to look like a real problem. You can try re-booting, but if you find that the reboot takes ten minutes or so and/or the keyboard doesn’t function at the login window, chances are your kernel_task process is running wild. If you’ve still got access to the desktop, you can check this in Activity Monitor, or use Terminal by typing:
>top -u
Normally, kernel_task won’t take up much more than one or two percent of CPU activity, so if you’re running at over 100% or you can’t get past the login window, its time to do a PRAM/VRAM reset.
Here’s how:
1. Power down the machine.
2. Locate the following keys on your keyboard in preparation for Step 4:
‘command’ – ‘option’ – ‘P’ – ‘R’
3. Press the ‘power on’ button.
4. Immediately – and before the grey screen appears – hold down ‘command-option-P-R’ all together.
5. Keep them held down until you’ve heard the start-up chime twice. After you release them you should hear it again, and hopefully your Mac will boot up as it should and with the kernel_task process back to normal.
Tooltip: download and run smcFanControl in your ‘Login items’ to keep an eye on your temps and fan speed in the Menubar. 😉
Have you still got this problem, or found another solution? Let us know in the Comments! 🙂
Related posts:
Why is my mac running so hot?
Why is my mac running so slow?
Also see:
Resetting the System Management Controller (SMC)
featured picture wormhole by IVIXIVIXVXII

