Blog Archives
how to remove MyCouponsmart on macOS

The adware plague on macOS continues, and if you’re one of the thousands that have caught something unwanted when you downloaded some other program, this post should help. I’ll explain what MyCouponsmart is, what it does, and how you can remove it, either yourself or with a simple and free shareware program I develop.
What is MyCouponsmart?
Like MyCouponize, TotalAdviseSearch, DigitalChannel Search and many others, MyCouponsmart is one of a host of “search offer” programs that either redirect or inject your web browser with ads when you make an internet search. You may have been looking for some kind of media downloader or media player, like Adobe’s Flash, and inadvertently end up with a bunch of unwanted programs like MacKeeper, Mac Auto Fixer, Advanced Mac Cleaner or some other similarly named “performance” app.
Typically, these programs will take over your browser, showing scare pages like the following:
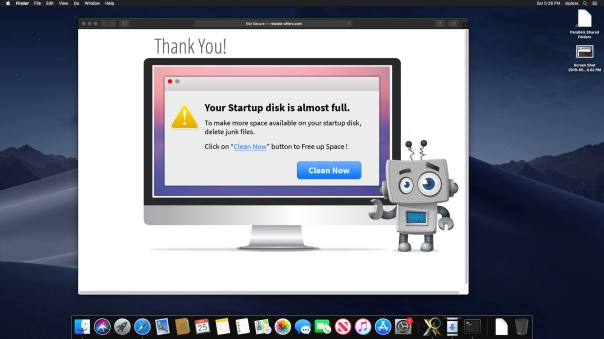
Hmm, it looks like my computer has got plenty of free space available, thank you very much!
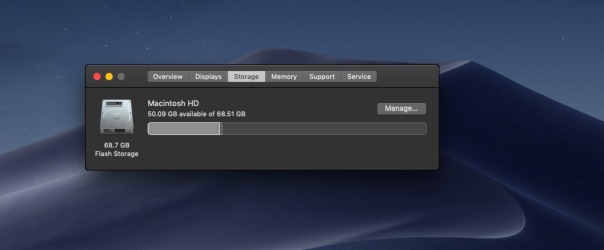
That’s no surprise, really. Webpages cannot tell you how much free space is on your local drive, nor can they scan your drive and “detect infections” as some other scare pages want users to believe.
All such warnings are entirely fake and tell you only that you have some kind of adware infection in your browser! The people behind the ads bank on the fact that many users do have full drives, so when they check they are fooled into believing the advertised product can help them.
Similarly, many users who see these kind of scare adverts offering fake Anti-virus software often do indeed have malware on their computer: the malware that’s causing the advert to appear!
Needless to say, none of these advertised programs are worth your money.
What does MyCouponsmart do?
Let’s take a look inside your user Library. This is hidden by default, but you can get to it from the Finder’s “Go” menu. Click on the Finder then use the keyboard combination
Command-Shift-G
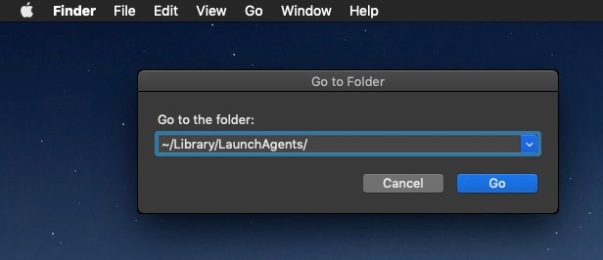
Type in, or copy and paste, the following, and be sure not to miss that tilde ~ at the beginning, or you’ll end up in a different place:
~/Library/LaunchAgents
This is the LaunchAgents folder. There’s actually more than one, but the one in your own user account is the one we’re interested in. The LaunchAgents folder is responsible for ensuring certain things launch, as the name implies, every time you login. This is achieved by executing files called “property lists” or plist for short.
Property lists are really useful, and are meant as an aid so that you don’t have to keep starting up lots of processes manually every time you log into your account. They can also be used to make sure that a process stays alive all the time that you’re logged in. Great for things that you want to happen, but bad if you have got some adware or malware that you’re trying to get rid of.
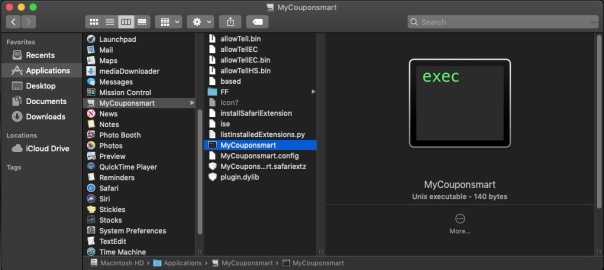
If MyCouponsmart is installed on your Mac, you should find it has installed a property list in the LaunchAgents folder to ensure that it’s always running. Before getting rid of this, let’s just take a look at it. You don’t need to open it in an editor, just select the file by clicking it once and then pressing the spacebar to allow QuickView to show you the contents.
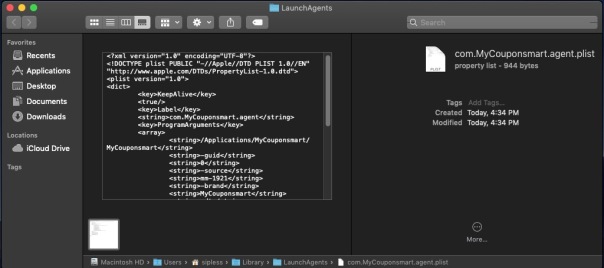
Notice that first ProgramArgument? It points to a folder within your /Applications folder, also named MyCouponsmart, and then to something else with the same name inside that folder, too. Let’s go take a look at what they are.
If you want to play along, open the Terminal, type the word file then drag the MyCouponsmart executable into the Terminal window. Press ‘return’.
The file command reveals that the MyCouponsmart file is actually a bash script, and if we take a look at its contents with the cat command, you can see that the script is itself meant to launch another executable called mmLaunchMe located in the hidden /tmp/ folder. Let’s see if this executable has a valid code signature.
codesign -d -v /tmp/mmLaunchMe
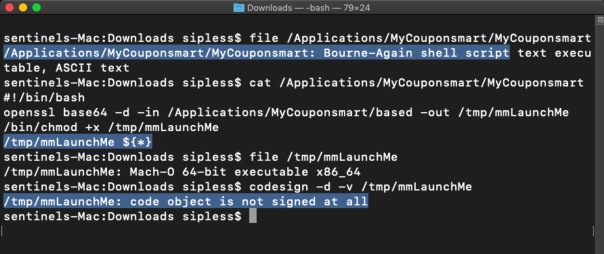
No, indeed it doesn’t, but as I’ve written about before, that won’t stop the code from running, regardless of what Gatekeeper settings you use. The purpose of this executable is to run every time you login, and download more software that you didn’t specifically ask for in the background. It’ll keep on doing this every time you login until you remove it. Of course, by then you’ll have lots of unwanted programs to remove, too.
How do I remove MyCouponsmart?
The main thing to do to remove MyCouponsmart is to delete the property list and restart your computer. After that, you’ll need to search and find all the components it’s installed. If you like playing around in the Terminal, I have a post here on how to do that.
Alternatively, you can use the shareware app I created, DetectX Swift, which will remove the property list and all the other components for you.

Notice from the Activity Log that DetectX also automatically kills background processes belonging to the adware as well as removing the files. Nevertheless, you should always restart your Mac after removing these kinds of files to ensure you have purged everything from running memory.
You can use DetectX Swift to remove MyCouponsmart and similar adware without registering or paying any fee. In fact, I encourage you NOT to register DetectX Swift until after you’ve used the app a few times and feel you want to support the continued existence of shareware apps like this. Payment is not at all required: nobody should have to pay just to remove junkware from their Mac!
If you have any questions about removing MyCouponsmart or about using DetectX Swift, feel free to share them in the comments below.
Picture Credits: Anaya Katlego
adware extensions erode trust in Apple, Google app stores
Browser extensions are a staple of almost every user’s set up. Even in managed environments, users are often able to install extensions or ‘Add Ons’ without authorisation when these are sourced from trusted sources like Apple’s Safari Extensions Gallery and Google’s Chrome store. Of course, there’s nothing new about attackers exploiting the browser extension as a means to gaining a foothold in a target environment. The problem has been around for years: what is surprising is just how difficult it is to contain the problem. In this post, I take a look at the risks involved with what appears to be a harmless extension available for both Safari and Chrome. As we’ll find out, not everything appears as it seems.
browsers’ anti-phishing protections easily defeated

While troubleshooting a user’s mac the other day, I happened to come across a curious line in one of the logs:

After a bit of digging, it occurred to me that this and the other flags being sent in the process command were possibly Preferences or Settings in the Chrome.app. Looking at chrome://settings/privacy revealed, of course, Google’s phishing and malware protection setting, ‘Protect you and your device from dangerous sites’.
Here it is set to ‘On’, which is the default setting:

A quick test proved that setting it to ‘Off’ produced the `—disable-client-side-phishing-detection’ flag in the browser’s process output. Setting it back to ’On’ and relaunching the browser produced no output, confirming my theory.

A quick message to my user also confirmed that he wasn’t aware that phishing protection had been disabled, and to the best of his memory, had not been disabled by himself.
A simple preference setting
That got me to wondering whether that setting could be turned off programmatically by another, possibly malicious, process. To my surprise, it turns out that it’s trivial to do so.
All Chromium browsers have a Preferences file located in their Application Support folder. Usually this is within another folder called ‘Default’, but not always. Chrome and Vivaldi, for example, have it there, but Opera (and Opera Developer) store the Preferences file at the root level of their respective support folders.
The file contains the setting for whether the Phishing protection should be enabled or not. To determine how the preference was encoded in the file, I made a copy of the current Preferences file, toggled the setting, then made another copy. BBEdit’s ‘Find Differences’ function quickly told me the name of the key (if you don’t have BBEdit, you can also use Xcode’s FileMerge to run diffs, though it isn’t as pretty or as full-featured):

Again, there are differences among browsers. As shown above, Opera uses the key “fraud_protection_enabled” which takes a boolean. Chrome and Vivaldi, on the other hand, use a “safebrowsing” key which takes an array of key-value pairs, with the first item of the array being the key “enabled:”, and taking a bool for its value, like this:
Vivaldi:
"safebrowsing":{"enabled":true,"unhandled_sync_password_reuses":{}}
Chrome:
"safebrowsing":{"enabled":true,"scout_group_selected":true,"unhandled_sync_password_reuses":{}}
With this information, it’s a pretty simple thing for another process running under your username to write to the Preferences file and turn off the built-in protections.
What about Safari?
Safari isn’t vulnerable to quite the same tactic as it doesn’t store its preferences in the same way. However, it’s even easier to defeat Safari’s ‘Warn when visiting a fraudulent website’ setting:

Apple hardened some of Safari’s preferences (like setting the Home page) some time ago to stop adware from making unauthorised changes, but this one is still unprotected in the current public release of macOS High Sierra. A one-liner in Terminal removes the preference:
defaults write com.apple.Safari WarnAboutFraudulentWebsites 0

What can you do?
The ease with which these protections can be surreptitiously turned off in all major browsers is a worry. And let’s face it, who would notice if this setting was quietly turned off? In both Chrome and Safari, the change takes effect immediately and does not even require a restart of the browser.
Fortunately, my shareware app DetectX Swift will warn you if browsing protection is off when you run a search and prompt you to turn it back on. To ensure that all insecure pages have been removed after turning the setting back on, DetectX Swift will continue to show the warning until you restart the browser and execute another search.

The protection covers all the browsers mentioned above. If you’re running some other browser and would like to know if it’s similarly vulnerable, drop a line in the Comments or contact Sqwarq Support and request support for your browser to be added.
Stay safe, folks! 😀
Featured pic: Nature by PichieArt
adware goes old school with cron job

I’ve been wondering for a while now why we see so much adware persisting with nothing much other than easily detected Launch Agents when there’s a variety of other methods available on macOS. Some of those require privileges, like this little known one, but others do not.

Thanks to a DetectX user’s quick reporting, I was able to spot a known offender making good use of the venerable old crontab routine. Set to run on the 4th minute, every second hour, the job fires an executable lurking in the user’s Application Support folder.

A quick look on Google’s VirusTotal confirms what we expected:
Although cron jobs are easy to spot if you go looking for them, this one would probably have stayed hidden away for a while longer if it hadn’t been for the speedy reporting of the user.
DetectX will now find this particular miscreant in its normal search routine, but if you want to check for others, run the Report a Problem to Sqwarq Support function in the Help menu. We’re happy to look through the logs that creates on your Desktop for you, or if you like delving into this kind of thing, check out the DetectX_Swift.Processes.txt file in the logs and search down for where it says ‘User Crontab’ as indicated in the screenshot at the top of this post. If you find anything there that you didn’t put in yourself, it warrants further investigation. Feel free to contact us at Sqwarq support if you need help with that.
Stay safe, folks! 🙂
What’s the difference between DetectX and DetectX Swift?

Since releasing DetectX Swift back in January, a lot of people have been asking me how the new ‘Swift’ version differs from the older one, aside from requiring 10.11 or higher (the original will run on 10.7 or higher).
Well sure, it’s written in Swift — and it’s much swifter, literally, but of course there’s a lot more to it than that.
I’ve finally had a spare moment to enumerate the feature list and create a comparison chart. Although the image above is essentially the same as the one you’ll see at the link address at the moment, there’s still a bunch of features to be added as we go through development of version 1. Thus, be sure to check the latest version of the chart to get the most up-to-date info.
Of course, if you have any questions drop me a comment below, or email me either at Sqwarq or here at Applehelpwriter.
Enjoy 🙂
Mac Media Player’s secret MacKeeper installer

Last week I added MacGo’s Mac Media Player.app to DetectX’s search definitions after finding that the installer was delivering MacKeeper on unsuspecting users. After a support call asking me whether the MacGo player itself was malicious, I decided to look into what was going on in a bit more detail.
Downloading the Mac Media Player from the developer’s site rewarded me with a DMG file called Macgo_Mac_Media_Player.dmg, and mounting that revealed the Installer.app (pictured above).
Examining the package contents of Installer.app had a few surprises. For one thing, the bundle identifier (a reverse domain-name style string used to uniquely identify an app on macOS) was the oddly titled com.throbber.tipcat, and the executable binary file was named hemorrhoid. Examining both the binary and other files in the Installer bundle revealed some heavily obfuscated code that is really quite unusual to see in anything except malware.
That gave me pause to try and run the Installer in the lldb debugger and see exactly what it was up to, but – also another sign of malware – the Installer.app appears to have been coded precisely to stop that from being possible. Every time I tried to attach the debugger to the Installer’s process, the installer quit with “status = 45”, a sign that the debugger is being deliberately thwarted.
My next tack was to dump the class names with
otool -oV /Volumes/Installer/Installer.app/Contents/MacOS/hemorrhoid | grep name | awk '{print $3}'

And that revealed some oddities, too. With names like ‘stockyardsStormed’ and ‘DefilersDiesels’ I was sufficiently intrigued to run the installer to completion and see it in action. As the screenshots below from my shareware troubleshooter DetectX and Objective Development’s Little Snitch 4 indicate, the unwary will get a lot more than just a free video player:


Finally, just to confirm my results, I uploaded the installer.app to VirusTotal, and found that it was a variant of the InstallCore strain of adware.

That pretty much wraps up the case against the installer, but what about the Mac Media Player app and its related version the Macgo Mac Blu-ray Player Pro? It seemed as far as I could tell that the apps themselves were ‘clean’. However, RB AppChecker Lite reveals that the installer and both the apps are signed with the same Apple Developer ID, ZJ Tech Inc, F9QTW5KSLJ.
That pretty much rules out any possibility that the developers had been unknowingly compromised. Clearly, ZJ Tech are quite happy to distribute their software to customers and do a stealth install of MacKeeper at the same time. Presumably, there’s some financial pay-off for them in doing that. Given that ZJ’s media players also seem to be little more than copies of VLC.app, it seems there’s pretty good reason enough to avoid using their products.
scan for malware on the command line
DetectX Swift now has the ability to do command line searches for issues on your mac like malware, keyloggers, browser hijacks and potentially dangerous software, and there’s a number of extra options that are not available when using the user interface. In this post, I’m going to give you a quick tour of the CLI (Command Line Interface) tool with some examples of how to use it (if you haven’t yet grabbed a free copy of DetectX Swift you might want to do that first to play along).
1. Basic scan
Let’s start with a basic scan. To use the CLI search, you need to specify the full path to the app executable. In this example, let’s suppose that the app is in /Applications folder. In that case, you’d need to execute this on the command line:
/Applications/DetectX\ Swift.app/Contents/MacOS/DetectX\ Swift search
Since that’s a bit of a handful, even using tab completion, you might want to edit your .bash_profile to include a shortcut alias. Here’s mine:
sphil@sphils-iMac-5:~$ cat .bash_profile
alias sudo='sudo '
alias detectx='/Applications/DetectX\ Swift.app/Contents/MacOS/DetectX\ Swift'
Note the sudo line (and note the extra space in the value). We’re going to need that so that we can pass the alias to sudo when we want to pass certain options to the search. Like…
2. Scan other users
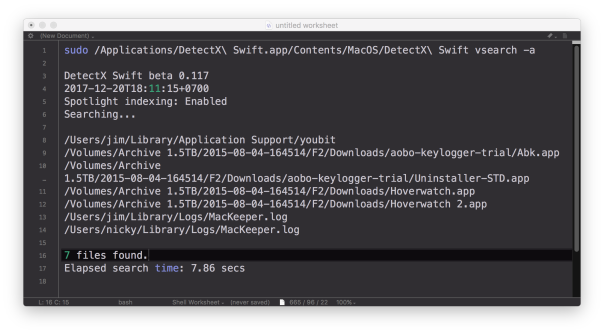
Probably the most important benefit you gain with scanning on the command line rather than from the app’s interface is the ability to scan all, or selected, other users. You can search all users by using sudo and the -a option:
sudo detectx search -a
If you want to restrict the search to one or more users, the -u option allows you to specify a list of shortuser names (comma-delimited):
sudo detectx search -u alice,bob
3. Go deep
If you’d like more verbose output, including how long the search took, try either the vsearch or vvvv commands:
sudo detectx vvvv -a
4. Save the results
You can specify a path to output the results, either in regular text:
sudo detectx vvvv -a ~/Desktop/searchtest.txt
or, by passing the extra -j option, in JSON format:
sudo detectx search -aj ~/Desktop/searchtest.json
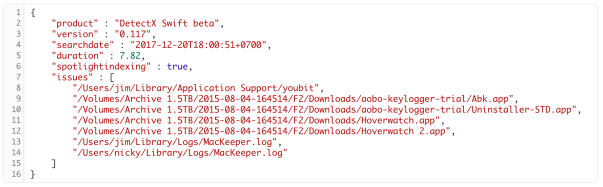
Here’s an example of what the formatted JSON file looks like:
5. Anything else?
There’s a help command that will output the documentation to the command line, and also if you get into the habit of regularly running command line checks, don’t forget to launch the app from time to time in the Finder. Like its predecessor, DetectX, DetectX Swift does a lot of other stuff besides searching that can help track down and remediate problems with your mac, and a large part of that revolves around the way it tracks changes to your system every time you launch it. The CLI tool runs independently of that and won’t give you that kind of feedback or record those changes.
Finally, note that in the release version of DetectX Swift, the CLI tool is only available for a limited period to Home and Unregistered users. Unlimited acccess to the CLI tool requires a Pro or Management license.
Enjoy! 🙂
how to remove MyCouponize adware

MyCouponize is an aggressive adware infection that simultaneously installs itself in Safari, Chrome and Firefox, It hijacks the user’s search and page loads, redirecting them to multiple web sites that advertise scamware and other unwanted junk.
You can remove it easily with DetectX Swift (a free/shareware utility written by myself) as shown in this video. If you prefer reading to watching, here’s the procedure:

1. Run the search in DetectX.
2. Click on the [X] button.
You’ll find this button just above the results table to the right, between the search count and the tick (whitelist) button. It will turn red when you hover over it. When it does so, click it.
Then hit ‘Delete’ to remove all the associated items.
You’ll need to enter a password as some of the items are outside of your user folder.
Press the esc key or click the ‘Cancel’ button on any pop up dialogs that appear.
3. Go to the Profiler
Here we’ll unload the launchd processes that belong to MyCouponize.

Navigate to the user launchd processes section and move the cursor over the item com.MyMacUpdater.agent
Click the ‘Remove x’ button that appears when the line is highlighted.
Wait for the profiler to refresh and then go back to the same section and remove the second process called com.MyCouponize.agent


4. Quit the mediaDownloader.app
This item has already been deleted in step 1, but its process may still be running in memory. If its icon appears in the Dock, right click on it and choose ‘Quit’ from the menu.
4. Finally, go to Safari Preferences’ Extensions tab
Click the uninstall button to remove the MyCouponize extension.
After that, Safari should be in good working order. If you have Chrome, Firefox or possibly other browsers installed, make sure you remove the extensions or Add Ons from those, too.
DetectX and DetectX Swift are shareware and can be used without payment, so go grab yourself a copy over at sqwarq.com.
DetectX Swift beta has arrived

It’s been unusually quiet on Applehelpwriter these past few months, and the reason is that I’ve been devoting all my time and efforts to the new version of DetectX. The new version is called DetectX Swift because (yeah, you guessed it) I wrote it in Swift and because it’s considerably faster than its older sibling.
DetectX Swift’s got a new interface, but there’s far more going on under the hood. The Search uses some fancy heuristics as well as hard-coded and live update search definitions to ensure it provides the very best in security threat scanning.
The new Profile view employs some super cool dynamic highlighting and lets you inspect the contents not only of directories but also of scripts, plists and other files that could execute troublesome code on your mac.
There’s changes in the History view, too, both in the display and functions. One of the coolest things I like about the new History function is that you can run a diff on any previous run against the latest run, immediately seeing how they differ.
There’s tons more to DetectX Swift, but the best way to find out about it is just to try it. The beta version is free to use for both Home and Commercial users, so just head off over to its home page and grab yourself a copy!
Don’t forget to keep us informed of how it goes. The beta is still in an early stage and more features are slated as it develops, but feel free to tell us about anything that you feel could be done better or things that you’d like to see added.
Share and enjoy! 🙂

