Blog Archives
how to script with Objective-C

Is it me, or is AppleScript experiencing something of an Indian Summer? It seems everywhere I go, people are talking more about macOS automation, AppleScript and even Apple’s curious hybrid syntax AppleScriptObjC (ASObjC).
Of course, some people have suffered miserably at the hands of AppleScript in the past, and even though the thought of scripting with access to Cocoa APIs through Objective-C is tempting, they fear the AppleScript side of it.
If that’s you, bear in mind that AppleScriptObjC isn’t really “AppleScript + Objective-C” at all. It is actually just a dialect of Objective-C that will be accepted in the (Apple)Script Editor and can be run by an instance of the AppleScript component. In plainer English, you can use Objective-C in an AppleScript without any AppleScript whatsoever!
The point of doing so would be that one could package Objective-C code in a .scpt file (or scptd bundle or AppleScript .app), and also mix whatever scripting language you prefer with calls to Cocoa’s APIs.*
The problem that using ASObjC presents anyone familiar with Objective-C is how to translate ‘pure’ Objective-C into the dialect that Script Editor (and other applescript runners like FastScripts, Keyboard Maestro, Automator, etc) can understand. If you use LateNight Software’s Script Debugger for scripting, you’ll already know that the work is done for you by the app’s built-in code completion. If you’re battling on in Apple’s default Script Editor, you’ll need to do the translation manually.
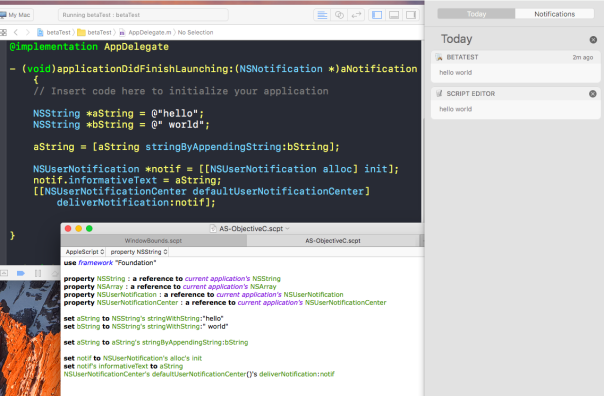
By way of example, then, here’s some original Objective-C, and below it, a translation that would work in Script Editor:
Objective CNSString *aString = @"hello";NSString *bString = @" world";
aString = [aString stringByAppendingString:bString];
NSUserNotification *notif = [[NSUserNotification alloc] init];notif.informativeText = aString;[[NSUserNotificationCenter defaultUserNotificationCenter] deliverNotification:notif];
AppleScriptObjCset aString to NSString's stringWithString:"hello"set bString to NSString's stringWithString:" world"
set aString to aString's stringByAppendingString:bString
set notif to NSUserNotification's alloc's initset notif's informativeText to aStringNSUserNotificationCenter's defaultUserNotificationCenter()'s deliverNotification:notif
As you can see, there’s a direct 1-to-1 correspondence, with the 6 statements in Objective-C paralleled by the 6 statements in AppleScriptObjC.
The main peculiarity is the use of possessive word forms and that variable attribution is done by using "set X to Y" rather than "X = Y". Type declaration is done via the idiom 'set <var> to <NSObject>'s <class init method>', which returns an instance of the object just as it would normally. You call instance methods by putting the instance in front of the method just as you would in regular Objective-C (e.g, see line 3 of the examples).
As you can see in the screenshot below showing Xcode and Script Editor, they work in the same way. You’ll notice in Script Editor there is a 'use' statement (equivalent to Objective-C’s ‘import’), and there’s also a whole load of property statements. These latter are peculiar to the ASObjC translation, and don’t have a counterpart in pure Objective-C. All you need to know about these is for each kind of Objective-C object you want to use (NSString, NSArray, whatever*), you’ll want a property statement for it at the beginning of the script. The statement always has the same form:
property <NSObject> : a reference to current application's < NSObject>
I think the best way to think of ASObjC was recently summed up by Sal Saghoian, when he said that ASObjC is “…the ultimate duct tape. You can do anything you want with ASObjC. You own the computer.”
Enjoy! 🙂
*not all Cocoa frameworks nor all Objective-C objects can be bridged to, but pretty much all the most useful ones are available.
Further reading:
– Applehelpwriter’s review of Script Debugger 6
– how to quickly toggle Swift Compiler warnings
Picture credits: Top image adapted from MilleniumBirdge by lesogard
return the difference between two strings
If you’ve ever looked at trying to compare and evaluate two strings in Objective-C, you’ll find a whole host of methods to help you out. What you won’t find, however, is a method that will actually return the substring (or substrings) that belongs to one but not the other of the two strings you’re comparing.
I spent some time trying to figure out how to do this last week for one of my apps, and finally decided the best way was to break the strings down into arrays and then compare the arrays by removing items that belonged to one not the other.
I chose a fairly simple equivalence test based on length, and then set out to determine which was the longer of the two, before removing all the objects of the shorter one from the longer one. Here’s how I did it:
-(NSString *)getDifference: (NSString *)aString and:(NSString *)anotherString {
int i = aString.length;
int j = anotherString.length;
NSString *result, *longest, *shortest;
if (i == j) {
result = @””;
return result;
}
if (i > j) {
longest = aString;
shortest = anotherString;
} else {
longest = anotherString;
shortest = aString;
}
NSArray *fa = [longest componentsSeparatedByString: @” ” ];
NSArray *sa = [shortest componentsSeparatedByString: @” “];
NSMutableArray *remainder = [NSMutableArray arrayWithArray:fa];
[remainder removeObjectsInArray:sa];
result = [remainder componentsJoinedByString:@” “];
return result;
}
Here’s an example of how to call the method:
NSString *t1 = @"Mary had a little lamb";
NSString *t2 = @"Mary had a little lamb yesterday";
NSString *changes = [self getDifference:t1 and t2];
NSLog(@"%@", changes); //"yesterday"
This method is pretty basic as it stands. For one thing, the length equivalence test will certainly fail under some conditions of change; for another, you’d need to extend it to return items that are in the shorter string but not the longer (though that wouldn’t be that difficult). Nonetheless, the core of the method could be used as a basis for something far more robust. For example, this vastly more complex set of match patch and diff libraries appear to be essentially based on the same principle of breaking strings down into NSMutableArray’s and adding and removing objects, but with a vast army of conditions and other checks built in to improve reliability.
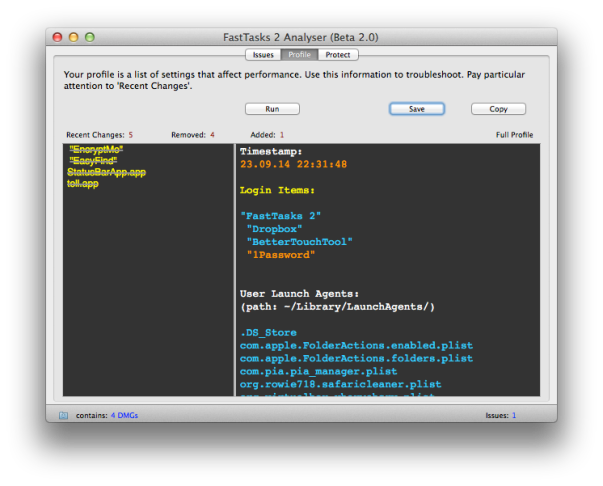
Still, the basic method I’ve posted above is the core idea I’m using in the new system profiler feature coming in the 1.5 release of FastTasks 2 (see the screenshot above), and at least at this stage of beta testing, seems to be doing the job it was designed for quite nicely.
UITableView doesn’t immediately reload data

Here’s a little problem and solution I ran into the other day while using UITableView. I wanted to have a master-detail set up in which the UITableView was segued to after an initial home screen.
The problem occurred whenever I added or deleted something in the UITableView, segued back to the home page and then returned to the table view. Sometimes the table would not update. Going out and back into the view a second time, however, would finally reload my data and show me the changes. Why was my app needing to load the view twice before the table would show any changes?
Logging showed me that something even weirder was going on: Every time I segued into the table view, the viewDidLoad method was being called not once, but twice. So basically, to get my updated data to show, I was actually calling viewDidLoad four times!
I worked through a whole bunch of stackexchange posts related to various problems and solutions with the reloadData method — adding delays, removing it from any edit- or insert- methods and so on, calling it on the main thread — but the problem stubbornly remained.
Then I noticed something else. In my awakeFromNib method, the call to super had somehow got pushed to the end of the method, after a bunch of other set up calls. I’m not sure how it got there, but I did remember seeing a WWDC 2014 Swift video pointing out that one difference between Objective-C and Swift was that calls to super need to be made after doing any initial set up in Swift’s case, but before for Objective-C. Since this was an Obj-C project, what was my call to super doing at the end of the method?
And as if by magic, moving [super awakeFromNib] to the beginning of my awakeFromNib method resulted in viewDidLoad only being called once, and my table view updating correctly.
Though I found quite a few threads with people having a similar problem with UITableView’s needing two calls before updating, I haven’t come across this particular solution to (or cause of) the problem. Hopefully, this post will save someone else a few hours of head scratching!
how to master Cocoa & Objective-C

It’s been quiet on Applehelpwriter this month, largely because we’re all waiting for OS X Mavericks to come out, and I’ve been rather busy helping out with the beta testing. I’ll have plenty to tell you when the public release finally comes around, but for now I’m under strict orders from Apple’s NDA (Non-Disclosure Agreement) to keep schtumm.
Xcode 5 was released for Mountain Lion last week, and that brought up a couple of questions about how to develop competency in creating apps for Mac OS X. I wrote something about this sometime ago, but the truth is I’ve been through a bit of a learning curve myself since then. So, while we wait for Mavs (10.9) and explore the new features of Xcode 5, this seems like the perfect time to share some of my coding experience. Although this might seem a little diaristic, the aim of this post – like pretty much all others on APH – is purely tutorial. 🙂
So, let me go back about a year or so. I’d been working my way through the 4th edition of Aaron Hillegass and Adam Preeble’s widely-acclaimed ‘Cocoa Programming for Mac OS X‘ quite nicely till I hit the ‘challenge’ at the end of Chapter 5. Although I’d followed all the previous chapters quite carefully and with little trouble, the challenge seemed totally beyond me. Indeed, as I read and re-read the earlier material, I couldn’t see anything in the book that would help me solve the core problem of the challenge.
The challenge said: “when the user types in a string and clicks the button, change the message text to display the input string and the number of characters“.

Building the interface was easy, but at that time I had no idea how to go about measuring the string length (despite the mention offered on the next page about the -(NSUInteger) length method.)
After struggling with the problem for some while and not being able to resolve it, I came to an impasse: either I moved on to the next chapter, hoping that I’d learn more and be able to solve this challenge at a later date, or I gave up on the book completely. I wrestled with this for a while, until eventually deciding that I needed to postpone going any further into the book ( a different strategy from ‘giving up’!), and instead learn more about the underlying programming language behind Cocoa, namely Objective-C.
I should point out at this point that the authors are quite clear at the beginning that you really should know your way around Objective-C before tackling Cocoa, but since the early chapters – and even the chapter that reviews Objective-C itself – are fairly light, I fell into the mistake of thinking that I could get by with what they provided, a little background knowledge, and some judicious internet browsing to fill in the gaps.
Alas, that was far from the truth. I put aside the Hillegass book and turned instead to Stephen Kochan’s primer on Objective C, the excellent ‘Programming in Objective-C 2.0‘. In fact, I’d already read a couple of chapters of this in the past, (that’s the “little background knowledge” I mentioned in the last paragraph), but it was clear that I needed to work through it in far more detail if I hoped to master Cocoa.
Kochan begins his book by saying you don’t need to know C to read it, and indeed it’s true (in retrospect…) that he does a good job of surreptitiously teaching your the heart of the C programming language under the guise of teaching you Objective-C. When I say “surreptitious” that’s not a criticism: Objective-C is an extension of the C programming language, and in fact it isn’t really that much different from it once you re-orient your idea of what a program is and how it works. It’s kind of like those black and white gestalt pictures in psychology ( you know, “do you see a rabbit or an old lady”?). Once you switch your perspective, it becomes fairly clear, but until then though, the other point of view can seem as obscure as mud.
Well, I got through about six or seven chapters of Kochan and again got stumped. It occurred to me then that despite his claim that you didn’t need C to learn Objective-C, I…well…needed to learn C before I could learn Objective-C!
So I embarked on a mission to first learn C, which I did through a couple of excellent books: first, with Dave Mark’s ‘Learn C on the Mac‘ and then with the classic ‘The C Programming Language‘ by Kernighan and Ritchie (K&C). If you have trouble finding a reasonably priced version of this venerable book in hardcopy, do as I did and try your local public or university library, both of which are sure to have it. In my earlier post, I also suggested you look at ‘C for Dummies‘ (another book I was reading concurrently with my first attempt at Kochan back then), but in retrospect, that book doesn’t cover enough ground and takes too long to cover what it does deal with, so I think now I’d say give that one a miss.
In any case, six months after working my way through the Dave Mark and the K&C books, I approached Kochan again, and found myself working through it like a hot knife through butter. After that, I finally went back to Hillegaas. And guess what? Not only did that challenge at the end of Chapter 5 seem trivial in Objective-C, I actually knew how to solve it even more efficiently in C without even using Objective-C at all!
(Even more efficiently? Well, only to computer programmers, who count spaces as ‘characters’, does the string “This is only a test” have 19 characters. To normal people, it’s only got 15. An early lesson in K&C will teach you how to count the characters without including any white space.😉 ).
Now I said this would be a tutorial, and indeed it is, for the moral of the story is an old one: learn to walk before you run. Do not believe the many claims that are often touted that you can learn how to create great apps for Mac OS X (or iOS) just by reading a book or two on Xcode or Cocoa (or anything else). Instead, get your foundations sorted out before you start trying to tackle Cocoa or even Objective-C.
And that means: learn C, the ‘grandfather’ of all modern OOP languages, which will not only make the rest of the learning curve a relatively easy glide, but will equip you with a far deeper understanding of what you’re doing and a far greater ability to tackle harder problems. You’ll learn how to create more complex apps than you ever could have with just a superficial knowledge of the ‘higher-level’ languages. Like the tortoise and the hare, it might seem like you’re the slow coach at first, but before you get to the end of the track, you’ll find you’re leagues ahead of the competition. 🙂
Related Posts:
Get the free utility app from Applehelpwriter
how to become an Apple app developer
Developing apps for iPhone, iPod, iPad, and Mac OS seems like the California gold-rush of the 21st century — the press are full of reports of the riches to be had in this amazing land, stories of “little people” making “big bucks”. Anyone can be an app developer, they say, but what’s the truth behind the hype, and how do you actually learn how to do it?
Last I heard, there were currently something like 600,000 apps on the Apple App store (for iPhone/iPad) and some 100,000 or so on the App store for Mac OS. Apple have paid out (i.e., passed on customer payments after taking their 30% cut) literally billions of dollars to developers. That’s a lot of cash! The question is, can you get a slice of it too?
In theory, there’s no reason why not. As I’ll detail below, the route to becoming an app developer is not particularly hard, nor is it particularly costly. But that doesn’t guarantee success. Anyone can write a book, but writing a killer book that’ll sell like Harry Potter is not so easy, and writing a killer app that will sell like Angry Birds is every bit as difficult.
The analogy holds for success in both cases: you need a great idea, you need to execute it well, and you need to market it properly. Did I mention those 600,000 apps on the App store? How, exactly, are you going to make your fortune if your app is buried in a pile like that? Well, I’ll save ideas and marketing for a future post. In this one, I want to focus on the things that we know we can achieve and only have to depend on ourselves for: developing the skills needed to turn that great idea into an actual piece of software that will run on Apple machines.

Learn the language
If you want to write a killer novel, the first thing you have to do is learn the language that you want to write the novel in, be it French, Chinese, or English. If you want to write a killer app, the same goes. Visual Basic? Visual C++? Java? Yes, that kind of thing except…if you’re developing for iOS (the iPhone/iPad operating system) or Mac OS (Mac computer operating system) you have to learn the Apple language, not any of those common ones associated with lesser machines!
So what is the Apple language? It’s called ‘Objective-C’, and it runs in a programming environment called ‘Cocoa’. You’ll need to learn ‘Cocoa’, but in order to learn that you’ll need to learn ‘Objective-C’, and to learn that, you’ll need to learn the basics of the standard (Ansi) C programming language. Oh my!
And once you’ve got a hold on all that, you’ll then need to learn Xcode, which isn’t a language or a programming environment at all, but a very sophisticated development tool (in fact, Xcode is itself an app!), in which you do all your Apple programming. You’re probably now thinking that it’d be easier to write that next Harry Potter novel and are already hunting around for the back of an envelope to start scratching down your ideas, but wait…
I know it sounds disheartening, but there is some good news. After all, it can’t be that hard if so many other people are doing it, right? (Well, actually, yeah it can, there’s a lot of dedicated programming geeks out there!). But look, I’ve been down this road too, and while I haven’t produced any killer apps (still waiting for that great idea…), I have gone from knowing next to nothing about programming to being able to put together an application that does what I tell it to and doesn’t crash my system.
(OK, not entirely true that I didn’t know anything about programming: in the 1980s, I once learned how to get a monochrome computer screen to print “Hello World” in BBC BASIC, which basically involved nothing other than typing >Print “Hello World”; it seemed so ridiculously pointless in 1982 that it turned me off programming for the next thirty years! Other than that, I’m a newbie 🙂 ).
And the good news gets better: most all of the documentation you need to learn how to be an app developer is available free from Apple. Truly, and I mean this with no trace of irony, it is hugely generous of Apple to put the amount of free material they have online for anyone to use. Want to be a Windows developer? Find your local bookstore and start shelling out one heck of a lot of $$$!! The cynical, of course, will say that Apple only do the giveaway to benefit themselves; others might say that giving away free training justifies their 30% cut.
I think of it as a symbiotic relationship: would-be developers who aren’t in computer science departments or big companies could never afford to buy all the material. Likewise, Apple could never have built an App store with such a huge number and wide variety of programs to Wow! their users if they had only had universities and commercial software developers to rely on. This way, both the little people, that’s me (and — I’m assuming — you), and Apple get to win.
I’ll tell you how to get started in a minute, but before I do let me point out that the ride is not entirely free. There’s probably a point at the beginning and certainly one at the end where you will need to lay out some of your hard-earned. So let’s deal with that now.
What you need
Right off, you’re going to need a Mac computer. Sorry, if you don’t already have one, you’re going to have to buy one; a low-range Macbook Air or Mac Mini will do, anything that can run OS X Lion. You can’t develop Mac apps on your iPhone or iPad, I’m afraid (but it does work the other way too: you don’t need an iPad or iPhone to develop apps for these devices. More on this below).
And what about if you have a good-spec PC? Yes, you could get a Mac emulator (VMmare) or mess around with OSx86, but frankly, these options are likely to cause you more grief than they’re worth; you could end up with apps that don’t build properly, and/or which breach Apple’s licensing conditions.
I’m not saying don’t do it, that’s your choice; I am saying your chances of successfully building an app, making it stable, and getting it accepted into the App store by Apple are significantly reduced if you go that route. Given the price of a basic Mac Mini on Ebay, you could well end up spending more money (as well as time) trying to avoid buying a Mac than just buying a cheap one.
The other expense you might need to lay out for is a basic ‘Intro to C’ book. There’s plenty of web offerings, but really a good ‘idiots’ book like the Dummies or Absolute Beginners should be enough and has the benefit of being reasonably likely to get you to the level of proficiency you need in the shortest amount of time. After that, you learn the rest for free (Objective-C, Cocoa, Xcode) from Apple. At the end of the process, when your app is built and you want to submit your app to the App store, you’ll have to register with Apple for a licence as an app developer and vendor; current cost $99.
Take the first step
“Sign me up”, you say, “where do I start?” The first thing to do is to sign up to Apple’s developer community: this is free (don’t confuse it with the Developer Program or Licensing, which costs $99 and which you don’t need till you’ve built an app you want to upload to the App store).
Once you’re in the Developer Community, download Xcode 4, Apple’s development environment (a different thing from a programming environment, but don’t worry, you’ll get the hang of all this terminology easily enough once you start reading the docs). This is a 4GB monster of a program – bigger than your average operating system, so make sure you have the space – and it is also free. Xcode comes with free iPhone and iPad simulators and in itself, this is a piece of software that’s probably worth a couple of thousand dollars. So smile: you’re already making a profit even though you bought that Mac Mini! This is also the reason why you don’t need, and in fact can’t use, your own iPad or iPhone to test your apps: everything has to be done in Xcode, and this monster app only runs on Mac OS X.
Once you’ve downloaded Xcode, you can play around with it if you want, but unless you’ve worked with an IDE (integrated development environment) before, it’s pretty complicated, so it’s best to wait till you work through the tutorials. It’s not the kind of software you can learn through serendipitous exploration.
Instead, go to the documentation resources and start with the tutorial Your First Mac Application.
By the time you get through this, you’re going to realise why you need to learn Ansi C, Objective-C and Cocoa. So put Xcode away for now, and start on the path of learning to speak Apple’s language. When you get there, just add 1 great idea + 1 great marketing strategy, and you’re on your way to California!
The short guide:
1. Get a Mac
2. Learn C, learn Objective-C, learn Cocoa, learn Xcode
3. Come up with an idea for a great app and plan it out carefully
4. Build and test your app
5. Pay the licensing fee and submit your app to Apple
6. Once it’s been through the review process and accepted, implement your marketing strategy
7. Watch the millions role in and retire.
😃

