Blog Archives
scan for malware on the command line
DetectX Swift now has the ability to do command line searches for issues on your mac like malware, keyloggers, browser hijacks and potentially dangerous software, and there’s a number of extra options that are not available when using the user interface. In this post, I’m going to give you a quick tour of the CLI (Command Line Interface) tool with some examples of how to use it (if you haven’t yet grabbed a free copy of DetectX Swift you might want to do that first to play along).
1. Basic scan
Let’s start with a basic scan. To use the CLI search, you need to specify the full path to the app executable. In this example, let’s suppose that the app is in /Applications folder. In that case, you’d need to execute this on the command line:
/Applications/DetectX\ Swift.app/Contents/MacOS/DetectX\ Swift search
Since that’s a bit of a handful, even using tab completion, you might want to edit your .bash_profile to include a shortcut alias. Here’s mine:
sphil@sphils-iMac-5:~$ cat .bash_profile
alias sudo='sudo '
alias detectx='/Applications/DetectX\ Swift.app/Contents/MacOS/DetectX\ Swift'
Note the sudo line (and note the extra space in the value). We’re going to need that so that we can pass the alias to sudo when we want to pass certain options to the search. Like…
2. Scan other users
Probably the most important benefit you gain with scanning on the command line rather than from the app’s interface is the ability to scan all, or selected, other users. You can search all users by using sudo and the -a option:
sudo detectx search -a
If you want to restrict the search to one or more users, the -u option allows you to specify a list of shortuser names (comma-delimited):
sudo detectx search -u alice,bob
3. Go deep
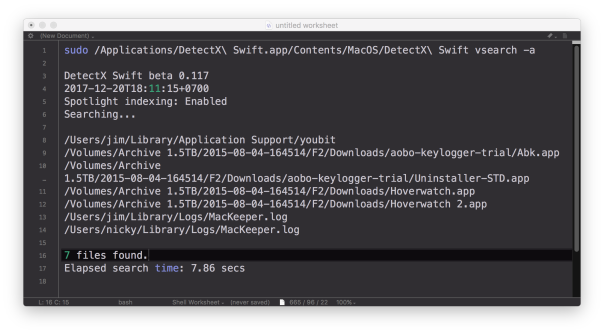
If you’d like more verbose output, including how long the search took, try either the vsearch or vvvv commands:
sudo detectx vvvv -a
4. Save the results
You can specify a path to output the results, either in regular text:
sudo detectx vvvv -a ~/Desktop/searchtest.txt
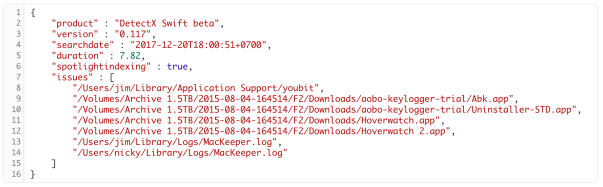
or, by passing the extra -j option, in JSON format:
sudo detectx search -aj ~/Desktop/searchtest.json
Here’s an example of what the formatted JSON file looks like:
5. Anything else?
There’s a help command that will output the documentation to the command line, and also if you get into the habit of regularly running command line checks, don’t forget to launch the app from time to time in the Finder. Like its predecessor, DetectX, DetectX Swift does a lot of other stuff besides searching that can help track down and remediate problems with your mac, and a large part of that revolves around the way it tracks changes to your system every time you launch it. The CLI tool runs independently of that and won’t give you that kind of feedback or record those changes.
Finally, note that in the release version of DetectX Swift, the CLI tool is only available for a limited period to Home and Unregistered users. Unlimited acccess to the CLI tool requires a Pro or Management license.
Enjoy! 🙂
learning the Terminal: Part Three
It’s been a while since we last posted about Terminal tips and tricks, but a question popped up today about how to discover what tools are available on the command line.
Most of the tools you use in Terminal are located in /usr/bin, and we can use a nifty little tool from there to find out about all its friends. The whatis tool gives you a one-liner description of what a tool does. If it looks interesting, you can find out more about the tool by typing man and the tool’s name on the command line to see its help manual.
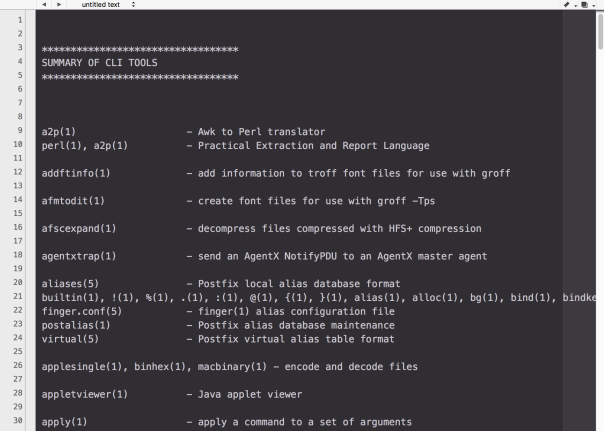
On my current machine, there’s over 1000 tools in /usr/bin, and life is just too short to go through them all doing whatis on each and every one, so we’ll combine a bit of command line power with some AppleScript magic, and produce a nice, easy-to-scroll output of all the summaries like the one in the screenshot above.
Copy the script below (or from my pastebin here) and paste it into the Script Editor (/Applications/Utilities/Script Editor.app). Click the ▶︎ button to run it.
This script took about 1m 30 seconds to run on my machine, but you only need to run it once then save the output. Browse or search through it at your own convenience. 🙂
The script will choose TextWrangler for display if you have it installed; if not, it’ll default to TextEdit. The display is much nicer in TextWrangler, but if you’re stuck with TextEdit, turning off ‘Check Spelling’ in TextEdit will aid readability.
# start
(*
This script produces a summary of all the CLI tools
in /usr/bin and displays it in a text document
*)
set noDocsList to {}
on extractDescription(aText)
repeat with i from 1 to count of items in aText
set this_item to item i of aText
if this_item contains "NNAAMMEE" then
set r to item (i + 1) of aText
try
set o to offset of "—" in r
set short_r to text (o + 1) thru -1 of r
set r to short_r
end try
return r
end if
end repeat
end extractDescription
set theDescriptions to return & return & "**********************************" & return & "SUMMARY OF CLI TOOLS (Version 2)" & return & "**********************************" & return & return & return
tell application "System Events"
set theItems to name of every file of folder "bin" of folder "usr" of startup disk
end tell
repeat with i from 1 to count of theItems
set this_item to item i of theItems
set n_item to length of this_item
try
set what_is to do shell script "whatis " & this_item
if text 1 thru n_item of what_is is this_item and what_is does not contain "nothing appropriate" then
set theDescriptions to theDescriptions & return & what_is & return
else
try
set getMan to paragraphs of (do shell script "man " & this_item)
set desc to extractDescription(getMan)
set what_is to this_item & tab & tab & tab & tab & desc
set theDescriptions to theDescriptions & return & what_is & return
on error
set end of my noDocsList to this_item & return
end try
end if
end try
end repeat
set theApp to "TextEdit"
tell application "Finder"
if exists POSIX file "/Applications/TextWrangler.app" then
set theApp to "TextWrangler"
end if
end tell
set theDescriptions to theDescriptions & return & return & return & "The following tools do not have any documentation: " & return & return & noDocsList
tell application theApp
activate
make new document
set front document's text to my theDescriptions
end tell
# EOF
Related Posts
learning the Terminal – Part One
learning the Terminal – Part Two
learning the Terminal – Part Four

