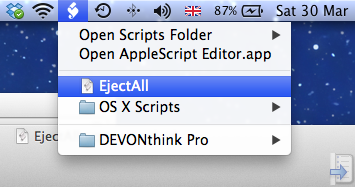
eject all your disks at once
Here’s a simple AppleScript one-liner that can be useful if, like me, you have several disks connected to your laptop at home or the office and you need to get up and go quickly.
1. Open the AppleScript Editor.app by typing Apples in the Spotlight search bar and hitting ‘return’.
2. Copy the following code into the editor window:
3. Hit ‘Command-K’ to compile and ensure you didn’t make any mistakes. Fix any typos if it doesn’t compile and try again. Save the script to your Desktop as ‘EjectAll.scpt’
4. If you don’t already have the Scripts menubar icon visible in your menu bar, hit ‘command ,’ (that’s the Command key and the comma key) and check the ‘Show Script menu in menu bar’ item in the General pane of AppleScript’s Preferences window.
5. From the Scripts menu, choose ‘Open Scripts Folder > Open Computer Scripts Folder’ and drag ‘EjectAll.scpt’ from the Desktop to the Computer Scripts Folder. You’ll need to authenticate with an Admin password to complete the move.
And that’s it. Now whenever you want to eject every disk with one simple operation, just hit the Script menu icon and click on ‘EjectAll’. 🙂
Posted on March 30, 2013, in AppleScript, Finder-2, Scripts, Time Machine and tagged AppleScript, disks, eject, finder, Mac, OS X, Time Machine. Bookmark the permalink. Leave a comment.


Leave a comment
Comments 0