Blog Archives
Deciphering the searchpartyd macOS process and its impacts
The searchpartyd process in macOS is an integral part of Apple’s innovative location tracking system, introduced with macOS 10.15 Catalina, iOS 13, and iPadOS 13.1. This daemon is a cornerstone of the Find My service, enabling users to locate their devices, even when offline. Understanding searchpartyd, its functionality, and addressing common issues like high CPU usage is crucial for macOS users.
The Integral role and functionality of searchpartyd
At its core, searchpartyd serves as a major daemon within the Offline Finding (OF) system of the Find My app. Its primary function is to generate the necessary cryptographic keys and perform all related cryptographic operations. This process is vital for synchronizing keys, sending location reports as a finder device, and obtaining location reports for devices owned by the user.
When a device equipped with the Find My feature is lost, it emits Bluetooth Low Energy (BLE) signals containing a public key. These signals are picked up by finder devices, which then use the key to encrypt the location of the lost device and send this information back to Apple’s servers. The Find My app accesses these reports to help users locate their missing devices.
The dual nature of searchpartyd process
Although the authentic searchpartyd process is an integral component of macOS’s security and geolocation functionalities, it is crucial for users to remain vigilant against potentially intrusive programs (PIPs) that could disguise themselves with analogous nomenclature. Such deceptive applications have the capability to alter web browser configurations, leading to unwarranted redirects and the proliferation of diverse forms of online advertisements. This activity not only disrupts user experience but also contributes to a noticeable reduction in the Mac’s operational efficiency.
Addressing high CPU usage and management concerns
A frequently reported issue among macOS users is the high CPU usage associated with searchpartyd. This can lead to problems like overheating and rapid battery depletion. Despite some misconceptions, searchpartyd is not a form of malware or virus but an authentic and essential part of macOS. However, users have limited control over this process due to its protected status within the operating system. Tools like EtreCheck are invaluable in identifying applications that may be causing excessive CPU usage by searchpartyd.

exploring sshd-keygen-wrapper on Mac
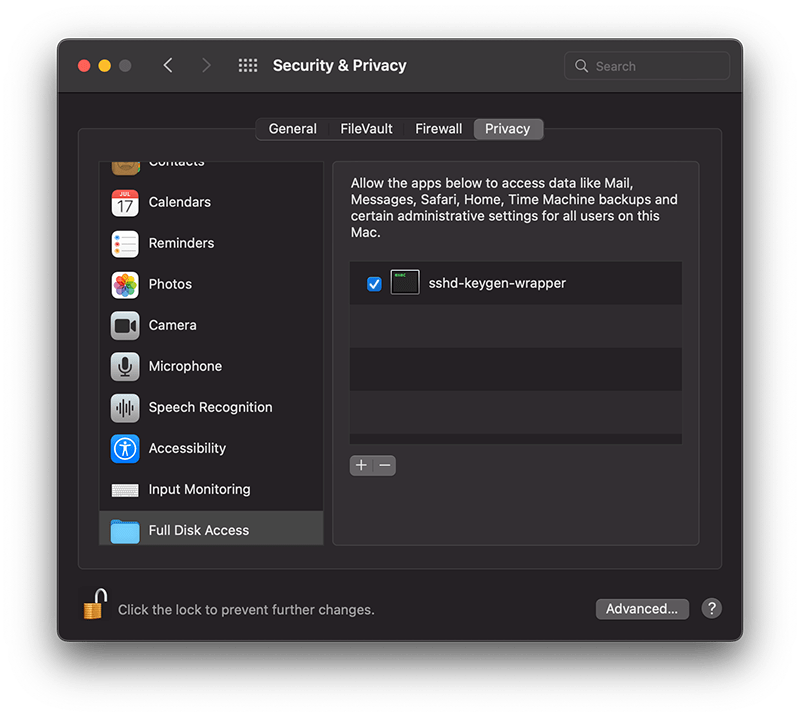
The sshd-keygen-wrapper tool, located within macOS Privacy settings, has garnered attention from users, particularly when they discover it in the Full Disk Access section of their Privacy preferences. While its presence might be disconcerting to some, a deeper understanding of its purpose and functionality can dispel any concerns.
The inclusion of sshd-keygen-wrapper in the Full Disk Access section can be perplexing. Some users may interpret it as an indication of a security compromise or malware. However, the reality is that sshd-keygen-wrapper is an integral component of macOS, functioning as an SSH secure shell key generator. Its primary role is to facilitate users in enabling or disabling remote access to their Mac via the Secure Shell Protocol (SSH).
The visibility of sshd-keygen-wrapper in Full Disk Access correlates with the Remote Login setting. Users who have never activated Remote Login will not encounter this tool. But for those who have, the tool will be present, albeit disabled by default, indicating that its access and permissions are inactive.
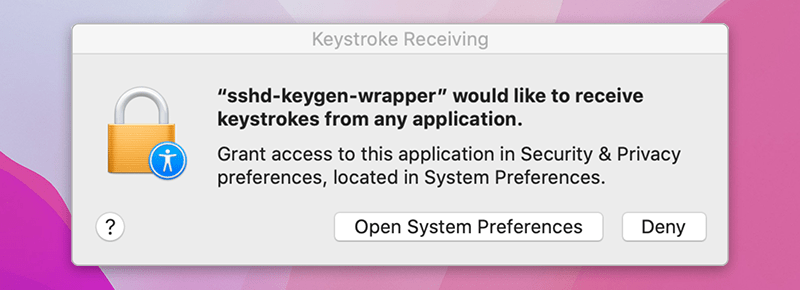
While navigating the Privacy settings on a Mac, users might come across a popup message stating, “‘sshd-keygen-wrapper’ would like to receive keystrokes from any application.” This message can be particularly perplexing, leading to concerns about the tool’s intentions and whether it poses any security risks.
Is it malware?
A prevalent misconception is associating sshd-keygen-wrapper with malware or unwanted software. Contrary to this belief, the tool is an authentic part of macOS and poses no malicious intent. Its placement in the Full Disk Access section is inherently tied to the SSH remote access feature. Activating SSH remote access from System Preferences ensures the association of sshd-keygen-wrapper, which then guarantees the generation of secure SSH shell keys for remote connections.
Should sshd-keygen-wrapper be granted Full Disk Access?
A frequently posed question revolves around whether sshd-keygen-wrapper should receive full disk access. Users contemplating remote access to their Mac via SSH might consider this option. By granting Full Disk Access to sshd-keygen-wrapper, macOS inherently extends the same privilege to SSH. As a result, any individual accessing the Mac through SSH can access all data, encompassing emails, messages, and files. The choice to activate this feature should stem from individual security assessments and requirements.
how to tell if your mac is too hot

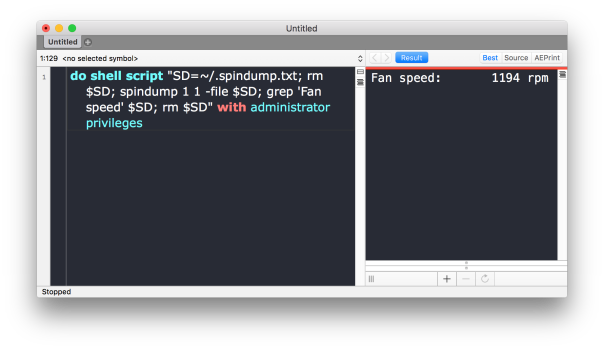
The sound of the fans spinning up on your mac is never a welcome noise, but it’s usually completely normal. Determining the fan speed without 3rd party software isn’t easy, but not impossible:
do shell script "SD=~/.spindump.txt; rm $SD; spindump 1 1 -file $SD; grep 'Fan speed' $SD; rm $SD" with administrator privileges
Copy and paste the above into your (Apple)Script Editor and run it. You’ll need an Adminstrator password.
However, that doesn’t really tell you what you want to know: is my mac too hot or not? Should I do something about it?
Fortunately, we can get a better idea of the mac’s thermal state (and we don’t need admin privs to do it!), with this script:

The script not only reports the mac’s thermal state, but prints out Apple’s recommended advice, if any. Uncomment the last line of the script to get the result in a display dialog box; otherwise, you can just read the result in the results pane of your script editor.
Enjoy! 🙂
Featured Image: Flicker
How to track app use with OSXClock

OSXClock just got a major update, adding a productivity log that helps you to track how much time you spend actively using each app on your mac.
I wrote an ad-hoc AppleScript to do this sometime ago that proved pretty popular, but I wasn’t satisfied with either the code or the interface. OSXClock improves on that by tapping directly into Cocoa’s API and by offering a more attractive display.
OSXClock is currently on offer for only $2.99. Lots more exciting features are planned for future updates, so now’s a good time to get with the program, folks!
🙂
*OSXClock requires OSX Yosemite
how to remove Google’s secret update software from your mac

If you’ve ever downloaded Chrome, even for just a trial (guilty!), you might not be aware that Google have slipped a little bit of hidden software into your Library.
This software is called Google Updater, and it secretly “calls home” on a regular basis and downloads updates to your Google software without either asking before, or notifying you after, doing so. In Developer circles, this is considered very shady practice. Users should be asked for consent and informed when software makes changes to either itself or the user’s computer, and ideally those notifications should tell the user what has been changed and how the changes could impact them.
Before I beat this drum any harder, however, I owe you at least the other side of the story. If I worked for Google, I’d probably come up with this response: “Hey look, a major source of computer virus and malware infections is that users are often using out-of-date software that hasn’t been patched to combat newly-discovered exploits. No matter how much we tell users to keep ther software up-to-date, the truth is the majority don’t. We provide an automatic updater so that users don’t have to worry about it, and can be assured they’re always using the latest and safest version of our software”.
I’ve heard this argument so many times, I don’t doubt it’s something close to what Google would actually argue. My problem with this is that while automatic updates can be a good thing if they’re security related, it’s not at all clear why an app should be updating itself automatically for any other reason, or why it’s updating itself without providing notifications about when and what updates were made.
If an independent developer did that, they’d almost certainly find their software labelled as “suspicious” at best, and “dangerous” at worst. The fact that Google is a multinational, global enterprise with a stranglehold on the internet, and which is often tangling with the law in countries throughout the world, may make you feel more or less confident that they can be trusted more than independent developers, whose income depends very much on their reputation. I’ll leave that one for the reader to decide. 😉
Do I have Google Updater?
To see if you’ve got Google Updater hiding on your system, try this quick test in Terminal. Triple click the line of code below to highlight it.
defaults read com.google.Keystone.Agent
If you’ve previously installed my Terminal workflow, just hit control-opt-cmd-T or right/control click and choose “Services > Run in Terminal” from the contextual menu. Alternatively, if you have my free utility app FastTasks 2, the Analyser’s Profile view will show you if Google Updater is installed (see ‘Locate Google Updater’ below for the locations to check in the profile view). Elsewise, manually copy and paste it into a Terminal window.
If the result comes back as
Domain com.google.Keystone.Agent does not exist
you’re fine. Google Updater has not found its way into your system. Anything else and you’re going to need to decide whether you want to remove it or not. If you’re a regular Chrome user, keeping Updater might prove convenient, though you’ll have to live with the idea that the app is updating itself in ways over which you have no control. If you rarely or never use Chrome, there’s no reason to have this hidden process regularly calling home to Google every time you’re connected to the net.
How do I remove it?
You have two options. You can either disarm it or you can nuke it. Disarming it is simplest, it’s a one-line Terminal command:
defaults write com.google.Keystone.Agent checkInterval 0
This command tells the Updater how often to “call home”. A value of 0 basically means ‘never’. Disarming it is probably better than nuking it if you still keep Chrome on your system and use it occasionally. You can temporarily set it back to something like ‘once a week’ from time to time to check for security updates with
defaults write com.google.Keystone.Agent checkInterval 604800
Nuking the Google Updater is a bit more complex. You’ll want to run some uninstaller commands, and then you’ll want to go and clear up the crud that is still left behind. And before you can do either of those, you need to find out where it’s hiding. So, we have a three-step process.
1. Locate Google Updater
Triple click the first of these two lines, and choose ‘Services > Reveal in Finder’ from the contextual menu (that’s another right-click or control-click on the selected line), and then repeat for the second line:
~/Library/Google
/Library/Google
You will likely get the error message “The operation can’t be completed because the item can’t be found” from one of these lines, but not the other. Note that the difference is all in the presence or absence of the tilde ~. Make a note of which one worked, and run the appropriate commands in step 2.
2. Run the uninstaller commands
Run these in Terminal (again, triple clicking to highlight and doing the usual trick afterwards with shortcut key or Services menu if you have my workflow installed), one at a time:
Updated, Jun 2018:
If the Updater was in your user library (with the tilde ~), then first triple-click this (it’s all one line) and run it in the Terminal:
~/Library/Google/GoogleSoftwareUpdate/GoogleSoftwareUpdate.bundle/Contents/Resources/ksinstall --uninstall
then this:
touch ~/Library/Google/GoogleSoftwareUpdate
If the Updater was in your domain library (no tilde ~), then first do this (it’s all one line):
sudo /Library/Google/GoogleSoftwareUpdate/GoogleSoftwareUpdate.bundle/Contents/Resources/ksinstall --uninstall
and enter your Admin password (note that you won’t see any indication of your password being typed in the Terminal window). Then do this:
sudo touch /Library/Google/GoogleSoftwareUpdate
3. Clear up the crud
If the updater was in your user library, open that now and go to
~/Library/Google/
and delete the folder called ‘GoogleSoftwareUpdate’. If you don’t use any other Google software (I don’t), you can just delete the entire ‘Google’ parent folder.
If the updater was in your domain library, search for the same folder and send it to the trash. You will need to give Finder your admin password to authorise the move.
Next, let’s just check the uninstaller was successful. Look for the following. If you don’t find them, good (the installer did its job). If you do, help them on their way to oblivion by sending them to the trash:
~/Library/Caches/com.google.Keystone.Agent
~/Library/LaunchAgents/com.google.Keystone.agent.plist
~/Library/Preferences/com.google.Keystone.Agent.plist
If you’ve deleted Chrome from your Applications folder too, then you might as well hunt down and exterminate its prefs list while you’re at it:
~/Library/Preferences/com.google.Chrome.plist
The following sources were used in researching this post:
http://wireload.net/products/guu-google-update-uninstaller/
http://raamdev.com/2008/howto-remove-google-software-update-on-mac-os-x/
http://blog.slaunchaman.com/2010/06/30/google-earth-now-available-without-automatic-updates/
https://support.google.com/installer/answer/147176?hl=en
‘Don’t be evil’ picture was remediated from here.
Related Posts
Terminal tricks for defeating adware
Carbon Copy Cloner: see last back up date
If you’re a user of Bombich Software’s excellent Carbon Copy Cloner but you’re not doing backups as scheduled tasks, you may wish there was a way to find out the last time you successfully completed a backup task.
Unfortunately, CCC doesn’t provide an easy way for users to see this information natively, but in this post we’re going to add it through a bit of AppleScript and Automator magic.
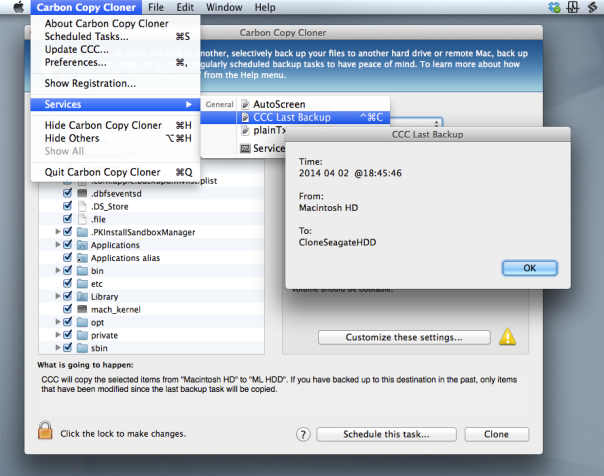
As it turns out, CCC does keep a log of all your past backup details stashed away in a CCC.log file buried in your local domain’s Library folder. You can view this file in Console, but it’s a bit of a pain. Wouldn’t it be nicer if you could just hit a hotkey like ‘Command-Control-C’, say (you know, for ‘CCC’🙂 ), and get a dialog box like this:

If you think so too, then download my Automator workflow:
For Lion, Mountain Lion and Mavericks:
Download for 10.7.5 thru 10.9.2 
For Snow Leopard:
Download for 10.6.8 
Double-click on the .zip file and double click again on the unzipped workflow file. You’ll get a warning message saying that you’ve downloaded the file from the internet (from me, actually!). After clicking ‘Open’ to dismiss the warning, for all users except 10.6, click ‘Install’ on the the following dialog box:
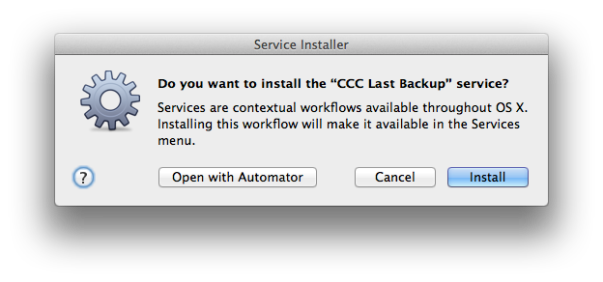
After clicking ‘Install’, click ‘Done’ to dismiss the confirmation dialog box that pops up.
For those of you running Snow Leopard (10.6.8), after clicking ‘Open’ the workflow should open in Automator. Hit ‘command-S’ to save it as a Service.
For all users, if you now click up to any application name next to the Apple near the top left of your screen (see the screenshot at the top of this post) and scroll down to ‘Services’ you should see the new Service already there. If you don’t, try logging out and logging back in to your user account.
Once you can see the workflow in the Services menu, go ahead and give it a click to test it out. 🙂
A couple of notes on usage:
Carbon Copy Cloner does not have to be open for the Service to work.
The date format display is YYYY-MM-DD.
If you want to add a shortcut key as suggested earlier, open up System Preferences > Keyboard and click the ‘Shortcuts’ tab. Down the sidebar you should see ‘Services’. Click on that and scroll way down to the bottom till you see the name of the Service. Click ‘Add Shortcut’ and hit the keys you want to use. I like ‘command-control-C’ as it’s an easy mnemonic for ‘Carbon-Copy-Cloner’.
how to show or hide hidden files with one click

Reveal is a one-click toggle switch to show/hide hidden files in the Finder. Unzip it, pop it in your Applications folder and drag it to your Dock for quick access. You may need to override your GateKeeper settings the first time you run it if you have those set to ‘App Store & Identified Developers’ or stricter. Don’t worry! So long as you download it from here, I personally guarantee it’s safe (I wrote it myself!). Best of all, it’s free, so enjoy!
how to correct the external monitor resolution

A problem that’s been bugging me since at least Mountain Lion is that sometimes when I connect my external monitor to my Macbook Pro, the display resolution is incorrect. The problem is pretty annoying as it often occurs on wake if the MBP goes to sleep even when the external monitor hasn’t been disconnected.
There are a number of solutions to this problem, and I’ve used them all. Some are less irritating than others, but in this post I’ll give you a run down of the options.
1. The old fridge magnet trick
As I often use a tiny magnet to put my MBP display to sleep while keeping the lid open, normally putting the magnet on and then taking it off again will cause the displays to reset. But this method is annoying both because I’m often connecting to external monitors away from home and because I often misplace that tiny magnet! The other problem with this method is it doesn’t always work… 😦
2. Put the external monitor to sleep with a Hot Corner
Go into System Preferences > Mission Control, and set one of the Hot Corners to ‘Put Display to Sleep’ (not ‘Start Screen Saver’). When your mac wakes up and the monitor is in the wrong resolution, move the cursor to the Hot Corner, wait a couple of seconds, and move the cursor back to the centre of the screen.
3. Activate ‘Detect Displays’
Ok, two ways to do this. The manual way is that you open System Preferences, hold down the ‘option’ key and hit the ‘Detect Displays’ button at the bottom of the window. Note that you won’t see this button unless you’re holding down the ‘option’ key. After the display resets properly, quit System Preferences. My main beef with this method is it’s totally disruptive to my workflow, so much in fact that it makes me angry every time I use it!
Fortunately, you can lower the inconvenience with the second way, which is an AppleScript that does the same thing automagically.
Update Jan 2015:
Partly in response to this problem, I’ve written an app called DisplayDroid which detects when a monitor is connected or disconnected and automatically runs a script in response. The script below is built into DisplayDroid as one of the presets that you can choose!
Find out more about DisplayDroid…
trytell application "System Preferences" to quit
end trydelay 1tell application "System Preferences"
activate
reveal pane "com.apple.preference.displays"
end tell
tell application "System Events"
tell process "System Preferences"
set frontmost to true
try
key down option
delay 0.2
click button "Detect Displays" of window 1
delay 0.2
key up option
on error
key up option
end try
end tell
end tell
tell application "System Preferences" to quit
You might want to save this in your scripts menu or make it into a Dock-able app for convenience. Don’t forget you’ll need to allow the AppleScript editor permission to use Assistive Devices.
4. A free screen utility
Unhappy with a GUI scripting solution, I started researching how to change the displays in Cocoa or from the BASH command line so that I could avoid the overhead of System Preferences popping open and closed, which is an ugly solution at best. I didn’t get far in my research before I found that someone else had already beaten me to the punch, and had even offered the code up for free. Y’gotta love the heroes of the programming community! Download the free RDM.app, which lets you change the screen resolution on any of your monitors from the status bar on your desktop. Move it from your Downloads folder into your /Applications folder. I’ve even got it in my login items for maximum convenience!

Although the app is probably slightly slower than the Hot Corner solution when I’m at home, I like it because I regularly connect my mac to all sorts of other monitors and projectors and the mac doesn’t always choose the best display. The RDM.app lets you slide through the available options much more efficiently than the System Preferences panel, too. Big respect to Paul Griffin at http://www.phoenix-dev.com for this!
5. Trash old prefs
No matter how well or otherwise any of these techniques work, the question remains: why is the resolution setting being forgotten in the first place? I haven’t nailed this down as a cert yet, but ever since I did this to solve a different problem, my monitor’s been behaving itself, too.
1. Go to
Hard Disk/Library/Preferences/System Configuration
Now make sure you’re at the right place because there’s another ‘System Configuration’ folder at /Library/System Configuration, and you definitely don’t want to be messing with that one. Also, this is the Library folder at the root of your hard disk and NOT your user account library (i.e, the path is /Library, not ~/Library). Check that path. Here it is again
Hard Disk/Library/Preferences/System Configuration
2. OK, click on that folder, and copy it over to your Desktop. Now go back and delete it from /Library/Preferences (or hold down ‘option’ while you drag to do a ‘move’. I prefer the first way; it’s safer, if slower).
3. Restart and test.
Hopefully, if you’ve been venting at the ears like me over the external display problem, one or more of these options will help lower the frustration!
🙂
Related Posts:
DisplayDroid from Applehelpwriter
how to see recently accessed files

While professional troubleshooters will use software like fseventer or the Instruments.app that comes as part of Xcode, there’s an easy way for anyone to see which files have recently been accessed on their Mac.
1. Open any Finder window and hit ‘command-F’.
2. Click the ‘Kind’ button and choose ‘Other’ at the bottom of the menu:

3. Next, scroll down the list till you see ‘System files’ and check the box and hit ‘OK’.
4. Change the button that says ‘aren’t included’ to ‘are included’.
5. Now hit the little ‘+’ button over on the right side of the window.
6. Again, change ‘Kind’, this time to ‘Last Modified’ and change ‘within last’ to ‘today’.

7. Finally, go to Finder > View menu at the top and choose ‘Arrange By > Date Last Opened’.
You can save the search in the Sidebar for convenience. Give it a more useful name like ‘latest changes’ or ‘fs events’ (“fs” stands for filesystem) and click on it whenever you need to check what’s just happened to your Mac! 🙂

unable to turn Bluetooth on or off
f Bluetooth is stuck in the on or off setting, this simple procedure should cure the problem.
You may have already tried clicking in the Status bar icon or the System Preferences pane; perhaps you even did a Restart, all without effect.
The surprisingly simple answer is:
Shutdown the mac, and power on again.
Shutdown works whereas Restart doesn’t because – unlike Restart – Shutdown puts the Bluetooth power manager through a complete power cycle.
🙂
More Bluetooth problems? Drop a comment below!

