Author Archives: philastokes
hello, applescript 3: (don’t?) tell me to run
Continuing where we left off at the end of User In, User Out, let’s build on our knowledge of getting user input and using conditionals.
Script 7
In this script, we’re going to query the user for some information, and if that information meets a certain test, we’ll give the user one answer, if it doesn’t we’ll give them another. Kind of like a mini-quiz game program. There’s lots of new stuff in this script, but don’t be put off. Just bang it out on the keyboad, fix any typos if it won’t compile, and run it. Run it at least three times choosing a different button each time. We’ll go through it line by line after you’ve had a play around with it.

Line 1 assigns a string literal (the lovely “Loser”) to a variable, heReply. We’re doing two things here. We’re first declaring a variable that we’ll want to use later in the script, and we’re also initialising it with a default value. “Loser” is one of two possible values we’ll want this variable to have later, so we’ll set this as the default now, which means the variable will always have this value when we use it unless we change it later in the script.
Most of Line 2 should be familiar to you now, except that we’ve added a third button and a default value for the answer. We’ve also added a default button, in this case 3. To understand what the default button parameter does run the script with value 1, and then again with value 2.
As you will notice, the number refers to one of the buttons defined in the buttons list, where 1 is the first item in the list and the left most button, and 3 is the last item in the list and the right most button. The parameter determines which button has focus (and therefore responds to the return key on the keyboard).

If you’ve already tried experimenting with 4 buttons, you’ll see that the compiler complains that a maximum of 3 buttons is allowed. That’s not strictly true, but we’ll save that trick for later in the series.
Note: Lists in AppleScript, unlike most other modern programming languages, are not zero-indexed. The first item is item 1, not item 0 as it would be in Python, C, Swift and so on.
If you prefer you can also refer to buttons by their name instead of their index. This helps improve readability of your code and makes it clearer which button was intended as the default. To refer to the button by name, you would write the parameter like this:
default button "Sure?"Line 3 should be familiar to you, but refer back to Script 6 in the previous post if you need a reminder.
Line 4 begins an if statement block that contains another if statement block (again, see Script 6), but there’s also something new here: the else condition. This says that if our condition in Line 4 isn’t met, do whatever’s in the else block starting at Line 10.
If the condition in Line 4 is met, however, then Line 6 offers a further condition: if the user typed in “Phil”, then Line 7 says change the value of the variable theReply from “Loser” to “Winner”. Note, particularly, that if this condition is not met, then the value of theReply will be “Loser” when it’s called later in the script.
Line 8 ends the inner if statement block.
Line 9 now says: display the dialog to the user, showing them the value of whatever theReply is currently set to (either “Winner” or the default “Loser”). Note that the same value is used to set the title.
Line 10 starts the else block. This will be triggered if the user doesn’t choose either “Cancel” – which would end the script – or “Sure?” – which would trigger the first condition – when Line 2 is executed.
We don’t need to put in a specific test for “Cancel” because “Cancel” will automatically end the script with
error -128. However, as we’ll see later in the series, sometimes it can be useful to catch “Cancel” in theifblock too, in order to execute certain commands before the script quits.
Line 11 may look a bit mysterious; this is your first introduction to AppleScript’s most pervasive control statement. tell is how you send a command to a particular object in AppleScript. If you’ve ever done any Object-oriented programming, another way of expressing the same idea is to say tell allows you to target a message toward an object. In this case the object is me — a built-in AppleScript keyword that refers to the script itself. So,
tell me to runsays “send the run message to the script”.
There’s an easy (and inaccurate) way to understand what that means, and a hard (and accurate) way. For now, we’re going to go easy so that the learning curve doesn’t get too steep. In this context, we will say that run means “go back to Line 1 and begin execution of the script again”.
Every time you choose “Try Again”, the script goes back to Line 1 and repeats itself until you choose one of the other answers.
Where we are: so far!
In this post, we’ve been introduced to AppleScript’s list class, consolidated our knowledge of display dialogs and if statements, and had our first taste of tell, me, and run. These concepts will require more elucidation and, most importantly, more practice, all of which are coming up!
In the next post hello applescript 4: shelling out, we’ll work with these concepts some more and build on them to produce our first practical scripts. Be sure to follow Applehelpwriter to be notified when the post is published.
See you there! 
For extra credit:
This week’s extras
1. Modify Script 7’s inner if statement so that if the text returned contains your name, theReply is “Winner”; if the text contains “Phil”, theReply is set to “Runner Up”. Any other name should produce the default reply “Loser”.
There are in fact two ways to solve this challenge, see if you can produce both. For help, look up else if in the Control Statements Reference section of the AppleScript documentation.
Solutions from last time
1. Use the hidden answer parameter:
2. In the second exercise, we posed a number of questions. The easiest way to find out about the parameters for a command is to use Script Debugger’s Dictionary viewer, which you can access by clicking on the Window menu (not, confusingly, the Dictionary menu!) and choosing ‘Dictionary’.

Also, don’t forget to use the AppleScript documentation, which I’ve linked to multiple times in this and earlier posts. It’s a great source of information, hampered somewhat by the lack of an effective search feature on Apple’s site. An older, pdf version of the doc which you can search can be downloaded by clicking this link, and is also available from here. Bear in mind, though, that Apple’s online docs contain some information that the older pdf doesn’t.
We’ll leave the other questions open for now, as they’ll be coming up in later posts!
hello, applescript 2: user in, user out
If you’re ready to learn AppleScript, this is the place to start! If you’re not sure yet whether AppleScript is for you, take a look at the intro to this series, What’s the Use. For those of you that are ready, let’s fire up Script Debugger and write our first script!
Script 1
OK, you want ‘hello, world’? Of course, you do!
Here it is, with a difference:

Type it in to the editor’s window, then run the script by clicking the Run button or hitting “Command-R” on the keyboard.

Wow. No “print” command for one, and an actual user interface. Cool!
If you don’t see a notification in the top right of your screen, you may need to adjust your Notification preferences.
What happens if you leave off the last quotation mark?
Try it and see:

This is called a compile time error, one of three kinds we’ll learn about (the others are run time and logic errors). When you run a script, the AppleScript compiler first checks it for syntax errors. If all is well, it turns your plain text into “pretty print” (we’ll talk about what the syntax colouring means later in the series); if not, your text isn’t compiled and you get an error message.
You can get a compiler check anytime without running the script by clicking either the
√button or using “Command-K” on the keyboard.
You’ll notice that when you have a compile time error in Script Debugger, you get a message and the error number in the bottom left corner (you won’t see the error number if you’re using Apple’s Script Editor). These can be useful, so much so that we’ll write a little script ourselves to tell us more about the error based on the error number we get in hello, applescript 4: shelling out.
For now, let’s take a look at the message.
“Expected string but found end of script.”
It may seem rather cryptic at first, but it can be translated simply enough. A string in AppleScript (and most other programming languages), is text placed between a pair of quotation marks. Anything between quotes will be treated as just a piece of ordinary text and not as part of the programming language. display notification isn’t a string in our script: it’s part of the programming language – specifically, a command to do something. “hello, world”, on the other hand, is a string: it’s just the ordinary text we want to display. The compiler says it “expected a string” because it found the first quote mark at the beginning of “hello, indicating the start of a string. It then went looking for the second one to mark the end of the string, but instead found…yes, you guessed it: the end of the script!
Script 2
Replace the missing quotation mark. We’ll come back to error messages shortly, but for now, let’s add our own title to the notification rather than having the default one:

Make sure those quotation marks are balanced!

Looking good!
Script 3
Notifications are useful when all we want to do is pass a simple message, but if you need users to make a choice or you need to provide a longer message, we should use a dialog.
Type in the script as you see it on the left in the image below.

Run it, and click the “OK” button when the dialog appears. Now look at the Results pane (right-hand panel in Script Debugger; bottom Accessory view in Script Editor).
That looks interesting! Let’s explore some more.
Script 4
Let’s add some bells and whistles:

Run the script.

Click either one of the buttons to end the script. Again, remove the quote mark after “world”, but this time don’t try to run the script. Just try to compile it. Remember, you can do that either by clicking the √ button in the toolbar or “Command-K” on the keyboard.
Notice this time we get a different error message and a different number, despite the fact that we seem to have errorred in exactly the same way and in exactly the same place as before:

Or did we? Look at it from the compiler’s point of view. Just as before, the compiler finds the first quote mark and continues looking. But this time it does find the second one! Only it’s not where it’s meant to be. Because we left off the quote mark after “world”, the compiler assumes that the quote mark that prefixes “Message is the closing quote mark for the opening one:

As a result, the term Message looks to the compiler like its supposed to be part of the programming language, as it follows the string “hello world with title ”. That sure is a valid string (you can put any text you like in your string, it doesn’t have to make sense), but what follows it is not a valid part of the programming language. You can learn more about identifiers here, but for now, just note that this error message has the form “this can’t go after that”, and is another clue that our quote marks are unbalanced.
What about the third quote mark? The compiler never sees it. The compiler reads from left to right, so after pairing the first two quote marks it throws the error and stops trying to read any further. If there are further errors in our script, we’ll never know till we fix (all) the preceding ones.
After you dismiss the error alert, the compiler is kind enough to highlight the this (“Message”) that can’t go after the that (“"“) in your script.
Errors -2740 and -2741 are common enough that whenever you see them, you now know what to check first: are my quotation marks balanced?
Let’s get back to our display dialog command. Are you wondering what happens if you use another number instead of 2 after with icon? I hope so!
Replace the missing quotation mark, and experiment by changing the number after with icon for all three values from 0 to 2.
Normally, you’ll use with icon 1, which will insert the icon of the executing program. In this case, that’s the icon for Script Debugger, but as you go through this series you’ll be learning how to execute your scripts in other ways, and it’s useful to have the icon of the executing program visible in the dialog box so that you know exactly where it’s coming from.
Our dialog box has some unnecessary cruft. We have an “OK” button and a “Cancel” button, but they appear to do the same thing; that is, they halt the script. But look a bit closer at the editor. Run the script again, twice, choosing the “Cancel” button first, and then the “OK” button on the second run.
When you choose “Cancel” there is no result, but there is an error message in the Events pane, specifically, error -128.

Errors, error messages and error numbers are powerful friends. We’ll see how we can harness errors like -128 later in the series.
When you run the script again and choose “OK”, however, there is a result. There are many result types, but in this case you get what is known as a record (similar to a Dictionary or key/value pair in other languages) in the Results view:
{button returned:"OK"}
The record contains a label (in this case, button returned, and a value (here, "OK"). This is important, as we’ll see in the following scripts.
Script 5
What if we want to get more than just an acknowledgement, but need some input from the user? Here’s one way:

Run the script, type in an answer, and hit “OK”. Take a look at the result:
{button returned:"OK", text returned:"Phil"}
It’s a record again, with the added pair “text returned” and the text that the user typed.
The default answer parameter is an empty string. What happens if you put some text between the quote marks and run the code?
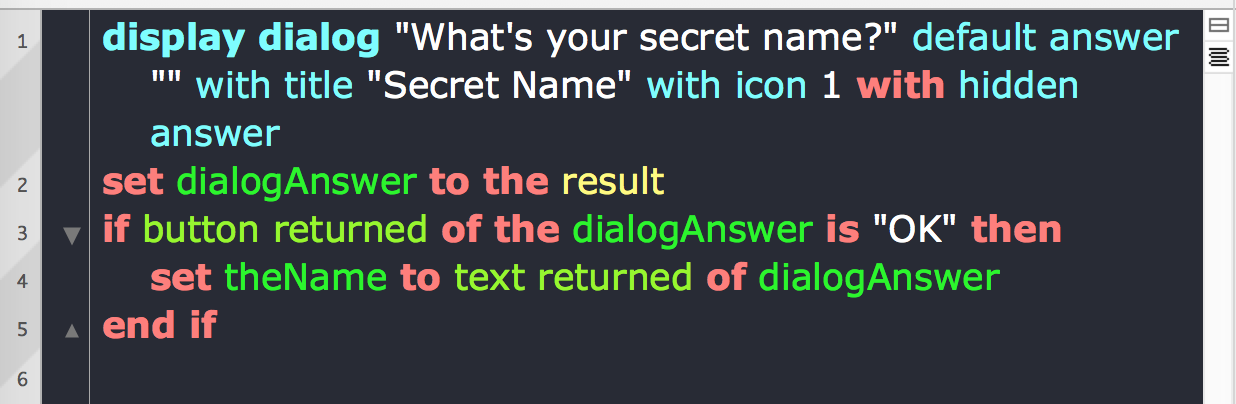
Script 6
Let’s build on Script 5 and capture the answer that the user provides:

This script has a lot of new stuff going on. Let’s take it from Line 2 (refer back to Script 5 for line 1):
Line 2
This captures the result of the dialog in a variable called dialogAnswer. The result of the dialog isn’t the name you typed in, but the record of two labels with two values. In other words, the value of dialogAnswer is:
{button returned: "OK", text returned: "Phil"}
We could have called the variable (almost) anything we liked. I just chose dialogAnswer because it’s descriptive.
Descriptive names are useful because when I read back my script at some point in the future, it’ll be immediately obvious what this variable represents. However, I could have called it alpha, or just d or almost anything else. There are some reserved words in AppleScript that you can’t use, and you also can’t start variable names with a number or use certain special characters in them, as noted here.
Most commonly, we use the set command to assign values to variables. In many other programming languages, they use the = sign, like this:
dialogAnswer = result
You can’t do this in AppleScript (or rather you can, but it means something else, not variable assignment), so if you’ve come to AppleScript with a background in another language, you’ll need to make the mental adjustment.
What about result though? Where did that come from? This is a built-in property, filled with the value of the last command to be executed.
Take a moment to consider that. It means that the result property changes on (almost) every line of your script.
Before we continue working through the rest of Script 6, let’s take a closer look at the result property. Type this in, then compile and run it:

Notice that in the Events pane, result changes from 2, to 3 and finally (in the Results pane) to 6.

AppleScript can use the usual programming conventions for mathematical operators (+, -, /, *. For x % y, use x mod y). That also includes the = sign, where it means “is equivalent to” (aka “==” in many other programming languages) and not, as we mentioned above, “assign to”.
In this little script, we also learned how to use the log command to print the value of a variable to the Events pane. In Script Editor, you’ll need to do that a lot if you want to see the values of your variables at different times in your script. In Script Debugger, however, it’s rarely necessary as you can see the values in the Variables inspector view.
To verify this, try removing the two log statements and running the script again. The log statements no longer appear in the Events pane, but Script Debugger captures them anyway in the Variables inspector view.
Line 3
Line 3 of Script 6 is an if statement, a kind of control flow statement. The clause, in this case, takes the form of a block. That means it evaluates a condition on one line, executes any commands if the condition is met on subsequent lines (Line 4) and then provides an end statement (Line 5) to signal the end of the block.
The conditional here first examines the button returned property of the result, which, remember, we’ve captured in the dialogAnswer variable.
After the conditional has been evaluated and any commands executed if the condition was satisfied, the rest of the script continues to execute as normal. In Script 6 there were no more commands after the block, so the script ends.
Line 4
In Line 4 of Script 6, if the user clicked “OK”, we set a new variable, theName, and assign it the value of the text returned property of the dialogAnswer record. Because we ended the block and the script on the next line, we never actually got to use this new variable, but typically the point of doing this would be so that we can use that value somewhere else in our script.
Where we are: so far!
Woah! We’ve done a lot in this post! We’ve seen how to get data in to our scripts from users and how to get data out, through dialogs, notifications and the Events and Results panes. We’ve had a first go at writing a conditional, logging messages, and viewing variable values. We’ve also been introduced to the compiler’s error messages and AppleScript’s record class.
If it’s all a bit of a blur, don’t worry. We’ll be practicing all of this, and expanding our skills some more, in the next post in this series, hello, applescript 3: (don’t?) tell me to run!. Be sure to follow Applehelpwriter to be notified when a new post is published.
See you there!
For extra credit:
1. Try to modify Script 6 so that when you run it and type in your name, it looks exactly like this.

You’ll need to consult the docs for display dialog, so try to find and explore Script Debugger’s Dictionary viewer in order to do that.
2. Go back to Script 4. What happens if you set with icon to 3?
This is an example of a run time or ‘execution’ error. The script will compile fine, because the parameter, or value, for with icon only has to be a number in order to compile. AppleScript tells you ‘a resource wasn’t found’ because, unlike ‘icon 0, ‘icon 1’ and ‘icon 2’, there’s no such thing as ‘icon 3’.
That raises a number of questions: how can we tell what kind of parameter an argument or command takes? Why are there only three icon resources and where are they declared? How can I add other icons if I want to? And last, but most importantly, what else do we need to know about run time errors? All this, and much, much more, will be covered in the hello, applescript series. Stay tuned!
hello, applescript: what’s the use?

In the first of a series of AppleScript tutorials, this post explains why you might want to consider learning AppleScript.
What’s the use?
If you’re not sure whether you want to invest time in learning AppleScript, this post is for you. Here I’ll outline four good reasons to learn AppleScript. I’m sure they’re not the only ones, but they’re the main ones that come to my mind as a daily user of the language. If, after reading this post, you want to give it a try, be sure to follow this series, as we’ll be quickly moving on with hands-on examples and detailed explanations that will rapidly turn you into an AppleScript power user! At the end of this post, I’ll briefly discuss tools, so that you’re ready to get started when the next in this series, User In, User Out, is published.
1. Automation
First of all, AppleScript can interact with other applications. That means it can get one app to perform a function and pipe the result to another app to perform a different function that the first app didn’t have. There’s no limit to the number of apps and functions you can chain together in this way (other than your computer’s resources). Why would you want to chain apps together like that?
To achieve things that none of those apps can do on their own.
Imagine this scenario (scripts for this appear later in this series of posts): Suppose you run a small business and customer orders come in via email. With an AppleScript, you can have those emails automatically scanned, the customers’ order details extracted, and your Excel or Numbers spreadsheet updated accordingly. You could then have the product details forwarded to another person (Packaging?) and the customer details forwarded to a third (Marketing?). Your script could tell Word, or Pages, to print out a label, and tell Mail to now send an automated response back to the customer. There is no one program on your computer that can accomplish all that, but you can, with AppleScript.

Once set up, none of this requires any interaction on your part. You build the script, test it, and add it as a Mail rule. The rest happens automatically when the mail arrives in your Inbox; you don’t need to monitor it. You can go on holiday. This ability to automate is what makes AppleScript so unique.
2. Integration
AppleScript’s ability to chain or pipe application functions together is similar to the Unix command line ability to pipe utilities together, only it allows you to do it with full-blown applications. But you can use it to connect those applications to command line utilities, too. This is the second thing that makes AppleScript unique: integration across the entire macOS environment. You can even chain it to other programming languages.

For example, I could have AppleScript run some Python code, take the result and run that through a Perl script, and take the result of that and display it to the user (or myself) in a dialog box or notification (or send an email, or a Chat message, etc). And I can do that without having to mess about worrying how to create graphical user interface elements like you might do with Tcl/Tk (if you know what that is; if you don’t, forget it!).
The relationship between AppleScript and the shell is symbiotic. If you’re a shell diehard, you’ll be happy to know that you can actually create and execute AppleScripts in .sh files without ever going near an AppleScript editor.
3. Power
AppleScript can not only harness the power of other scripting languages, it can harness the power of macOS itself. The AppleScript-ObjectiveC bridge means you could, if you wanted to – and many programmers do – create full on native macOS Cocoa apps without ever getting into the intricacies of Xcode projects and workspaces. You can even code sign your AppleScript apps from within the script editor.

4. God-mode
Finally, AppleScript can drive the user interface and even drive apps that haven’t been specifically made to support AppleScript. If you find yourself repeatedly doing the same actions in the UI to achieve a task, you can cut-out the middle-man (you!) and tell AppleScript to click those buttons, move those windows or copy that text from Safari and paste it into Pages instead of laboriously and repeatedly doing it yourself. This creates an eery effect not unlike those old-time pianolas.
Look no hands!

Where’s the catch? To achieve the level of automation and time-saving we’ve been discussing, you’re going to have to invest some time up front learning how to script. It won’t always be easy, and you won’t always be happy that it’s not easy, but that’s the price of investing in learning anything.
If you’re ready to learn this amazing, unique language, let’s get tooled up!
Tools
I’ll keep this short. You can learn AppleScript the hard way using the built-in Script Editor, or you can learn AppleScript the easier way by using the free 3rd-party editor Script Debugger.
Script Debugger gives you a full-featured trial for 20 days, and after that if you don’t want to buy it you lose some of the more advanced features but you can use the rest indefinitely anyway. It works in rather the same way as BBEdit’s trial does, if you’re familiar with that.
If you save scripts in Script Debugger (so long as they’re not debug scripts, more on that later), you can run (and edit) them in Script Editor and vice versa. In other words, you’re not locked in to a proprietary tool.
I’m not even going to consider that you’d choose to learn AppleScript the hard way since the easier way is free, so all the examples in this series of posts will use Script Debugger. However, unless otherwise marked as SD-only or SD-paid-only, you can do all of the examples in the series in either tool.
Don’t worry, at this point, about how to use either Script Editor or Script Debugger. We’ll get into that in the next post: hello, applescript 2: User In, User Out. Follow Applehelpwriter to be notified when a new post is published.
🙂
wifi display – simple network awareness

Ever wished you could see at a glance whether your network has changed without having to click on the Wifi icon in the Status bar to check the currently active connection? I know I have, particularly when toting the laptop between work, home and coffee shop.
Although you can require admin approval for changing networks in System Preferences, in practice that can often be quite disruptive. It also has the potential to expose your login password in public places or situations where it might be awkward or inconvenient to insist on privacy while you type it in.
It would be easier, it seemed to me, if I could just always see the name of the currently connected network in the Status bar, instead of having to actively go and look to see if it has changed.
I decided to solve the problem by writing my own little Wifi Display utility, which I’m sharing here for free for anyone that has a similar need.
The Wifi Display.app simply displays the currently active SSID Wifi name in the Status bar. You can command-drag the Wifi name along the Status bar to move it next to your Wifi icon for visual contiguity. The app is sandboxed and signed with my Apple developer ID.
Wifi Display is free to use and requires macOS 10.10 Yosemite or higher.
Share and enjoy! 🙂
SIP’s soft underbelly – a hiding place for malware?

There’s no doubt that System Integrity Protection has helped keep macOS more secure since its introduction in 10.11, and it continues to see updates that restrict what can be modified and where non-system files can be stored.


Apple’s official, user-facing documentation says:
Unfortunately, this documentation leaves out an important part of the story. The full list of protected paths and process labels can be found in a bunch of related files in the Sandbox folder within System/Library.
Among these are a list of protected locations in the rootless.conf file. The file, however, tells a little more than Apple’s user-facing documentation. Not only does it list the locations that can’t be modified, it also lists some that can. Despite what Apple officially says, not everything in System, it turns out, is in fact protected by SIP.
We can use a quick-one liner on the command line to output the exceptions on the current system like so:
awk '$1 ~ /^\*/' /System/Library/Sandbox/rootless.conf


On my 10.13.6 system that returns 9 locations, four of which are within the System’s Library folder:
Let’s check to see if these paths are really writable. We’ll create a simple script that, when run, produces a dialog box showing where the script is located. We first create the script in the /tmp folder, give it executable permissions, then move it into the System Library’s ‘Speech’ folder. We can do all this on the command line in Terminal, then execute it:
Sure enough, our test produces a script showing that it’s running out of one of the locations listed as an exception in rootless.conf.
This, of course, isn’t a SIP vulnerability. The paths we’re talking about are listed as exceptions to SIP protection, after all; what’s more, they do indeed require administrator privileges to write to (although not to run). The issue is that very few users will know that these paths are exceptions. In fact, aside from their being written in rootless.conf, there may be no other place where they are all documented, at least not at the user level. And that obscurity, of course, means many will have no idea that malware can install itself in places in the System folder where, for sure, most users will fear to tread.
Moreover, even if the user were to notice these paths in a process output or list of open files in Activity Monitor, it would be very easy to overlook them as being legitimate since they would all begin with the path ‘/System/Library/…’. Naturally, we assume the System’s folder is reserved for system files, not the user’s and not third-party applications’ either. Apple’s user-facing documentation that we referred to earlier encourages this very assumption.
What does it all mean?
In this post we’ve seen that there are places in the System folder that could easily be adopted as a nice hiding place for malware which has acquired elevated privileges. The aim here was to make these exceptions a little less obscure and to encourage people – especially those troubleshooting macOS for malware and adware issues – to add these locations to their list of places to keep an eye on.
Enjoy!😃
Advanced Mac Cleaner strikes again!

It’s been a truism on macOS for some time that the most reviled piece of software on the platform is MacKeeper, but brother-in-arms Advanced Mac Cleaner must be running it a close second.
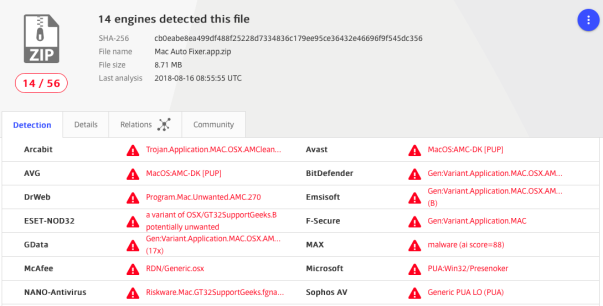
Advanced Mac Cleaner is produced by PCVark and has many incarnations. Aside from ‘AMC’, it’s also distributed as Mac Tonic, Mac Mechanic, Malware-Crusher, Mac Optimizer and now, the most recent form we’re seeing, Mac Auto Fixer.
Like all the other forms of AMC, this app gets bundled in with fake Flash installers and writes itself all over your Mac to multiple places inside your user and local domain Library folders. Here’s a 40-second video showing how Mac users get tricked into installing AMC and its fake virus scanner:
https://www.youtube.com/embed/ZeU72ihgApE?version=3&rel=1&showsearch=0&showinfo=1&iv_load_policy=1&fs=1&hl=en&autohide=2&wmode=transparent
For those of you that want to remove Mac Auto Fixer and related manually, here’s a list of most of the paths you should look for:
/Applications/Mac Auto Fixer.app
/Library/Advanced Mac Cleaner
/Library/Application Support/Advanced Mac Cleaner
/Library/Application Support/amc
/Library/Application Support/Mac Mechanic
/Library/Application Support/Mac Tonic
/Library/Application Support/MacOptimizer
/Library/Application Support/maf
/Library/hlprmaf/mafgset.plist
/Library/LaunchAgents/com.pcv.amcuninstall.plist
/Library/LaunchAgents/com.pcv.hlpramcn.plist
/Library/LaunchAgents/com.techyutil.maftask.plist
/Library/LaunchAgents/com.techyutil.mafuninstaller.plist
/Library/Mac Mechanic
/Library/Mac Tonic
/Library/MacOptimizer
/Library/Preferences/com.techyutils.cleaner.plist
/Volumes/MacAutoFixer/.hlpr/Mac Auto Fixer
/Volumes/MacAutoFixer/.hlpr/maf
~/Applications/Mac Auto Fixer.app
~/Library/Advanced Mac Cleaner
~/Library/Application Support/Advanced Mac Cleaner
~/Library/Application Support/amc
~/Library/Application Support/Mac Auto Fixer
~/Library/Application Support/Mac Mechanic
~/Library/Application Support/Mac Tonic
~/Library/Application Support/MacOptimizer
~/Library/Application Support/maf
~/Library/Caches/com.pcv.amcuninstallhelper
~/Library/Caches/com.pcv.rlistupdater
~/Library/Caches/com.PCvark.Advanced-Mac-Cleaner
~/Library/Caches/com.techyutil.macautofixer
~/Library/Caches/com.techyutil.maftask
~/Library/Caches/com.techyutil.maftaskreviser
~/Library/Caches/com.techyutil.mafuninstaller
~/Library/Caches/com.techyutils.cleaner
~/Library/hlprmaf
~/Library/hlprmaf/mafgset.plist
~/Library/LaunchAgents/com.pcv.amcuninstall.plist
~/Library/LaunchAgents/com.pcv.hlpramcn.plist
~/Library/LaunchAgents/com.techyutil.maftask.plist
~/Library/LaunchAgents/com.techyutil.mafuninstaller.plist
~/Library/Logs/Advanced Mac Cleaner.log
~/Library/Logs/helperamc.log
~/Library/Logs/Mac Auto Fixer.log
~/Library/Logs/maftask.log
~/Library/Mac Auto Fixer
~/Library/Mac Mechanic
~/Library/Mac Tonic
~/Library/MacOptimizer
~/Library/Preferences/com.pcv.hlpramc.plist
~/Library/Preferences/com.PCvark.Advanced-Mac-Cleaner.plist
~/Library/Preferences/com.techyutil.macautofixer.plist
~/Library/Preferences/com.techyutil.maftask.plist
~/Library/Preferences/com.techyutil.mafuninstaller.plist
~/Library/Preferences/com.techyutils.cleaner.plist
You can also save yourself a whole lot of grief by using my shareware troubleshooting tool DetectX Swift, which will not only find all these pesky elements for you, it’ll remove them all for you, too. There’s no requirement to pay, we don’t mind ridding your Mac of this stuff for free!
Enjoy! 😃
latest MacKeeper file paths
Most recent update: Mon 3 Sep 2018
Want to remove MacKeeper? The easiest way is to use my free/shareware app DetectX Swift, but if you’re looking to do it yourself, here’s the complete list of all past and current known filepaths.
Bear in mind that DetectX Swift can find other MacKeeper paths that are not on the list due to its internal search heuristics; however, I’ll update this list as new paths come to light. If you happen to find any that are not on the list, please share in the comments!
Thx & Enjoy!
Paths
$TMPDIR/MacKeeperUninstaller.app

$TMPDIR/com.mackeeper.MacKeeper.Installer.config

/Applications/MacKeeper.app

/Applications/Utilities/MacKeeper.app

/Library/Application Support/MacKeeper

/Library/Application Support/MacKeeper/AntiVirus.app

/Library/Application Support/MacKeeper/AntiVirus.app/Contents/MacOS/AntiVirus

/Library/Application Support/MacKeeper/MacKeeperATd

/Library/Application Support/MacKeeper/MacKeeperTrackMyMacDaemon

/Library/LaunchDaemons/com.mackeeper.AdwareAnalyzer.AdwareAnalyzerPrivilegedHelper.plist

/Library/LaunchDaemons/com.mackeeper.AntiVirus.plist

/Library/LaunchDaemons/com.mackeeper.MacKeeperTrackMyMacDaemon.plist

/Library/LaunchDaemons/com.mackeeper.MacKeeperPrivilegedHelper.plist

/Library/LaunchDaemons/com.mackeeper.MacKeeper.MacKeeperPrivilegedHelper.plist

/Library/LaunchDaemons/com.mackeeper.MacKeeper.plugin.AntiTheft.daemon

/Library/LaunchDaemons/com.mackeeper.plugin.AntiTheft.daemon

/Library/LaunchDaemons/com.zeobit.MacKeeper.AntiVirus

/Library/LaunchDaemons/com.zeobit.MacKeeper.AntiVirus.plist

/Library/LaunchDaemons/com.zeobit.MacKeeper.plugin.AntiTheft.daemon

/Library/PrivilegedHelperTools/com.mackeeper.AdwareAnalyzer.AdwareAnalyzerPrivilegedHelper

/Library/PrivilegedHelperTools/com.mackeeper.Cerberus

/Library/PrivilegedHelperTools/com.mackeeper.MacKeeperPrivilegedHelper

/Library/LaunchDaemons/com.zeobit.MacKeeper.plugin.AntiTheft.daemon.plist

/Library/Security/SecurityAgentPlugins/MKAuthPlugin.bundle -- warning: deleting this file could harm your Mac! Contact me for help.

~/Applications/mackeeper.app

~/Applications/Utilities/mackeeper.app

~/Documents/MacKeeper Backups

~/Downloads/MacKeeper.3.12.1.pkg

~/Downloads/MacKeeper.3.16.4.pkg

~/Downloads/MacKeeper.pkg

~/Library/Application Support/com.kromtech.AdwareBuster

~/Library/Application Support/com.kromtech.AdwareBusterAgent

~/Library/Application Support/com.mackeeper.AdwareAnalyzer

~/Library/Application Support/com.mackeeper.MacKeeper

~/Library/Application Support/com.mackeeper.MacKeeper.Helper

~/Library/Application Support/com.mackeeper.MacKeeper.MKCleanService

~/Library/Application Support/com.mackeeper.MacKeeper.Uninstaller

~/Library/Application Support/com.mackeeper.MacKeeperAgent

~/Library/Application Support/MacKeeper

~/Library/Application Support/MacKeeper 3

~/Library/Application Support/MacKeeper Helper

~/Library/Caches/com.mackeeper.MacKeeper

~/Library/Caches/com.mackeeper.MacKeeper.Helper

~/Library/Caches/com.mackeeper.MacKeeper.MKCleanService

~/Library/Caches/com.zeobit.mackeeper

~/Library/Caches/com.zeobit.mackeeper.helper

~/Library/LaunchAgents/com.kromtech.AdwareBusterAgent.plist

~/Library/LaunchAgents/com.mackeeper.AdwareAnalyzer.plist

~/Library/LaunchAgents/com.mackeeper.MacKeeper.Helper.plist

~/Library/LaunchAgents/com.mackeeper.MacKeeperAgent.plist

~/Library/LaunchAgents/com.zeobit.mackeeper.helper

~/Library/LaunchAgents/com.zeobit.mackeeper.plugin.backup.agent

~/Library/Logs/MacKeeper

~/Library/Logs/MacKeeper/MacKeeper.log.db

~/Library/Logs/MacKeeper.Duplicates.log

~/Library/Logs/MacKeeper.log

~/Library/Logs/MacKeeper.log.signed

~/Library/Preferences/com.mackeeper.MacKeeperAgent.plist

~/Library/Preferences/com.mackeeper.MacKeeper.Helper.plist

~/Library/Preferences/com.mackeeper.MacKeeper.plist

~/Library/Preferences/com.zeobit.mackeeper.helper.plist

~/Library/Preferences/com.zeobit.mackeeper.plist

~/MacKeeper Backups
Bundle Identifiers & Launch Labels
com.kromtech.AdwareBuster

com.kromtech.AdwareBuster.AdwareBusterPrivilegedHelper

com.mackeeper.AdwareAnalyzer

com.mackeeper.AdwareAnalyzer.AdwareAnalyzerPrivilegedHelper

com.mackeeper.AntiVirus

com.mackeeper.Cerberus

com.mackeeper.Kira

com.mackeeper.macKeeper

com.mackeeper.MacKeeper.MacKeeperPrivilegedHelper

com.mackeeper.MacKeeper.plugin.AntiTheft

com.mackeeper.MacKeeper.plugin.MKAuthPlugin

com.mackeeper.MacKeeperTrackMyMacDaemon

com.mackeeper.MacKeeper.Uninstaller

com.mackeeper.MacKeeperAgent

com.mackeeper.MKFoundation

com.mackeeper.MKUIKit

com.mackeeper.plugin.AntiTheft

com.mackeeper.WPAdwareUtils

com.zeobit.MacKeeper.AntiVirus

com.zeobit.MacKeeper.plugin.AntiTheft
Related:
how to uninstall MacKeeper
how to love (and read) crash reports

Crash Reports are essential, if often opaque, guides to problems in your app that every developer has to deal with from time to time.
For small enterprise developers like myself, commercial analytics aren’t really an option. And while there are open source alternatives like UKCrashReporter, I’ve been lucky enough to suffer relatively few crashes and typically just ask users to manually submit crash reports (stored in ~/Library/Logs/DiagnosticReports) as and when they occur.
Choosing a method of collecting crash reports is one thing, but scouring them for useful information is quite another, and the reams of data often included can seem a little overwhelming.
On a good day, your crash report may include a direct reference to the method or function that’s caused the issue, like this one from an early version of my troubleshooting app DetectX Swift:


On other days, though, you might get presented with nothing but a bunch of unhelpful memory addresses:


It’s at this point that you need to enlist the help of the built-in command-line tool atos. In the remainder of this post, we’re going to learn what it does and how to use it to find the line in our source code that caused the crash.
How does atos help?
The beauty of atos is that it will give you a reference to the source file, function and even line number in your code where the crash occurred. Given that it can do this for a crash that occurred on another user’s machine that you can’t reproduce locally and don’t have access to, this seems like nothing short of magic.
Here’s an example of what atos might provide from a crash log like the one above:
ViewController.checkReg(isCli:) (in DetectX Swift) (ViewController.swift:4042)
The output from atos tells me the name of the Swift source file, the name of the function and — here’s the truly wonderous part — even the line number: 4042.
This is all part of the magic of symbollication, which is such an esoteric word I’m not even going to try to spell it again :-). Instead, let’s just get down to the practical nitty-gritty of how to get this kind of data out of our users’ crash reports.
How to use atos
The method is fairly simple and goes like this:
1. Create a folder called “CrashWork”.
2. Go to Xcode’s ‘Organizer’, and right-click on the archive of the version of the app that crashed.


Choose “Show in Finder”. That takes you to the .xcarchive file in Finder, from which right-click again and choose “Show Package Contents” to open the package:


3. Click on the .dSYM file and make a copy of it. Switch back to your CrashWork folder and paste the copy in there. Grab a copy of the same version of your app that crashed (you can also get that from the Products folder in the .xcarchive package, if you don’t have one handy elsewhere) and place it in the same folder:


Important: Be sure you’re working with the same version of your app as the user; atos needs that to match up the addresses in the crash report, and any other version will produce incorrect results or an error.
4. It’s now time to head on over to the Terminal. cd into your CrashWork directory:
cd ~/Desktop/CrashWork
5. The format of the command is generally going to be like this (see man atos for options):
atos -o <path to executable> -arch x86_64 -l <load address> <address>
<path to executable> is the path all the way to the Mach-O binary in your app bundle in the CrashWork folder, so the path in my example looks like this:
atos -o DetectX\ Swift.app/Contents/MacOS/DetectX\ Swift -arch x86_64 -l <load address> <address>

You need to be careful to get the <load address> and the <address> the right way around. They are the reverse order of what you see in the crash log:
Now my complete example looks like this:
atos -o DetectX\ Swift.app/Contents/MacOS/DetectX\ Swift -arch x86_64 -l 0x10a10e000 0x000000010a16a601

6. Hitting ‘return’ produces the magic:


7. Now, going to my source file, I see exactly where the app crashed (lo! and behold, what do you know? An unwrapped optional, of course!):
Enjoy! 🙂
Featured pic: crash by febra-febra

accessing TCC.db without privileges

Earlier this year, Digita Security’s Patrick Wardle took apart a cross-platform backdoor trojan he nicknamed ”ColdRoot’. Wardle was retro-hunting possible malware by searching for apps on VirusTotal that access Apple’s TCC privacy database.
For those unfamiliar, TCC.db is the database that backs the System Preferences > Security & Privacy | Accessibility preferences pane and which controls, among other things, whether applications are allowed access to the Mac’s Accessibility features. Of interest from a security angle is that one of the permissions an app with access to Accessibility can gain is the ability to simulate user clicks, such as clicking “OK” and similar buttons in authorisation dialogs.
One particular comment in Wardle’s article caught my eye:
there is no legitimate or benign reason why non-Apple code should ever reference [the TCC.db] file!
While in general that is probably true, there is at least one good reason I can think of why a legitimate app might reference that file: reading the TCC.db used to be the easiest way to programmatically retrieve the list of apps that are allowed Accessibility privileges, and one reason why a piece of software might well want to do that is if it’s a piece of security software like DetectX Swift.
If your aim is to inform unsuspecting users of any changes or oddities in the list (such as adware, malware or just sneaky apps that want to backdoor you for their own ends), then reading TCC.db directly is the best way to get that information.
Just call me ‘root’
Since Apple put TCC.db under SIP protection subsequent to my reports on Dropbox’s user-unfriendly behaviour, apps are no longer able to write to the database via SQL injection. An app with elevated privileges can, however, still read the database. A sufficiently privileged app (or user) can output the current list with:
sudo sqlite3 /Library/Application\ Support/com.apple.TCC/TCC.db 'select * from access'
On my machine, this indicates that there are twelve applications in the System Preferences’ Privacy pane, all of which are enabled save for two, namely LaunchBar and Safari:
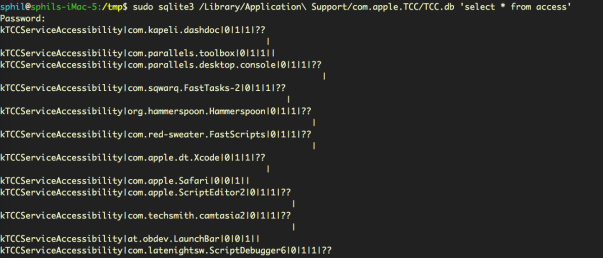

We can see from the output that LaunchBar and Safari both have the ‘allowed’ integer set to ‘0’ (the middle of the three values in “0|0|1”) , whereas all the other apps have it set to ‘1’ (“0|1|1”).
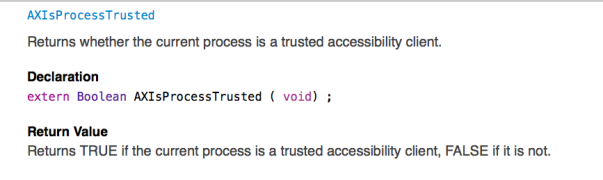
It’s not clear to me why reading the database should require privileges. Certainly, Apple have provided APIs by which developers can test to see if their own apps are included in the database or not. The AXIsProcessTrusted() global function, for example, will return whether a calling process is a trusted accessibility client (see AXUIElement.h for related functions):

However, there remains a case (as I will demonstrate shortly) where developers may well need to know whether apps other than their own are, or are not, in the list. Moreover, there doesn’t seem to be any obvious vulnerability in allowing read access to that data, just so long as the write protection remains, as it does, in place.
The use case for being able to read the TCC.db database is clearly demonstrated by apps like DetectX Swift: security apps that conform to the principle of least privilege, always a good maxim to follow whenever practical. Asking users to grant elevated privileges just to check which apps are in Accessibility is akin to opening the bank vault in order to do an employee head count. Surely, it would be more secure to be able to determine who, if anyone, is in the vault without having to actually take the risk of unlocking the door.
Did they put a CCTV in there?
Without direct access to TCC.db, we might wonder whether there are any other less obvious ways by which we can determine which apps are able to access Accessibility features. There are three possibilities for keeping an eye on bad actors trying to exploit Accessibility without acquiring elevated privileges ourselves, each of which has some drawbacks.
1. Authorisation dialogs
The first is that we can read the property list that records all invocations of the Accessibility authorisation dialog, without admin rights:
defaults read ~/Library/Preferences/com.apple.universalaccessAuthWarning.plist

That gives us a list of all the apps that macOS has ever thrown the ‘some.app would like permission to control your computer’ dialog alert for, along with an indication of the user’s response (1= they opened sys prefs, 0= they hit Deny).
This list could prove useful for identifying adware installers that try to trick users into allowing them into Accessibility (looking at you, PDFPronto and friends), but it’s main drawback is that the list is historical and doesn’t indicate the current denizens of Accessibility. It doesn’t tell us whether the apps in the list are currently approved or not, only that each app listed once presented the user with the option of opening System Preferences and what the user chose to do about it at that time.
2. Distributed Notifications
The second option is that developers can register their apps to receive notifications when any other application gets added or removed from the list with code similar to this:
DistributedNotificationCenter.default().addObserver(self, selector: #selector(self.accessibilityChanged), name: NSNotification.Name.init("com.apple.accessibility.api"), object: nil)


This ability was in fact added to DetectX Swift in version 1.04.
However, Apple hasn’t made this API particularly useful. Although we don’t need elevated privileges to call it, the NSNotification returned doesn’t contain a userInfo dictionary – the part in Apple’s notification class that provides specific information about a notification event. All that the notification provides is news that some change occurred, but whether that was an addition or a deletion, and which app it refers to, is not revealed:
Even so, notification of the change is at least something we can present to the user. Alas, this is only useful if the app that’s receiving the notification is actually running at the time the change occurs. For an on-demand search tool like DetectX Swift, which is only active when the user launches it, the notification is quite likely to be missed.
It would be nice, at least, if Apple would provide a more useful notification or an API for developers wishing to keep their users safe and informed. The lack of a userInfo dictionary in the notification was apparently reported as a bug to Apple several years back, but I suppose it could always use a dupe.
3. AppleScript – everyone’s favourite ‘Swiss Army Knife’
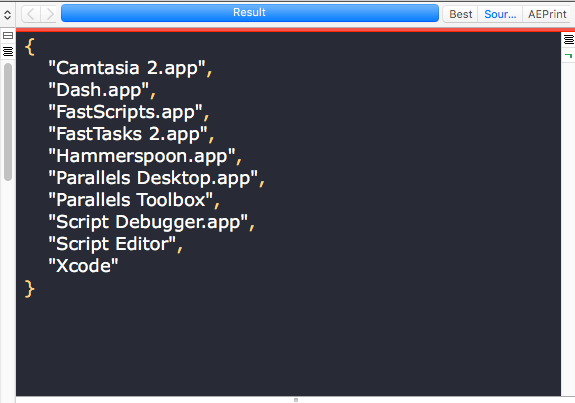
There is, as it turns out, a third way to reliably get exactly all the info we need about who has access to Accessibility. We can use AppleScript to return a complete list of apps in Accessibility that are enabled. Note that the output of this unprivileged script, shown here in the results pane of Script Debugger, returns a more readable version of the same list of apps we obtained from the privileged sqlite3 query of TCC.db, minus Safari and LaunchBar, which as we previously noted were not enabled:

Fantastic! There’s just one problem. While this AppleScript does not require blanket elevated privileges to run – in short, it doesn’t require an administrator password – it does need to be run by an app that is itself already in the list of Accessibility apps. If you have a script runner like Apple’s Script Editor, or third-party tools like Script Debugger or FastScripts, already approved in Accessibility, then you can run it without authorisation. It’s also worth noting that the script relies on launching and quitting System Preferences, which it attempts to do as quietly as possible.
As for DetectX Swift, I may consider adding something like this to a future version as an option for users who are happy to add DetectX to the list of apps in Accessibility.
Enjoy! 🙂
Have your own tips about accessing TCC.db? Let us know in the Comments!
Featured pic: Can’t STOP Me by smilejustbcuz
reduce unwanted alerts in DetectX Swift
If you’re a regular user of DetectX Swift (DTXS), you’ll be familiar with the Folder Observer function. Although DetectX has always been and will remain an on-demand search tool in principle (i.e., it doesn’t do anything unless you launch it), the Folder Observer adds the capability to alert you and optionally launch DTXS if any items are added or removed from your Launch folders.
This is a useful feature which removes the need, for example, to set Folder Actions or other scripting solutions on the folders which are most likely to be written to in the event of an adware or malware attack. However, as some users (and even myself!) have noticed, the Folder Observer can, at times, be a little irritating.
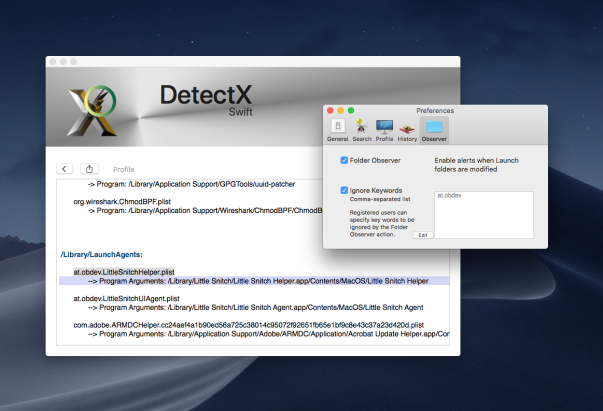
For example, here at sqwarq I have Little Snitch installed, which puts daemons and agents in both of the local domain Launch folders. The annoyance occurs whenever Little Snitch requires an update. When that happens, the daemon and agents will get written to, and DTXS will dutifully throw me an alert:

Great, except that I don’t really want alerts for software I already trust. I only really want to know about stuff that I don’t know is already in those folders. Of course, I can uncheck the preference for the Folder Observer entirely to stop all alerts, but that then deprives me of the security of being warned of things that I do want to be informed about.
Fortunately, there’s a simple solution that will allow you to tame DTXS and customise the alerts to your personal needs.
1. Go to DetectX Swift > Preferences and click the ‘Observer’ tab.
2. Click the ‘Ignore Keywords’ checkbox (you need to be a registered or licensed user).
3. Click the ‘Edit’ button, and add the launch label of each item you want to ignore in a comma-separated list.
4. Click the ‘OK’ button to finish.
You can get the launch label either by reading it from each of the property lists that you want to ignore, or directly from DetectX Swift’s Profiler. The linked video shows one way you can do that.
Enjoy! 🙂

