Category Archives: Security-2
how to remove “Plugins Button” from Chrome

Update: DetectX v2.75+ now deals correctly with the Plugins Button adware and the instructions below are now redundant. Just ‘Search’ and ‘Trash All…’ should be sufficient.
If you’re having trouble trying to remove the “Plugins Button” from Chrome because its ‘managed and cannot be removed or disabled’, then follow this procedure.
1. Launch DetectX and do a search. You should see at least 5 items. Do NOT click the Trash button yet.

2. Quit Chrome
3. In Terminal, execute this command* (you’ll need admin privileges)
sudo /usr/bin/profiles -P; sudo -K
If you see a single configuration profile installed with the profileIdentifier ‘org.superduper.extension’, then execute
sudo /usr/bin/profiles -D; sudo -K
to remove it.
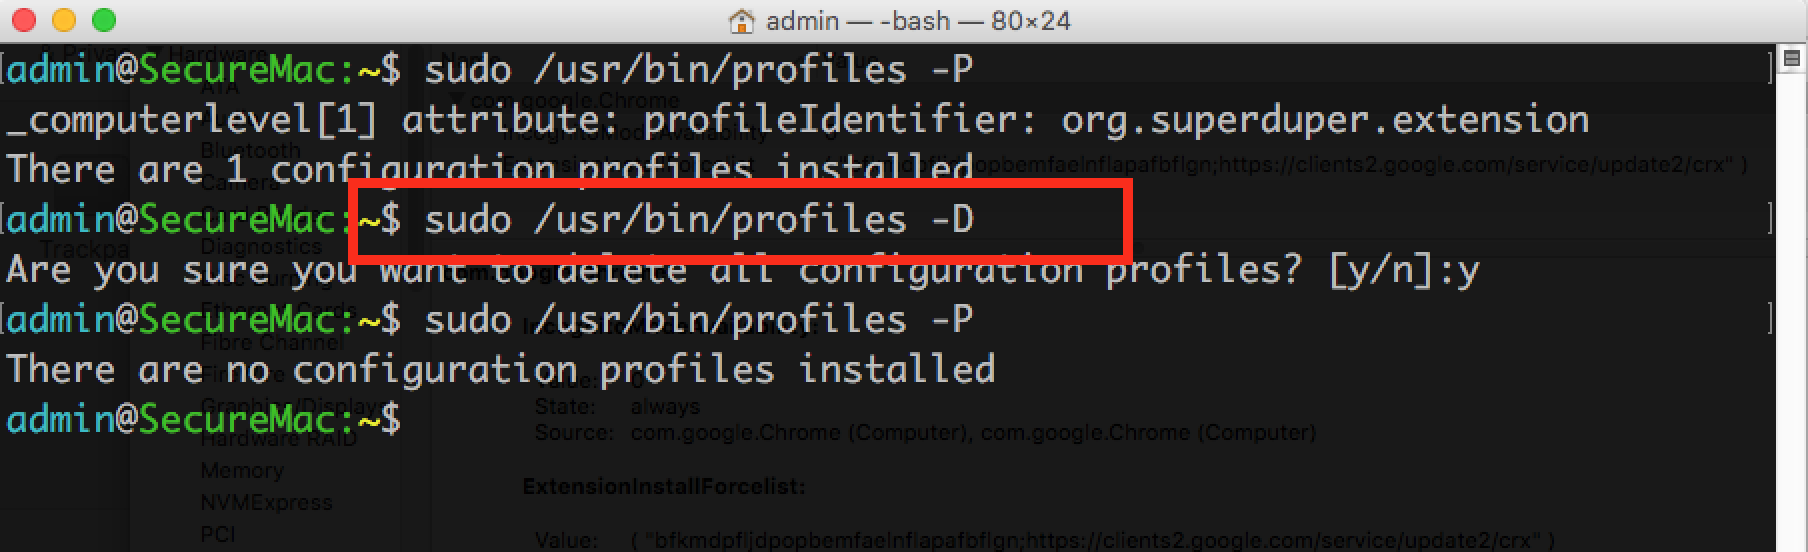
Type ‘y’ when prompted.
4. Read the caveats below, and then if appropriate, in DetectX, now click the ‘Trash All…’ button.
5. Relaunch Chrome and check that all is well.
Caveats
* If you or the machine’s administrator are using ‘Managed Preferences’ and have profiles other than the one mentioned above installed, then do NOT use the ‘-D’ switch in step 3. You’ll need to identify the correct profiles. Use the -P switch to list the installed profiles and only delete the one with ‘org.superduper.extension’ identifier. Likewise, do NOT use the Trash All… feature in DetectX, which will remove the Managed Preferences folder***. Instead, double-click the items in DetectX’s window to open them in Finder and remove them manually that way.
** You’ll need to authorise the deletions when macOS asks you as DetectX doesn’t have the permissions to do that (a safety feature).
*** Note that the ‘Managed Preferences’ folder is a perfectly legitimate folder for server admins that have knowingly installed managed preferences for their users, or for those using Parental Controls. An application update for DetectX will be released shortly to more accurately target this issue rather than flagging the entire Managed Preferences folder.
Terminal tricks for defeating adware

So, your browser is acting up, redirecting you to scamsites, offers for MacKeeper and Mac Cleaner and other unwanted software. You have what is technically known as ‘an adware’ infection. It’s not a virus, it’s not a ‘trojan’ and it’s not a ‘worm’, but it is a nuisance and may well be associated with any of the above. What to do?
Here’s 10 Terminal tricks you can use to help identify and remove adware items. It won’t cover every situation: adware mutates faster than a flu virus on amphetamines, but it will catch 90% of the cases currently out there. For the ones it doesn’t, see the ‘Getting Help’ section at the end of this post.
I’m going to split this up into two phases, ‘Gathering Information’ and ‘Dealing with the Results’. After explaining the first half-dozen commands individually, I’ll then give you one ‘master’ or ‘mother’ command which combines them into a single execution, but you should read through the explanations first so that you know what you’re doing and what to expect.
Gathering Info
First, most adware wants to persist on your mac across logins and restarts, and that means it has to put an executable somewhere where macOS will look on start up. One place most users should be familiar with and check first is the Login Items in System Preferences ‘Users & Groups’ pane. A lot of adware will insert itself there for good measure, but most will almost certainly be in other, trickier to find places.
This is where our first Terminal trick comes in. This Terminal trick will output the contents of the main locations where adware typically hides:
1. List the contents of your Launch* folders:
ls -alF /Lib*/Launch*/ ~/Lib*/Launch*/
That’ll output the contents of three different directories, /Library/LaunchAgents, /Library/LaunchDaemons, and ~/Library/LaunchAgents. If you’re planning on getting help by publishing the results in a public forum like Apple Support Communities, then you might want to use this version, which will scrub your username out of the results:
2. Same trick, redacting personal info:
w=`id -un`;ls -alF /Lib*/Launch*/ ~/Lib*/Launch*/ | sed "s@$w@[redacted]@g"
The output of that command will have a load of files with names like ‘com.company.filename.plist’. To give you an example here’s what mine outputs (note, none of these are adware files; unsurprisingly, my Mac is adware free!).
Slipping a shell script into the /etc/ directory is a common adware trick, so let’s also run this one, which will output any files in /etc/ that have the .sh shell script extension:
3. Find shell scripts in /etc/:
ls -alF /etc/*.sh
(this one won’t contain your user name, so we don’t need to redact anything).
A lot of adware persists by running sneaky little AppleScripts from a shell script. We can detect if any of these are at work with this little spell:
4. List osascript processes targeting your browser:
ps -axo ppid,pid,command | grep 'osascript -e global' | egrep -i "if is_Firefox_running|if is_Safari_running|if is_Chrome_running" | grep -v "grep" | grep -v ' 1 ' | awk '{ print $1, $2}'
All this command outputs is two numbers, perhaps like this:
7783 7792
7783 7825
8978 8987
We’ll discuss what to do with those in the ‘Dealing with Results’ section below.
Next, we want to see what processes are actually running in the background. This will both confirm and possibly add to information we collected earlier. To do this, we need a little trick which looks like the same command twice, but which in fact operates on two different lists of processes:
5. List loaded background processes:
w=`id -un`; r="s@$w@[redacted]@g"; launchctl list | grep -v apple | sed "$r"; sudo launchctl list | grep -v apple | sed "$r"; sudo -K
When you run this one, a list of processes will be output, and then you’ll be asked to supply an Admin password on the command line (where even the key presses won’t be visible when you type). Supply the password and a second list will be produced. We will want to examine both later.
A file name common to a widespread family of adware is rec_script.sh, and this can be hidden anywhere in the user or local Library folders, so let’s run this one, too (here we will add the redacting again in case you’re posting the results in a public forum). You’ll need to supply an admin password for this though:
6. Find a common adware executable:
w=`id -un`; sudo find /Library ~/Library -name "*rec_script.sh*" | sed "s@$w@[redacted]@g"; sudo -K
This one may take a couple of seconds to complete.
That concludes the first step of our info gathering stage, but for convenience, I’m going give you them all again concatenated into one, single ‘mother of all commands’ 🙂 string. Even more conveniently, I’ve added code to output the results to a text file on your Desktop, called ‘adware_search.txt’, so after running the code below go look for ~/Desktop/adware_search.txt in Finder. If you’re posting to a public forum, it’s much easier to copy and paste the results from the text editor rather than from Terminal.
TL;DR
If you triple-click anywhere in the block of code below, you can copy and paste the whole block into Terminal and execute all of the commands given above in one fell swoop. Remember you’ll need a password.
7. The ‘Mother’ of all the above:
w=`id -un`; r="s@$w@[redacted]@g"; f="/Users/"$w"/Desktop/adware_search.txt"; ls -alF /Lib*/Launch*/ ~/Lib*/Launch*/ /Users/Shared /usr/local/bin | sed "$r" >> "$f"; printf "\n\n/etc:\n" >> "$f";ls -alF /etc/*.sh 2>/dev/null >> "$f"; printf "\n\n# osacript processes:\n" >> "$f"; ps -axo ppid,pid,command | grep 'osascript -e global' | egrep -i "if is_Firefox_running|if is_Safari_running|if is_Chrome_running" | grep -v "grep" | grep -v ' 1 ' | awk '{ print $1, $2}' | sed "$r" >> "$f"; printf "\n\n# User launchd:\n" >> "$f"; launchctl list | grep -v apple | sed "$r" >> "$f"; printf "\n\n# Root launchd:\n" >> "$f"; sudo launchctl list | grep -v apple | sed "$r" >> "$f"; printf "\n\n# Find rec_script.sh:\n" >> "$f"; sudo find /Library ~/Library -name "*rec_script.sh*" | sed "$r" >> "$f"; sudo -K
Interlude: Playing Safe
Before we move on to dealing with the results, I want to stress that you don’t want to be deleting files that you’re not sure of. Good practice is to move files to a temporary Quarantine folder, or at least move them to but don’t empty the Trash.
Even better practice is to make sure you have an up-to-date, bootable backup disk as well as a Time Machine backup, so that you can easily recover your system if you make a mistake and delete something you shouldn’t.
Dealing with the results
Looking at the output of the first Terminal command given above (Trick 1 or 2), how can you tell which are good and which are bad? In a lot of cases, you’ll recognise the app or developer name. TunnelBear, for example. “Sure, yeah, I’ve got that” and so on. Others, however, will look and sound weird, like these (all genuine adware file names):
com.glutting_Panagia.plistcom.pPHGASlN.plistcom.phellonic.plist
Google anything you’re not sure of, and see if it’s already been identified as adware. See ‘Getting Help’ at the end of this post if you’re not sure.
Walking up & down the tree
Assuming you’ve found some candidates for removal, the next job is to find the parent and child processes associated with each. We do that with a couple more Terminal tricks.
For the first one, we want to find any process that contains the same name as our suspected adware. For each suspect, take the unique part of the name for your search term. With this one we can put all our candidates in one command like so:
8. Search for your target’s family members:
w=`id -un`; ps -axo ppid,pid,command | egrep -i "glutting_Panagia| pPHGASlN | phellonic" | grep -v ' 1 ' | grep -v grep | sed "s@$w@[redacted]@g"
Note the part after egrep -i that’s inside quote marks. Each search term is separated between a vertical bar, aka the pipe character. Note that the terms themselves are not inside quote marks individually. One pair of double-quote marks is used to encapsulate all terms.
So to use the command above replace “glutting_Panagia| pPHGASlN | phellonic” with “search term 1 | search term 2 | search term 3”, where ‘search term n’ is your search term. Of course, you can have more or less than three search terms. Just add or remove as required.
When you examine the results, so long as the first number is not ‘1’ (it shouldn’t be if you executed the command correctly, as all those should have been excluded), follow the file path shown under the ‘Command’ column using either Finder or the Terminal. If you’re sure you’ve found a baddie, send it to the Trash or your quarantine folder! If you’re not sure, see ‘Getting Help’ below.
You will need to construct and run the next command separately for each suspect. The output will give you the path to the binary being executed by the plist. In many cases, you’ll have already found that from the previous commands, but in some cases – particularly if the plist has failed for some reason or if the binary isn’t running when you do your search – it won’t. This one’s the trickiest because you’re going to have to construct most of it yourself. Here’s an example (this is actually a legitimate file, but it will serve for our purposes):
cat /Library/LaunchAgents/com.razer.rzupdater.plist | grep -iA3 program
Let’s look at how that command is structured:
9. Find more children:
cat [path to file] | grep -iA3 program
You get the ‘path to file’ part from the results of your /Library/Launch* searches, and there’s no harm in practising this one on good files to get used to the output. For each item you search, it should return something that looks like this:

Here we see the path to the executable that the plist is launching. If this were a bad guy, I’d be straight over there to send him where he belongs, too.
After working through all your suspects with Trick 8, now take a look at the results of the command to output shell script file names from /etc/ (Trick 3). If there were any results at all (hopefully there wasn’t), you’re going to have to open that file in a text editor and determine whether it is malicious or not. This is the hardest part for the novice, because there’s certainly plenty of reasons to have a shell script in /etc/ depending on what 3rd party software you’re running. I can only repeat here what I have said above: see the ‘Getting Help’ section below if in any doubt.
Next, let’s take a look at the results for the osascript processes (Trick 4). Hopefully, you got no results, but if you had two sets of numbers outputted like this:
7783 7792
then the first number is the parent process ID, and the second number is the child ID. We want to find and eliminate both the parent (again, so long as this number is not ‘1’) and the child.
Take the first number and execute this in Terminal
10. More parents on the loose:
ps [number]
Take a note of the path that’s shown and ensure it doesn’t belong to a legitimate app that you recognise. Again, if in doubt, ask Google, or see ‘Getting Help’ below.
Now, do the same with the second number, the child process. Work through however many numbers were output, ‘quarantining’ as you go.
Almost there! Take a look at the output of the two launchd lists (Trick 5). You should have a good idea by now which ones are suspect and which are OK. You may have found the paths to any suspicious ones already, but if not, we’ll use the same command as we just used with the osascript processes. Here’s the output on my machine of the Trick 5 command (all legitimate) for comparison:

We’re only interested in the first number (the second one is status code). For any suspicious process, take the first number shown in the list, and use the Trick 10 command on these to find the parent file path (you know what to do with the ones that aren’t legitimate!).
If there is only a ‘-‘ dash instead of a number, it means that process is or was loaded but is not currently running. That dash may or may not be followed by another number that is not ‘0’. That number is just an error code and isn’t really relevant to us here. For any of your suspects that have failed like that, hopefully the info you gathered earlier will give you some clues (if not, see ‘Getting Help’ next).
Finally, anything found in the ‘find’ command (Trick 6) is almost certainly malware. Of course, be mindful that it’s entirely possible a legit’ script could accidentally have a name clash and be called rec_script.sh, but it’s highly unlikely and definitely should be examined closely. Also, if you see that the path is within an application bundle like this …Contents/MacOS/rec_script.sh, don’t hesitate to pull the trigger on that one.
Getting Help
I want to repeat that doing this safely and effectively takes practice and experience, and you should in no way be surprised that, if you don’t have that experience, you’re not sure whether something you’re looking at is good or bad, or that you go through all of this and still can’t find the problem. There’s some fairly obscure ways that adware and other malware can infest and persist on your mac that only experts will be able to advise you on. Throughout this post I’ve glossed over a few situations where you’ll draw a blank, and that’s because most of the other techniques for spotting malware require that experience.
To ameliorate this, I wrote an app called DetectX Swift to deal with this and many other things, and you can download it and use it without any requirement to pay. You can also use it to get personal, free-of-charge, help from me through the Help > Report a Problem to Sqwarq Support if your troubles persist.
Let me be clear why I don’t charge for this personal service: the payoff for me is I get to improve my app’s heuristics from what I learn about infections that DetectX doesn’t automatically detect. All information is kept strictly confidential and I do not sell or use your email address or other information for any marketing purposes whatsoever.
If you want to read more about me, also see the about page on DetectX’s parent site, Sqwarq.com.
Happy hunting! 🙂
Related Posts
scan for malware on the command line
revealing Dropbox’s dirty little security hack

Update: also see Discovering how Dropbox hacks your mac
If you have Dropbox installed, take a look at System Preferences > Security & Privacy > Accessibility tab (see screenshot above). Notice something? Ever wondered how it got in there? Do you think you might have put that in there yourself after Dropbox asked you for permission to control the computer?
No, I can assure you that your memory isn’t faulty. You don’t remember doing that because Dropbox never presented this dialog to you, as it should have:

That’s the only officially supported way that apps are allowed to appear in that list, but Dropbox never asked you for that permission. I’ll get to why that’s important in a moment, but if you have the time, try this fascinating experiment: try and remove it.
Ok, you say, no problem. We all know how to do that – open the padlock, un-click the checkbox. Click the ‘-‘ button to remove it from the list. Simple, right? Look there it goes, no more Dropbox in the the Preferences panel, right?
Wrong…like a bad penny it’ll be back again before you know it. Either log out and log back in again or quit Dropbox and restart it. Dropbox will surreptitiously insert itself back in to that list AND the checkbox will be checked. That’s the magic of Dropbox for you. If you don’t want to try it for yourself, watch me do it:
That leaves a couple of questions. First, why does it matter, and second, is there any way to keep using Dropbox but stop it having access to control your computer?
There’s at least three reasons why it matters. It matters first and foremost because Dropbox didn’t ask for permission to take control of your computer. What does ‘take control’ mean here? It means to literally do what you can do in the desktop: click buttons, menus, launch apps, delete files… . There’s a reason why apps in that list have to ask for permission and why it takes a password and explicit user permission to get in there: it’s a security risk.
Interlude: Contrary to Dropbox’s completely spurious “explanation”/obfuscation here, Accessibility has nothing at all to do with granting permissions to files. Accessibility frameworks were first introduced in Mac OS X 10.2 and expanded in 10.3 to allow control of user interface items via System Events and the Processes suite. As anyone can readily see, what that allows is GUI control just as if the program or script was clicking buttons and menu items.
But perhaps you implicitly trust Dropbox to not do anything untoward. After all, they’re a big name company who wouldn’t want to upset their customers, right?
There’s two flaws in reasoning that way. One: the bigger the name, the less effect customer dissatisfaction has. Let’s face it. If a 1000 people read this post and stop using Dropbox because of it, it’s not going to make much difference to Dropbox. So assuming you can trust a “big name” company not to “feck you off’ because they might lose your business is not “smart computing”, even less smart if they figure that you’re a customer on a free plan anyway… :p (See this for more reasons why big companies in general don’t pay much attention to ethical values). Two, and more importantly, you already have hard proof that Dropbox can’t be trusted. It just overrode your and Apple’s security preferences without asking you, and – as you’ve seen if you tried to remove it and noticed its magic reappearance act – it disregards your choices and re-inserts itself even after you’ve explicitly removed it (we’ll sort this naughty behaviour out in a minute).
It matters for another reason, too. Let’s assume for the sake of argument that Dropbox never does any evil on your computer. It remains the fact that the Dropbox process has that ability. And that means, if Dropbox itself has a bug in it, it’s possible an attacker could take control of your computer by hijacking flaws in Dropbox’s code. Of course, that’s entirely theoretical, but all security risks are until someone exploits them. The essence of good computer security and indeed the very reason why OSX has these kinds of safeguards in place to begin with is that apps should not have permissions greater than those that they need to do their job.
Which is the third reason why it matters: Dropbox doesn’t appear to need to have access to Accessibility features in order to work properly (update). I figured out what Dropbox was up to in October 2015. Why has it taken me this long to write about it? First, because after having reported it to Apple Product Security at that time, I wanted to see if they would force Dropbox to change this behaviour (they haven’t…yet ;)). Second, because the only way I could be sure that DB didn’t need to be in the list of apps with Accessibility privileges was to test it over a period of time. I use Dropbox across 3 different macs and an iPhone. I haven’t experienced any issues using it whatsoever while denying it access to Accessibility. Caveat: I haven’t tested Dropbox against all of OSX’s Accessibility features, but certainly for a ‘standard’ set up of OS X, it is not needed – and, let me repeat, even if it were needed for some particular feature to work, Dropbox should have explicitly asked for this permission, like every other app, and obeyed the user’s decision to revoke that permission when removing it from the list of allowed apps.
There really isn’t any excuse for Dropbox to ride roughshod over users’ security and preference choices. So that leaves us with just one last question: how to get Dropbox out of there? The short answer is that you first quit Dropbox, then remove it from the Accessibility pane, then delete the DropboxHelperTools folder (see my procedure here). Relaunch Dropbox, but now you hit ‘Cancel’ when it asks you for an admin password:
Stop! Choose ‘Cancel’ !!!
The dialog box apparently lies (again, still trusting this big name firm?) when it says Dropbox won’t work properly and clearly deceives because this is NOT the dialog box that Dropbox should be showing you to get access into Accessibility. Indeed, even with your admin password, it still shouldn’t be able to get into Accessibility. Clearly Dropbox’s coders have been doing some OS X hacking on company time.
Now, there’s a slight catch. So long as you never give Dropbox your admin password, it won’t be able to install itself in Accessibility and you can keep on using Dropbox just as you have done before. However, it will throw up this dialog box on every restart of the machine or relaunch of Dropbox. So the catch is that you have to actually notice what’s asking you for your password and not just blindly throw your password into the box without looking. :O
But you shouldn’t be doing that anyway, of course, cos that’s not good security practice… 😉 , but given that the dialog box looks just like*** an authentic password request from the OS itself, that may be a habit you have to train yourself into.
Slightly annoying, but not as annoying as having an app hack your mac (of course, if you forget, you’ll have to go uninstall Dropbox again, remove it from Accessibility, then reinstall it).
***But not “like” enough – note the ‘Type your password…’ sentence is both misaligned and is spaced into a separate paragraph, unlike genuine authentication requests from OS X. The phrasing of the first sentence “your computer password” is also very “un-OS X”.
Further Reading: Discovering How Dropbox Hack’s Your Mac
Last edit: 21 Sept, 21:35 ICT.
keep an eye on Console with ConsoleSpy
ConsoleSpy is a simple but powerful little app that offers a window into system.log and which can trap incoming messages meeting user-defined search criteria. It’s aimed at software testers, bug hunters, security researchers and anyone who needs to do analytical troubleshooting work on a mac.
Minimum system requirements: OS X 10.11. ConsoleSpy is currently free.
Here’s an intro to its features and how you can use ConsoleSpy to aid in analysing your mac and your software.

What does it do?
The best way to illustrate the use case for ConsoleSpy is to consider a couple of ‘based on a true story’ user problems I’ve encountered recently.
Case 1: In one case, a user was concerned that an attacker was logging into her computer remotely. Unaware of how that might be happening, the user searched the Console.app and found a number of suspicious remote login attempts. However, these always seemed to occur at times she wasn’t at the computer and sometimes weeks apart. It became a laborious job and anxious routine for her both to remember and to search through the Console logs every morning to see if anything suspicious had occurred.
Case 2: In the second case, a user realised that the Time Machine backups she’d been relying on had been silently failing to pass verification checks. There was no indication from Time Machine itself, and she only discovered the problem, weeks after it had began, by a fortuitous glance at the Console.app where she discovered multiple ‘Backup verification failed’ messages.
In both these cases, ConsoleSpy could have alerted the user to the problem as soon as it had occurred. ConsoleSpy allows you to set search terms to trap incoming messages. Both a Dock badge and a visual indicator in ConsoleSpy’s display indicate when a message has been trapped. By using the search term ‘sharing,’, our user worried about remote hacking would have instantly been able to see if a log in had been attempted and when. Our user with the failed backup problem would have likewise been alerted instantly the first time the problem occurred by using ‘backup,’ or ‘backup verification,’ (if she had only wanted to trap specific verification messages) as Alert strings.

ConsoleSpy becomes more useful the more accurately you know what you’re looking for. For bug hunters and software developers, simply setting an alert on your app or process id name will immediately funnel all incoming messages into ConsoleSpy’s ‘Alerts received’ box, allowing you to exercise your app in various conditions and immediately see the results. You can get as specific or as general as you want, but do see the help on Alert string syntax.
How do I use it?
After launching ConsoleSpy, you’ll be presented with an ‘always on top’ display of the most recent message into the Console. You can move the display around by clicking anywhere in the black part of the display and dragging. The four buttons on the right hand side offer you access to all of ConsoleSpy’s main functions, clockwise from top left:

Display
i. Freeze the display: in the event that you see something interesting and want more time to read it before the next message comes in, you can lock the display by clicking the little padlock button. When locked, the text in the display changes colour and a padlock appears at the end of the text. Note that when the display is locked, the View buttons in the Preferences window (See below) will have no effect. Click the padlock again to unlock the display.
ii. Hide ConsoleSpy: click the orange button to hide ConsoleSpy. Often, you won’t want the display visible but you will want ConsoleSpy to keep watching for alerts. You can also hide the app with ‘Command-H’.
iii. Open Console.app: the little ‘eye’ button immediately opens Console and takes you to the most recent message in system.log.
iv. Preferences: this is a toggle button that opens or closes the Preferences drawer. We’ll get to that next.

Preferences
The controls on the far left should be self-explanatory, but a couple of notes are in order.
View: As mentioned above the ‘View’ buttons are disabled when the display is locked, but otherwise they toggle the length of the display. The ‘Long’ view is particularly useful when reading multiple messages in the ‘Alerts received’ box.

Frequency: this controls the frequency at which ConsoleSpy updates the display. Note that ConsoleSpy continues to scan for messages that meet your Alert string criteria even between polls regardless of whether the app is visible or hidden, or the display is locked (see above). ConsoleSpy’s buffer can handle up to 40 messages between polls. If ConsoleSpy’s buffer is flooded with more than that, the display will show a ‘Flood’ warning. For more information see ‘The Hoary Gory’ section below.
Alert Strings: this is the most important field you’re going to want to manage. When you first launch ConsoleSpy, you’ll see some default search strings are already included by way of example. You can remove or add to them by clicking the ‘Edit’ button at the bottom left of the text box. Search string syntax is fairly basic, but allows you to be as specific or as general as you wish. Ensure that each term is comma-separated and the entire list is comma-terminated (i.e, there should be a comma after the last search term in the list, too). Click the ‘?’ button to go to the support page giving examples of search string syntax. Drop us a line in the Comments if you need help or contact Sqwarq support.
Alerts received: this is the main display for your results. You can select and copy all or parts of the message to search in Console.app if you want to see the message in context. Using the date string without the seconds is a particularly useful way to search for messages in Console if you want to see what else was happening around the same time.
You can clear the ‘Alerts received’ box (and the Dock badge and the display alert symbol) by clicking the ‘-‘ minus button at the bottom left of the text box. We suggest regularly and promptly removing messages from the Alerts received box once you’ve read them as the messages are already archived in Console.app.
The Hoary Gory
ConsoleSpy polls the system log every 1, 2 or 5 seconds according to the Frequency setting in the Preferences, and displays the most recent message. Unless the system log is being flooded with more than 40 messages since the last poll, ConsoleSpy won’t miss a thing and you’ll get an alert if any message meets your search criteria, even if it wasn’t displayed in ConsoleSpy’s display. If ConsoleSpy’s buffer is flooded, a small ‘flooding’ alert symbol shows in the display. The start and end flood times can be displayed in the Alerts Received box by setting an alert string for ‘flood,’.
If you experience a lot of flood warnings (entirely possible in scenarios where you are beta testing software or even the operating system itself), try using a faster frequency (i.e, 1 sec). While this may seem counterintuitive, it is a consequence of ConsoleSpy’s fixed buffer size. The buffer can hold up to 40 new messages since the last poll, so the amount of messages ConsoleSpy can search between each poll is 40/(frequency). As we develop the app, we plan to include a choice of larger buffer sizes. The current buffer size is a conservative choice designed to ensure the app is usable even on smaller, less powerful macs.
If you’re already using the fastest poll time of 1 sec and flood warnings are occurring constantly, this is a good sign that some software is not behaving as intended. Of course, when testing beta software, especially a beta OS, there may be so many deliberate logs to the system log that ConsoleSpy reports flooding almost all the time. This is not a problem for ConsoleSpy; indeed, having ConsoleSpy alert you of flooding is one of its intended functions, so that you can see just when and how often something is happening. The main thing to be aware of during times of repeated or constant flooding is that ConsoleSpy may not be able to search every single message received against your search terms. You can, of course, turn Alerts off during such times, but a better solution is to leave Alerts on (ConsoleSpy will still return most if not all search hits, depending on how severe the flooding) and simply use the Console.app itself to do an historical search to see if any crucial messages you would have expected but which did not get spotted by ConsoleSpy are in the log.
Note that while Alert string searches begin as soon as ConsoleSpy is launched, flood detection is not enabled until 30 seconds after launch. This is due to the fact that ConsoleSpy’s buffer needs to be full before it can determine the rate of incoming messages.
That about rounds up our introduction to ConsoleSpy. We hope you find it useful, and if you have any questions, drop us a comment or email us at Sqwarq support.
how to stop ransomware infecting a backup disk

If you use a scheduled backup task such as Time Machine or Carbon Copy Cloner, any ransomware infection of your internal drive could soon propagate to your scheduled backup.
To help ameliorate that, I’ve produced a script that will abort a scheduled backup task using Carbon Copy Cloner if a user-defined percentage of changes have occurred in a designated ‘Canary’ folder.
Here’s how it works. In order to be successful, ransomware must change a large percentage, if not all, of your personal files in your Home folder by encrypting them. That means we can determine if a folder has been encrypted by looking for an unusual amount of changes or additions since the last backup.
A Canary folder is a folder that we use to warn us of precisely that. It should be a folder that contains some random dummy files (.doc, .png, .xls files etc), and/or a folder which you don’t make large changes to from one backup to the next. The script itself will change the folder slightly each time it runs, to ensure that the Canary folder does not look like it’s ‘stale’ (which might cause an attacking script to ignore it).
The key to the Canary is that the percentage of files changed or added on each scheduled backup is less than the threshold you set in the script. The default is set to no more than 10%. If the number of files changed or added is higher than that, then the backup aborts. You can of course change the default to a bit higher if you use a ‘real’ folder that you don’t change often, but remember we’re only talking changes between one scheduled backup and another, so it will also depend on how frequently your backups are scheduled.
For example, I have a 2-hour scheduled backup and I use my ‘Documents’ folder as the Canary. Since I only use that folder for long-term archives, it is actually rarely changed, and certainly never as much as 10% within 2 hours, and that makes it a perfect choice as a Canary. You can pick any real, rarely used folder or you can set up a complete dummy folder if you prefer.
If you do pick a real folder, keep in mind its size. The larger the folder, the longer it’s going to take the script to determine the differences between it and the last backup of it. A couple of thousand files is OK, but once you get into the tens of thousands you might find the script takes several minutes to complete. With only a few hundred files in my Documents folder, it takes literally a second or two.
Here’s a sample output from the log file the script produces in the ‘Canary’:
Destination /Volumes/Backup Disk/Users/phil/Documents has 360 files in the folder. There are 3 changes between it and the source /Users/phil/Documents. The threshold for aborting the task is 10 percent, or 30 changes. Result: task will run.
For our strategy to be successful, we need to ensure the attacking script doesn’t ignore the Canary and does try to encrypt the Canary before the next backup is scheduled. For that reason, if you opt for a complete dummy folder, you might like to give it a name so that it’s somewhere near the beginning (alphabetically) of your Home folder. Since the Canary folder will be slightly modified each time the script runs, it should get hit early if the attack is looking either for recently modified files or just starts trawling your home folder in ascending name order (and I know what you’re thinking: what about descending order? Sure, you could add another Canary at the end, and modify the script to check both ;)).
Note that this script is for use only with a regular, scheduled backup task, and only for use with Carbon Copy Cloner (version 4). We’ll be posting about Time Machine strategies later.
Another note of caution is that while this script should stop your scheduled CCC task from infecting a backup drive, it won’t stop an attacking script from attempting to encrypt any mounted drives it finds by itself. That really depends on the sophistication of the attack. To that end, we’ll soon be posting a general strategy for detecting a ransomware attack on your internal drive using multiple Canaries and a bit of Folder Action script magic. Stay tuned for that.
In the meantime, here’s the script. Due to the vagaries of WordPress.com formatting, I’ve hosted it over on my pastebin. Please read the extensive comments, which also explain how to set it up and how to use it. Any questions, drop a comment below. 

Picture Credits: ‘Caged Egg’ by Marije Berting
FastTasks 2 v2.8 released

This update sees the introduction of a major new feature, the TaskPad. If you’ve ever been frustrated by the limitations of Apple’s Notes and Reminders apps and wondered why they didn’t, well, just combine the two, then FT2’s TaskPad may be for you.
Inspired by one of my favourite free apps from the Snow Leopard era, Lighthead software’s Remember.app (still available but sadly never updated to 10.7 and beyond), the TaskPad keeps things light and simple, while having a lot of power to keep you organised and on task.
You can set due dates, add rich-text notes, as well as order and re-order via drag and drop. If you want to use the same database across more than one mac, that’s possible, too (requires an independent syncing service such as Dropbox or similar). You can also maintain more than one list database and switch between them as you need.
Since FastTasks is all about being fast, you don’t need to wade through the main menu to call up the TaskPad (though of course you can do that if you want!). Just hold down the Command key and click the F2 icon and the TaskPad will immediately appear.
Another change in this update is that the Eject Disks function will now let you eject individual disks as well as all disks. We’ve also updated the Analyser with new definitions.
The FT2 2.8 update is available to users on 10.10.5 or above. Unfortunately, FT2 no longer supports OS X Mavericks, but 10.9 users can still download the previous version (2.7) of FT2 for the time being.
news: DetectX v2.18 released
We’ve had a bit of a mad day here at Sqwarq and Applehelpwriter, releasing three updates within a few hours of each other for DetectX.
It all started with 2.16, which introduced some changes to the licensing and user interface. All well and good, until we noticed a serious security issue with Microsoft Silverlight had recently surfaced, and we didn’t want to wait to address it.
That resulted in 2.17, which added a Silverlight check to the detector Search function. If you have a version of MS Silverlight that is not the currently patched version, you’ll see a warning in the log drawer when you run a search. In 2.17 we also fixed a false positive in the Keylogger detector and updated some search definitions.
Alas, we’d inadvertantly let a bug slip in with v2.16 that prevented DetectX from quitting in certain situations. Luckily that report came in pretty quick (many thanks to Al), and we were able to address the bug with a simple code tweak (if you got bit by that bug, please open and then close the Licensing window before attempting to update to v2.18).
So, here we are at version 2.18 … we’re a bit breathless, so it’s time for a sit-down and a nice cup of tea!
Enjoy 🙂
how to: check for Sparkle vulnerability

[updated Mon 15th:]
Here’s what we know about the widely-reported vulnerability found in Sparkle so far:
1. It requires a version of Sparkle earlier than 1.13
AND
2.1 It requires the SUFeedURL address to be an unencrypted http address AND/OR
2.2 the release notes address to be an unencrypted http address.
Condition 1 and one (or more) of conditions 2 need to be true to make the exploit possible. You can check to see if condition 2.1 is true for many apps on your system with the following procedure:
1. Control-click on the app in the Finder
2. Choose ‘Show Package Contents’
3. Navigate to /Contents/Info.plist
4. Hit the space bar to open in quick look, scroll down for the SUFeedURL field (it won’t have one if it doesn’t use Sparkle). The field will show you whether the address is https or not.
To make life easier, you can run this script in the AppleScript Editor (/Applications/Utilites/Script Editor.app) to do the job for you.
#script version 1.64
#regression to 1.52 and then
#added: now includes apps that do not have SUFeedURL key in plist and reports their Sparkle version number
#added: borrowed Bill Cheeseman's idea of using choose list and offering to launch the app
#added: borrowed reverse_offset handler from Nigel Garvey's post on MacScripter
#changed: test if Sparkle is < 1.13.1 first
#shows the Sparkle version number for each entry in the list
#added logic for opening prefPanes if chosen from the list
#changed the mdfind command to improve speed
#searches for keys of the form "SUFeedURL*" rather than just "SUFeedURL"
on extractSUFeedURL(aRecord)
set aRec to “httpx”
try
set aRec to item 1 of aRecord
on error errorMessage
set aRec to errorMessage
set aRec to my parseErrorMsg(aRec)
end try
return aRec
end extractSUFeedURL
on parseErrorMsg(aErr)
set what to “SUFeedURL” –define the full or partial record name you’re trying to find
if aErr contains what then
set theStart to offset of what in aErr
set thisString to text theStart thru -1 of aErr
set theEnd to offset of “,” in thisString
set subString to text 1 thru theEnd of thisString
–log subString –see the record name and its value in Script Editor’s Messages pane
return subString
end if
end parseErrorMsg
on reverse_offset(d, t)
set astid to AppleScript’s text item delimiters
set AppleScript’s text item delimiters to d
set ro to (count t) – (count text item -1 of t)
set AppleScript’s text item delimiters to astid
return ro
end reverse_offset
set foundCounter to 0
set infoFilePath to “/Contents/info.plist”
set theApps to do shell script “mdfind \”kMDItemFSName == ‘*.prefPane’cd || kMDItemFSName == ‘*.app’cd’\””
set theApps to paragraphs of theApps
set sparkleAppsList to {}
tell application “System Events”
repeat with anApp in theApps
set anApp to anApp as text
set aFrameWork to anApp & “/Contents/Frameworks/Sparkle.framework”
if exists disk item aFrameWork then
try
–get Sparkle Version first
set aSparklePlist to aFrameWork & “/Versions/A/Resources/Info.plist”
set thePlist to contents of property list file aSparklePlist
set theValue to value of thePlist
try
set sparkleVersion to CFBundleShortVersionString of theValue as text
on error
set sparkleVersion to CFBundleVersion of theValue as text
end try
end try
— compare version num
considering numeric strings
set vulnerable to sparkleVersion < “1.13.1”
end considering
if vulnerable then
–get SUFeedURL if it exists
set thePlist to contents of property list file (anApp & infoFilePath)
set theValue to value of thePlist
try
set thisSUFeedURL to my extractSUFeedURL(theValue)
if length of thisSUFeedURL = 0 then
set thisSUFeedURL to “httpx”
end if
on error
set thisSUFeedURL to “httpx”
end try
if thisSUFeedURL contains “http:” then
set end of sparkleAppsList to anApp & ” : uses insecure update URL (not https) ” & “with Sparkle v” & sparkleVersion
set foundCounter to foundCounter + 1
else if thisSUFeedURL contains “httpx” then
set end of sparkleAppsList to anApp & ” : update URL unknown (http/https??); uses Sparkle v” & sparkleVersion & linefeed & linefeed
set foundCounter to foundCounter + 1
end if
end if
end if
end repeat
end tell
set thePrompt to “Found ” & foundCounter & ” items that may be using a vulnerable form of the Sparkle framework: ” & linefeed & linefeed
choose from list sparkleAppsList with title “Sparkle Vulnerability Check” with prompt thePrompt OK button name “Launch”
if result is not false then
set appPath to item 1 of result
get offset of ” :” in appPath
set appPath to text 1 thru (result – 1) of appPath
set ro to reverse_offset(“/”, appPath)
set appPath to text (ro + 1) thru -1 of appPath
if appPath contains “prefPane” then
set paneOffset to offset of “.” in appPath
set paneName to text 1 thru (paneOffset – 1) of appPath
log paneName
tell application “System Preferences”
activate
try
reveal (first pane whose name is paneName)
end try
end tell
else
tell me to launch application appPath
end if
end if
#EOF
However, be aware that this script will not find certain plug-ins (e.g., Mail plug-ins that use Sparkle).
If the app runs on 10.6, it’s not possible for Sparkle to be updated to the latest secure version, 1.13.1, so you need to check with the developers that they’re using https addresses for both the appcast feed and the release notes html.
Rest assured that Sqwarq apps that use Sparkle (App Fixer, DetectX, FastTasks 2, and OSXClock) all use encrypted https update feeds and release notes addresses, so as far as we’re aware at the moment, none of our apps are vulnerable to the exploit regardless of what version of Sparkle they’re using.
As said above, we’ll update this post if things change as the story unfolds.
Credits: Thanks to Yvan for significantly improving my earlier drafts of the AppleScript and writing the code for retrieving the Sparkle bundle number. Thanks to Chris Stone for tweaking and eeking a bit more speed out of the mdfind command. Thanks to Al for pointing out that in earlier versions of the script the Display Dialog message could get truncated.
how to recover Safari from a browser hijack

The quickest way to get out of a persistent popup that won’t go away (unless you do what it demands!) is to quit or force quit* the browser then restart Safari holding down the ‘Shift’ key.
Holding down Shift allows Safari (or any other app) to restart without resuming its last state.
While this is a great, fast way to solve the problem, it can be annoying if you had other tabs open, and you don’t want to loose those too (or any unsaved data they may contain).
Here’s how you get rid of these kinds of Javascript hijacks without losing your other tabs.
1. Go to Terminal and paste this command (it’s all one line):
defaults write com.apple.safari "com.apple.Safari.ContentPageGroupIdentifier.WebKit2JavaScriptEnabled" 0; killall Safari
This turns off Javascript and quits Safari.
2. Reopen Safari
You’ll get all your tabs back including the hijacked tab, but the pop up won’t appear, and you can now close the hijacked tab.
3. Go to Safari Preferences and reenable JavaScript in the Security prefs
(alternatively you can do that in Terminal).
Don’t forget this step, or you’ll think the web is broken!
More sophisticated or persistent adware and malware attacks can be mitigated by using apps like my free App Fixer or DetectX.
*You can force quit an app by pressing the following keys in combination on your keyboard <command><option><esc> then choosing the app you want to quit.

how to see active internet connections

I was playing around with some ways of detecting active network connections to add as a function in one of my apps — didn’t really work out, so far — but as I was prototyping the code in AppleScript I came up with this little ditty which some of you might be able to make use of:
1. Open the Script Editor
2. Paste the code below into it and hit ‘Run’
#start of script
on getConnections()
set theCmd to "lsof +c 0 -i -n | grep -i established | cut -d \" \" -f 1 | awk '!_[$0]++'"
set theMsg to (do shell script theCmd)
display dialog "The following apps & processes are actively using your internet connection: " & return & return & theMsg with title "Net Tattler" buttons {"Refresh", "OK"} default button "OK"
set theRes to button returned of the result as string
if theRes = "Refresh" then
getConnections()
end if
end getConnections
getConnections()
#eof
If you need more information than just the names of the process, you can play around in Terminal with lsof -i. Here’s a great little tutorial.
For something a bit more heavy-duty, check out either Little Snitch or Charles Web Debugging Proxy, both of which are paid-apps but offer free trials. If even those aren’t enough to satisfy your network monitoring desires, head on over to MurusFirewall.com and check out their packet filter GUI offerings for the Mac.
Enjoy 🙂
Acknowledgements
Thanks to the folks over at Etresoft for additional suggestions.

