Carbon Copy Cloner: see last back up date
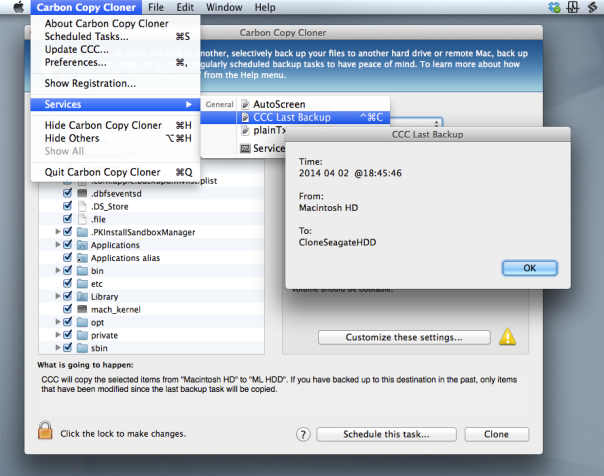
If you’re a user of Bombich Software’s excellent Carbon Copy Cloner but you’re not doing backups as scheduled tasks, you may wish there was a way to find out the last time you successfully completed a backup task.
Unfortunately, CCC doesn’t provide an easy way for users to see this information natively, but in this post we’re going to add it through a bit of AppleScript and Automator magic.
As it turns out, CCC does keep a log of all your past backup details stashed away in a CCC.log file buried in your local domain’s Library folder. You can view this file in Console, but it’s a bit of a pain. Wouldn’t it be nicer if you could just hit a hotkey like ‘Command-Control-C’, say (you know, for ‘CCC’🙂 ), and get a dialog box like this:

If you think so too, then download my Automator workflow:
For Lion, Mountain Lion and Mavericks:
Download for 10.7.5 thru 10.9.2 
For Snow Leopard:
Download for 10.6.8 
Double-click on the .zip file and double click again on the unzipped workflow file. You’ll get a warning message saying that you’ve downloaded the file from the internet (from me, actually!). After clicking ‘Open’ to dismiss the warning, for all users except 10.6, click ‘Install’ on the the following dialog box:
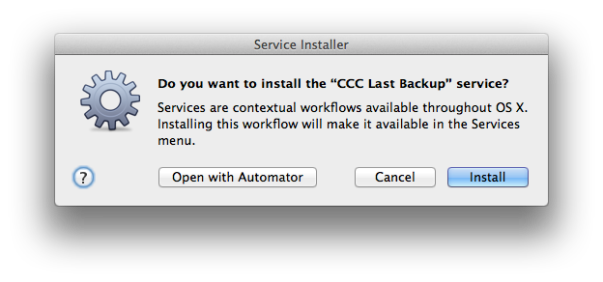
After clicking ‘Install’, click ‘Done’ to dismiss the confirmation dialog box that pops up.
For those of you running Snow Leopard (10.6.8), after clicking ‘Open’ the workflow should open in Automator. Hit ‘command-S’ to save it as a Service.
For all users, if you now click up to any application name next to the Apple near the top left of your screen (see the screenshot at the top of this post) and scroll down to ‘Services’ you should see the new Service already there. If you don’t, try logging out and logging back in to your user account.
Once you can see the workflow in the Services menu, go ahead and give it a click to test it out. 🙂
A couple of notes on usage:
Carbon Copy Cloner does not have to be open for the Service to work.
The date format display is YYYY-MM-DD.
If you want to add a shortcut key as suggested earlier, open up System Preferences > Keyboard and click the ‘Shortcuts’ tab. Down the sidebar you should see ‘Services’. Click on that and scroll way down to the bottom till you see the name of the Service. Click ‘Add Shortcut’ and hit the keys you want to use. I like ‘command-control-C’ as it’s an easy mnemonic for ‘Carbon-Copy-Cloner’.
how to clear Safari’s cookies on quit
If ever there was a free app that deserved more recognition, it’s Safari Cleaner (direct download). Developed out of a simple applescript, this app does what many people would expect Safari to have an option to do in the Preferences panels: automatically clear stored information when Safari quits.
Personally, I’ve found this particularly needsome since signing into any Google service seems to be particularly irritating. Gmail, for example, needs several clicks just to be told that you don’t want to be remembered. Safari Cleaner takes care of automatically ‘forgetting’ as much or as little info as you want without you having to remember to clear cookies or caches. It’ll also, thankfully, forget Top Sites. 
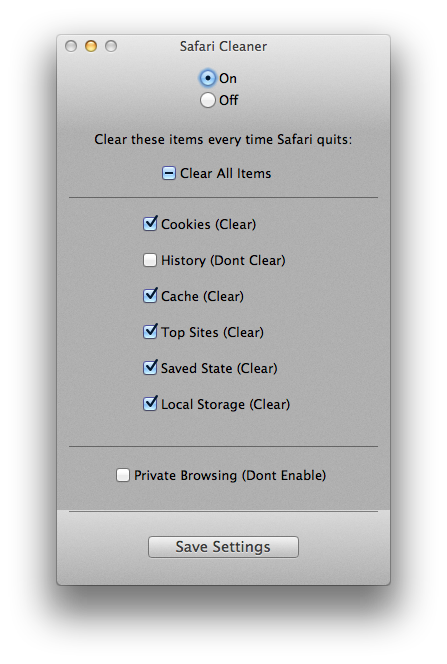
Personally, I leave my history as that’s something I regularly need across sessions, but the rest, I’m happy to be forgotten. If you’re wondering why anyone might care, well, there’s a whole bunch of reasons including protecting you from malware and malicious websites, but at least one other is nicely detailed in this Ars Technica article, which explains how cookies can be used to track your physical whereabouts.
One caveat to note with Safari Cleaner: in my tests, I’ve noticed that if you click and restart Safari in rapid succession (within about 5 seconds or less), the script hasn’t had time to complete running and caches and cookies aren’t cleared. To be safe, you probably want a nice 10 secs or so between quitting and relaunching Safari if you absolutely must be sure the previous session was wiped out.
Once you’ve run and set up Safari Cleaner’s options, you can quit the app and it’ll just carry on working in the background. Launch the app only if you want to change your options. If you want to uninstall it, note that there’s an uninstaller in the DMG, so don’t throw that away.
advanced search in Preview

Unlike Adobe Acrobat, you won’t find any complicated advanced search boxes in Preview, but that doesn’t mean you have any less power to find exactly what you want. Feel free to open up a pdf that you can play around with as we go along.
Finding stuff
Preview does all its searching in the spotlight-like filter field in the top right, and you access it either by clicking in it or hitting ‘command-F’.
Simply typing in a few letters will return every page that contains that string, either as a word or a partial word. If you want to restrict the results to complete words – say you type in ’cause’ but you don’t want it to return ‘because’, then add double quote marks around what you type.
"cause"
If you add another word (or words), also in double quotes, this is effectively telling Preview to return only those pages that contain all those complete words on the same page. Thus
"cause" "pattern" "function"
will only return pages in your pdf document that contain all three of those terms. This is the same effect you get when you put the ampersand ‘&’ between words (the logical AND), but the & is automatically implied by default, so there’s no need to actually type it.
What if you want to return all pages that have either “cause” or “function” in them? In this case, you use the ‘|’ sheffer stroke (hold down shift and hit the backward slash key, up their above the return key!).
Note for the techies: Preview doesn’t distinguish between NOR and NAND. Though both are valid input, one sheffer stroke will return the same as two.
As with the logical ‘AND’ function, you can have as many terms as you want. For example, if you wanted to return every page that had a numeral in it, you could use
"1" | "2" | "3" | "4" | "5" | "6" | "7" | "8" | "9" | "0"
That would return every instance of any one of those digits on their own, but it wouldn’t return a page that had, say, ‘2014’ in it. Remember that the quote marks indicate whole expressions, not parts. To get any number, do the same without the quotes:
1 | 2 | 3 | 4 | 5 | 6 | 7 | 8 | 9 | 0
You could even combine this with word searches:
1 | 2 | 3 | 4 | 5 | 6 | 7 | 8 | 9 | 0 | one | two | three | four | five | six | seven | eight | nine | "ten" | eleven | twelve | thirteen | fourteen | fifteen | sixteen | seventeen | eighteen | nineteen | twenty | thirty | forty | fifty | sixty | seventy | eighty | ninety | hundred | thousand | million | billion | trillion | zero | nought | nil
That would return every mention of any number in numerals or words. Note that “ten” is delimited as a complete word due to the number of false positives that would arise from words with those three letters (heighten, often, tendency, etc). Also notice the various synonyms for ‘zero’ at the end of the search term. Even so, it isn’t quite complete – the assiduous search-hound would probably want to add ordinals, ‘1st’, ‘first’, ‘2nd’, ‘second’ and so on, but I’ll leave that as an exercise for the reader.
Organising results
OK, so you’ve got your results, what can you do with them? First of all, note that you’ve got some options above the search sidebar. You can list by page order from beginning to end of the document, or by number of hits per page with ‘Search Rank’. Highest number of matches on a page appears at the top of the results and the rest follow in descending order.

Secondly, you can cycle backwards and forward through the hits on each page by using ‘command-G’ and ‘command-shift-G’, respectively. That’s a whole lot less laborious than clicking the tiny forward and backward arrows under the filter field, but that way is available too.

The filter field
Finally, don’t forget that you can move the cursor around in the filter field with a few shortcuts: both ‘control-E’ and command-right arrow will put the cursor to end of the search term, while ‘control-A’ and command-left arrow will put it at the beginning. You can also use ‘control-K’ to delete everything from the cursor to the end of the search term, which can be handy if you have a lengthy search term that you want to cut in half. Move the cursor to where you want the search term to end, and hit ‘control-K’ to delete all subsequent characters.
Hopefully, that should give you some pretty good ideas on how to power search in Preview. Who needs ‘advanced search’ dialog boxes? Not us! 🙂
featured picture: searching for light by HealingRock
Contacts won’t launch

Try running the following script in AppleScript editor:

If you get an error message back from the AppleScript editor mentioning error number -10661 has occurred, then you’re going to need the following procedure.
The problem stems from the launch services database being out of sync and not knowing which app to launch when it gets passed “Contacts” as input. To solve that, we’re going to do a couple of things in Terminal (roll up your sleeves!).
First up, we’re going to ensure that the locate database is loaded. We’re going to need that to find the address of the Launch Services database, so
1. Open Terminal.app (/Applications/Utilities/Terminal.app) and type
You should get one of two possible results. Either you get a message telling you that the locate database doesn’t exist, and instructions on a command to run to create it:
or you get a path back that looks something like
In the first case, use the command suggested in the reply to create the database. The Terminal prompt will probably reappear almost instantaneously after you run that, but your database may not have finished creating yet. Wait a few minutes before running the ‘locate lsregister’ command again.
In the second case or once you’ve got your locate database loaded and working, copy the address returned to the clipboard by dragging across the whole thing to highlight it and hitting ‘command-C’ on your keyboard.
Still with Terminal active, hit ‘command-V’ to paste that address at the prompt. Hit the spacebar once, and then complete the command by adding
So the whole thing should look something like this:
Finally, hit ‘return’ to enter the command. It’ll take a few seconds to return the prompt (it’s about 10 seconds on my machine, but your mileage may vary).
After the prompt returns, go test that AppleScript again. Hopefully, Contacts fires up without issue. 🙂
*Thanks go to Yvan and Deivy on the AppleScript users list for identifying and solving this problem.
check for security flaw in OS X and iOS
Update: Mavericks users can now update to 10.9.2 which fixes the flaw. 🙂
News is just breaking of a flaw in Apple’s implementation of SSL security, which could affect anyone using iOS and 10.9 OSX over public/open access wifi ‘hotspots’.
If you’re using iOS, please ensure you do Software Update immediately as a patch has already been released by Apple.
No word from Apple on OS X at time of writing. You can test to see if you have the problem by clicking the following link. Basically, if SSL is working properly you shouldn’t be able to read the message on this page:
https://www.imperialviolet.org:1266
If you can read the message on that website from your Mac computer, the best advice to date is to stay off public/open access wifi networks until we hear something more from Apple.
Ars Technica have more information on the security flaw here.
how to show or hide hidden files with one click

Reveal is a one-click toggle switch to show/hide hidden files in the Finder. Unzip it, pop it in your Applications folder and drag it to your Dock for quick access. You may need to override your GateKeeper settings the first time you run it if you have those set to ‘App Store & Identified Developers’ or stricter. Don’t worry! So long as you download it from here, I personally guarantee it’s safe (I wrote it myself!). Best of all, it’s free, so enjoy!
how to correct the external monitor resolution

A problem that’s been bugging me since at least Mountain Lion is that sometimes when I connect my external monitor to my Macbook Pro, the display resolution is incorrect. The problem is pretty annoying as it often occurs on wake if the MBP goes to sleep even when the external monitor hasn’t been disconnected.
There are a number of solutions to this problem, and I’ve used them all. Some are less irritating than others, but in this post I’ll give you a run down of the options.
1. The old fridge magnet trick
As I often use a tiny magnet to put my MBP display to sleep while keeping the lid open, normally putting the magnet on and then taking it off again will cause the displays to reset. But this method is annoying both because I’m often connecting to external monitors away from home and because I often misplace that tiny magnet! The other problem with this method is it doesn’t always work… 😦
2. Put the external monitor to sleep with a Hot Corner
Go into System Preferences > Mission Control, and set one of the Hot Corners to ‘Put Display to Sleep’ (not ‘Start Screen Saver’). When your mac wakes up and the monitor is in the wrong resolution, move the cursor to the Hot Corner, wait a couple of seconds, and move the cursor back to the centre of the screen.
3. Activate ‘Detect Displays’
Ok, two ways to do this. The manual way is that you open System Preferences, hold down the ‘option’ key and hit the ‘Detect Displays’ button at the bottom of the window. Note that you won’t see this button unless you’re holding down the ‘option’ key. After the display resets properly, quit System Preferences. My main beef with this method is it’s totally disruptive to my workflow, so much in fact that it makes me angry every time I use it!
Fortunately, you can lower the inconvenience with the second way, which is an AppleScript that does the same thing automagically.
Update Jan 2015:
Partly in response to this problem, I’ve written an app called DisplayDroid which detects when a monitor is connected or disconnected and automatically runs a script in response. The script below is built into DisplayDroid as one of the presets that you can choose!
Find out more about DisplayDroid…
trytell application "System Preferences" to quit
end trydelay 1tell application "System Preferences"
activate
reveal pane "com.apple.preference.displays"
end tell
tell application "System Events"
tell process "System Preferences"
set frontmost to true
try
key down option
delay 0.2
click button "Detect Displays" of window 1
delay 0.2
key up option
on error
key up option
end try
end tell
end tell
tell application "System Preferences" to quit
You might want to save this in your scripts menu or make it into a Dock-able app for convenience. Don’t forget you’ll need to allow the AppleScript editor permission to use Assistive Devices.
4. A free screen utility
Unhappy with a GUI scripting solution, I started researching how to change the displays in Cocoa or from the BASH command line so that I could avoid the overhead of System Preferences popping open and closed, which is an ugly solution at best. I didn’t get far in my research before I found that someone else had already beaten me to the punch, and had even offered the code up for free. Y’gotta love the heroes of the programming community! Download the free RDM.app, which lets you change the screen resolution on any of your monitors from the status bar on your desktop. Move it from your Downloads folder into your /Applications folder. I’ve even got it in my login items for maximum convenience!

Although the app is probably slightly slower than the Hot Corner solution when I’m at home, I like it because I regularly connect my mac to all sorts of other monitors and projectors and the mac doesn’t always choose the best display. The RDM.app lets you slide through the available options much more efficiently than the System Preferences panel, too. Big respect to Paul Griffin at http://www.phoenix-dev.com for this!
5. Trash old prefs
No matter how well or otherwise any of these techniques work, the question remains: why is the resolution setting being forgotten in the first place? I haven’t nailed this down as a cert yet, but ever since I did this to solve a different problem, my monitor’s been behaving itself, too.
1. Go to
Hard Disk/Library/Preferences/System Configuration
Now make sure you’re at the right place because there’s another ‘System Configuration’ folder at /Library/System Configuration, and you definitely don’t want to be messing with that one. Also, this is the Library folder at the root of your hard disk and NOT your user account library (i.e, the path is /Library, not ~/Library). Check that path. Here it is again
Hard Disk/Library/Preferences/System Configuration
2. OK, click on that folder, and copy it over to your Desktop. Now go back and delete it from /Library/Preferences (or hold down ‘option’ while you drag to do a ‘move’. I prefer the first way; it’s safer, if slower).
3. Restart and test.
Hopefully, if you’ve been venting at the ears like me over the external display problem, one or more of these options will help lower the frustration!
🙂
Related Posts:
DisplayDroid from Applehelpwriter
enable text selection in Quick Look

One neat little feature of Quick Look is that if you want to copy some text from one pdf, rtf, or txt file (as far as I can tell, it doesn’t work with .doc and .docx) to another without opening the source file, you can browse through the Finder, hit the spacebar, and select the text from within the Quick Look preview.
However, if you find that you can’t select text inside a QL preview window, you may need to enable it in your defaults settings. To do this, triple-click the line below, copy and paste it into a Terminal window and hit ‘return’.
defaults write com.apple.finder QLEnableTextSelection -bool true
security: keeping OS X’s nose out of your data

Well, probably. For most people, most of the time. But not always. The security implications of having your OS (and even Apple) copying everything you type, open or edit on your computer can sometimes be disturbing. What if you need to open a confidential pdf in Preview but are required to make sure (either morally or contractually) that all copies of that document are destroyed after viewing? No one wants to be zeroing their hard-drive every week; and what if you need to edit a Pages or Numbers document but don’t want the changes pushed to the cloud? Turning iCloud on and off is no 2-second job and can have implications for your other workflows and data. Making duplicates to save locally risks having copies stored in the hidden .DocumentRevisions-v100 folder.
Use a secure USB
With USB flash drives now coming in at large GB sizes and relatively low cost, one solution is to load and delete sensitive files via a USB. Wiping a flash drive takes considerably less time than wiping a hard disk and keeps your sensitive data nicely partitioned from everything else, but there are problems. First, there’s always the danger of negligence; in the heat of deadlines or other pressures, we might just forget to wipe that disk; second, there’s the danger of loss or theft; and third, there’s always the possibility of deep recovery by people with the appropriate tools and know-how. Some of those issues can be mitigated by encrypting the drive using Disk Utility.
Set up a RAM disk on OS X
Using an encrypted USB can be a great idea, but it both takes time to create and is not always unobtrusive. If another party should get physical access to your USB, the fact that it’s encrypted also tells interested parties that you might have secrets to hide. A faster and less conspicuous solution could be to use a RAM disk, a portion of your RAM memory that is partitioned and formatted just like any other disk. RAM disks were once common on Macs when peripherals were considerably slower at loading data, but with the speed of modern drives few people bother with them anymore. However, a RAM disk has another advantage apart from being the fastest way to read and write data: its entirely non-persistent. There’s no way of recovering something that was once in RAM once that memory has been flushed.

A 0.5GB RAM disk
Making, using and deleting a RAM disk is incredibly simple. Here I’ve created one that’s a half a gigabyte. To create it, you just need a one liner in Terminal. Triple-click the following line and copy and paste it directly into a Terminal window:
diskutil erasevolume HFS+ "ramdisk" `hdiutil attach -nomount ram://1165430`
After you hit ‘return’, you’ll see a new disk icon on your desktop and in the Finder sidebar. You can now use the RAM disk just like any other disk. Use it as the location to download, open or create sensitive files that you know you are going to destroy after use. You can, of course, even create copies of applications and run them from your RAM disk, too.
The RAM disk, while it exists, will behave just like any other disk, so it will have its own .Trashes directory, and its own Versions and Spotlight indexes just as all other disks do. That means you get all the comforts of OSX’s failsafes while the disk is mounted, but as soon as you eject or unmount the disk, all the Versions and Autosaves and Trashes disappear completely and unrecoverably. RAM disks are ideal for reading or editing short pieces of information (such as messages or passwords) that you want to quickly review or store before discarding without a trace.
You can eject the disk either in the usual way from within Finder or the Desktop, or you can use another Terminal line:
hdiutil detach /dev/disk1
And if you want to flush the contents of your entire RAM buffer for good measure, you can also do:
sudo purge
followed by an admin password (if you’re using any version of OS X before 10.9, you can just type ‘purge’ at the command line. No need for sudo or a password).
A word of caution, however. The strength of a RAM disk from a security point of view is simultaneously a danger from almost every other: — the volatility of RAM means you could easily lose everything in your RAM disk if any of the following occur: you eject the disk accidentally, the computer crashes, the power fails or battery runs flat, you log out or restart the computer. Keep these points in mind and only use your RAM disk for short sessions. Never store anything solely on a RAM disk if preserving the data is of importance to you.
🙂
discover 10 new OS X shortcuts

No matter how many times I visit this page, I always find something new that I hadn’t tried before. So the title of this post is more of a suggestion than a description. Why not take a poke around Apple’s shortcut list and discover ten that you don’t already know? I’m going to give a quick round up of ten shortcuts that I use on a regular basis.
1. ⌘ ⌃ Space
Command-Control-Space is a universal shortcut (i.e., you can use it no matter what application is currently active) for bringing up the character viewer (see the screenshot, top of page). In order for it to work, the cursor must be in a text field where character entry is possible, but you can use it literally anywhere: text documents, search fields, browser bars, save dialogs, etc. I used it heavily in creating this post!
2. ⌘ ⌃
Command-Control-Eject saves you having to trawl all the way up to the icon top left of your screen and choose ‘Restart…’. It’ll give you the chance to save any unsaved work or cancel the shutdown. This shortcut has a cousin, too: add the option key (⌘ ⌥ ⌃  ) to the mix and you get Shutdown instead of Restart.
3. ⌘ ⌫
One of my pet annoyances is continually being asked if I want to save ‘Untitled’ documents, those that I’ve never saved before, when trying to quickly quit an app. Having to take my fingers off the keyboard to move the cursor down to that ‘Delete’ button is time-consuming, and tabbing to it takes multiple hits of the tab key. Fortunately, ‘Command-Delete’ will let you discard the document immediately from the keyboard in one quick shot.

4. ⌘ G
Most people are familiar with invoking ‘Find’ on a page by using ‘Command-F’, but have you ever got annoyed by having to mouse up to those tiny little jump arrows in order to cycle through the hits?

Save your eyes and use Command G instead! Note that you have to invoke Find with ‘Command F’ first.
5. ⌃A, ⌃E, ⌃K
That’s three separate shortcuts not one! In any text field, Control-A moves the cursor to the beginning of the line; Control-E moves it to the end, while ⌃K deletes everything from the cursor to the end of the line. Old-hands of the Terminal and other command-line utilities will know these well, but even they may be surprised that these work across a wide-range of GUI apps, too. Particularly useful in Web browser address bars, search fields, Spotlight and so on.
6. ⌘ L
Command-L in Safari and other browser-based apps (including Xcode’s Documentation viewer  ) will immediately move the focus to the address bar/search bar and allow you to edit its contents. No clicking necessary!
7.⌘ ⌃ 1, ⌘ ⌃ 2, ⌘ ⌃ 3
Three commands new for Safari’s sidebar. Respectively, open the sidebar with Bookmarks showing, with Reading list showing, and with Shared links showing. Hitting the same shortcut again toggles the sidebar closed. Note that those are the numbers ‘1’, ‘2’ and ‘3’, not F1, F2, F3.
8. ⌘ ⇧ A, ⌘ ⇧ U, ⌘ ⇧ H, ⌘ ⇧ D
Again, that’s 4 different shortcuts, this time for the Finder. OK, hands up all those that switch to the Finder, hit Command-N to open a new window, and then click to their Desktop? Save yourself the grief (and the time), just activate Finder and hit Command-Shift-D. No need to open a window first, the shortcut will open a new window for you showing your Desktop folder. The others do the same thing but for different folders: Command-Shift-A opens your Applications folder, Command-Shift-U the Utilities folder, Command-Shift-H opens your Home folder.
9. ⌘ F1
This one’s for those of you with dual monitors or when your Mac is hooked up to a projector. Command-F1 toggles between mirroring and separate monitor views. Great for presentations.
10.(fn) ⌃ F8
Control-F8 activates the Status bar (top right row of icons on your screen). Use the left/right arrow keys to move along them, and the up/down arrows to select things in any menu. Hit ‘enter/return’ to perform the action. Note that on laptops you may need to invoke the fn ‘Function’ key, depending on your settings in Keyboard Preferences.
This is a great one for turning on/off Bluetooth, Wifi and checking Mavericks’ new Energy monitor in the Battery/Power icon. Mostly though, I use it for manually starting Time Machine backups or entering TM’s “star wars” interface (oh, and as a bonus…note that (fn) ⌃ F2 activates the other side of the menu bar (i.e., the menu). Enjoy!

Got your own favourite shortcuts? Tell us what you use most in the Comments! 🙂

