Blog Archives
discovering how Dropbox hacks your mac
Update: Dropbox hack blocked by Apple in Sierra
Following my post revealing Dropbox’s Dirty Little Security Hack a few weeks ago, I thought I’d look deeper into how Dropbox was getting around Apple’s security.
After a little digging around in Apple’s vast documentation, it occurred to me to check the authorization database and see if that had been tampered with. According to the docs:
In a policy-based system, a user requests authorization—the act of granting a right or privilege—to perform a privileged operation. Authorization is performed through an agent so the user doesn’t have to trust the application with a password. The agent is the user interface— operating on behalf of the Security Server—used to obtain the user’s password or other form of identification, which also ensures consistency between applications. The Security Server—a Core Services daemon in OS X that deals with authorization and authentication—determines whether no one, everyone, or only certain users may perform a privileged operation.
The list of authorization “rights” used by the system to manage this “policy based system” is held in /var/db/auth.db database, and a backup or default copy is retained in /System/Library/Security/authorization.plist.
Looking at the default with
defaults read /System/Library/Security/authorization.plist
we can find that there is an authorization right for System Preferences’ Accessibility list, which says:
"system.preferences.accessibility" = {
class = user;
comment = "Checked when making changes to the Accessibility Preferences.";
group = admin;
shared = 0;
timeout = 0;
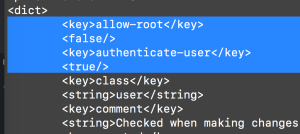
That file’s comments also state that “The allow-root property specifies whether a right should be allowed automatically if the requesting process is running with uid == 0. This defaults to false if not specified.”
In other words, if allow-root isn’t explicitly set, the default is that even a process with root user privileges does not have the right to perform that operation. Since that’s not specified in the default shown above, then even root couldn’t add Dropbox to the list of apps in Accessibility preferences. Is it possible then, that Dropbox had overriden this setting in the auth.db? Let’s go and check!
To see what the current policies are, you have to actually read the sql database in /var/db/auth.db. There’s various ways of doing that, but the easiest for me was to access auth.db through the command line using the security tool. Issuing the following command in Terminal will return us the currently active policy for Accessibility:
security authorization read system.preferences.accessibility
On my machine, this returned:
Root wasn’t allowed to override Accessibility, and authenticate was on, so it couldn’t be this way that Dropbox was hacking my mac.
Security on OS X is a complex beast, however, and there are other authorization protocols at work. One that I already knew of is tccutil. If you issue man tccutil in Terminal, you’ll see this:
tccutil(1) BSD General Commands Manual tccutil(1)
NAME
tccutil — manage the privacy databaseSYNOPSIS
tccutil command serviceDESCRIPTION
The tccutil command manages the privacy database, which stores decisions the user has made about
whether apps may access personal data.One command is current supported:
reset Reset all decisions for the specified service, causing apps to prompt again the next time
they access the service.EXAMPLES
To reset all decisions about whether apps may access the address book:tccutil reset AddressBook
Darwin April 3, 2012 Darwin
(END)
I had heard of a hack of this utility that was related directly to adding apps to Accessibility list over a year ago when I stumbled across this stackexchange page. In short, what that hack suggests is that you modify tcc directly by inserting an entry into the sql database located here /Library/Application Support/com.apple.TCC/TCC.db.
You can read the current list with the command:
sudo sqlite3 /Library/Application\ Support/com.apple.TCC/TCC.db 'select * from access'.
To insert an app in the list, you grab it’s bundle identifier (in the case of Dropbox, that’s com.getdropbox.dropbox), and issue:
sudo sqlite3 /Library/Application\ Support/com.apple.TCC/TCC.db “REPLACE INTO access VALUES(‘kTCCServiceAccessibility’,’com.getdropbox.dropbox’,0,1,1,NULL, NULL);”
(*note the code given on the stackexchange page isn’t quite correct for the latest builds of the mac operating system, in which the access table now has 7 columns and so requires and extra “NULL” on the end as shown above).
I tested this with several of my own apps and found it worked reliably. It’ll even work while System Preferences is open, which is exactly the behaviour I saw with Dropbox.
It remained to prove, though, that this was indeed the hack that Dropbox was using, and so I started to look at what exactly Dropbox did after being given an admin password on installation or launch. Using DetectX, I was able to see that Dropbox added a new folder to my /Library folder after the password was entered:


As can be seen, instead of adding something to the PrivilegedHelperTools folder as is standard behaviour for apps on the mac that need elevated privileges for one or two specialist operations, Dropbox installs its own folder containing these interesting items:
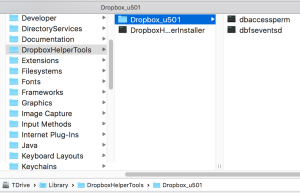
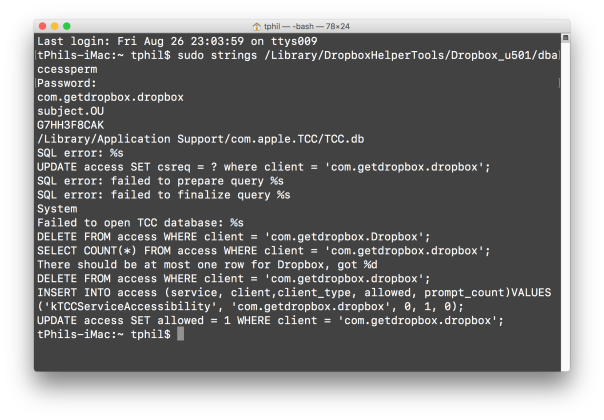
Not one, but three binaries! I wonder what they do? The first thing I did on each was to run the strings command on them. I still haven’t determined what that 1.5MB DropboxHelperInstaller binary is doing (that’s pretty big for a binary for a helper app), but its jam-packed with strings relating to file compression and encryption. The string output for dbfseventsd binary didn’t reveal anything much interesting, but with the deliciously named dbaccessperm file, we finally hit gold and the exact proof I was looking for that Dropbox was using a sql attack on the tcc database to circumvent Apple’s authorization policy:
This is all the more telling when we look at what Dropbox themselves say when queried about why their app is in the list of Accessibility apps here. After a great deal of obfuscation, misdirection and irrelevance in which they mention everything about permissions in general and nothing about Accessibility in particular, or that they’re hacking their way into the user’s Accessibility list rather than going through the supported channel of presenting the user with a dialog box and asking for permission, comes this line:
we need to request all the permissions we need or even may need in the future.
(my emphasis)
Ostensibly, that’s in the context of Drobpox on mobile apps, but since the question isn’t related to mobile apps at all, I think interpreting anything said there as being honest is naive at best. What I do suspect, especially in light of the fact that there just doesn’t seem to be any need for Dropbox to have Accessibility permissions, is that it’s in there just in case they want that access in the future. If that’s right, it suggests that Dropbox simply want to have access to anything and everything on your mac, whether it’s needed or not.
The upshot for me was that I learned a few things about how security and authorisation work on the mac that I didn’t know before investigating what Dropbox was up to. But most of all, I learned that I don’t trust Dropbox at all. Unnecessary privileges and backdooring are what I call untrustworthy behaviour and a clear breach of user trust. With Apple’s recent stance against the FBI and their commitment to privacy in general, I feel moving over to iCloud and dropping Dropbox is a far more sensible way to go for me. For those of you who are stuck with Dropbox but don’t want to allow it access to Accessibility features, you can thwart Dropbox’s hack by following my procedure here.
🙂
Further Reading:
Dropbox hack blocked by Apple in Sierra
Revealing Dropbox’s Dirty Little Security Hack
")
how to secure your mac (OS X Lion)

Security in OS X Lion is a big problem that not many people are aware of, and here’s why: your Lion computer contains the install/recovery disk on the internal drive. That means anyone with a basic knowledge of Mac and Lion can start up your mac and reset your passwords, thereby accessing your user accounts and all your personal data. The same trick can help kids easily get round restrictions applied through OS X’s ‘Parental Controls’ feature.
How is this possible, you may ask? First, a little history. Among the 250 changes vaunted about Lion over its predecessor, Snow Leopard, there is one that is widely known but whose implications are rarely pointed out: you download the OS rather than install it from a disc. In the past, if your OS went bad and needed to be recovered, or you forgot your admin passwords, the simplest answer was to insert your install disk. From that, you could restore the OS and reset your passwords. That made your Mac a little safer (though not entirely safe) so long as your disc was kept somewhere physically different from your computer.
With Lion having no install disc, Apple had to find an answer as to how to provide the recovery option. The solution was to install a Recovery partition on the same disk as the operating system itself. In the event that the OS goes bottoms up and needs to be recovered or re-installed, you just restart your computer holding down the ‘command’ and ‘r’ keys to access the Recovery partition.
So far so good, but likewise, just as with the old DVD install discs, you — or anyone else — can also reset the user account passwords from the Recovery partition. That means your passwords are effectively useless. Anyone who wants to hack your user account just has to restart your Mac holding down ‘command’ and ‘r’ and then use the built-in Password Utility to make new passwords for your accounts. Now I’m not going to tell you quite how to do it (you do need a little knowledge to get the user account names and know how to do the reset) but it is widely publicized elsewhere, and indeed even in Apple’s own online documentation (so if you really want to know, google is your friend or follow some of the links in this post…).
What’s the answer to this security nightmare? Here’s one thing that’s NOT the answer but which I have seen widely touted: setting a firmware password. If you’re not familiar with the concept of the firmware password, don’t worry. It is practically useless, since anyone can reset that simply by taking off the back of your computer, and then pulling out and then putting back in one of the memory chips.
Apple, of course, thought about this problem. Their own solution is to encourage you to use FileVault 2 (FV2) to encrypt all your data. Indeed, this is the BEST solution. Without your password, no one can access the disk on your computer no matter what they do (and that includes YOU if you forget it…). However, there are a couple of drawbacks to FV2. One is that it requires extra disk space, and if you have more than one partition on your hard drive, or a lot of data, and little space you may not be able to encrypt and decrypt your data. The other drawback is that FV2 places a little extra wear-and-tear on your hard disk (though that may be negligible given the security pay off).
Using FileVault 2 is really the only security option if you’re using Lion. However, if you don’t have the space for it, there is a ‘second-best’ strategy (see below why it’s only ‘second best’), and that is to remove the recovery disk and use a clone as your recovery option instead (WARNING: the Recovery disk is required for FileVault 2, so by removing it you will also remove the ability to use FV2).
There’s a couple of ways to remove the recovery partition on your internal disk, but this is probably the best:
1. Clone your current system to an external disk using Carbon Copy Cloner. This will clone your entire system exactly as it is now, but it will not copy the Recovery disk.
2. Still booted into your internal OS (the one on your machine), open Terminal.app and paste the following command:
defaults write com.apple.DiskUtility DUDebugMenuEnabled 1
Press ‘Return’.
3. Open Disk Utility.app (Applications/Utilities/Disk Utility.app). In the menu bar of Disk Utility, choose Debug > Show Every Partition.
4. In the left-hand pane of Disk Utility, you can now see the Recovery HD. Click on it. Then click on the Erase tab on the (larger) right-hand pane. Click the Erase button down there on the bottom right.
5. Quit Disk Utility.
Now you can use your bootable clone as your recovery disk if your OS becomes corrupt and no one can boot up your computer with ‘command-r’. If you keep the clone backed up on a regular incremental schedule (you can choose anything from once an hour, once a day, week, or month), you can simply restore a corrupted internal disk to exactly the same state as your last backup.
Why only ‘second best’?
As alluded to earlier, it is still possible for advanced users to start up your mac and reset the password without the Recovery partition (this was also true in Snow Leopard even without the install disc). In fact, what this procedure does is give your OS X Lion installation the same security level as an OS X Snow Leopard installation, which is not actually that great, but better than Lion with a Recovery disk! Also, if you are storing highly sensitive data, don’t neglect the fact that someone who has complete unfettered access to your hard drive could even remove the disk and recover the data using special software.
The short story is if you want to be absolutely certain that your data is secure, FileVault 2 is really your only option.
featured picture Security Workstation by digitalhadz

