Blog Archives
FastTasks – free download

I’ve been planning this ever since I first wrote a shell script along the same lines. All it needed was a nice interface, and that’d be something I could use almost everyday. Well, it only took me 8 months to get round to it, but here it is. 😉

Download FastTasks»
FastTasks allows you to achieve a number of things that you would normally have to roll up your sleeves and do in Terminal or AppleScript.
The window consists of two columns: left-side for info, right-side for actions. Here’s a detailed breakdown of functions with possible uses.
–Left-side (Info):
OS X Version:
Displays your current OS Version and build number
Startup Disk:
Displays your boot volume
I sometimes forget which particular volume I’m booted into, so this is vital info for me and anyone who’s regularly booting in and out of different installations.
Router IP:
The IP address of your network router
This can be useful for troubleshooting or if you need to access your router’s Admin page.
Just select the address and paste it into Safari’s search bar.
Local IP:
Your node on the local network
Useful to copy and paste if you need your local IP/ network node.
External IP:
How the rest of the world sees you
Very useful if you’re using proxies and want to check whether they’re working.
Installed Ram:
Just a courtesy reminder, but the real value here is the summary of usage stats underneath. These are pretty good approximations to what AM shows on my 10.8, but there are discrepencies on some versions of OS X between what ‘top’ shows and what Activity Monitor shows. FastTasks uses the same information that you’d get if you used the ‘top’ command in Terminal.
By the way, there’s a refresh button (keyboard shortcuts shown) for both the memory usage and network addresses, as the displays do NOT update continuously. Using the refresh buttons does not CHANGE anything on your system: They just update the display to reflect the current state of the system.
–Right-side (Actions):
Show hidden files:
Reveal or hide the hidden files and folders in the Finder whose names begin with a period
This is probably the most useful function of the app as it provides a dead easy way to hide and unhide system files without messing around in Terminal.
Show User Library:
Reveal or hide the User Library in the Finder
Likewise, this hides or unhides the ~/Library folder in Finder. This is ‘hidden’ in a different way from files that begin with a period, and its setting can be manipulated independently of that setting, so you can have the User Library showing, but ‘hidden’ files still hidden.
Flush DNS Cache:
Flush the cache that resolves internet domain names into IP addresses
Flushing the DNS cache can sometimes help resolve problems when you can’t access certain websites. Depending on what system you’re running, you may or may not see a ‘Requires Admin password’ warning next to this button. If you see the warning, then when you press the button the system will ask you for your password. The password request is from OS X and it goes to OS X: It’s not called, seen or stored by the app itself.
Free Memory:
Purge the RAM of inactive memory
Again, depending on what system you’re running, you may or may not see a ‘Requires Admin password’ message. On Snow Leopard, this requires the Command Line Tools supplied with Xcode, so if you see a message telling you to install Xcode, you may have to live without it (availability of Xcode for Snow Leopard these days is a bit hit and miss). You’ll also see the information on the left-side refreshed under ‘Usage’ when you use the free memory function and it successfully completes.
NOTE: on some systems where both Flush DNS Cache and Free Memory display ‘Requires Admin password’, note that after supplying the password for one of those actions, the user will be able to perform the other action without authenticating for a period of around 5 minutes (unless the sudo timeout setting has been altered by an Admin user).
Lastly, at the bottom of the window you’ll see a tiny plea to donate if you find the app useful ;). Note that the underlined text ‘Applehelpwriter’ and ‘Donate’ are hotlinks that if clicked will launch Safari and load a tab with this site and a Paypal donate page, respectively.
I hope you enjoy using FastTasks. Please read the provided Licence and User Guide that are in the download. Thanks! 🙂
FastTasks – a utility for ten common terminal tasks
Update: I’ve since written a nice GUI version in AppleScript-ObjectiveC which you can download for free here»
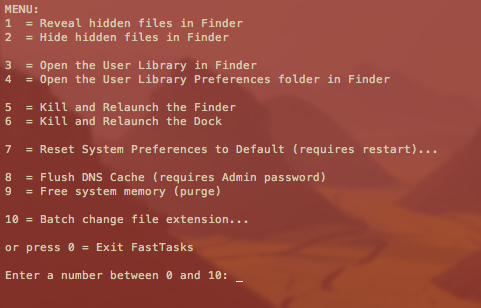
If you find you only ever go into Terminal to perform a small number of tasks that can’t be done (easily or at all) in the OS X graphical user interface, this little utility could be for you. It allows you to run a number of common tasks such as
reveal and hide hidden folders
batch change the extension on multiple files
purge system free memory
flush the DNS cache
restore system preferences to defaults
without having to bother looking up the commands. You will, however, have to do a little Terminal ‘dirty work’ to initially get the utility up and running (it’s a shell script which you need to turn into an executable file), but step by step instructions are all provided. 😉
Here’s what you do:
1. Copy or download the entire script from here FastTasks code and paste it into a text editor (TextEdit or Tincta, my favourite, will do).
2. Save the file as plain text onto your desktop with the name ‘FastTasks’
3. Open Terminal.app and paste this command:
sudo chmod 755 ~/Desktop/FastTasks
and press ‘return’ on your keyboard. You’ll be asked for you Admin password which will be invisible when you type it. If you’re wondering what you’ve just done, you’ve just changed that plain text file into an executable program.
4. Paste the next line into Terminal.app
cp ~/Desktop/FastTasks /etc/bin/FastTasks
then press ‘return’ on your keyboard.
As a result of that last command, you can now use the script by typing ‘FastTasks’ in a Terminal window or by double-clicking ‘FastTasks’ in Finder or on the Desktop.
5. By the way, if the Terminal window remains open after FastTasks has completed, change the following settings in Terminal’s Preferences:
Preferences > Settings > Shell > When the shell exits…
and change the dropdown menu from ‘Don’t close the window’ to ‘Close if the shell exited cleanly’.
And that’s it. You can now run any of the tasks in the menu without having to know the commands! 🙂
Fast tips for using FastTasks
1. FastTasks is actually quickest to run by using Spotlight and Terminal.
If you have the Spotlight hotkey set up (usually cmd-space by default), simply open Spotlight, and type ‘Term’ and hit ‘return’ on the keyboard. At the Terminal prompt type ‘fasttasks’ and hit ‘return’.2. Running it this way has another benefit. If you want to run FastTasks again after performing one task, just hit the ‘up’ arrow on the keyboard (hitting the ‘up’ arrow repeatedly will take you through previous commands entered at the Terminal prompt. Use the ‘down’ arrow to go forward), then ‘return’ when you see ‘fasttasks’ on the command line.

