Blog Archives
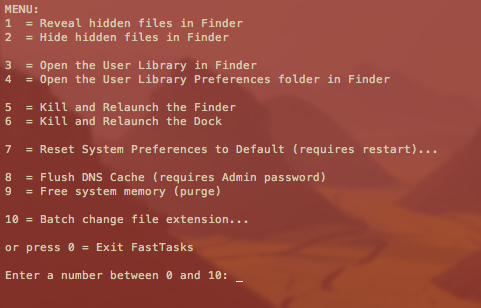
FastTasks – a utility for ten common terminal tasks
Update: I’ve since written a nice GUI version in AppleScript-ObjectiveC which you can download for free here»
If you find you only ever go into Terminal to perform a small number of tasks that can’t be done (easily or at all) in the OS X graphical user interface, this little utility could be for you. It allows you to run a number of common tasks such as
reveal and hide hidden folders
batch change the extension on multiple files
purge system free memory
flush the DNS cache
restore system preferences to defaults
without having to bother looking up the commands. You will, however, have to do a little Terminal ‘dirty work’ to initially get the utility up and running (it’s a shell script which you need to turn into an executable file), but step by step instructions are all provided. 😉
Here’s what you do:
1. Copy or download the entire script from here FastTasks code and paste it into a text editor (TextEdit or Tincta, my favourite, will do).
2. Save the file as plain text onto your desktop with the name ‘FastTasks’
3. Open Terminal.app and paste this command:
sudo chmod 755 ~/Desktop/FastTasks
and press ‘return’ on your keyboard. You’ll be asked for you Admin password which will be invisible when you type it. If you’re wondering what you’ve just done, you’ve just changed that plain text file into an executable program.
4. Paste the next line into Terminal.app
cp ~/Desktop/FastTasks /etc/bin/FastTasks
then press ‘return’ on your keyboard.
As a result of that last command, you can now use the script by typing ‘FastTasks’ in a Terminal window or by double-clicking ‘FastTasks’ in Finder or on the Desktop.
5. By the way, if the Terminal window remains open after FastTasks has completed, change the following settings in Terminal’s Preferences:
Preferences > Settings > Shell > When the shell exits…
and change the dropdown menu from ‘Don’t close the window’ to ‘Close if the shell exited cleanly’.
And that’s it. You can now run any of the tasks in the menu without having to know the commands! 🙂
Fast tips for using FastTasks
1. FastTasks is actually quickest to run by using Spotlight and Terminal.
If you have the Spotlight hotkey set up (usually cmd-space by default), simply open Spotlight, and type ‘Term’ and hit ‘return’ on the keyboard. At the Terminal prompt type ‘fasttasks’ and hit ‘return’.2. Running it this way has another benefit. If you want to run FastTasks again after performing one task, just hit the ‘up’ arrow on the keyboard (hitting the ‘up’ arrow repeatedly will take you through previous commands entered at the Terminal prompt. Use the ‘down’ arrow to go forward), then ‘return’ when you see ‘fasttasks’ on the command line.
get ready for Mountain Lion

With the last seven days of July upon us, the suspense is just killing some people waiting for the release of Apple’s latest version of OS X, 10.8 Mountain Lion. While rumours abound for just about every conceivable day left being the ‘official’ release date (with the 25th being the most popular, it seems), the sensible are making sure they’re prepared. So here’s a few things to do both before and on the big day:
1. Check the tech specs
Check out the tech specs for Mountain Lion and the list of supported machines to make sure you can run it on your current system. If you are upgrading from Snow Leopard, you should also check out will my old apps work with Lion?.
2. Run Software Update
Make sure you have the latest version of everything by running
> Software Update
before you upgrade. This will help to cut down any compatibility problems when installing Mountain Lion.
3. Backup your current install
Without a doubt the biggest cause of trouble and frustration with every OS release is among users who didn’t backup their systems before trying to install the new one. Like Lion, Mountain Lion will be delivered as a download from the App Store, and while this method is certainly convenient, corrupted downloads are not uncommon. Moreover, even when the install proceeds as expected, you want to be able to get back to your previous system if you find things are not to your liking. An OS installation is like performing major surgery on your computer and the chances of complications are always a significant risk. As the old boy scout saying goes ‘Be Prepared’. Backup, backup, backup.
4. Remove everything from your Login Items.
For Lion users, that’s
> System Preferences…> Users & Groups | Login Items
If you’re upgrading from Snow Leopard 10.6.8, go to
> System Preferences…> Accounts | Login Items
There’s a couple of reasons for doing this, but mainly it’s to ensure that you can log in without difficulty. Login Items are one of the main causes of OS problems at the best of times, but with a major upgrade like this, you don’t want any incompatible software choking the system from booting up. See Steps 8 & 9 below about re-activating your Login Items after the installation.
5. Uninstall AV software & other utilities
If you have Sophos, VirusBarrier, iAntiVirus, F-Secure, or similar uninstall these prior to upgrading. After upgrading, if you must use them, look for updates. Uninstall MacKeeper, Little Snitch, LogMeIn or any other 3rd party utility that runs prior to user login.
6. Be prepared for slow download times
Apple’s servers will be hotter than a forest fire on release day, so you can expect download times to be pretty poor. At the very least, connect your computer to your router via ethernet cable rather than wifi – that’ll at least help push things along a bit faster at your end. If you can do it from the office or somewhere else that has a lot more bandwidth than the usual home connection, do so.
7. Save the installer
After the download completes the installer will run automatically. Do NOT click ‘Install’, but instead quit it. Then go to your Applications folder and copy the ‘Install OS X Mountain Lion .app’ and save it to your Downloads folder or somewhere else. Then you can run the installer in your Applications folder.
The reason for doing this is that when you install Mountain Lion the Install app in your Applications folder will self-delete. If the install shouldn’t work for some reason the first time round, you won’t have to go through the whole tiresome wait of a download from the App store again if you save a copy to your Downloads folder.
8. Update 3rd-party apps
Assuming Mountain Lion boots up just fine, the first thing you’re going to want to do (after having a nose around, of course!) is update your 3rd party apps. Start off by opening the App store to see if any that you’ve sourced from there have updates waiting for you. After that, start up all the main apps that you normally use and use their ‘Check for Updates’ option (usually in the Apps main menu), or contact the developers through their websites. If you use Parallels 7, you will need to update that before trying to run your virtual machines.
9. Test your Login Items apps
In particular, you’re going to want to test out the apps that you want to put back in your Login Items, before you put them back in there. Run each app and play around with the system for a couple of hours before deciding to put it back in your Login Items list. If you notice any weird behaviour with Finder, the Dock or Desktop backgrounds, problems with wifi or graphics, chances are one or more of your 3rd party apps needs updating to work with Mountain Lion. If there is no update yet, stop using that app till one becomes available or find an alternative. In general, it’s always best to keep Login Items down to a bare minimum. Running apps at login is a sure fire way to slow down boot up times.
10. Check back with Applehelpwriter.com
As always, I’ll be here with tips on how to get the most out of OS X and how to solve some common problems. See you then!🙂
change Flag names in Mail
‘Red’, ‘Green’ and ‘Yellow’ aren’t particularly meaningful ways to categorise messages, but changing the names to something more useful can make the ‘Flags’ feature a handy tool.
The procedure is quite simple, but the first thing you have to do is actually flag a couple of messages:
1. Flag some messages (one of each colour if you want seven categories):

2. Next, go into the sidebar in Mail. Click the little disclosure triangle:

3. Click on one of the names and press ‘return’ on the keyboard:

4. Type in a new name and press ‘return’ again:

5. Of course, you can change the flag names at any time:

need a manual for Lion?
Got a new Mac and feeling like you’re on a whole different planet? Providing user manuals with computers isn’t really very Apple somehow 😉 …after all, the OS is supposed to be so intuitive and easy to use we shouldn’t need one…
However, clearly more than a few have been having problems getting used to their new Lion installation as Apple are now prominently displaying two beginners help guides on the ASC support forum.
Have a look at Mac 101 if you’re new to computers in general or haven’t really used one for a while.
If you’re pretty computer savvy but have just switched over from a lifetime of Windows to your first Mac, then Switch 101 will clue you into both some of the major differences and how to accomplish familiar Windows tasks in your new Mac OS X environment.
To keep up to date, troubleshoot, or find answers to specific questions not covered in the above materials, be sure to visit http://www.apple.com/support/lion/. You can also find this page from the menu at the top left of your screen. Click
> About This Mac and then ‘More Info…’:

Over on the right of the next panel, click the ‘Support’ button:

You can access both the online Lion manual (indicated in blue), and also a pdf manual (indicated in purple) for your computer from here.
Enjoy exploring! 🙂
Struggling with the basics? Don’t be shy, let us know in the Comments below! 🙂
featured picture The Close Light by *qaz2008
maximizing screen space in OS X
If you don’t like full-screen apps because they hide the menubar, or you’re using Snow Leopard and you need to increase screen real-estate, here’s a few tricks you can try.


1. Try to maximize the app to take up all the rest of the screen space by clicking the green indicator light in the top left corner (there are three in a row, red, amber, green).

2. You can hide or collapse the toolbar (that’s the top part of the app that the indicator lights and other icons sit in) in some apps by clicking the elongated button on the far-right of the toolbar (if present). Alternatively, if there’s no button, look in the menubar at the top for ‘View > Hide Toolbar‘. While you’re there, look for ‘Hide Status Bar‘, which is the strip at the bottom of an application window.
3. Try either right-clicking or ‘control’ clicking anywhere on the toolbar and experimenting with the options. Some apps will let you hide the toolbars (like Office for Mac), while others give you options such as ‘use text only’ to remove icons which will reduce the size of the toolbar. Experiment to see what works best.
change the default app for a file type
OS X is known for its intuitive and simple way to achieve common user tasks, but one area where it fails is in setting or changing the default app to open a given file type. New OS X users migrating from Windows may find it especially frustrating given the ease with which this can be done in Windows 7 and so on. How, for example, do you make all your video files open with Quicktime instead of VLC by default or pdf files to open with Acrobat instead of Preview?
Here’s the answer:
1. In the Finder, select any file of the given type you want to change.
2. Using the keyboard, press Cmd-i or right-click on the file to display the contextual menu, and chose ‘Get Info’.
3. About 2/3rd of the way down the tall dialogue box, you should see ‘Open with…’ and a menu button. Click on the menu and choose the app you want.


4. After clicking on your preferred app, click the ‘Change All…’ button. This means that not only this file, but all files with the same extension will open with the app you just chose.
5. Press Cmd-w on the keyboard or click the red ‘Close’ button in the top-left corner to close the dialogue box.

