Author Archives: philastokes
how to remove the System Preferences Badge app icon (Catalina Upgrade)
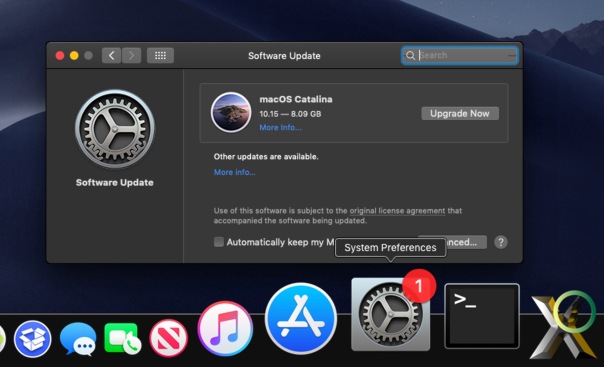
If you’re not ready to upgrade to macOS Catalina yet – and there’s good reasons why you might want to hold off – you might also be tired of seeing the red update badge in the System Preference’s Dock icon in macOS Mojave and the ‘Upgrade Now’ advert in the Software Update pane. Also, there’s a similar badge polluting you with more unwanted visual noise every time you open System Preferences main view itself.
Unlike other applications in the Notifications preferences pane, there’s no entry for the System Preferences app itself where you can turn off the Badge app icon.
I know there are those that will deliberately run their Macs at least one major version behind the current version (though I can think of multiple security reasons why that’s not a good idea) and others who don’t want to update at all. Aside from those wanting to avoid the expense of their current 3rd party software demanding “pay-me for a new Catalina-compatible version”, there are those still using incompatible 3rd party kexts, 32-bit apps or who are just happy with the features and performance they’re currently enjoying.
Are they all condemned to having the annoying update notifications in their faces until they surrender to Apple’s will?
Fortunately not, but there are three different places the nags appear, and depending on how obsessive you are about not seeing the update and badge icons, you may or may not want to deploy some or all of the tricks described below. There’s a couple of things to watch out for, too, so if you do choose to implement any of these workarounds, remember to bookmark this page for future reference when you want to undo any of the changes you made.
1. Remove the Catalina Advert Inside Software Update

If all you want to do is stop Catalina appearing in the Software Update pane urging you to “Upgrade Now”, you can use this super tip from Macadmin guru Rich Trouton. It’ll require a trip to the Terminal.app (/Applications/Utilities/Terminal.app) and an administrator’s password.
From the command line, copy and paste the following:
sudo softwareupdate --ignore "macOS Catalina"
Hit ‘return’ and type your admin password, which will be invisible when you do so.
After completing this step, you’ll no longer see Catalina advertized, but you’ll still have the red number “1” badge in both System Preferences and the Dock.
Gotchas and How to Undo
The main gotcha to remember after doing this is you won’t see Catalina updates, and even if you go to the App Store and try to “get” it, it will fail to install.
To reverse the above step, go back to the Terminal and use:
sudo softwareupdate --reset-ignored
2. Remove the Badge on the Dock Icon
If you keep System Preferences in the Dock, you’ll notice that even after the previous step you still have the eye-catching red banner alert on the Dock.
I’ve seen some suggestions of using a defaults command to try to address this, but it appears to be a temporary fix and has to be repeated every time you open Software Update, so I don’t recommend this particular trick.
defaults write com.apple.systempreferences AttentionPrefBundleIDs 0; killall Dock
A better way to rid yourself of it is by replacing System Preferences in the Dock with an alias to the app instead.
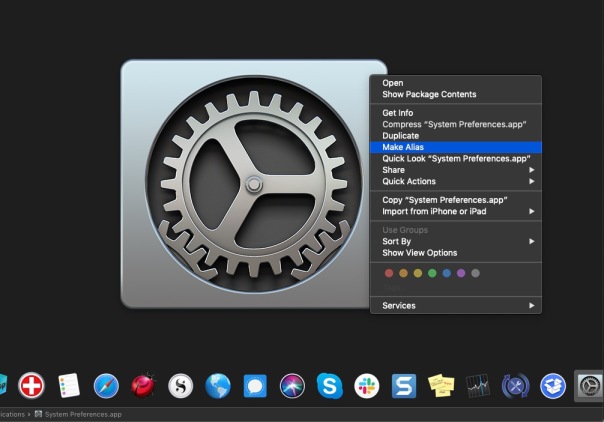
In the Finder, navigate to the /Applications folder, right-click on System Preferences and choose ‘Make Alias’. Now add the alias to the Dock by dragging it from the Finder into place on the Dock. Remove the original System Preferences Dock icon by dragging it from the Dock to the centre of your screen.

Gotchas and How to Undo
The main gotcha with this one is that you won’t see the update badge for other updates that may be relevant to your current install, so you’re going to need to develop the habit of making a regular check. A weekly or fortnightly Reminder or Calendar alert could be useful here. While that might seem like you’re replacing one notification with another, at least it would be one that will leave you in peace during whatever interval you set between reminders.
Undoing the workaround is as simple as removing the alias from the Dock and replacing it with the original. Of course, if you’re done with the alias don’t forget to delete it from the Applications folder, too.
If you happened to try the defaults workaround, the way to reverse that is with the same command but replacing the 0 with a 1.
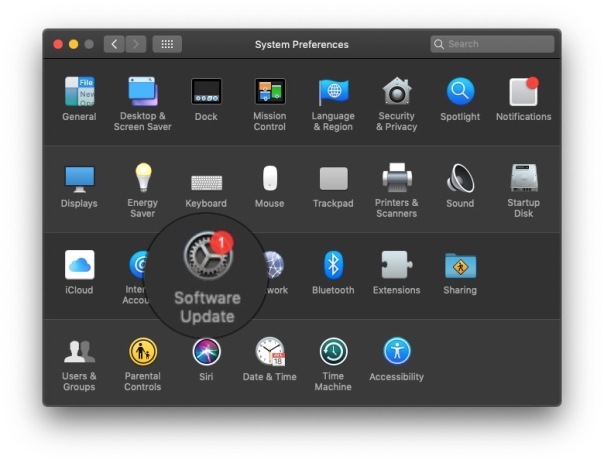
3. Removing the Badge Icon in System Preferences Pane
This is the trickiest one, as in fact there is no way to keep the icon in the pane without the badge. What we can do, however, is hide the icon entirely. That doesn’t mean we lose access to Software Update, however, as I’ll explain below.
To hide the icon, go to the View menu and choose “Customise”.

Unclick the checkbox next to “Software Update” and click “Done” at the top. You’ll now see that the Software Update icon is no longer shown.
In order to run a check for new software, just begin typing “software” in the search filter and click on either “Software Update” or “Check for Software Updates”. Alternatively, you can go to System Preferences’ View menu at the top of the screen and choose ‘Software Update’ from the menu list.

Gotchas and How to Undo
The main “gotcha” here is that you might easily forget that you’ve hidden the pane and might also forget to check for updates. As always, it’s a good idea to have “Check for updates automatically” turned on with security updates set to install to avoid missing out on any important security and bug fixes.
To reverse, just go back to the Customise option in the View menu, and re-enable the checkbox.
Conclusion
If after reading all that you’re thinking: “my word, what a pallava, I’m not sure I’ll bother!” you may well be thinking exactly what Apple want you to think. Of course, Apple are heavily invested in ensuring users move up to the latest version of macOS as soon as possible, and the difficulty of avoiding that and the “nags” and nuisance badges is not accidental. Whether you decide to go along with Apple or hold out for your own reasons is entirely your choice, but the irritation or inconvenience you might experience with going with the latter option isn’t something Apple are going to lose sleep over, I’m afraid!
Enjoy! 
Deciphering the searchpartyd macOS process and its impacts
The searchpartyd process in macOS is an integral part of Apple’s innovative location tracking system, introduced with macOS 10.15 Catalina, iOS 13, and iPadOS 13.1. This daemon is a cornerstone of the Find My service, enabling users to locate their devices, even when offline. Understanding searchpartyd, its functionality, and addressing common issues like high CPU usage is crucial for macOS users.
The Integral role and functionality of searchpartyd
At its core, searchpartyd serves as a major daemon within the Offline Finding (OF) system of the Find My app. Its primary function is to generate the necessary cryptographic keys and perform all related cryptographic operations. This process is vital for synchronizing keys, sending location reports as a finder device, and obtaining location reports for devices owned by the user.
When a device equipped with the Find My feature is lost, it emits Bluetooth Low Energy (BLE) signals containing a public key. These signals are picked up by finder devices, which then use the key to encrypt the location of the lost device and send this information back to Apple’s servers. The Find My app accesses these reports to help users locate their missing devices.
The dual nature of searchpartyd process
Although the authentic searchpartyd process is an integral component of macOS’s security and geolocation functionalities, it is crucial for users to remain vigilant against potentially intrusive programs (PIPs) that could disguise themselves with analogous nomenclature. Such deceptive applications have the capability to alter web browser configurations, leading to unwarranted redirects and the proliferation of diverse forms of online advertisements. This activity not only disrupts user experience but also contributes to a noticeable reduction in the Mac’s operational efficiency.
Addressing high CPU usage and management concerns
A frequently reported issue among macOS users is the high CPU usage associated with searchpartyd. This can lead to problems like overheating and rapid battery depletion. Despite some misconceptions, searchpartyd is not a form of malware or virus but an authentic and essential part of macOS. However, users have limited control over this process due to its protected status within the operating system. Tools like EtreCheck are invaluable in identifying applications that may be causing excessive CPU usage by searchpartyd.

exploring sshd-keygen-wrapper on Mac
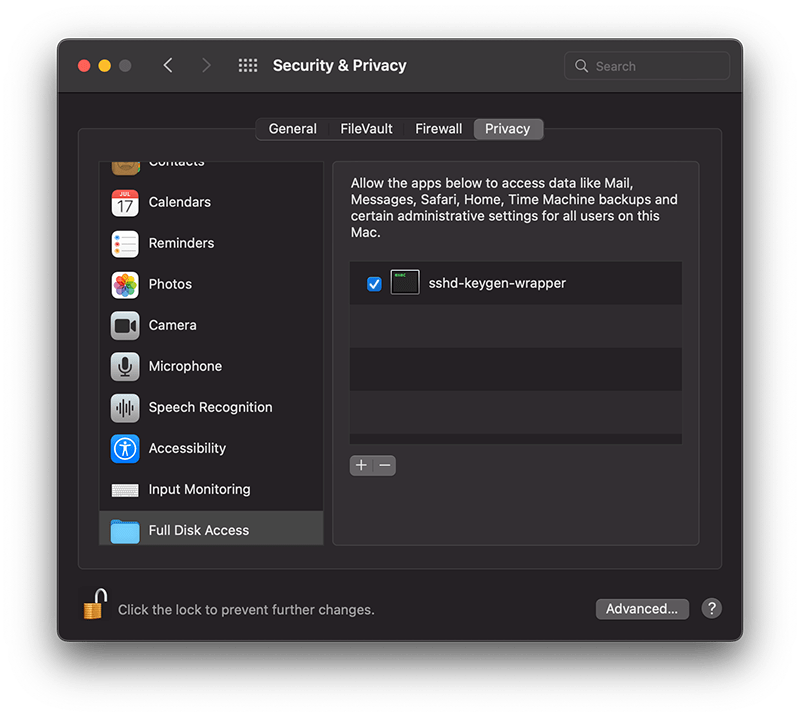
The sshd-keygen-wrapper tool, located within macOS Privacy settings, has garnered attention from users, particularly when they discover it in the Full Disk Access section of their Privacy preferences. While its presence might be disconcerting to some, a deeper understanding of its purpose and functionality can dispel any concerns.
The inclusion of sshd-keygen-wrapper in the Full Disk Access section can be perplexing. Some users may interpret it as an indication of a security compromise or malware. However, the reality is that sshd-keygen-wrapper is an integral component of macOS, functioning as an SSH secure shell key generator. Its primary role is to facilitate users in enabling or disabling remote access to their Mac via the Secure Shell Protocol (SSH).
The visibility of sshd-keygen-wrapper in Full Disk Access correlates with the Remote Login setting. Users who have never activated Remote Login will not encounter this tool. But for those who have, the tool will be present, albeit disabled by default, indicating that its access and permissions are inactive.
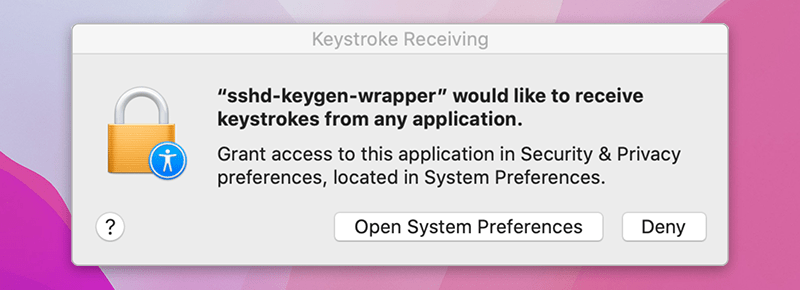
While navigating the Privacy settings on a Mac, users might come across a popup message stating, “‘sshd-keygen-wrapper’ would like to receive keystrokes from any application.” This message can be particularly perplexing, leading to concerns about the tool’s intentions and whether it poses any security risks.
Is it malware?
A prevalent misconception is associating sshd-keygen-wrapper with malware or unwanted software. Contrary to this belief, the tool is an authentic part of macOS and poses no malicious intent. Its placement in the Full Disk Access section is inherently tied to the SSH remote access feature. Activating SSH remote access from System Preferences ensures the association of sshd-keygen-wrapper, which then guarantees the generation of secure SSH shell keys for remote connections.
Should sshd-keygen-wrapper be granted Full Disk Access?
A frequently posed question revolves around whether sshd-keygen-wrapper should receive full disk access. Users contemplating remote access to their Mac via SSH might consider this option. By granting Full Disk Access to sshd-keygen-wrapper, macOS inherently extends the same privilege to SSH. As a result, any individual accessing the Mac through SSH can access all data, encompassing emails, messages, and files. The choice to activate this feature should stem from individual security assessments and requirements.
21 macOS & iOS Twitter Accounts You Should Be Following

With Apple’s signature developer event WWDC 2019 just around the corner, it’s a good time to think about your Apple-related Twitter feeds from an IT and security-related perspective. Are you keeping up with all the news that Apple want you to know about and (maybe!) some they don’t, like bugs, vulnerabilities and exploits?
In this post, we offer a curated list of all the best macOS and iOS related Twitter accounts to make sure you don’t miss a thing.
how to remove MyCouponsmart on macOS

The adware plague on macOS continues, and if you’re one of the thousands that have caught something unwanted when you downloaded some other program, this post should help. I’ll explain what MyCouponsmart is, what it does, and how you can remove it, either yourself or with a simple and free shareware program I develop.
What is MyCouponsmart?
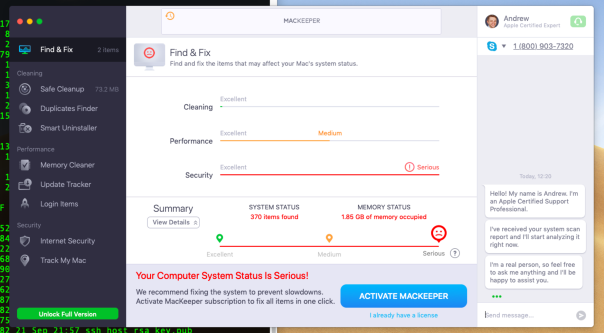
Like MyCouponize, TotalAdviseSearch, DigitalChannel Search and many others, MyCouponsmart is one of a host of “search offer” programs that either redirect or inject your web browser with ads when you make an internet search. You may have been looking for some kind of media downloader or media player, like Adobe’s Flash, and inadvertently end up with a bunch of unwanted programs like MacKeeper, Mac Auto Fixer, Advanced Mac Cleaner or some other similarly named “performance” app.
Typically, these programs will take over your browser, showing scare pages like the following:
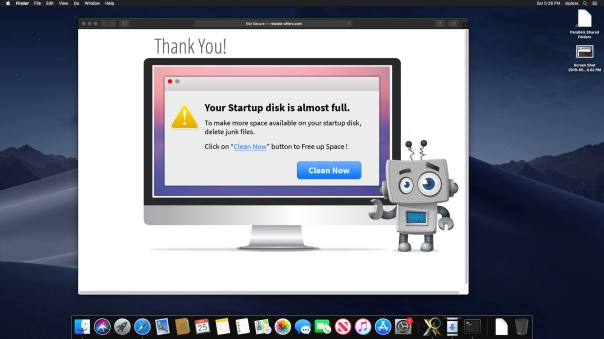
Hmm, it looks like my computer has got plenty of free space available, thank you very much!
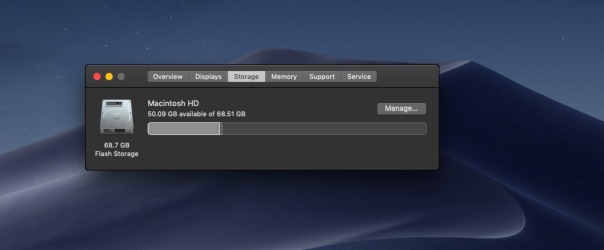
That’s no surprise, really. Webpages cannot tell you how much free space is on your local drive, nor can they scan your drive and “detect infections” as some other scare pages want users to believe.
All such warnings are entirely fake and tell you only that you have some kind of adware infection in your browser! The people behind the ads bank on the fact that many users do have full drives, so when they check they are fooled into believing the advertised product can help them.
Similarly, many users who see these kind of scare adverts offering fake Anti-virus software often do indeed have malware on their computer: the malware that’s causing the advert to appear!
Needless to say, none of these advertised programs are worth your money.
What does MyCouponsmart do?
Let’s take a look inside your user Library. This is hidden by default, but you can get to it from the Finder’s “Go” menu. Click on the Finder then use the keyboard combination
Command-Shift-G
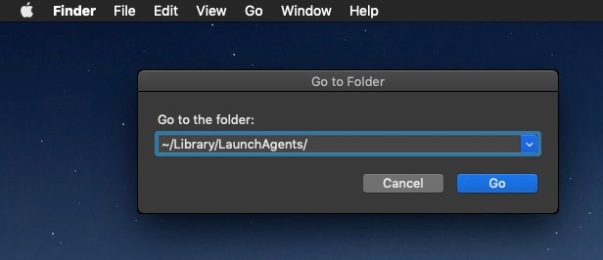
Type in, or copy and paste, the following, and be sure not to miss that tilde ~ at the beginning, or you’ll end up in a different place:
~/Library/LaunchAgents
This is the LaunchAgents folder. There’s actually more than one, but the one in your own user account is the one we’re interested in. The LaunchAgents folder is responsible for ensuring certain things launch, as the name implies, every time you login. This is achieved by executing files called “property lists” or plist for short.
Property lists are really useful, and are meant as an aid so that you don’t have to keep starting up lots of processes manually every time you log into your account. They can also be used to make sure that a process stays alive all the time that you’re logged in. Great for things that you want to happen, but bad if you have got some adware or malware that you’re trying to get rid of.
If MyCouponsmart is installed on your Mac, you should find it has installed a property list in the LaunchAgents folder to ensure that it’s always running. Before getting rid of this, let’s just take a look at it. You don’t need to open it in an editor, just select the file by clicking it once and then pressing the spacebar to allow QuickView to show you the contents.
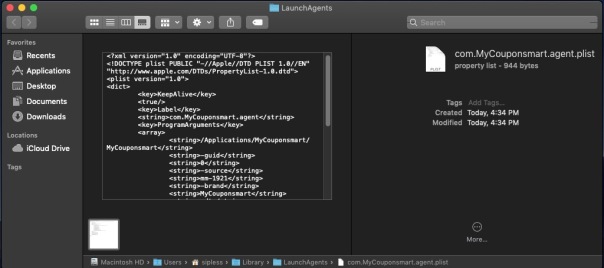
Notice that first ProgramArgument? It points to a folder within your /Applications folder, also named MyCouponsmart, and then to something else with the same name inside that folder, too. Let’s go take a look at what they are.
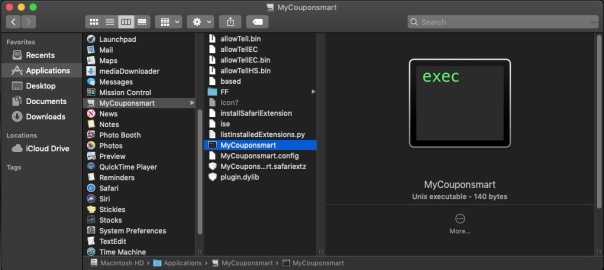
If you want to play along, open the Terminal, type the word file then drag the MyCouponsmart executable into the Terminal window. Press ‘return’.
The file command reveals that the MyCouponsmart file is actually a bash script, and if we take a look at its contents with the cat command, you can see that the script is itself meant to launch another executable called mmLaunchMe located in the hidden /tmp/ folder. Let’s see if this executable has a valid code signature.
codesign -d -v /tmp/mmLaunchMe
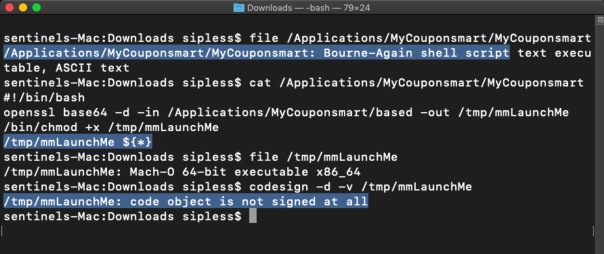
No, indeed it doesn’t, but as I’ve written about before, that won’t stop the code from running, regardless of what Gatekeeper settings you use. The purpose of this executable is to run every time you login, and download more software that you didn’t specifically ask for in the background. It’ll keep on doing this every time you login until you remove it. Of course, by then you’ll have lots of unwanted programs to remove, too.
How do I remove MyCouponsmart?
The main thing to do to remove MyCouponsmart is to delete the property list and restart your computer. After that, you’ll need to search and find all the components it’s installed. If you like playing around in the Terminal, I have a post here on how to do that.
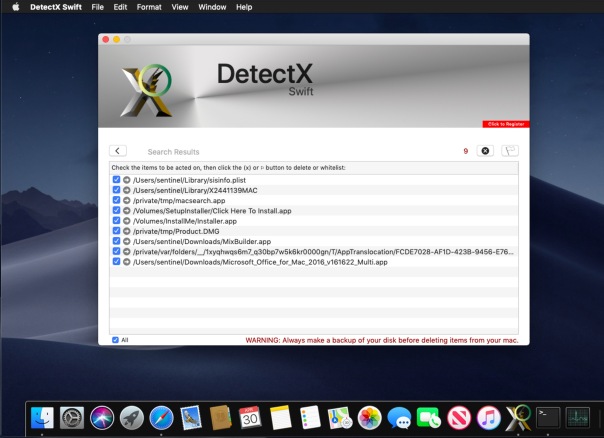
Alternatively, you can use the shareware app I created, DetectX Swift, which will remove the property list and all the other components for you.

Notice from the Activity Log that DetectX also automatically kills background processes belonging to the adware as well as removing the files. Nevertheless, you should always restart your Mac after removing these kinds of files to ensure you have purged everything from running memory.
You can use DetectX Swift to remove MyCouponsmart and similar adware without registering or paying any fee. In fact, I encourage you NOT to register DetectX Swift until after you’ve used the app a few times and feel you want to support the continued existence of shareware apps like this. Payment is not at all required: nobody should have to pay just to remove junkware from their Mac!
If you have any questions about removing MyCouponsmart or about using DetectX Swift, feel free to share them in the comments below.
Picture Credits: Anaya Katlego
adware extensions erode trust in Apple, Google app stores
Browser extensions are a staple of almost every user’s set up. Even in managed environments, users are often able to install extensions or ‘Add Ons’ without authorisation when these are sourced from trusted sources like Apple’s Safari Extensions Gallery and Google’s Chrome store. Of course, there’s nothing new about attackers exploiting the browser extension as a means to gaining a foothold in a target environment. The problem has been around for years: what is surprising is just how difficult it is to contain the problem. In this post, I take a look at the risks involved with what appears to be a harmless extension available for both Safari and Chrome. As we’ll find out, not everything appears as it seems.
Lazarus APT targets Mac users

Last month, researchers at Kaspersky reported on a Lazarus APT campaign targeting both macOS and Windows users involved in the financial sector, particularly those using cryptocurrency exchanges. The Lazarus group, also known as Hidden Cobra, have been operating since at least 2009 and were most notoriously blamed for the 2014 hack on Sony.
let’s bury the myth of the safe Mac

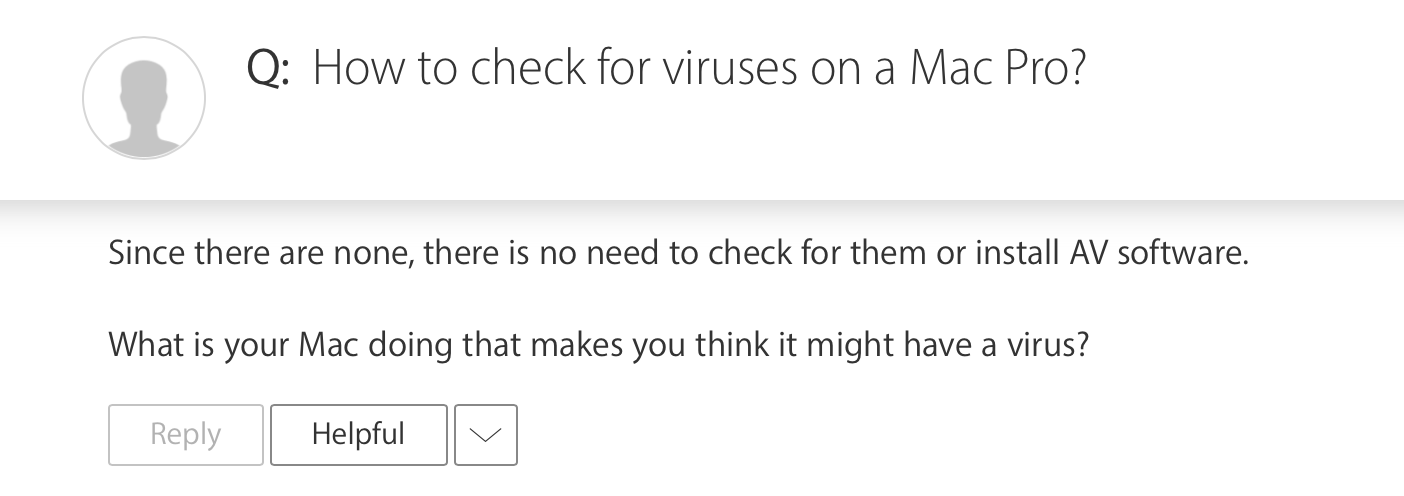
Do Macs get malware? Can my Mac get infected by a virus? Do I need AV software for my Mac? These are questions I hear a lot, but the answers that come from many so-called Apple Mac gurus are often wrong or misleading.
In this post, we’ll take a look at some of the reasons why people think Macs are safe from malware and the confusions that are often bandied around concerning “AV” (“anti virus software”), “viruses” and genuine malware. Then we’ll look at the actual security situation on macOS and make some suggestions as to how you can stay safe without turning yourself into a paranoid security conspiracist or downloading useless software that just eats up your system resources while providing no real protection.
“It’s All Security Theatre” theatrics
There’s an unfortunate and dangerous misconception perpetrated by certain people in the macOS community. These people variously claim that there is no malware threat to Macs, or if there is then Macs are immune from it, and no matter what the case, Macs are inherently safer than other kinds of computer, specifically Windows computers.
The purveyors of such arguments typically make a big deal of trying to undermine any argument that security is an issue on macOS by claiming that malware on Macs is all a myth made up by AV vendors to drum up business for their own products. In many Mac user forums, people worried about hacking and malware are often treated to dismissive replies of this sort:
“you are at much greater risk from a concussion due to a fish falling from the sky. The Mac AV industry and security researchers have worked very hard to make you believe this is something to be afraid of.”
The claim that emanates from such people often begins with “there are no known viruses for macOS” and, therefore, you don’t need anti-virus software. This is a laughable confusion of terminology.
AV software is inappropriately named. There actually aren’t any known viruses on macOS, it’s true (these days, there are very few for Windows either and most AV software isn’t primarily looking for them). That’s because viruses are a specific kind of threat that went out of fashion long ago. Viruses were the product of vandals; the modern security threats facing macOS users are the products of profiteers. It’s a different ball game.
These days, criminals are more interested in pushing macOS adware, backdoors, keyloggers, RATS, trojans and spyware. Ransomware has also been known on the platform, though thankfully to date that’s an isolated incident.
The conspiracy theorists like to point out that security vendors have a vested interest in making people fearful. It’s rather like saying insurance companies or law enforcement have an interest in higher crime rates. I’m all for healthy cynicism. The reality is that there are, indeed, commercial interests involved in fighting malware just as there are in fighting other kinds of crime. And where there’s commerce, you’ll also find cheats and unscrupulous dealers. There are plenty of dodgy AV products around; some are even on the Apple App Store. Some of those proclaiming that the security industry is all fraud are pushing their own software as an alternative. Unscrupulous, indeed.
Be wary of any software that offers to “find” threats but then insists you pay up in order to remove them or which tries to lock you in after minimal use where you cannot fully determine the value of the offering.
However, unlike the one shown above and others like it, there are genuine security products out there developed by genuinely-good people serving the community.
But the real point is that the existence of commercial interests in the anti-malware industry is, on its own, no more an indicator of duplicity than it is in any other industry. While amplification of threat intelligence through news stories, tweets and other social media serves the security industry just as amplification of relevant issues serves any business sector, to claim that all vendors are unscrupulous or that the threat is entirely fictional is disingenuous and worse, it’s dangerous.
As we’ll see below, the threats are real, but the conspiracy theorists threaten to lead macOS users into a false sense of security.
Burying the Myth of the Safe Mac
It’s not just the conspiracy theorists you have to watch out for. It’s also the “wisdom of the wise”. Far and wide, you’ll hear Mac gurus arguing from their own personal experience that, since they’ve never encountered macOS malware and they’ve been using the platform for x, y, z amount of years, there are, consequently, no malware threats to macOS and that it’s inherently safer than other platforms.
The logical fallacy in that should be clear. Arguing from a sample of one to a conclusion for all is just bad thinking. It also should perhaps come as no surprise if a “power user” hasn’t come across threats to their own Mac. They typically have limited and specialised interests that don’t take them to many of the far corners of the internet. Power users also tend to write scripts or even their own software to do things on their Mac, whereas other users would instead go looking for a tool to download from adware-infested mass distribution sites, torrent sites and who-knows-where, with all the risks that that involves.
When the self-professed gurus tell you they have never encountered a security issue on a Mac, they aren’t testifying to the safety of the platform; they are in fact revealing only that they know nothing about macOS security.
Will Gatekeeper Protect You From Malware?
Some people are more realistic and acknowledge the existence of the threat, just as Apple themselves have done by building anti-malware protections into macOS itself, namely, Gatekeeper, XProtect and MRT (Malware Removal Tool).
Because Apple have taken these measures and have been pretty vocal in their marketing about it, too, many think that Apple’s built-in security technologies will keep them safe. Here’s a typical example of this kind of thinking, where a forum poster suggests Apple may not be sharing information about malware threats because they can just kill them by revoking the malware developer’s code signature.

Of course, there is no such setting as “Run only signed apps”, but seasoned Mac users would understand that the poster is referring to Gatekeeper, which is the first check the system makes on application code signatures.
Unfortunately, the poster is just flat-out wrong. Even when set to App-Store only, it’s a simple matter for even a standard user to run apps with invalid signatures or no codesigning at all. Both Gatekeeper and XProtect are easily bypassed. Not only can standard users override Gatekeeper’s “App Store only” settings, so can other processes. None of this needs admin privileges. As for Apple’s Malware Removal Tool, it is useful to the extent of its signature database, but it has the major limitation that it only runs when you reboot your Mac.
Malware Campaigns That Target macOS Users
A typical day for me hunting macOS threats on VirusTotal looks something like this, with several hundred new samples to inspect:

So, yes, macOS malware is a thing and it’s out there. From nation state actors to sneaky hackers on Discord, if you’re using a Mac to interact widely with other people, visit websites, read email – in other words, doing the things that make your Mac useful – then there is a non-negligible chance of you encountering someone trying to infect your Mac.
In 2018 alone, we saw the emergence of malware families such as OSX.MaMi, CrossRAT, OSX.AppleJeus, WindTail, OSX.Dummy, CoinTicker, OSX.DarthMiner and OSX.LamePyre. On top of that, we’ve seen the appearance of a number of adware installers acting as trojans for cryptominers, such as PPMiner, CreativeUpdate and SearchPageInstaller. Old favourites like OSX.Fruitfly remain viable threats that can be repurposed by other actors as neither XProtect nor Gatekeeper is equipped to tackle script-based and fileless attacks.
Adware and PPI (pay-per-install) PUPs (potentially unwanted programs) like MacKeeper and Advanced Mac Cleaner, MyShopcoupon, Yahoo and Bing redirect virus are rampant. Adware in general is an increasing concern as we see adware developers expand their range of techniques and begin to cross the line into malware-like behaviour. Browser extensions are still a widely unappreciated threat, built-in browser anti-phishing protections are easily defeated, and if you haven’t had a phishing email in your Inbox then you are likely one of an increasingly diminishing global minority.
Finally, let’s note that for criminal types, it’s never been easier to get into the macOS malware business with the proliferation of dedicated exploit kits like empyre, EvilOSX, Pupy, Bella, EggShell and others.
How To Stay Safe on macOS
The evidence provided above is conclusive: the threats are real, so don’t let anyone try to kid you otherwise.
That said, the most widespread, “in the wild” problems affecting Macs today come from adware and PUPs. It might not be the end-of-the-world if your Mac gets infected with some nuisance adware and scam virus alerts keep popping up in your browser, but neither is it a particularly pleasant experience that you should have to put up with.
Fortunately, dealing with them is fairly straightforward, so let common-sense prevail. Most home users don’t need the expense or resource-impact of a full-on AV Suite. Reboot your Mac often to take advantage of what protection the built-in MRT tool offers, and use a lightweight, troubleshooting tool like my DetectX Swift to help diagnose and remove problems if your Mac starts behaving oddly.
While the technically-proficient may be able to deal with a lot of adware from the Terminal, DetectX is light enough to be run on a regular or scheduled basis (like after you install any new software) and can look for and remove adware, malware, keyloggers and more.
You can use DetectX Swift indefinitely and without paying a cent. It won’t burden your finances with a monthly subscription bill or demand that you pay money to remove suspicious or unwanted files, or insist that you pay up after a few uses. While there is an optional registration for home use which also provides a few bonus features, it’s not necessary to register in order to use the app’s core functionality. You can even script it with AppleScript and enjoy almost all the troubleshooting functions it offers as an unregistered, unpaid user. I also offer free, personal triage to both registered and unregistered users if you have an issue that DetectX does not resolve.
If you have a fleet of Macs in an organisational setting you might want to consider the low-cost, DetectX Swift Management license in order to access the command line search tool and integrate with platforms like Jamf or Munki. For more in-depth coverage and cross-platform support, enterprises should look at next-gen AV software that uses behavioural AI like SentinelOne.
Picture Credit: Bing
how to reverse malware on macOS
Resources for learning malware analysis and reverse engineering abound for the Windows platform and PE files, but by comparison there’s very little literature or tutorials for those who want to learn specifically about how to reverse macOS malware and macOS malware analysis techniques.
In this series of posts, you’ll take a sample file and use native tools and techniques to understand what a file does and to build a list of IoCs (Indicators of Compromise) that can be used in detection.

As there’s a lot of ground to cover, the tutorial is split over several parts. In Part 1, you’ll learn how to set up a safe environment to test malware on macOS. You’ll install all the tools you need (bonus: doesn’t cost a cent!) and learn where you can source samples of macOS malware from. You’ll examine an application bundle and its contents to understand how it works and find an interesting encrypted text file. In Part 2, you’ll learn the fundamentals of static analysis of Mach-O binaries, the native executable file type for macOS. In Part 3, you’ll use dynamic analysis techniques to execute a malware file in a controlled manner and read code from memory.
If you have ever wanted to learn how to reverse malware on macOS, this is the place to start! Continue reading…
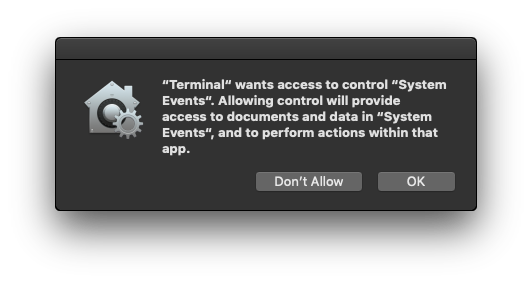
Mojave: not authorized to send Apple events
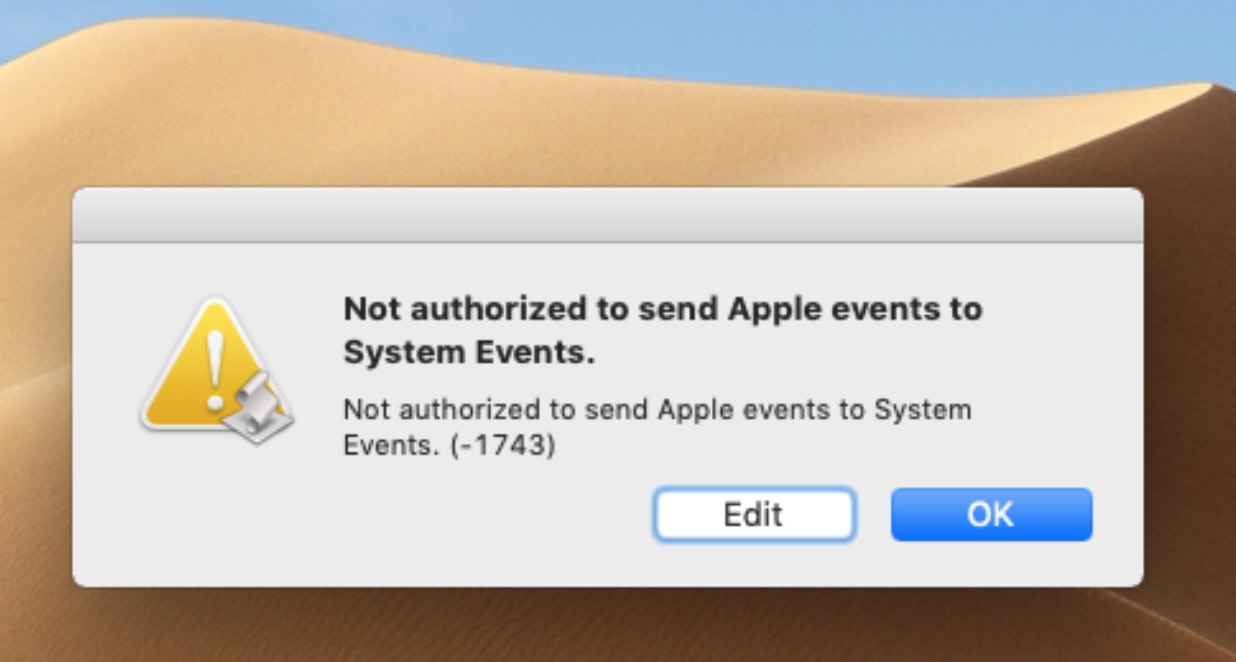
If you’re suffering from error messages like the one above after upgrading to Mojave, welcome to macOS’s new “User Data Protections”. In this post we’ll explain what they are and how to deal with them.
That error’s produced when the app your script is targeting (in this example, System Events) has been denied access to one of the areas now protected in Mojave.
Here’s the list of places which are no longer accessible programmatically without user approval on 10.14:

If the app you’re targeting in your script – or the script runner itself – is trying to access any of those 12 locations, you’ll likely either get the error shown at the top of this post, or some other failure.
The official way of dealing with this is to add the application to System Preferences’ new ‘Full Disk Access’ section in the Privacy pane:

At least that’s the theory, but you might find that you’ve tried that and things are still not working. If that happens, you can “start over from scratch” by resetting the access permissions to default.
In Terminal, try
tccutil reset AppleEvents; tccutil reset SystemPolicyAllFiles
After you’ve done that, the next time you run that script you should get an authorization dialog like this:
Alternatively, just go right ahead and add the app with the ‘+’ button in System Preferences.
Enjoy the resumption of normal service

