Category Archives: AppleScript
365SportTV window position

applehelpwriter.com
The 365SportTV app for Mac leaves a great deal to be desired. As anyone who’s used it has no doubt discovered, basic functionality is missing. Whoever knocked up the Mac version of the app for them has clearly never used Xcode before…
Of the many frustrations with this app, the only one I’ve been able to solve without completely re-writing it (365SportTV people: I’d be happy to give you a kind price…;) ) is moving the position of the window. That’s good because it is particularly annoying if you’re watching it on a large external monitor and the image is stuck where it doesn’t make best use of your screen.
Of the many frustrations with this app, the only one I’ve been able to solve without completely re-writing it (365SportTV people: I’d be happy to give you a kind price…;) ) is moving the position of the window. That’s good because it is particularly annoying if you’re watching it on a large external monitor and the image is stuck where it doesn’t make best use of your screen.
To move the window, launch the AppleScript Editor (just type Apples in Spotlight or Launchpad) and paste in the following code:
tell application "System Events"
tell application process "365SportTV"
activate
set position of front window to {100, 50}
end tell
end tell
Fire up 365SportTV app, get your match going and then switch back to AS and click the green ‘Run’ button.
You can play with those two numbers near the end to suit your own screen. The first number is the number of pixels from the left, the second number is the number of pixels from the top.
Hope this helps. 🙂
Related Posts:
getting to grips with AppleScript
FastTasks – free utility from Applehelpwriter
get computer’s local & external IP address

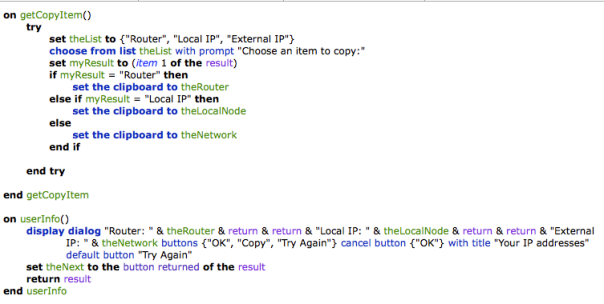
Here’s an AppleScript you can save as a service that will show your router’s IP, your local network node and your external IP, if connected. Save it as a service and you can assign it a nice little hotkey. Pressing the ‘Copy’ button will display a menu that lets you choose which IP address you want to copy to the clipboard. If the connection request returns a timeout, hit the ‘Try Again’ button (or check your connection… 😉 ).
Tip: If you’re not familiar with using AppleScript yet, see my intro getting to grips with AppleScript for a guide to the basics! If AppleScript’s not your thing at all, download my free app FastTasks that will show you all your IP addresses and a whole lot more too!
🙂
Copy the entire code from Pastebin
Related Posts:
FastTasks – download the free utility app from Applehelpwriter
move selection

It should be a simple thing to select a few files and sling them into your chosen folder. But OS X requires that you have to first open a Finder window, select the destination, then go all the way back to the location of the files you want to move and drag them in.
Wouldn’t it be much simpler if you could just select the files you want to move first, then choose the location without all the kerfuffle? Sure it would!
🙂
If you agree, then this is the script for you. I use it to move screenshots (of which I take a lot) from the Desktop to whatever location I want to store them in with a simple hotkey command (set up in Services or via FastScripts), control-command-M (‘M’ for move, of course!).
--start
tell application "Finder"
try
get selection
if selection is not equal to {} then
move selection to (choose folder)
else
display dialog "Nothing selected to move!" buttons {"OK"} default button "OK" with icon 2
end if
on error
set selection to {}
end try
end tell
--eof
🙂
Featured Picture: cul-de-sac by ~MichalTokarczuk
how to log time spent using apps

If you are looking for a way to log how long a user (such as yourself!) is spending time in a given app, or to collect data on your pattern of work over time, this little script should do the trick.
Update: I’ve recently written a Cocoa-app that includes this function. Take a look at OSXClock here. 🙂
It will create and keep a running log file (called ‘log.txt’) on your Desktop indicating which apps have been in focus on your machine and for how long each time. This could be ideal if you want to keep track of how long you spend working on a particular project either for billing a client or just for checking your own productivity.
How to use:
Open AppleScript Editor and paste the text below into the Editor window. Click the ‘run’ button. When you’ve had enough click the ‘stop’ button. It would be possible to automate running and stopping this, but I’ll leave that for the comments or maybe a later post.
*Note: be sure to click out of the app you’re using and activate Finder before you put the machine to sleep, otherwise the log will include the sleep time in the app’s duration
--start of script
set front_app to (path to frontmost application as text)
set _start to current date
repeat
delay 5
set current_app to (path to frontmost application as text)
if current_app is not equal to front_app then
set _stop to current date
do shell script "echo " & front_app & " was active from " & _start & " until " & _stop & " >> ~/Desktop/log.txt"
set front_app to current_app
set _start to current date
end if
end repeat
--end of script
Example log:
You will see the log looks something like this:
Seagate DP1:Applications:Utilities:AppleScript Editor.app: was active from Monday, 17 June 2013 17:20:30 until Monday, 17 June 2013 17:20:35
Seagate DP1:Applications:Adobe InDesign CS6:Adobe InDesign CS6.app: was active from Monday, 17 June 2013 17:20:35 until Monday, 17 June 2013 17:21:15
Seagate DP1:Applications:TextWrangler.app: was active from Monday, 17 June 2013 17:21:15 until Monday, 17 June 2013 17:21:25
Seagate DP1:Applications:Adobe InDesign CS6:Adobe InDesign CS6.app: was active from Monday, 17 June 2013 17:21:25 until Monday, 17 June 2013 17:24:46
Seagate DP1:Applications:TextEdit.app: was active from Monday, 17 June 2013 17:24:46 until Monday, 17 June 2013 17:26:26
Seagate DP1:Applications:Safari.app: was active from Monday, 17 June 2013 17:26:26 until Monday, 17 June 2013 17:45:03
Seagate DP1:Applications:Adobe InDesign CS6:Adobe InDesign CS6.app: was active from Monday, 17 June 2013 17:45:03 until Monday, 17 June 2013 17:46:03
Seagate DP1:Applications:TextEdit.app: was active from Monday, 17 June 2013 17:46:03 until Monday, 17 June 2013 17:46:13
On subsequent runs, you can keep the same log (the script will continue to add to the log on each run) or roll it over by renaming the log.txt on the Desktop and saving it off to somewhere else. If you rename or move the log.txt, then the next time you run the script, it will create a fresh log.txt on your Desktop automatically.
🙂
Featured picture: My Work Desk by ~RianGonzales
how to paste with no formatting
If you find it annoying that in Pages and other Apple apps, there’s no easy way to remove rich text formatting when you copy and paste from websites and other rich text sources, this could be just the tip for you.
The video begins with a demonstration and then shows you how to create the shortcut shown. If you don’t see captions at the bottom of the video, be sure to press the ‘CC’ button in the YouTube video controller bar at the bottom of the screen.
The procedure is fairly straightforward:
1. Open Automator.app and create a new service by clicking on the gear/cog.
2. Change the ‘Service receives’ menu to ‘no input’.
3. Type ‘Apples’ in the Action filter bar, and drag a ‘Run AppleScript’ action into the main pane.
4. Clear the default text, and copy/paste this into the window:
set the clipboard to «class ktxt» of ((the clipboard as text) as record)
5. Click the hammer icon to compile the code, and then ‘command-S’ to save it (you don’t need to choose a save location).
6. The service will now appear in your Services menu (eg. Pages > Services > plainTxt).
Whenever you copy some formatted text, just click on the plainTxt item in the Services menu before you paste, and you’ll get plain text instead.
7. Follow the second half of the video if you want to make a global shortcut.
Enjoy! 🙂
search Safari Reading List

This is something I’ve been thinking about for a while. I have a pretty long Reading List and Spotlight often fails to find things in it. For that reason I came up with this little script which you might find useful.
1. Open up Automator by typing auto in Spotlight.
2. Click on ‘Service’ (the big cog wheel) and then ‘Choose’.

3. Change the Service receives option to “No input” from the dropdown menu.
4. In the small filter bar to the left, type ‘run app’. You should see an action called ‘Run AppleScript’ in the second column. Drag it to the big pane on the right.

5. Select all the purple text inside the window and delete it. You don’t need any of it.
6. Command click on the image below, and copy the code from the pastebin page that opens up in another Safari tab. Paste the code into the Automator pane.

7. Hit ‘Command-S’ and give it a name like ‘Search Safari Reading List’. Click ‘Save’ (note: you do not specify a location for the save as it will automatically be saved in your ~/Library/Services folder).
8. Now click on the main menu for any app and have a look in the Services submenu. You should see your new service there (to add the keyboard shortcut, see Step 10 below).

9. Test it to make sure it works as expected. You should end up with something that looks like this:

10. If you want to assign a universal shortcut key like mine in the screenshot from Step 8, do so by going to > System Preferences > Keyboard > Keyboard shortcuts. Look in Services for the name you gave it and add the shortcut by clicking in the empty space to the far right of the name.

A note on usage:
The reading list is really just a list of special bookmarks, with one difference: they contain short snippets or previews from each page. This has an impact on the way my script works in the following way: if the search string is in the preview snippet but isn’t in the URL, you’ll get back the line from the snippet but you won’t get the URL. It might be possible to code round that, but I haven’t had time to figure it out yet. If that’s a feature you want, send me a nag mail and I’ll put it on my list of things to do! ;). Otherwise it appears to function quite well as a workaround for the lack of a proper search facility.
eject all your disks at once

Here’s a simple AppleScript one-liner that can be useful if, like me, you have several disks connected to your laptop at home or the office and you need to get up and go quickly.
1. Open the AppleScript Editor.app by typing Apples in the Spotlight search bar and hitting ‘return’.
2. Copy the following code into the editor window:

3. Hit ‘Command-K’ to compile and ensure you didn’t make any mistakes. Fix any typos if it doesn’t compile and try again. Save the script to your Desktop as ‘EjectAll.scpt’

4. If you don’t already have the Scripts menubar icon visible in your menu bar, hit ‘command ,’ (that’s the Command key and the comma key) and check the ‘Show Script menu in menu bar’ item in the General pane of AppleScript’s Preferences window.
5. From the Scripts menu, choose ‘Open Scripts Folder > Open Computer Scripts Folder’ and drag ‘EjectAll.scpt’ from the Desktop to the Computer Scripts Folder. You’ll need to authenticate with an Admin password to complete the move.
And that’s it. Now whenever you want to eject every disk with one simple operation, just hit the Script menu icon and click on ‘EjectAll’. 🙂
how to merge PDF files in OS X

How to merge PDFs into one file is something I have frequently been asked ever since Preview 6 made combining and saving PDFs a little more torturous than it needs to be (see here for the gory details). There are also various little apps that you can buy that will do this for you, but this is the kind of functionality I was talking about here that you can easily do for yourself with a bit of AppleScript magic.
Open up the AppleScript Editor by clicking on the Spotlight icon and typing Apples. Click on the AppleScript code below and copy the code from the pastebin page that opens up:

Paste the copied code into the AppleScript Editor, hit ‘Compile’ in the toolbar (or press ‘Command-K’) and save as either a .scrpt file or .app as I described in getting to grips with AppleScript.
Click on the script or app and enjoy merging those files to your hearts content (and for free)! 🙂
Featured picture: sliver by *ether
getting to grips with AppleScript

Learning AppleScript is probably the second most productive thing you can do (the first is learning the Terminal) to improve your Mac experience. You know all those utilities that you see in the Mac App Store, on MacUpdate and so on, with developers charging anything from 99 cents to $20? Well, many of those are just doing simple jobs that you can actually script yourself for free with a little learning of OS X’s unique scripting language (and, indeed, some of those apps have been built in exactly this way).
To keep this post short and practical, I’m going to leave aside the wider discussion of what AppleScript is (and isn’t), what it can (and can’t) do and all manner of other interesting but theoretical things, and instead give you a taste of what you can do with it. I’ll give you some references at the end where you can find out more and learn everything you need.
Let’s get straight to it. Open up the AppleScript Editor by opening the Spotlight search bar and typing Apples. Hit ‘return’ and you’ll be faced with a new editor window. Let’s type something in it.
tell application "Finder"
display dialog "What's your name?" default answer "" with icon note
set myName to the text returned of the result
delay 0.5
display dialog "Hi there, " & myName & "! Welcome to AppleScript!" with icon note
end tell
You could just copy and paste this into the editor, but I’m going to recommend that you don’t. There’s a good reason to take the tedious route and type it in yourself. Like learning a human language, learning a computer language requires using it, and using it repetitively. As you type in the language, you’ll get a feel for its syntax that you won’t get if you just copy and paste. And, unlike a real human language, learning a computer language’s syntax is pretty much the whole battle of mastering it.
After you’ve finished typing, press ‘Command-K’ on the keyboard. If you typed everything correctly, you see the script change into a multi-colored jamboree, like this:

If you weren’t so lucky, examine what you typed against what’s on the page here. Part of the frustration of any computer language is rooting out typos! Eventually, you get a feel for it and start to learn where to look first, based on the error messages you see. For now, you’ll have to peck and hunt (if you get really fed up, you can always go the cut-and-paste route!).
Assuming you’ve got your script to compile, now it’s time to run it and see what it does. Hit ‘Command-R’ (you can of course use the icons in the toolbar for compiling and running, too) and you should get this:

So go ahead, type your name!
OK, you’re getting the idea. Let’s try something different. Press Control-N to open up a clean editor window and enter this:
say "What's your name?" using "Vicki"
display dialog "My name is " default answer ""
set myName to the text returned of the result
say "His name is " & myName using "Vicki"
say "Welcome to AppleScript, " & myName using "Alex"
As before, press ‘Command-K’ to compile and ‘Command-R’ to run.
As you can see (or hear!), you can even have your computer continue a dialogue (with or without you!) using OS X’s many voices.
It’s worth noting that this feature is extremely useful if you’re learning a foreign language.
The Voices options in System Preferences > Dictation & Speech | Text to Speech | System Voice include many optional voices that you can download that will speak foreign text. You can paste the target text into a dialog box (like the ones you just created), and then listen and practice your language skills as repetitively as you desire. For those wanting to learn Thai, for example, download the voice “Narisa”. You can paste Thai script from the web or from the Dictionary.app (if you have the Thai extension installed) into a dialog box and have “Narisa” say it in a very passable Thai accent. Great for learning!
One last one. How about your own screencapture program? Tired of remembering those shortcut keybindings, or having to fire up Preview or SnagIt for the occasional screen grab? Why not have your own app in the Dock that captures the screen with a single click? Here’s how:
Open a new editor window and enter this (in this case, you might want to copy and paste it, for reasons I’ll explain shortly):
do shell script "screencapture -x ~/Desktop/" & time string of (current date) & ".png"
Do the Command-K thing, but then this time do Command-S instead of Command-R. From the resulting save box, change the File Format near the bottom of the box from ‘Script’ to ‘Application’. Give it a fancy name (ScreenGrab, say?) and save it in your Applications folder.

Once that’s all done, go to your Apps folder, grab the ScreenGrab.app and drag it to the Dock. Clicking on it puts a timestamped screenshot on your Desktop. If you’ve got multiple spaces open, flip between them clicking the ScreenGrab app. That’s one easy way to get a record of your entire set up! Cool, huh? (Don’t forget you can easily change the icon in the Dock for something more to your taste, as I explain here. Also, if you don’t like the / delimiters in the file name, use this version for your app.)
That last little script demonstrates one of AppleScript’s most powerful features: the ability to run other scripts (and apps). The command in the last script (and the reason why I suggested you paste it) was actually a Bash shell command (aka Terminal command), and we know those are very easy to mistype! AppleScript can actually run the commands of many apps from within its own scripts, putting the power of those apps at your disposal (and that includes some apps you’re very likely familiar with, like Word and Excel).
I hope this short intro has given you a taste for exploring AppleScript and finding out more. It’s an incredibly powerful language that you can use to enormous advantage, and profit. In order to do that, you’ll need to go on a learning adventure, but I promise, the following sources will make that relatively painless!
If you’re absolutely brand new to AppleScript, then the must-have starter’s book is
Once you’ve got through that you’ll be able to pretty much teach yourself the rest, picking it up from sources like
Other references you should consult once you’re up and running are
and don’t forget Apple’s own free guide:
AppleScript Language Guide which you can also download as a PDF for offline use.
Finally, my Mac OS X Technologies User Tip contains some of the above links as well as others that may be of interest.
Happy scripting! 🙂
Featured picture: wall and paper stencil by -endlesshate
how to recover disappearing Notes

There appears to be a bug in Apple’s Notes.app in OS X 10.8 that sometimes causes notes to disappear. If you need to recover the text of any note that’s gone missing on your mac, try pasting this into Terminal.app. It’s all one line, so copy and paste it as a whole, then hit ‘return’:
cd ~/Library/Containers/com.apple.Notes/Data/Library/Notes; strings NotesV1.storedata | grep body | open -f
The resulting TextEdit window can be searched or scrolled through for your missing text.
Due to this problem, a lot of people are giving up using Notes.app altogether and switching to alternatives like Evernote or nvALT. However, if for some reason you either want or need to keep using Notes, you might try saving that command above as its own little App that you can keep in the Dock (beats having to dig out or remember the Terminal code all the time).
To do so, we’re going to use the Applescript Editor. It lives in the /Applications/Utilities folder, but you can access it simply by clicking on Spotlight and typing Apples.
With the Editor open, paste this into the window (note, this is slightly different from the command above, as we have to tell AppleScript how to use the code):
do shell script "cd ~/Library/Containers/com.apple.Notes/Data/Library/Notes; strings NotesV1.storedata | grep body | open -f"
Press ‘Command-K’ to compile the script. If there are no errors, hit ‘Command-R’ to run it. If everything checks out fine, then hit ‘Command-S’ to bring up the ‘Save’ box. Change the ‘File Format:’ option at the bottom to ‘Application’, give the app a snappy name (‘findNotes’ ??), then choose your Applications folder as the destination before hitting ‘Save’.

The last thing to do is to go to your Applications folder and drag the icon to the Dock. Now, you can simply click the icon to produce the TextEdit window whenever a Note goes missing.
(Final tip: by the way, if you don’t like the Applescript icon in your Dock, you can always change it to an icon of your own! 🙂 ) )
Related posts:
getting to grips with AppleScript
sync notes between mac and android
FastTasks – download the free OS X utility from Applehelpwriter

