how to master Cocoa & Objective-C

It’s been quiet on Applehelpwriter this month, largely because we’re all waiting for OS X Mavericks to come out, and I’ve been rather busy helping out with the beta testing. I’ll have plenty to tell you when the public release finally comes around, but for now I’m under strict orders from Apple’s NDA (Non-Disclosure Agreement) to keep schtumm.
Xcode 5 was released for Mountain Lion last week, and that brought up a couple of questions about how to develop competency in creating apps for Mac OS X. I wrote something about this sometime ago, but the truth is I’ve been through a bit of a learning curve myself since then. So, while we wait for Mavs (10.9) and explore the new features of Xcode 5, this seems like the perfect time to share some of my coding experience. Although this might seem a little diaristic, the aim of this post – like pretty much all others on APH – is purely tutorial. 🙂
So, let me go back about a year or so. I’d been working my way through the 4th edition of Aaron Hillegass and Adam Preeble’s widely-acclaimed ‘Cocoa Programming for Mac OS X‘ quite nicely till I hit the ‘challenge’ at the end of Chapter 5. Although I’d followed all the previous chapters quite carefully and with little trouble, the challenge seemed totally beyond me. Indeed, as I read and re-read the earlier material, I couldn’t see anything in the book that would help me solve the core problem of the challenge.
The challenge said: “when the user types in a string and clicks the button, change the message text to display the input string and the number of characters“.

Building the interface was easy, but at that time I had no idea how to go about measuring the string length (despite the mention offered on the next page about the -(NSUInteger) length method.)
After struggling with the problem for some while and not being able to resolve it, I came to an impasse: either I moved on to the next chapter, hoping that I’d learn more and be able to solve this challenge at a later date, or I gave up on the book completely. I wrestled with this for a while, until eventually deciding that I needed to postpone going any further into the book ( a different strategy from ‘giving up’!), and instead learn more about the underlying programming language behind Cocoa, namely Objective-C.
I should point out at this point that the authors are quite clear at the beginning that you really should know your way around Objective-C before tackling Cocoa, but since the early chapters – and even the chapter that reviews Objective-C itself – are fairly light, I fell into the mistake of thinking that I could get by with what they provided, a little background knowledge, and some judicious internet browsing to fill in the gaps.
Alas, that was far from the truth. I put aside the Hillegass book and turned instead to Stephen Kochan’s primer on Objective C, the excellent ‘Programming in Objective-C 2.0‘. In fact, I’d already read a couple of chapters of this in the past, (that’s the “little background knowledge” I mentioned in the last paragraph), but it was clear that I needed to work through it in far more detail if I hoped to master Cocoa.
Kochan begins his book by saying you don’t need to know C to read it, and indeed it’s true (in retrospect…) that he does a good job of surreptitiously teaching your the heart of the C programming language under the guise of teaching you Objective-C. When I say “surreptitious” that’s not a criticism: Objective-C is an extension of the C programming language, and in fact it isn’t really that much different from it once you re-orient your idea of what a program is and how it works. It’s kind of like those black and white gestalt pictures in psychology ( you know, “do you see a rabbit or an old lady”?). Once you switch your perspective, it becomes fairly clear, but until then though, the other point of view can seem as obscure as mud.
Well, I got through about six or seven chapters of Kochan and again got stumped. It occurred to me then that despite his claim that you didn’t need C to learn Objective-C, I…well…needed to learn C before I could learn Objective-C!
So I embarked on a mission to first learn C, which I did through a couple of excellent books: first, with Dave Mark’s ‘Learn C on the Mac‘ and then with the classic ‘The C Programming Language‘ by Kernighan and Ritchie (K&C). If you have trouble finding a reasonably priced version of this venerable book in hardcopy, do as I did and try your local public or university library, both of which are sure to have it. In my earlier post, I also suggested you look at ‘C for Dummies‘ (another book I was reading concurrently with my first attempt at Kochan back then), but in retrospect, that book doesn’t cover enough ground and takes too long to cover what it does deal with, so I think now I’d say give that one a miss.
In any case, six months after working my way through the Dave Mark and the K&C books, I approached Kochan again, and found myself working through it like a hot knife through butter. After that, I finally went back to Hillegaas. And guess what? Not only did that challenge at the end of Chapter 5 seem trivial in Objective-C, I actually knew how to solve it even more efficiently in C without even using Objective-C at all!
(Even more efficiently? Well, only to computer programmers, who count spaces as ‘characters’, does the string “This is only a test” have 19 characters. To normal people, it’s only got 15. An early lesson in K&C will teach you how to count the characters without including any white space.😉 ).
Now I said this would be a tutorial, and indeed it is, for the moral of the story is an old one: learn to walk before you run. Do not believe the many claims that are often touted that you can learn how to create great apps for Mac OS X (or iOS) just by reading a book or two on Xcode or Cocoa (or anything else). Instead, get your foundations sorted out before you start trying to tackle Cocoa or even Objective-C.
And that means: learn C, the ‘grandfather’ of all modern OOP languages, which will not only make the rest of the learning curve a relatively easy glide, but will equip you with a far deeper understanding of what you’re doing and a far greater ability to tackle harder problems. You’ll learn how to create more complex apps than you ever could have with just a superficial knowledge of the ‘higher-level’ languages. Like the tortoise and the hare, it might seem like you’re the slow coach at first, but before you get to the end of the track, you’ll find you’re leagues ahead of the competition. 🙂
Related Posts:
Get the free utility app from Applehelpwriter
365SportTV window position

applehelpwriter.com
The 365SportTV app for Mac leaves a great deal to be desired. As anyone who’s used it has no doubt discovered, basic functionality is missing. Whoever knocked up the Mac version of the app for them has clearly never used Xcode before…
Of the many frustrations with this app, the only one I’ve been able to solve without completely re-writing it (365SportTV people: I’d be happy to give you a kind price…;) ) is moving the position of the window. That’s good because it is particularly annoying if you’re watching it on a large external monitor and the image is stuck where it doesn’t make best use of your screen.
Of the many frustrations with this app, the only one I’ve been able to solve without completely re-writing it (365SportTV people: I’d be happy to give you a kind price…;) ) is moving the position of the window. That’s good because it is particularly annoying if you’re watching it on a large external monitor and the image is stuck where it doesn’t make best use of your screen.
To move the window, launch the AppleScript Editor (just type Apples in Spotlight or Launchpad) and paste in the following code:
tell application "System Events"
tell application process "365SportTV"
activate
set position of front window to {100, 50}
end tell
end tell
Fire up 365SportTV app, get your match going and then switch back to AS and click the green ‘Run’ button.
You can play with those two numbers near the end to suit your own screen. The first number is the number of pixels from the left, the second number is the number of pixels from the top.
Hope this helps. 🙂
Related Posts:
getting to grips with AppleScript
FastTasks – free utility from Applehelpwriter
FastTasks – free download

I’ve been planning this ever since I first wrote a shell script along the same lines. All it needed was a nice interface, and that’d be something I could use almost everyday. Well, it only took me 8 months to get round to it, but here it is. 😉

Download FastTasks»
FastTasks allows you to achieve a number of things that you would normally have to roll up your sleeves and do in Terminal or AppleScript.
The window consists of two columns: left-side for info, right-side for actions. Here’s a detailed breakdown of functions with possible uses.
–Left-side (Info):
OS X Version:
Displays your current OS Version and build number
Startup Disk:
Displays your boot volume
I sometimes forget which particular volume I’m booted into, so this is vital info for me and anyone who’s regularly booting in and out of different installations.
Router IP:
The IP address of your network router
This can be useful for troubleshooting or if you need to access your router’s Admin page.
Just select the address and paste it into Safari’s search bar.
Local IP:
Your node on the local network
Useful to copy and paste if you need your local IP/ network node.
External IP:
How the rest of the world sees you
Very useful if you’re using proxies and want to check whether they’re working.
Installed Ram:
Just a courtesy reminder, but the real value here is the summary of usage stats underneath. These are pretty good approximations to what AM shows on my 10.8, but there are discrepencies on some versions of OS X between what ‘top’ shows and what Activity Monitor shows. FastTasks uses the same information that you’d get if you used the ‘top’ command in Terminal.
By the way, there’s a refresh button (keyboard shortcuts shown) for both the memory usage and network addresses, as the displays do NOT update continuously. Using the refresh buttons does not CHANGE anything on your system: They just update the display to reflect the current state of the system.
–Right-side (Actions):
Show hidden files:
Reveal or hide the hidden files and folders in the Finder whose names begin with a period
This is probably the most useful function of the app as it provides a dead easy way to hide and unhide system files without messing around in Terminal.
Show User Library:
Reveal or hide the User Library in the Finder
Likewise, this hides or unhides the ~/Library folder in Finder. This is ‘hidden’ in a different way from files that begin with a period, and its setting can be manipulated independently of that setting, so you can have the User Library showing, but ‘hidden’ files still hidden.
Flush DNS Cache:
Flush the cache that resolves internet domain names into IP addresses
Flushing the DNS cache can sometimes help resolve problems when you can’t access certain websites. Depending on what system you’re running, you may or may not see a ‘Requires Admin password’ warning next to this button. If you see the warning, then when you press the button the system will ask you for your password. The password request is from OS X and it goes to OS X: It’s not called, seen or stored by the app itself.
Free Memory:
Purge the RAM of inactive memory
Again, depending on what system you’re running, you may or may not see a ‘Requires Admin password’ message. On Snow Leopard, this requires the Command Line Tools supplied with Xcode, so if you see a message telling you to install Xcode, you may have to live without it (availability of Xcode for Snow Leopard these days is a bit hit and miss). You’ll also see the information on the left-side refreshed under ‘Usage’ when you use the free memory function and it successfully completes.
NOTE: on some systems where both Flush DNS Cache and Free Memory display ‘Requires Admin password’, note that after supplying the password for one of those actions, the user will be able to perform the other action without authenticating for a period of around 5 minutes (unless the sudo timeout setting has been altered by an Admin user).
Lastly, at the bottom of the window you’ll see a tiny plea to donate if you find the app useful ;). Note that the underlined text ‘Applehelpwriter’ and ‘Donate’ are hotlinks that if clicked will launch Safari and load a tab with this site and a Paypal donate page, respectively.
I hope you enjoy using FastTasks. Please read the provided Licence and User Guide that are in the download. Thanks! 🙂
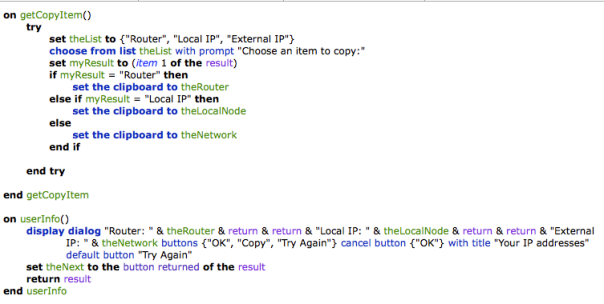
get computer’s local & external IP address

Here’s an AppleScript you can save as a service that will show your router’s IP, your local network node and your external IP, if connected. Save it as a service and you can assign it a nice little hotkey. Pressing the ‘Copy’ button will display a menu that lets you choose which IP address you want to copy to the clipboard. If the connection request returns a timeout, hit the ‘Try Again’ button (or check your connection… 😉 ).
Tip: If you’re not familiar with using AppleScript yet, see my intro getting to grips with AppleScript for a guide to the basics! If AppleScript’s not your thing at all, download my free app FastTasks that will show you all your IP addresses and a whole lot more too!
🙂
Copy the entire code from Pastebin
Related Posts:
FastTasks – download the free utility app from Applehelpwriter
Automator: make your own icons

Back around Christmas I posted this little procedure for making your own icons, with the promise that sometime I’d get round to writing it up as a script. Well, reader Cameron Leask has saved us all the effort and created this great little Automator workflow to do just that!
Download the workflow by clicking on the Automator robot below. When the download’s finished (it’s only 2MB), save it in your Applications folder.
To use it, just click on it to run. The first time you do that you may need to override your GateKeeper settings. Once you’ve allowed the app permission to run, choose the image you want to make into an icon and click ‘OK’ or press ‘return’. Cameron’s workflow will do the rest.
After a few seconds, you should see a little confirmation dialog telling you the icon is on your Desktop. Be sure to change the name of your new icon and/or move it to somewhere else before running the workflow again (or the next icon you create will overwrite the previous one).
Click the Automator robot to download:
Thanks a million Cameron!
Got your own favourite Automator workflow or AppleScript you’d like to share? I’d be happy to consider posting them on Applehelpwriter. Just drop me a mail.
🙂
move selection

It should be a simple thing to select a few files and sling them into your chosen folder. But OS X requires that you have to first open a Finder window, select the destination, then go all the way back to the location of the files you want to move and drag them in.
Wouldn’t it be much simpler if you could just select the files you want to move first, then choose the location without all the kerfuffle? Sure it would!
🙂
If you agree, then this is the script for you. I use it to move screenshots (of which I take a lot) from the Desktop to whatever location I want to store them in with a simple hotkey command (set up in Services or via FastScripts), control-command-M (‘M’ for move, of course!).
--start
tell application "Finder"
try
get selection
if selection is not equal to {} then
move selection to (choose folder)
else
display dialog "Nothing selected to move!" buttons {"OK"} default button "OK" with icon 2
end if
on error
set selection to {}
end try
end tell
--eof
🙂
Featured Picture: cul-de-sac by ~MichalTokarczuk
how to see recently accessed files

While professional troubleshooters will use software like fseventer or the Instruments.app that comes as part of Xcode, there’s an easy way for anyone to see which files have recently been accessed on their Mac.
1. Open any Finder window and hit ‘command-F’.
2. Click the ‘Kind’ button and choose ‘Other’ at the bottom of the menu:

3. Next, scroll down the list till you see ‘System files’ and check the box and hit ‘OK’.
4. Change the button that says ‘aren’t included’ to ‘are included’.
5. Now hit the little ‘+’ button over on the right side of the window.
6. Again, change ‘Kind’, this time to ‘Last Modified’ and change ‘within last’ to ‘today’.

7. Finally, go to Finder > View menu at the top and choose ‘Arrange By > Date Last Opened’.
You can save the search in the Sidebar for convenience. Give it a more useful name like ‘latest changes’ or ‘fs events’ (“fs” stands for filesystem) and click on it whenever you need to check what’s just happened to your Mac! 🙂

unable to turn Bluetooth on or off
f Bluetooth is stuck in the on or off setting, this simple procedure should cure the problem.
You may have already tried clicking in the Status bar icon or the System Preferences pane; perhaps you even did a Restart, all without effect.
The surprisingly simple answer is:
Shutdown the mac, and power on again.
Shutdown works whereas Restart doesn’t because – unlike Restart – Shutdown puts the Bluetooth power manager through a complete power cycle.
🙂
More Bluetooth problems? Drop a comment below!
how to log time spent using apps

If you are looking for a way to log how long a user (such as yourself!) is spending time in a given app, or to collect data on your pattern of work over time, this little script should do the trick.
Update: I’ve recently written a Cocoa-app that includes this function. Take a look at OSXClock here. 🙂
It will create and keep a running log file (called ‘log.txt’) on your Desktop indicating which apps have been in focus on your machine and for how long each time. This could be ideal if you want to keep track of how long you spend working on a particular project either for billing a client or just for checking your own productivity.
How to use:
Open AppleScript Editor and paste the text below into the Editor window. Click the ‘run’ button. When you’ve had enough click the ‘stop’ button. It would be possible to automate running and stopping this, but I’ll leave that for the comments or maybe a later post.
*Note: be sure to click out of the app you’re using and activate Finder before you put the machine to sleep, otherwise the log will include the sleep time in the app’s duration
--start of script
set front_app to (path to frontmost application as text)
set _start to current date
repeat
delay 5
set current_app to (path to frontmost application as text)
if current_app is not equal to front_app then
set _stop to current date
do shell script "echo " & front_app & " was active from " & _start & " until " & _stop & " >> ~/Desktop/log.txt"
set front_app to current_app
set _start to current date
end if
end repeat
--end of script
Example log:
You will see the log looks something like this:
Seagate DP1:Applications:Utilities:AppleScript Editor.app: was active from Monday, 17 June 2013 17:20:30 until Monday, 17 June 2013 17:20:35
Seagate DP1:Applications:Adobe InDesign CS6:Adobe InDesign CS6.app: was active from Monday, 17 June 2013 17:20:35 until Monday, 17 June 2013 17:21:15
Seagate DP1:Applications:TextWrangler.app: was active from Monday, 17 June 2013 17:21:15 until Monday, 17 June 2013 17:21:25
Seagate DP1:Applications:Adobe InDesign CS6:Adobe InDesign CS6.app: was active from Monday, 17 June 2013 17:21:25 until Monday, 17 June 2013 17:24:46
Seagate DP1:Applications:TextEdit.app: was active from Monday, 17 June 2013 17:24:46 until Monday, 17 June 2013 17:26:26
Seagate DP1:Applications:Safari.app: was active from Monday, 17 June 2013 17:26:26 until Monday, 17 June 2013 17:45:03
Seagate DP1:Applications:Adobe InDesign CS6:Adobe InDesign CS6.app: was active from Monday, 17 June 2013 17:45:03 until Monday, 17 June 2013 17:46:03
Seagate DP1:Applications:TextEdit.app: was active from Monday, 17 June 2013 17:46:03 until Monday, 17 June 2013 17:46:13
On subsequent runs, you can keep the same log (the script will continue to add to the log on each run) or roll it over by renaming the log.txt on the Desktop and saving it off to somewhere else. If you rename or move the log.txt, then the next time you run the script, it will create a fresh log.txt on your Desktop automatically.
🙂
Featured picture: My Work Desk by ~RianGonzales
can’t create kext cache error

If Console is reporting the ‘can’t create kext cache / owner isn’t root‘ message, complete the following procedure.
1. Run ‘Repair System Permissions‘ in Disk Utility.
Repairing system level permissions won’t solve the kext cache problem, but you’ll want to make sure they are all in order first. There is no need to repair ACL permissions for this procedure.
2. Open Terminal.app
Copy and paste the following:
sudo chown root:admin /
Hit ‘return’ and type in your admin password. This step ensures that the admin user has ownership permissions for everything on the startup disk.
3. Fix the kext cache permissions
Paste the following code into Terminal.app, hitting ‘return’ again and supplying the password if requested (if you do this shortly after step 2 you may not be asked for the password again):
sudo touch /System/Library/Extensions
4. Clear Console log and restart
The next two steps aren’t strictly necessary, but are good practice. Open Console.app, click ‘All Messages’ in the sidebar and hit the ‘Clear Display’ button in the Tool bar. Now, restart your mac.
5. Check for the problem
See if the procedure was successful by opening Console.app again, choosing ‘All messages’ in the sidebar and typing
can't
in the filter/search bar over on the right. If you carried out the procedure above correctly, it shouldn’t return any ‘can’t create kext cache / user isn’t root’ messages since the restart time.
🙂
Featured picture: I’m not a balloon owner anymore by ~starwink

