Blog Archives
how to find anything on your mac

With the release of FT2 2.13 comes a new SuperSearch function. You can use this to find anything on your mac or connected drives, open folders (including hidden ones) and launch apps. You can open SuperSearch quickly by holding down the shift key when you click the F2 icon in the status bar.
If you’re familiar with EasyFind and Spotlight, you can think of SuperSearch as sort of a ‘Spotlight on Steroids’ (use the ‘Faster’ option’) combined with an ‘EasyFind without the overhead’ (use the ‘Deeper’ option). SuperSearch supports using the spacebar to open Quick Look and double-clicking to reveal an item in the Finder.
For the most part, you’ll want to use the options ‘Faster’, ‘String’ and alternate between ‘Name’ (for files) or ‘Content’ (for text within files). Choose to include case sensitivity, emails and web history as needed. However, there’s a lot of different ways you can use SuperSearch. Here’s a few examples:

Find hidden files
(use ‘Deeper’, ‘Name’, ‘String’)
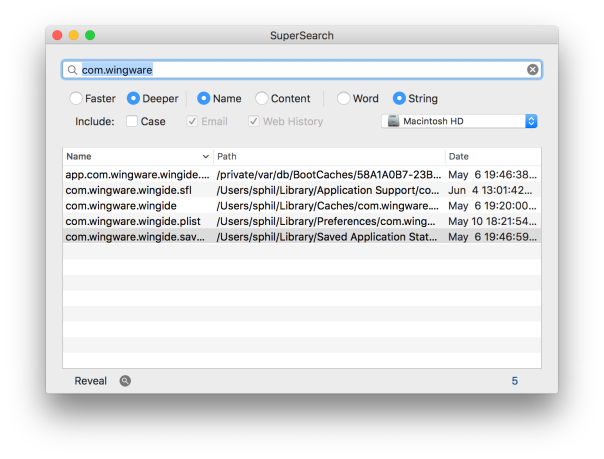
Find files by bundle identifier
(use ‘Deeper’, ‘Name’, ‘String’)

Open folders in the Finder
(just type the path and hit return; use ~/ to target the home folder; the options are not relevant)
Search for text in files
(use ‘Faster’, ‘Content’, ‘String’ for speed, or use ‘Deeper’ if you want to target a particular drive or directory, or if you want to search for content within hidden files and packages, too).

When you use ‘Deeper’ to search for content, the item name includes a hit count of the number of occurrences of the search term in that file:

Launch applications
(prefix the app name with ` (that’s the key directly above the ‘tab’ key) to tell SuperSearch you want to open it rather than find it. The options are not relevant).
🙂
FastTasks – free download

I’ve been planning this ever since I first wrote a shell script along the same lines. All it needed was a nice interface, and that’d be something I could use almost everyday. Well, it only took me 8 months to get round to it, but here it is. 😉

Download FastTasks»
FastTasks allows you to achieve a number of things that you would normally have to roll up your sleeves and do in Terminal or AppleScript.
The window consists of two columns: left-side for info, right-side for actions. Here’s a detailed breakdown of functions with possible uses.
–Left-side (Info):
OS X Version:
Displays your current OS Version and build number
Startup Disk:
Displays your boot volume
I sometimes forget which particular volume I’m booted into, so this is vital info for me and anyone who’s regularly booting in and out of different installations.
Router IP:
The IP address of your network router
This can be useful for troubleshooting or if you need to access your router’s Admin page.
Just select the address and paste it into Safari’s search bar.
Local IP:
Your node on the local network
Useful to copy and paste if you need your local IP/ network node.
External IP:
How the rest of the world sees you
Very useful if you’re using proxies and want to check whether they’re working.
Installed Ram:
Just a courtesy reminder, but the real value here is the summary of usage stats underneath. These are pretty good approximations to what AM shows on my 10.8, but there are discrepencies on some versions of OS X between what ‘top’ shows and what Activity Monitor shows. FastTasks uses the same information that you’d get if you used the ‘top’ command in Terminal.
By the way, there’s a refresh button (keyboard shortcuts shown) for both the memory usage and network addresses, as the displays do NOT update continuously. Using the refresh buttons does not CHANGE anything on your system: They just update the display to reflect the current state of the system.
–Right-side (Actions):
Show hidden files:
Reveal or hide the hidden files and folders in the Finder whose names begin with a period
This is probably the most useful function of the app as it provides a dead easy way to hide and unhide system files without messing around in Terminal.
Show User Library:
Reveal or hide the User Library in the Finder
Likewise, this hides or unhides the ~/Library folder in Finder. This is ‘hidden’ in a different way from files that begin with a period, and its setting can be manipulated independently of that setting, so you can have the User Library showing, but ‘hidden’ files still hidden.
Flush DNS Cache:
Flush the cache that resolves internet domain names into IP addresses
Flushing the DNS cache can sometimes help resolve problems when you can’t access certain websites. Depending on what system you’re running, you may or may not see a ‘Requires Admin password’ warning next to this button. If you see the warning, then when you press the button the system will ask you for your password. The password request is from OS X and it goes to OS X: It’s not called, seen or stored by the app itself.
Free Memory:
Purge the RAM of inactive memory
Again, depending on what system you’re running, you may or may not see a ‘Requires Admin password’ message. On Snow Leopard, this requires the Command Line Tools supplied with Xcode, so if you see a message telling you to install Xcode, you may have to live without it (availability of Xcode for Snow Leopard these days is a bit hit and miss). You’ll also see the information on the left-side refreshed under ‘Usage’ when you use the free memory function and it successfully completes.
NOTE: on some systems where both Flush DNS Cache and Free Memory display ‘Requires Admin password’, note that after supplying the password for one of those actions, the user will be able to perform the other action without authenticating for a period of around 5 minutes (unless the sudo timeout setting has been altered by an Admin user).
Lastly, at the bottom of the window you’ll see a tiny plea to donate if you find the app useful ;). Note that the underlined text ‘Applehelpwriter’ and ‘Donate’ are hotlinks that if clicked will launch Safari and load a tab with this site and a Paypal donate page, respectively.
I hope you enjoy using FastTasks. Please read the provided Licence and User Guide that are in the download. Thanks! 🙂
how to see recently accessed files

While professional troubleshooters will use software like fseventer or the Instruments.app that comes as part of Xcode, there’s an easy way for anyone to see which files have recently been accessed on their Mac.
1. Open any Finder window and hit ‘command-F’.
2. Click the ‘Kind’ button and choose ‘Other’ at the bottom of the menu:

3. Next, scroll down the list till you see ‘System files’ and check the box and hit ‘OK’.
4. Change the button that says ‘aren’t included’ to ‘are included’.
5. Now hit the little ‘+’ button over on the right side of the window.
6. Again, change ‘Kind’, this time to ‘Last Modified’ and change ‘within last’ to ‘today’.

7. Finally, go to Finder > View menu at the top and choose ‘Arrange By > Date Last Opened’.
You can save the search in the Sidebar for convenience. Give it a more useful name like ‘latest changes’ or ‘fs events’ (“fs” stands for filesystem) and click on it whenever you need to check what’s just happened to your Mac! 🙂

how to recover disappearing Notes

There appears to be a bug in Apple’s Notes.app in OS X 10.8 that sometimes causes notes to disappear. If you need to recover the text of any note that’s gone missing on your mac, try pasting this into Terminal.app. It’s all one line, so copy and paste it as a whole, then hit ‘return’:
cd ~/Library/Containers/com.apple.Notes/Data/Library/Notes; strings NotesV1.storedata | grep body | open -f
The resulting TextEdit window can be searched or scrolled through for your missing text.
Due to this problem, a lot of people are giving up using Notes.app altogether and switching to alternatives like Evernote or nvALT. However, if for some reason you either want or need to keep using Notes, you might try saving that command above as its own little App that you can keep in the Dock (beats having to dig out or remember the Terminal code all the time).
To do so, we’re going to use the Applescript Editor. It lives in the /Applications/Utilities folder, but you can access it simply by clicking on Spotlight and typing Apples.
With the Editor open, paste this into the window (note, this is slightly different from the command above, as we have to tell AppleScript how to use the code):
do shell script "cd ~/Library/Containers/com.apple.Notes/Data/Library/Notes; strings NotesV1.storedata | grep body | open -f"
Press ‘Command-K’ to compile the script. If there are no errors, hit ‘Command-R’ to run it. If everything checks out fine, then hit ‘Command-S’ to bring up the ‘Save’ box. Change the ‘File Format:’ option at the bottom to ‘Application’, give the app a snappy name (‘findNotes’ ??), then choose your Applications folder as the destination before hitting ‘Save’.

The last thing to do is to go to your Applications folder and drag the icon to the Dock. Now, you can simply click the icon to produce the TextEdit window whenever a Note goes missing.
(Final tip: by the way, if you don’t like the Applescript icon in your Dock, you can always change it to an icon of your own! 🙂 ) )
Related posts:
getting to grips with AppleScript
sync notes between mac and android
FastTasks – download the free OS X utility from Applehelpwriter
5 things you never knew about Spotlight

Whenever I’m helping customers with a misbehaving Mac, one of the most common things I hear is ‘Wow, I didn’t know you could do that with Spotlight!’ Whereas the average user will navigate around their computer by trawling through Finder, the savvy user knows how to get to places, launch apps, search the internet and calculate their tax with a few simple Spotlight tricks. In this post we’ll look at how to increase your productivity by using Spotlight for fast access to a variety of common functions. But first, we need to get Spotlight set up for maximum efficiency.
Set up the hotkey
To get the most out of Spotlight, the first thing to do is set up the keyboard hotkey. By default, this is usually ‘command-spacebar’, but if you are using multiple languages you might want to reserve that for the Input Switcher. Instead, I use ‘option-command-spacebar’, not least because this nice 3-finger combination can be executed with the left-hand while the right hand is reaching for the coffee mug… 😉
Whatever your choice of hotkey, keep it close to the bottom of the keyboard, as the other keys that you will want to be able to rapidly access are the cursor arrows and the ‘return’ key. If you haven’t set up your Spotlight hotkey yet, the fastest way to do so is to click on Spotlight on the top right of your screen with the mouse or trackpad and type
spot
and then hit ‘return’ on the keyboard (if Spotlight isn’t the top hit, just use the arrow down key to move down till you hit it)

After hitting ‘return’, you’ll be presented with the Spotlight preferences panel. At the bottom, you’ll see fields to define both the Spotlight menu keyboard shortcut and the Spotlight window keyboard shortcut. For the purposes of this post, we’re only interested in the menu shortcut (but feel free to set up the window one too, if you wish!). Once your hotkey is set up you can forget about the annoying inconvenience of dragging your cursor up to the top right corner. Just hit your hotkey combination to open the Spotlight search field.

But don’t close the Spotlight prefs just yet. The main pane in the window is the Search Results panel which lists the order in which results appear. You can alter the order of results that Spotlight shows by dragging items up and down the list. Altering this to your likes is a big part of getting the most out of Spotlight. If Spotlight is always showing you lots of results from Mail that you don’t want to see, for example, drag “Messages & Chats” to the bottom of the list.
For the purposes of this tip, make sure Applications is no.1 in the list and System Prefs no. 2, and Folders at no. 3. Follow that with Documents, Images, PDFs and so on according to the kind of files you access most often on a daily basis. A set up like this will make Spotlight much more efficient at navigating around your mac, and once you get the hang of it you’ll find yourself trawling through Finder much less often.
Incidentally, I don’t recommend unchecking any of those boxes. We want more power in our searches, not less; you never know when you might be looking for something that just won’t show up in a search because you’ve forgotten that you excluded those results in Spotlight’s preferences. Besides, there are better ways to restrict your searches in Spotlight like this and this.
When you’re done with setting up Spotlight’s preferences, hit ‘command’ and ‘Q’ to close System Preferences and read on.
1. Use Spotlight as an App Launcher
Long before the Apple engineers dreamed up Launchpad, many of us were already launching apps in half the time it takes in the Dock, Finder, or (now) even Launchpad itself. You can open any app with Spotlight just by typing three or four characters. Sometimes, just one is enough! All you need to do is hit your hotkey (see above) and type the first three or four letters of the App’s name and hit ‘return’.
Try typing tex and hitting ‘return’ to instantly open TextEdit, or act for ‘Activity Monitor’. iPhoto should be the top hit with ip. If you use Terminal a lot, there’s no need to go rooting around in the Applications/Utilities menu to open it. Simply hit the Spotlight hotkey and type
term
and hit ‘return’.
If you have Carbon Copy Cloner, type CCC, and if you use 1Password, just the number 1 and return should do the trick.
saf will open Safari and mai will launch Mail in an instant. Experiment with your favourite or most commonly used apps and you’ll find that using Spotlight is twice as fast as any other method.
As a bonus, if you moved Folders up to no.3 in the Preferences list, experiment with the first few letters of your favourite folders. Try some of these and see what comes up as the top hit:
home, downl, mov, musi, docu.
2. Use Spotlight to access System Prefs
We already saw one of Spotlight’s hidden uses – fast access to System Preferences. In fact you can do this with any of them. Want to check your login items in Users & Accounts | Login Items? No need to go clicking all round the desktop, hit your Spotlight hotkey and type
user
or
secu
if you want to change your Security preferences quickly.
Don’t hit ‘return’ just yet – check to see what is the ‘top hit’, as you might find that you have to “arrow down” an item or two. Even so, this is a whole lot faster than wading through either Finder or the menu.
Typing
sys
and hitting ‘return’ is also a fast way to open the main System Preferences panel.
3. Dictionary
Hit the Spotlight hotkey and try typing the word
codec
Just press ‘command-L’ to go straight to the dictionary entry and see its definition in a pop-up panel. Alternatively, hit ‘command-D’ to open the word in the Dictionary app.
Also note that in Spotlight, you can jump around by holding down the ‘command’ key and pressing the down arrow key (each press of the arrow key conveniently takes you to the top of each section; release the ‘command’ key and use the down arrow alone to move one item at a time within the section). Using the ‘control’ key and the down or up arrow takes you to the very bottom or the very top of the list, respectively.
When you’re done with Spotlight, just hit your hotkey combination again to dismiss it. You can also use the ‘esc’ key here: one tap of ‘esc’ will clear the Spotlight search bar, two will dismiss it.
4. Website search
But suppose you type in a word that Dictionary.app doesn’t know? Try
plomic
Again, use your command and arrow key to jump down to the bottom of the results and this time choose ‘search the web’. That will automatically open Safari and put the term in the search bar and return the results. But you’re not limited to dictionary searches, you can use Spotlight’s search bar just like the Google search bar in Safari. Try typing in
mini ipad versus samsung galaxy review
or
best small car of 2012
or anything else you might want to search the web for. Yep, Spotlight isn’t just a file finder on your mac – it’s a google search engine, too!
5. Use Spotlight as a Calculator
Want to quickly know what 17.5% of $45,000 is? Hit your Spotlight hotkey and type:
45000*17.5%
Don’t press ‘return’ – difficult to break that habit, I know! – the result is already listed next to the ‘Calculator’ icon, just look down to see the search results and the answer is already there!
You can of course do all the standard calculator functions like / for divide, * for multiplication and + and – for addition and subtraction. You can even do powers (3 to the power of 5 = 3^5) as well as bracket expansion. Try
(3x5)^2 and compare the result with 3*5^2
So whether its App launching, web searching, opening system prefs or using the dictionary or calculator, hitting your Spotlight hotkey is a habit you want to develop for faster computing. At least for me, it’s probably the most frequent keystroke I use on a daily basis.
🙂
Mountain Lion’s hidden wallpapers

If you’ve been enjoying Mountain Lion’s beautiful new Screensaver images, like National Geographic, Aerial and Cosmos, you might like to have some of those images as wallpapers for your Desktops in Mission Control.
First, from a Finder window, navigate all the way to here:
[Macintosh HD] > System > Library > Frameworks > Screensaver.framework > Versions > A > Resources > Default Collections
Select the four folders inside and then press ‘command’ and ‘c’ on the keyboard. Navigate to your Pictures folder from any Finder window’s sidebar and press ‘command’ and ‘v’ to copy the folders and images.
You can now add them to your collection of available Desktop pictures by clicking the Desktop tab in
> System Preferences… > Desktop & Screensaver
and clicking the plus ‘+’ button in the box underneath the list of folders on the left. From the window that pops up, choose ‘Pictures > National Geographic-1’and hit ‘Choose’.
Repeat for any of the others (Aerial, Cosmos, Nature Patterns) that you want to add. 🙂
Related Posts
easiest way to find your serial number

Click > About This Mac… then click on the greyed out text underneath the black ‘Mac OS X‘.
It probably says ‘Version 10.7.2’. When you click on it, it will change to the OS build number. Click on it again and you’ll see your serial number. Easy 🙂


