Category Archives: Scripts
how to recover disappearing Notes

There appears to be a bug in Apple’s Notes.app in OS X 10.8 that sometimes causes notes to disappear. If you need to recover the text of any note that’s gone missing on your mac, try pasting this into Terminal.app. It’s all one line, so copy and paste it as a whole, then hit ‘return’:
cd ~/Library/Containers/com.apple.Notes/Data/Library/Notes; strings NotesV1.storedata | grep body | open -f
The resulting TextEdit window can be searched or scrolled through for your missing text.
Due to this problem, a lot of people are giving up using Notes.app altogether and switching to alternatives like Evernote or nvALT. However, if for some reason you either want or need to keep using Notes, you might try saving that command above as its own little App that you can keep in the Dock (beats having to dig out or remember the Terminal code all the time).
To do so, we’re going to use the Applescript Editor. It lives in the /Applications/Utilities folder, but you can access it simply by clicking on Spotlight and typing Apples.
With the Editor open, paste this into the window (note, this is slightly different from the command above, as we have to tell AppleScript how to use the code):
do shell script "cd ~/Library/Containers/com.apple.Notes/Data/Library/Notes; strings NotesV1.storedata | grep body | open -f"
Press ‘Command-K’ to compile the script. If there are no errors, hit ‘Command-R’ to run it. If everything checks out fine, then hit ‘Command-S’ to bring up the ‘Save’ box. Change the ‘File Format:’ option at the bottom to ‘Application’, give the app a snappy name (‘findNotes’ ??), then choose your Applications folder as the destination before hitting ‘Save’.

The last thing to do is to go to your Applications folder and drag the icon to the Dock. Now, you can simply click the icon to produce the TextEdit window whenever a Note goes missing.
(Final tip: by the way, if you don’t like the Applescript icon in your Dock, you can always change it to an icon of your own! 🙂 ) )
Related posts:
getting to grips with AppleScript
sync notes between mac and android
FastTasks – download the free OS X utility from Applehelpwriter
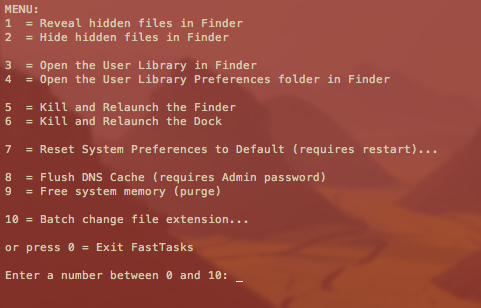
FastTasks – a utility for ten common terminal tasks
Update: I’ve since written a nice GUI version in AppleScript-ObjectiveC which you can download for free here»
If you find you only ever go into Terminal to perform a small number of tasks that can’t be done (easily or at all) in the OS X graphical user interface, this little utility could be for you. It allows you to run a number of common tasks such as
reveal and hide hidden folders
batch change the extension on multiple files
purge system free memory
flush the DNS cache
restore system preferences to defaults
without having to bother looking up the commands. You will, however, have to do a little Terminal ‘dirty work’ to initially get the utility up and running (it’s a shell script which you need to turn into an executable file), but step by step instructions are all provided. 😉
Here’s what you do:
1. Copy or download the entire script from here FastTasks code and paste it into a text editor (TextEdit or Tincta, my favourite, will do).
2. Save the file as plain text onto your desktop with the name ‘FastTasks’
3. Open Terminal.app and paste this command:
sudo chmod 755 ~/Desktop/FastTasks
and press ‘return’ on your keyboard. You’ll be asked for you Admin password which will be invisible when you type it. If you’re wondering what you’ve just done, you’ve just changed that plain text file into an executable program.
4. Paste the next line into Terminal.app
cp ~/Desktop/FastTasks /etc/bin/FastTasks
then press ‘return’ on your keyboard.
As a result of that last command, you can now use the script by typing ‘FastTasks’ in a Terminal window or by double-clicking ‘FastTasks’ in Finder or on the Desktop.
5. By the way, if the Terminal window remains open after FastTasks has completed, change the following settings in Terminal’s Preferences:
Preferences > Settings > Shell > When the shell exits…
and change the dropdown menu from ‘Don’t close the window’ to ‘Close if the shell exited cleanly’.
And that’s it. You can now run any of the tasks in the menu without having to know the commands! 🙂
Fast tips for using FastTasks
1. FastTasks is actually quickest to run by using Spotlight and Terminal.
If you have the Spotlight hotkey set up (usually cmd-space by default), simply open Spotlight, and type ‘Term’ and hit ‘return’ on the keyboard. At the Terminal prompt type ‘fasttasks’ and hit ‘return’.2. Running it this way has another benefit. If you want to run FastTasks again after performing one task, just hit the ‘up’ arrow on the keyboard (hitting the ‘up’ arrow repeatedly will take you through previous commands entered at the Terminal prompt. Use the ‘down’ arrow to go forward), then ‘return’ when you see ‘fasttasks’ on the command line.

