how to merge PDF files in OS X

How to merge PDFs into one file is something I have frequently been asked ever since Preview 6 made combining and saving PDFs a little more torturous than it needs to be (see here for the gory details). There are also various little apps that you can buy that will do this for you, but this is the kind of functionality I was talking about here that you can easily do for yourself with a bit of AppleScript magic.
Open up the AppleScript Editor by clicking on the Spotlight icon and typing Apples. Click on the AppleScript code below and copy the code from the pastebin page that opens up:

Paste the copied code into the AppleScript Editor, hit ‘Compile’ in the toolbar (or press ‘Command-K’) and save as either a .scrpt file or .app as I described in getting to grips with AppleScript.
Click on the script or app and enjoy merging those files to your hearts content (and for free)! 🙂
Featured picture: sliver by *ether
getting to grips with AppleScript

Learning AppleScript is probably the second most productive thing you can do (the first is learning the Terminal) to improve your Mac experience. You know all those utilities that you see in the Mac App Store, on MacUpdate and so on, with developers charging anything from 99 cents to $20? Well, many of those are just doing simple jobs that you can actually script yourself for free with a little learning of OS X’s unique scripting language (and, indeed, some of those apps have been built in exactly this way).
To keep this post short and practical, I’m going to leave aside the wider discussion of what AppleScript is (and isn’t), what it can (and can’t) do and all manner of other interesting but theoretical things, and instead give you a taste of what you can do with it. I’ll give you some references at the end where you can find out more and learn everything you need.
Let’s get straight to it. Open up the AppleScript Editor by opening the Spotlight search bar and typing Apples. Hit ‘return’ and you’ll be faced with a new editor window. Let’s type something in it.
tell application "Finder"
display dialog "What's your name?" default answer "" with icon note
set myName to the text returned of the result
delay 0.5
display dialog "Hi there, " & myName & "! Welcome to AppleScript!" with icon note
end tell
You could just copy and paste this into the editor, but I’m going to recommend that you don’t. There’s a good reason to take the tedious route and type it in yourself. Like learning a human language, learning a computer language requires using it, and using it repetitively. As you type in the language, you’ll get a feel for its syntax that you won’t get if you just copy and paste. And, unlike a real human language, learning a computer language’s syntax is pretty much the whole battle of mastering it.
After you’ve finished typing, press ‘Command-K’ on the keyboard. If you typed everything correctly, you see the script change into a multi-colored jamboree, like this:

If you weren’t so lucky, examine what you typed against what’s on the page here. Part of the frustration of any computer language is rooting out typos! Eventually, you get a feel for it and start to learn where to look first, based on the error messages you see. For now, you’ll have to peck and hunt (if you get really fed up, you can always go the cut-and-paste route!).
Assuming you’ve got your script to compile, now it’s time to run it and see what it does. Hit ‘Command-R’ (you can of course use the icons in the toolbar for compiling and running, too) and you should get this:

So go ahead, type your name!
OK, you’re getting the idea. Let’s try something different. Press Control-N to open up a clean editor window and enter this:
say "What's your name?" using "Vicki"
display dialog "My name is " default answer ""
set myName to the text returned of the result
say "His name is " & myName using "Vicki"
say "Welcome to AppleScript, " & myName using "Alex"
As before, press ‘Command-K’ to compile and ‘Command-R’ to run.
As you can see (or hear!), you can even have your computer continue a dialogue (with or without you!) using OS X’s many voices.
It’s worth noting that this feature is extremely useful if you’re learning a foreign language.
The Voices options in System Preferences > Dictation & Speech | Text to Speech | System Voice include many optional voices that you can download that will speak foreign text. You can paste the target text into a dialog box (like the ones you just created), and then listen and practice your language skills as repetitively as you desire. For those wanting to learn Thai, for example, download the voice “Narisa”. You can paste Thai script from the web or from the Dictionary.app (if you have the Thai extension installed) into a dialog box and have “Narisa” say it in a very passable Thai accent. Great for learning!
One last one. How about your own screencapture program? Tired of remembering those shortcut keybindings, or having to fire up Preview or SnagIt for the occasional screen grab? Why not have your own app in the Dock that captures the screen with a single click? Here’s how:
Open a new editor window and enter this (in this case, you might want to copy and paste it, for reasons I’ll explain shortly):
do shell script "screencapture -x ~/Desktop/" & time string of (current date) & ".png"
Do the Command-K thing, but then this time do Command-S instead of Command-R. From the resulting save box, change the File Format near the bottom of the box from ‘Script’ to ‘Application’. Give it a fancy name (ScreenGrab, say?) and save it in your Applications folder.

Once that’s all done, go to your Apps folder, grab the ScreenGrab.app and drag it to the Dock. Clicking on it puts a timestamped screenshot on your Desktop. If you’ve got multiple spaces open, flip between them clicking the ScreenGrab app. That’s one easy way to get a record of your entire set up! Cool, huh? (Don’t forget you can easily change the icon in the Dock for something more to your taste, as I explain here. Also, if you don’t like the / delimiters in the file name, use this version for your app.)
That last little script demonstrates one of AppleScript’s most powerful features: the ability to run other scripts (and apps). The command in the last script (and the reason why I suggested you paste it) was actually a Bash shell command (aka Terminal command), and we know those are very easy to mistype! AppleScript can actually run the commands of many apps from within its own scripts, putting the power of those apps at your disposal (and that includes some apps you’re very likely familiar with, like Word and Excel).
I hope this short intro has given you a taste for exploring AppleScript and finding out more. It’s an incredibly powerful language that you can use to enormous advantage, and profit. In order to do that, you’ll need to go on a learning adventure, but I promise, the following sources will make that relatively painless!
If you’re absolutely brand new to AppleScript, then the must-have starter’s book is
Once you’ve got through that you’ll be able to pretty much teach yourself the rest, picking it up from sources like
Other references you should consult once you’re up and running are
and don’t forget Apple’s own free guide:
AppleScript Language Guide which you can also download as a PDF for offline use.
Finally, my Mac OS X Technologies User Tip contains some of the above links as well as others that may be of interest.
Happy scripting! 🙂
Featured picture: wall and paper stencil by -endlesshate
how to recover disappearing Notes

There appears to be a bug in Apple’s Notes.app in OS X 10.8 that sometimes causes notes to disappear. If you need to recover the text of any note that’s gone missing on your mac, try pasting this into Terminal.app. It’s all one line, so copy and paste it as a whole, then hit ‘return’:
cd ~/Library/Containers/com.apple.Notes/Data/Library/Notes; strings NotesV1.storedata | grep body | open -f
The resulting TextEdit window can be searched or scrolled through for your missing text.
Due to this problem, a lot of people are giving up using Notes.app altogether and switching to alternatives like Evernote or nvALT. However, if for some reason you either want or need to keep using Notes, you might try saving that command above as its own little App that you can keep in the Dock (beats having to dig out or remember the Terminal code all the time).
To do so, we’re going to use the Applescript Editor. It lives in the /Applications/Utilities folder, but you can access it simply by clicking on Spotlight and typing Apples.
With the Editor open, paste this into the window (note, this is slightly different from the command above, as we have to tell AppleScript how to use the code):
do shell script "cd ~/Library/Containers/com.apple.Notes/Data/Library/Notes; strings NotesV1.storedata | grep body | open -f"
Press ‘Command-K’ to compile the script. If there are no errors, hit ‘Command-R’ to run it. If everything checks out fine, then hit ‘Command-S’ to bring up the ‘Save’ box. Change the ‘File Format:’ option at the bottom to ‘Application’, give the app a snappy name (‘findNotes’ ??), then choose your Applications folder as the destination before hitting ‘Save’.

The last thing to do is to go to your Applications folder and drag the icon to the Dock. Now, you can simply click the icon to produce the TextEdit window whenever a Note goes missing.
(Final tip: by the way, if you don’t like the Applescript icon in your Dock, you can always change it to an icon of your own! 🙂 ) )
Related posts:
getting to grips with AppleScript
sync notes between mac and android
FastTasks – download the free OS X utility from Applehelpwriter
how to stop help windows always being on top

Ever called up a HelpViewer window in an app only to find that you have to close the window in order to get back to the app and start following the instructions? That can be highly annoying if the instructions aren’t easy to remember.
That’s because the HelpViewer.app is by default set to always be on top. If you want to change that, here’s a nice little Terminal trick that will let you manage HelpViewer windows just like a normal window, courtesy of new tipster site defaults-write.com. Here’s what you do:
1. If you have any HelpViewer windows open, close them first.
2. Open Terminal.app (/Applications/Utilities/Terminal.app) and paste this command into the window:
defaults write com.apple.helpviewer DevMode -bool true
and press ‘return’ on your keyboard.
That’s it! From now on, you’ll be able to switch focus between the app and the HelpViewer window so that you can work with whichever one you need on top.
Tip: If you want to reverse the behaviour, use the same command as above but replace ‘true’ at the end with ‘false’.
If you like exploring the various things you can do with defaults preferences, have a rummage around the defaults-write.com site, a nice little addition to our bookmarks list! 🙂

5 things you never knew about Spotlight

Whenever I’m helping customers with a misbehaving Mac, one of the most common things I hear is ‘Wow, I didn’t know you could do that with Spotlight!’ Whereas the average user will navigate around their computer by trawling through Finder, the savvy user knows how to get to places, launch apps, search the internet and calculate their tax with a few simple Spotlight tricks. In this post we’ll look at how to increase your productivity by using Spotlight for fast access to a variety of common functions. But first, we need to get Spotlight set up for maximum efficiency.
Set up the hotkey
To get the most out of Spotlight, the first thing to do is set up the keyboard hotkey. By default, this is usually ‘command-spacebar’, but if you are using multiple languages you might want to reserve that for the Input Switcher. Instead, I use ‘option-command-spacebar’, not least because this nice 3-finger combination can be executed with the left-hand while the right hand is reaching for the coffee mug… 😉
Whatever your choice of hotkey, keep it close to the bottom of the keyboard, as the other keys that you will want to be able to rapidly access are the cursor arrows and the ‘return’ key. If you haven’t set up your Spotlight hotkey yet, the fastest way to do so is to click on Spotlight on the top right of your screen with the mouse or trackpad and type
spot
and then hit ‘return’ on the keyboard (if Spotlight isn’t the top hit, just use the arrow down key to move down till you hit it)

After hitting ‘return’, you’ll be presented with the Spotlight preferences panel. At the bottom, you’ll see fields to define both the Spotlight menu keyboard shortcut and the Spotlight window keyboard shortcut. For the purposes of this post, we’re only interested in the menu shortcut (but feel free to set up the window one too, if you wish!). Once your hotkey is set up you can forget about the annoying inconvenience of dragging your cursor up to the top right corner. Just hit your hotkey combination to open the Spotlight search field.

But don’t close the Spotlight prefs just yet. The main pane in the window is the Search Results panel which lists the order in which results appear. You can alter the order of results that Spotlight shows by dragging items up and down the list. Altering this to your likes is a big part of getting the most out of Spotlight. If Spotlight is always showing you lots of results from Mail that you don’t want to see, for example, drag “Messages & Chats” to the bottom of the list.
For the purposes of this tip, make sure Applications is no.1 in the list and System Prefs no. 2, and Folders at no. 3. Follow that with Documents, Images, PDFs and so on according to the kind of files you access most often on a daily basis. A set up like this will make Spotlight much more efficient at navigating around your mac, and once you get the hang of it you’ll find yourself trawling through Finder much less often.
Incidentally, I don’t recommend unchecking any of those boxes. We want more power in our searches, not less; you never know when you might be looking for something that just won’t show up in a search because you’ve forgotten that you excluded those results in Spotlight’s preferences. Besides, there are better ways to restrict your searches in Spotlight like this and this.
When you’re done with setting up Spotlight’s preferences, hit ‘command’ and ‘Q’ to close System Preferences and read on.
1. Use Spotlight as an App Launcher
Long before the Apple engineers dreamed up Launchpad, many of us were already launching apps in half the time it takes in the Dock, Finder, or (now) even Launchpad itself. You can open any app with Spotlight just by typing three or four characters. Sometimes, just one is enough! All you need to do is hit your hotkey (see above) and type the first three or four letters of the App’s name and hit ‘return’.
Try typing tex and hitting ‘return’ to instantly open TextEdit, or act for ‘Activity Monitor’. iPhoto should be the top hit with ip. If you use Terminal a lot, there’s no need to go rooting around in the Applications/Utilities menu to open it. Simply hit the Spotlight hotkey and type
term
and hit ‘return’.
If you have Carbon Copy Cloner, type CCC, and if you use 1Password, just the number 1 and return should do the trick.
saf will open Safari and mai will launch Mail in an instant. Experiment with your favourite or most commonly used apps and you’ll find that using Spotlight is twice as fast as any other method.
As a bonus, if you moved Folders up to no.3 in the Preferences list, experiment with the first few letters of your favourite folders. Try some of these and see what comes up as the top hit:
home, downl, mov, musi, docu.
2. Use Spotlight to access System Prefs
We already saw one of Spotlight’s hidden uses – fast access to System Preferences. In fact you can do this with any of them. Want to check your login items in Users & Accounts | Login Items? No need to go clicking all round the desktop, hit your Spotlight hotkey and type
user
or
secu
if you want to change your Security preferences quickly.
Don’t hit ‘return’ just yet – check to see what is the ‘top hit’, as you might find that you have to “arrow down” an item or two. Even so, this is a whole lot faster than wading through either Finder or the menu.
Typing
sys
and hitting ‘return’ is also a fast way to open the main System Preferences panel.
3. Dictionary
Hit the Spotlight hotkey and try typing the word
codec
Just press ‘command-L’ to go straight to the dictionary entry and see its definition in a pop-up panel. Alternatively, hit ‘command-D’ to open the word in the Dictionary app.
Also note that in Spotlight, you can jump around by holding down the ‘command’ key and pressing the down arrow key (each press of the arrow key conveniently takes you to the top of each section; release the ‘command’ key and use the down arrow alone to move one item at a time within the section). Using the ‘control’ key and the down or up arrow takes you to the very bottom or the very top of the list, respectively.
When you’re done with Spotlight, just hit your hotkey combination again to dismiss it. You can also use the ‘esc’ key here: one tap of ‘esc’ will clear the Spotlight search bar, two will dismiss it.
4. Website search
But suppose you type in a word that Dictionary.app doesn’t know? Try
plomic
Again, use your command and arrow key to jump down to the bottom of the results and this time choose ‘search the web’. That will automatically open Safari and put the term in the search bar and return the results. But you’re not limited to dictionary searches, you can use Spotlight’s search bar just like the Google search bar in Safari. Try typing in
mini ipad versus samsung galaxy review
or
best small car of 2012
or anything else you might want to search the web for. Yep, Spotlight isn’t just a file finder on your mac – it’s a google search engine, too!
5. Use Spotlight as a Calculator
Want to quickly know what 17.5% of $45,000 is? Hit your Spotlight hotkey and type:
45000*17.5%
Don’t press ‘return’ – difficult to break that habit, I know! – the result is already listed next to the ‘Calculator’ icon, just look down to see the search results and the answer is already there!
You can of course do all the standard calculator functions like / for divide, * for multiplication and + and – for addition and subtraction. You can even do powers (3 to the power of 5 = 3^5) as well as bracket expansion. Try
(3x5)^2 and compare the result with 3*5^2
So whether its App launching, web searching, opening system prefs or using the dictionary or calculator, hitting your Spotlight hotkey is a habit you want to develop for faster computing. At least for me, it’s probably the most frequent keystroke I use on a daily basis.
🙂
make your own .icns icons for free (it’s Christmas after all!)

Update: the procedure detailed below has now been turned into a little app. Have a look here!
There are some Application icons that just really annoy. Wouldn’t it be great if you could change them for something to your taste? In this tutorial, I’m going to take you through the basic steps of creating your own icons in png format, converting them into Apple’s icns format, and installing them into the application so that they display correctly throughout Finder and the Desktop. And the best news: you don’t need any commercial software, and the process – though lengthy – is not technically demanding.
1. Find or make the image
The first thing you’re going to need is a .png file of the image you want to use. If you want to create your own, you can use a free app like GIMP or Inkscape if you don’t have commercial software like Photoshop or Illustrator. Alternatively, you can use or modify an existing image. There’s a wealth of stock or public domain images on sites like DeviantArt and elsewhere.
If you’re starting from scratch in GIMP or other software, then use a base pixel size of 1024×1024 or 516×516. If you’re re-using a stock image and it’s not in the right pixel size, don’t worry, we’ll get to that shortly. The most important thing for now is that you save a working copy of the image in .png format.
2. Understanding icns files
Before we can do the next practical step, I need to explain something about icon files, so indulge me and try this little trick.
Open up the Applications folder in a Finder window. Locate Launchpad.app, and drag it from the Finder window to the Dock and drop it right on top of the Preview icon. Don’t be afraid! As you can see, Preview opens a window showing the Launchpad icons. You can do this with any app, just drag it onto Preview in the same way. If you look in the thumbnails in Preview, you’ll see there’s actually 10 versions of the same Launchpad.app icon – these are ten different sizes for various display needs. And that was what I wanted to explain: a single .icns file is actually a composite of ten .png files, of different sizes from 16pixels all the way up to 1024pixels, and is known as an ‘iconset’. Hence, the file extension ‘icns’ (and not ‘icn’), with the ‘s’ for ‘set’.
3. Create and name the required .pngs
Our next step then, is to use Preview to create our own iconset – all the required sizes and with the correct names so that Mac OS X will understand what to do with them. This is actually the most tedious part of the process and you must be careful to carry it out exactly or your final product won’t work. However, as I said earlier it’s technically fairly straightforward, you just need to take care to do it correctly. So, follow the steps in this order:
i. Create a new folder on your Desktop called ‘iconbuilder.iconset’ (without the quote marks). You will get a warning message from Finder like this:

Ignore the warning and choose ‘Add’ (your folder will display just fine!).
ii. Open your image in Preview. In the Taskbar, click the little pen icon on the right-hand side (the one nearest the search bar). Notice the new toolbar that appears underneath. Looking at that, choose the button on the far right, the double-headed arrow in a box.

This will open a new dialog box. Click ‘Custom’ in the first drop-down menu, and change ‘percent’ in the Width & Height to ‘pixels’. Unless you created your own image on a 1024×1024 or other square canvas, uncheck the ‘Scale proportionally’ box, and type ‘1024’ in both the Width and Height boxes. You can leave the resolution setting to whatever it is. Notice in the bottom half of the dialogue box there is confirmation of both the new pixel size and the file size in Kb. Review the information and press ‘OK’.
iii. This step is important – throughout this process, we do not want to save the source file we’re working on – we’re going to be using the (thankfully) re-introduced ‘Save As’ feature. You can either do this manually or use the shortcut ‘Command-Shift-S’. Press that now, rename the file as:
icon_512x512@2x.png
It’s vital that filename is correct and exactly the same as printed above (notice that its a 1024×1024 file, but it’s called 512×512 with the @x2 indicating ‘double 512’). Once you’re sure you’ve got it right, save the file to the iconbuilder.iconset folder we created earlier.
iv. OK, back to Preview. Click on the resize button on the far right of the toolbar again. Change the dropdown menu from ‘pixels’ to ‘percent’ – every file we’re going to create now is exactly 50% the size of the last one. Also, we now want the ‘Scale proportionally’ button checked, so click in that box, then type ’50’ in the ‘Width’ box and hit the tab key. If you checked the ‘Scale proportionally’ button as mentioned, the Height will automatically change to ’50’ too. Confirm from the bottom half of the dialogue box that your new image size is 512pixels and hit ‘OK’. Again, use ‘Save As’ (Command-Shift-S) and this time rename the file as:
icon_512x512.png
Again, save it to the ‘iconbuilder.iconset’ folder.
v. For this step, we’re going to need to go to the iconbuilder.iconset folder and right-click on the file we just made. Hit ‘Duplicate’ and change the name of the copy to
icon_256x256@2x.png
vi. And you’re going to continue on like this – using Preview to reduce the file, then duplicating those files that need a @2x extension. Here’s the full list – you should have ten files in the .iconset folder by the time you’re done. Notice that there’s only one file that is 64kb and it’s only for the Retina display.
FILENAME (= actual image size in pixels)
icon_16x16.png (= 16 x 16)
icon_16x16@2x.png (= 32 x 32)
icon_32x32.png (= 32 x 32)
icon_32x32@2x.png (= 64 x 64)
icon_128x128.png (= 128 x 128)
icon_128x128@2x.png (= 256 x 256)
icon_256x256.png (= 256 x 256)
icon_256x256@2x.png (= 512 x 512)
icon_512x512.png (= 512 x 512)
icon_512x512@2x.png (= 1024 x 1024)
4. Convert to icns
OK, I’m going to assume that you’ve double-checked that all your file sizes and file names are correct and you’re ready for the next step. For this one, open Terminal.app and copy and paste this command into the Terminal window:
iconutil -c icns ~/Desktop/iconbuilder.iconset
If you got all those filesizes and names correct, you should just see the prompt come straight back. Did anything actually happen? It sure did – go look on your Desktop, there’s a new file on it called ‘iconbuilder.icns’. If you click on that file and open it in Preview, you’ll see it’s just like the Launchpad.app one we looked at earlier (i.e., it contains all 10 images). Congratulations – you just made your first icns file!
5. Insert the file into the application and rename it
But we’re not done yet because we still need to insert this file into the Application, rename it and get Finder to load it.
i. Go to your applications folder in Finder, and click on the app once. Then, hold down the ‘control’ key and click on it again. Choose ‘Show Package Contents’ and navigate to the ‘Resources’ folder.
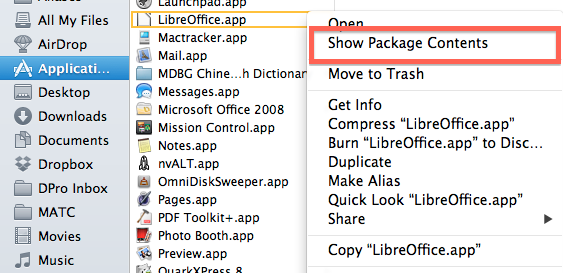
It will be useful if you switch to ‘icon’ view here (the left-most ‘View’button in Finder’s task bar, with four small squares). There may be a number of icns files in here, and different apps will call the one we want by different names (it may be named after the app, it may be named ‘icon.icns’, or ‘main.icns’ – as in LibreOffice – or something else entirely different). However, in icon view it should be easy to recognise – it will look like the icon you’re familiar with! If you’re in any doubt, double click it to open it in Preview and check that it contains multiple copies only of the same icon in different sizes (if you pick legacy software like LibreOffice that hasn’t been re-coded for Retina displays yet, you’ll find that there may only be a set of four icons instead of 10. No matter – you’re not only changing the icon, you’re actually making it more compatible with current macs!).
ii. Once you’ve identified the correct file, click on it once in Finder, hit ‘return’ on the keyboard and rename it by putting its initial letter in twice at the beginning. In other words, if the original is called ‘main.icns’, change it to ‘mmain.icns’, or if it’s called ‘snapshot.icns’ change it to ‘ssnapshot.icns’. There’s a good reason for using the same initial letter – it means the old icon will sit pretty close to – if not next to – the new one in Finder, which can be useful if you ever want to find it to change the app back to default.
iii. Once that’s done, go back to your Desktop and change the iconbuilder.icns file to whatever the other file was originally called (in LibreOffice’s case, that’s ‘main.icns’). Now move that file into the Resources folder of the app.
6. Initialize the file
OK, we’re almost done. You may notice that Finder and/or the Dock may start to display the new icon almost immediately, or not at all, or in some places you see the new icon and in others the old one. To make OS X see only the new icon and to unload the old one, go to Terminal.app and copy paste this command:
killall Finder; killall Dock
Press ‘return’ on the keyboard and it will cause the Dock and any open Finder windows to quit and relaunch. You should now only see your new icon.
7. Troubleshooting
My new icon isn’t displayed anywhere!
Check you gave the icns file the right name. Filenames are case sensitive so ‘SlipShod.icns’, ‘Slipshod.icns’ and ‘slipshod.icns’ are three different files. You must use the exact name required by the app. The correct name can be found in the Apps info.plist. To find that, do the ‘Show Package Contents’ trick again, and look for ‘Contents > info.plist’. You can open this with TextEdit or just Quicklook (click on it once and hit the spacebar). Look for the key ‘CFBundleIconFile’. The name listed as the ‘string’ is the correct name for your icns file. Remember, it’s case sensitive and it must be located in the Apps ‘Resources’ folder.
My new icon is displayed some places but not others in Finder/Dock
Be sure that you followed Step 6 to relaunch Finder and the Dock (or just restart your machine). If that’s not it, then you need to check the file names and sizes in ‘iconbuilder.iconset’. Looks like you missed a file, or got the wrong name or wrong size. Go through them till you find the one missing or that’s got the wrong size, or name. Correct the problem, then rebuild the icns file from Terminal and insert it into the app as before.
What if I want to return to the default icon?
Hopefully, that’s got you sorted. There’s only one other problem. What if your icon doesn’t look so good? Well, it’s back to the default in that case (delete your own icon and rename the original by taking the extra initial letter out of the name; relaunch Finder and the Dock), or it’s back to the drawing board and starting the process all over again.
Isn’t there a quicker way to do all this?
Yup! Take a look here.


OK, I’m not going to win any design awards, but it serves the purpose of illustrating this tutorial. I’m sure you can do better! Feel free to post links to your own re-designed icons in the Comments if you’d like to share. Enjoy!🙂
FastTasks – a utility for ten common terminal tasks
Update: I’ve since written a nice GUI version in AppleScript-ObjectiveC which you can download for free here»
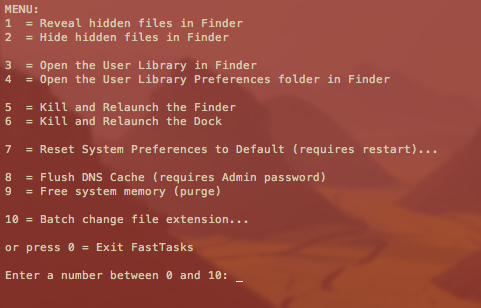
If you find you only ever go into Terminal to perform a small number of tasks that can’t be done (easily or at all) in the OS X graphical user interface, this little utility could be for you. It allows you to run a number of common tasks such as
reveal and hide hidden folders
batch change the extension on multiple files
purge system free memory
flush the DNS cache
restore system preferences to defaults
without having to bother looking up the commands. You will, however, have to do a little Terminal ‘dirty work’ to initially get the utility up and running (it’s a shell script which you need to turn into an executable file), but step by step instructions are all provided. 😉
Here’s what you do:
1. Copy or download the entire script from here FastTasks code and paste it into a text editor (TextEdit or Tincta, my favourite, will do).
2. Save the file as plain text onto your desktop with the name ‘FastTasks’
3. Open Terminal.app and paste this command:
sudo chmod 755 ~/Desktop/FastTasks
and press ‘return’ on your keyboard. You’ll be asked for you Admin password which will be invisible when you type it. If you’re wondering what you’ve just done, you’ve just changed that plain text file into an executable program.
4. Paste the next line into Terminal.app
cp ~/Desktop/FastTasks /etc/bin/FastTasks
then press ‘return’ on your keyboard.
As a result of that last command, you can now use the script by typing ‘FastTasks’ in a Terminal window or by double-clicking ‘FastTasks’ in Finder or on the Desktop.
5. By the way, if the Terminal window remains open after FastTasks has completed, change the following settings in Terminal’s Preferences:
Preferences > Settings > Shell > When the shell exits…
and change the dropdown menu from ‘Don’t close the window’ to ‘Close if the shell exited cleanly’.
And that’s it. You can now run any of the tasks in the menu without having to know the commands! 🙂
Fast tips for using FastTasks
1. FastTasks is actually quickest to run by using Spotlight and Terminal.
If you have the Spotlight hotkey set up (usually cmd-space by default), simply open Spotlight, and type ‘Term’ and hit ‘return’ on the keyboard. At the Terminal prompt type ‘fasttasks’ and hit ‘return’.2. Running it this way has another benefit. If you want to run FastTasks again after performing one task, just hit the ‘up’ arrow on the keyboard (hitting the ‘up’ arrow repeatedly will take you through previous commands entered at the Terminal prompt. Use the ‘down’ arrow to go forward), then ‘return’ when you see ‘fasttasks’ on the command line.
stop update notifications for unwanted apps

There it goes again – that little red badge on the App store telling you that there’s an update for your software. Only problem is, when you go to check it out, it turns out to be some little app that you downloaded but rarely use or which, for some reason (like not using up a limited download cap), you don’t particularly want to update.
Actually, there’s two ways you can get round this problem. The first, as obvious as it may seem, is to simply delete the app from your computer. If it was an app you purchased, don’t worry – it’ll still be in your purchases tab in the App store if you decide you want it back again one day.
Another way – and one which might also come in handy for those who use the app but don’t want the update – is to hide the app from your purchases list. This means you keep the app on your system, but the App store won’t inform you about updates. If this is the trick for you, then here’s how to do it:
To hide an app:
1. Open the App store and go to your purchases page. Sign in if necessary.
2. Control-click on the app you want to hide, and chose ‘Hide Purchase’.
It’s as easy as that! If you ever want to unhide this app, see if there are any updates, or just check whether any apps are already hidden (I found iPhoto had somehow got hidden without my knowing about it, and thus I wasn’t getting any updates for it!) then:
To unhide an app:
1. Open the App store.
2. In the menubar at the top, click ‘Store > View My Account…’
3. Sign in and wait for the Account page to show up.
4. Under ‘iTunes in the Cloud’, click on ‘Hidden Purchases’ and choose the apps you want to unhide. If you don’t see the ‘iTunes in the Cloud’ heading, then you don’t have any apps hidden.

5. Click ‘Done’ on the bottom right of the Accounts page.
🙂
featured picture: ‘Stop’ by SpongeSponge
sync notes between mac and android

Having an Android phone and Mac computer…not what intended…and syncing between them can be awkward. I use Dropbox on both and avoid iCloud for various reasons (some related to security), but I’ve always found syncing notes a problem.
My Android phone has a couple of notes apps , and my mac has, of course, the horribly-lemon yellow Notes.app, Stickies, and even Reminders can be used , not to mention TextEdit. The result was that I found I was keeping notes in several different places and then not knowing where to look for something, hunting around trying to remember which application I’d left some obscure, half-remembered note to myself in.
Then I discovered Notational Velocity. This is a great, free, open-source app built for OS X and it’s got all the simplicity I need. It has a combined search and enter field reminiscent of Spotlight, and the interface is clean, fast and efficient, requiring minimal keystrokes or trackpad movements.
On top of that, it can link to a web-based notes app called Simplenote.com (also a free service). Notational Velocity and Simplenote.com will sync to NV’s sister-app, Notational Acceleration, which is basically NV for the Android platform (and if you have an iOS device, there’s a Simplenote app for that too). Once you’ve got all of these set up, you have a notes app that you can use on your android phone, you mac, or log into from someone else’s computer, and the whole lot will keep in sync automatically!
Total cost: zero!🙂

