Blog Archives
how to track your clones

Last week I was asked whether I could produce a script that would keep track of Carbon Copy Cloner backup tasks so that a user could tell which of many, multiple backups of the same source disks were the most recent.
Of course, CCC has its own Task History and Disk Center functions to provide information, but these turn out to be insufficient in common scenarios. To see why, let’s consider a hypothetical task set-up and recovery situation.
In this situation, let’s suppose I’m keeping 2-hourly, daily and weekly clones of my mac’s internal disk. While I’m logged in to my mac, I can of course check CCC’s Task History to see when the last back up was, the destination, and whether it was successful or not.

However, suppose the internal disk fails – just the situation for which I keep my CCC backups on a regular schedule. Which disk contains my latest backup? The information from CCC’s history task is on the failed internal disk, so it is not now available to me. Of course, each backup contains CCC’s earlier History too, but there’s several problems here. First, these cloned task histories do not contain the history from the *last* task (that’s only written to the source disk after the last backup completes). Second, to compare them, I’d have to boot each clone individually – a time-consuming and not terribly convenient process. Third, CCC’s ‘Disk Center’ only provides backup information about connected disks if the current startup disk was used to run the backup task. Thus, if I backup Disk B from Disk C, that information won’t be available to me when I startup my mac with Disk A.
Before I discuss the solution to this, let me just complicate the scenario further. I have two other macs – two 13″ MacBook Pros that have been going strong since 2009 – each of which I backup to individual clones. There’s no way for me to see all the backup dates from all my macs with CCC. Further, we don’t need to consider only disk failure as a reason to need comparative backup history. Since some files are shared or swapped across my three macs, there’s no way to find out from CCC’s Task History or Disk Center when the latest backup of any particular one of those files was made, or on which backup disk I can find it. For example, the connected disk ‘MBP Z Clone’ is a scheduled task on my MBP, but looking at this disk when connected to my iMac gives me no information about its backup history:

Fortunately, CCC has two features which make our problems solvable. First, each source disk keeps detailed logs of the backups it has run (from which the Task History and Disk Center info is constructed); secondly, CCC allows us to run a shell script after each task has completed.
These two little features are going to allow us to build a shell script that will write a special log file to the destination after each task completes, and then retrieve it and compare it against both the current source and other disks. That means we’ll be able to get CCC backup data from any disk we connect to any mac, since the data will be stored on the destination disk itself thanks to our shell script (for the technically minded: to avoid permissions problems, the script writes to /Users/Shared/ if it’s a bootable clone, or to the root of a disk that isn’t).

That’s the outline of the problem and the solution. What started out as a simple AppleScripting task soon blossomed into a full-blown app. Although much of the background work I’ve outlined above is achievable via AppleScript, displaying the data effectively is rather cludgy, even if one uses some of the excellent scripting libraries like Shane Stanley’s ‘Myriad Tables’ to improve on the stock AppleScript offerings.
Accordingly, after about a week or so of wrestling with an acceptable solution, I finally came up with the Disk Inspector.app to solve all these problems in one go and add a few niceties on top. 😉
Whatismore, since it’s Christmas :D, I’m publishing this as a free utility on my software site, Sqwarq.com. Check out Disk Inspector’s support and download page here: https://sqwarq.com/disk-inspector
Here’s a quick overview of the main features:
1. See dates of all connected disks that have been backed up via CCC*
2. See the latest backup and (if available) Time Machine backup for the current source disk
3. See the OS Version and Build Number on connected, bootable drives
4. Open any disk’s root folder in the Finder by double-clicking its name in DI’s main view
5. See an estimate of the total and available space on each disk (rounded to the nearest GB)
6. Save all the data to a log file for easy record keeping of your backups
* after completing Disk Inspector’s set up procedure
Usage:
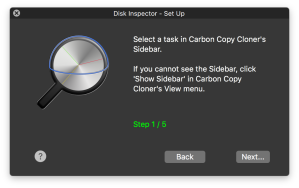
For full instructions refer to the Support page, but the basic idea is that on first launch, you run the ‘Set Up’ wizard to configure your tasks in Carbon Copy Cloner. Disk Inspector’s ‘Set Up’ wizard walks you through 5 simple steps to accomplish all this.
Once you’ve completed the set up procedure and each of your scheduled CCC tasks has run, you’ll start to see information for each backup disk in Disk Inspector’s main view on any mac (or on the same mac booted from a different drive) that you subsequently connect those disks to.
Disk Inspector runs on 10.10 and higher.
Enjoy, and Happy holidays to all!😀
how to remove Lion Recovery disk

If you have reverted your mac to Snow Leopard from Lion, its important that you also remove the Recovery HD, as it can compromise the security of your Snow Leopard installation (for security issues with Lion, see here). Reverting to SL via Time Machine or restoring from a clone will leave the Recovery partition in place, meaning anyone can boot into it and reset your Snow Leopard passwords merely by restarting your mac while holding down the ‘option’ key.
To remove the Recovery disk follow this procedure:
1. Revert back to Snow Leopard using Time Machine or a clone.
2. Once you’re up and running and have confirmed everything is good, go to Terminal (Applications > Utilities > Terminal) and paste/type this command to confirm the presence of the Recovery HD:
diskutil list
then press ‘Return’. If you see a partition labelled something like this
Apple_Boot Recovery HD (see image above)
then you will need to continue with the rest of the procedure. If the Recovery HD is not listed here, you do not have the Recovery partition and need not worry further.
3. If you find the Recovery HD in the list, paste the following command into Terminal:
defaults write com.apple.DiskUtility DUDebugMenuEnabled 1
Press ‘Return’.
Now open Disk Utility (Applications > Utilities > Disk Utility). In the menubar at the top, choose Debug > ‘Show every partition’
On the left in the main Disk Utility window, you’ll be able to see ‘Recovery HD’ (it’ll be greyed out). You can click ‘Mount’ in the taskbar to make it active, and you can now delete it using control-click/right click – erase or by using the ‘erase’ tab in DU’s window.
If you want to confirm that the Recovery disk is no longer present, go back to Terminal and type the command from step 2.
Related posts:
how to secure your mac (OS X Lion)
how to unfreeze your iPad
iPads are so easy to use, why bother with the manual? 😉 The chances are though, that at some point you’re either going to find that an app freezes on your screen or your whole tablet becomes unresponsive. Don’t panic, the answer’s simple:
First, be sure that it’s connected to a power source. The most common reason for iPads not working is people don’t realise they’re out of battery! Otherwise try these:
If it’s just a particular App that’s frozen on your screen:
— Hold down the ‘sleep/wake’ button (top right, back edge) for about 5 seconds until the slider appears. Release the ‘sleep/wake’ button. Now hold down the ‘Home’ button (bottom front, centre) until you see your Home screen.
If your whole machine is unresponsive, then do a restart:
— Hold down the ‘sleep/wake’ button for about 5 seconds until the slider appears. Slide it to ‘Off’. Then hold it down again until the Apple logo appears showing that the iPad is restarting.
If that doesn’t work, do a hard reset:
— Hold down the ‘sleep/wake’ button AND the ‘Home’ button simultaneously for about 10 seconds or until the Apple logo appears.
*For more serious problems with your iPad, such as continual restarting or no home screen, have a look here.
featured picture: ice crystals by Typen
Time Machine – anywhere, anytime!

One of the nice new features of OS X Lion is that you can access your Time Machine backups even when you are disconnected from the drive such as on the commute to work or even while on holiday. The downside is it takes up a chunk of your HD that you might not want to give up. Fortunately, you can turn this feature on or off (it’s on by default in Macbook’s, but off by default in iMac/Mac Pro).
When the feature is on, local snapshots of the last few days’ Time Machine backups are stored on a local drive called MobileBackups. If your time machine backup disc should get corrupted for any reason, these can also serve as a second line of defence. Be careful though, these backups get replaced and updated without warning, so don’t rely on them for anything more than the last couple of days saves.

You can access these from the regular Time Machine icon. Alternatively, find them by clicking on the computer name at the bottom of the left-hand column in any Finder window, and then navigating to the MobileBackups drive.
If you want this option on your iMac/Mac Pro, you’ll have to enable it through Terminal. Open the Terminal application and paste in the following command:
sudo tmutil enablelocal
followed by your admin password and a return-key stroke (don’t expect to see anything when you type the password).
If Terminal returns to the prompt you should be good to go. Check by opening Time Machine preferences, which should now display the message that “Time machine keeps local snapshots as space permits and…” followed by the Time Machine backup schedule. If it hasn’t worked, it’ll just say “Time machine keeps:” and then the schedule.
If you wish to disable local snapshots to save disk space (mine takes up about 8GB), then just type:
sudo tmutil disablelocal

followed by your password. Don’t forget to quit Terminal straight after you’ve verified everything’s working. Enjoy!
Time Machine Preferences:
how to recover OS X Lion

Since OS X Lion is only available via download from the App store, you may be wondering what to do if you need to recover the whole OS. In times past, you’d simply insert the original CD/DVD that the OS came on, but how do you do this if the OS is download only?
Apple has provided a couple of different ways of effecting a full recovery of Lion. In most cases, so long as you are connected to the internet either by Wifi or ethernet cable, you can simply restart your machine while holding down the Command key and the ‘R’ key on the keyboard (Cmd-R).
This will put your machine in recovery mode, and you can follow the instructions from the start up screen. Initially, your machine will try to recover from a special Recovery partition that Lion created on your hard disc when you originally installed it. However, if your HD is corrupted or unavailable for some reason, Lion will attempt to recover the OS directly from Apple’s servers. In both cases, be aware that you need an internet connection.
If Lion cannot re-install on your internal disc, or if you want to move the OS to a new or external disc, you will need to go through a few preparation steps. To learn about these and more about Lion’s recovery options, see the full Apple support article here.

