Category Archives: Terminal
learning the Terminal: Part Three
It’s been a while since we last posted about Terminal tips and tricks, but a question popped up today about how to discover what tools are available on the command line.
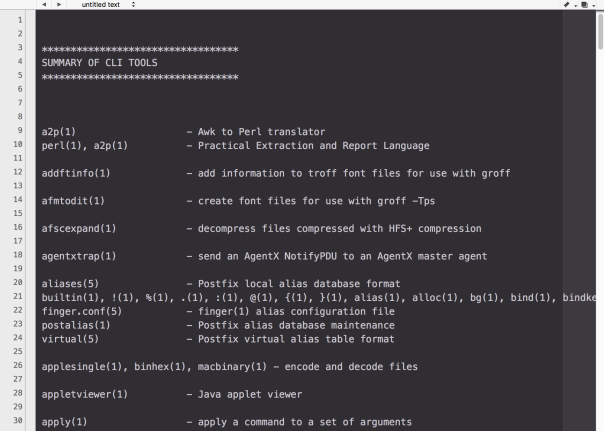
Most of the tools you use in Terminal are located in /usr/bin, and we can use a nifty little tool from there to find out about all its friends. The whatis tool gives you a one-liner description of what a tool does. If it looks interesting, you can find out more about the tool by typing man and the tool’s name on the command line to see its help manual.
On my current machine, there’s over 1000 tools in /usr/bin, and life is just too short to go through them all doing whatis on each and every one, so we’ll combine a bit of command line power with some AppleScript magic, and produce a nice, easy-to-scroll output of all the summaries like the one in the screenshot above.
Copy the script below (or from my pastebin here) and paste it into the Script Editor (/Applications/Utilities/Script Editor.app). Click the ▶︎ button to run it.
This script took about 1m 30 seconds to run on my machine, but you only need to run it once then save the output. Browse or search through it at your own convenience. 🙂
The script will choose TextWrangler for display if you have it installed; if not, it’ll default to TextEdit. The display is much nicer in TextWrangler, but if you’re stuck with TextEdit, turning off ‘Check Spelling’ in TextEdit will aid readability.
# start
(*
This script produces a summary of all the CLI tools
in /usr/bin and displays it in a text document
*)
set noDocsList to {}
on extractDescription(aText)
repeat with i from 1 to count of items in aText
set this_item to item i of aText
if this_item contains "NNAAMMEE" then
set r to item (i + 1) of aText
try
set o to offset of "—" in r
set short_r to text (o + 1) thru -1 of r
set r to short_r
end try
return r
end if
end repeat
end extractDescription
set theDescriptions to return & return & "**********************************" & return & "SUMMARY OF CLI TOOLS (Version 2)" & return & "**********************************" & return & return & return
tell application "System Events"
set theItems to name of every file of folder "bin" of folder "usr" of startup disk
end tell
repeat with i from 1 to count of theItems
set this_item to item i of theItems
set n_item to length of this_item
try
set what_is to do shell script "whatis " & this_item
if text 1 thru n_item of what_is is this_item and what_is does not contain "nothing appropriate" then
set theDescriptions to theDescriptions & return & what_is & return
else
try
set getMan to paragraphs of (do shell script "man " & this_item)
set desc to extractDescription(getMan)
set what_is to this_item & tab & tab & tab & tab & desc
set theDescriptions to theDescriptions & return & what_is & return
on error
set end of my noDocsList to this_item & return
end try
end if
end try
end repeat
set theApp to "TextEdit"
tell application "Finder"
if exists POSIX file "/Applications/TextWrangler.app" then
set theApp to "TextWrangler"
end if
end tell
set theDescriptions to theDescriptions & return & return & return & "The following tools do not have any documentation: " & return & return & noDocsList
tell application theApp
activate
make new document
set front document's text to my theDescriptions
end tell
# EOF
Related Posts
learning the Terminal – Part One
learning the Terminal – Part Two
learning the Terminal – Part Four
how to remove Dropbox green blobs

UPDATE: this method should no longer be necessary. See the Comments below for the latest.
If like me, you’re not impressed with Dropbox drawing huge green blobs all over your Finder windows without even asking, here’s a great tip from Zackary Corbett for getting rid of them. Run the following line in Terminal:

pluginkit -e ignore -i com.getdropbox.dropbox.garcon
And you’ll be blessed with some visual peace and quiet:
If you want to reverse the effect and enjoy the green blobs again, use this line:
pluginkit -e use -i com.getdropbox.dropbox.garcon
Thanks Zachary 🙂
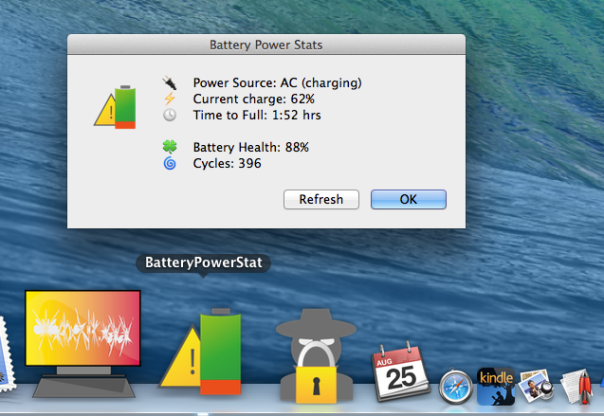
applescript: make your own battery health meter
A couple of weeks ago, I posted about how to extract numbers from strings. That led one reader to wonder what use they could make of such a handler. That sounded like an invitation for a little AppleScript tutorial, so in this post we’re going to build our own, colourful and highly useful battery health meter. In the process we’ll not only use the numbersInString handler I posted last time, but learn how to make our AppleScript displays a little more colourful by adding images, and we’ll take a quick look at some very useful Bash utilities that will do some of the heavy lifting for our little app. So, open up your AppleScript editor and let’s get started!
Step 1. Grab the returnNumbersInString(inputString) handler I posted here, and paste the code into a new, blank AppleScript editor window. Hit ‘cmd-K’ to turn it into ‘pretty text’ and check that it compiles OK.
Step 2. Underneath that, hit return a couple of times to create some white space, and define a new handler like this:
on powerstats()
set iconAC to ""
display dialog iconAC & "Power Source: " with icon 1
end powerstats
Hit ‘Cmd-K’ again to compile, then underneath our new powerstats handler, hit return to make some space again and type
powerstats()
Hit ‘cmd-R’ this time, which will build and run our code at the same time, and you should get the nice if not terribly useful result as so:

Believe it or not, that’s all it takes to get the core of our app, and all that remains now is to fill out the powerstats() handler and the display dialog command with the details.
Step 3: You might have been wondering what that ‘iconAC’ variable at the beginning of the display dialog command was doing, since all we did was set it to an empty string with “”. That was a placeholder. Let’s put something in it.
First, place the cursor between the two quote marks in the line that reads
set iconAC to ""
Now, either use the keyboard shortcut control+command+spacebar, or open the Character Viewer from the Keyboard menu bar (check the System Preferences > Keyboard | Keyboard: Show Keyboard & Character Viewers in menu bar item if necessary). Pick an image you like to represent AC Power. You can find the same image as I used by typing plug in the search/filter bar, but feel free to choose any image you like.
When you find the image you want, double-click it, and you should see it inserted between the quotation marks in your AppleScript. With the cursor placed immediately after the plug character but before the final quotation mark, hit the space bar three times. That’ll position it just nicely with our ‘Power Source:’ text:

OK, we’re going to set the other images we need in the same way. So, now place the cursor after the quote marks on the ‘set iconAC ‘ line, and hit return to create a space between that line and the display dialog line.
Now add the following lines, but do not include the words in orange like #battery after each set of quote marks. I’ve included those here just as search tips to help you find appropriate characters in the Character Viewer. As before, put the cursor between each set of quote marks and use the suggested orange words to find the images. Of course, you can use any image you like, but don’t forget to add the three spaces after the ASCII image.
set iconBatt to "" #batteryset iconCharge to "" #voltageset iconTime to "" #clockset iconHealth to "" #cloverset iconCycles to "" #cycloneset iconWarning to "" #warning
Now we’re going to update our Display Dialog command so that we get the images at the beginning of a new line. We do that by adding
& return &
between each variable. Also, we don’t need all the images (iconBatt and iconAC are alternatives, and the warning sign appears elsewhere), so we’ll just add the ones we know will always be displayed. Finally, we’ll add an extra
return &
between iconTime and iconHealth to create some space. Update your Display Dialog command so that it now looks like this:
display dialog iconAC & "Power Source: " & return & iconCharge & return & iconTime & return & return & iconHealth & return & iconCycles with icon 1
When you hit ‘cmd-R’ it should now give you this:

Step 4: Ok, we’re done with the images, but not quite with the Display Dialog command. We need some more static text in there, so edit the command to look like the following:
display dialog iconAC & "Power Source: " & return & iconCharge & "Current Charge: " & return & iconTime & return & return & iconHealth & "Battery Health: " & return & iconCycles & "Cycles: " with icon 1
Be careful to ensure you close every quote and add an ampersand between every term and every return, or your code won’t compile correctly. Feel free to cut and paste it from above if necessary, but you should now have something like this:

This is all the ‘static text’ — text that will appear every time we run the script. As you can see, there’s some parts missing, as they will need to be added depending on the state of our battery.
Step 5: Coding time! We need to get our data for the battery before we can do much else, and for that we’re going to use a couple of unix utilities. Rather than messing around in Terminal, though, we’re going to let AppleScript manage them for us using the ‘do shell script’ command. First, we’ll ask pmset for a load of information about the machines power management settings, then we’ll ask grep to narrow it down to just the bits we’re interested in. To do all that, we’ll add the following short but powerful command to our powerstats() handler. Place the cursor on a new line after all the set icon commands, but before the Display Dialog command. Then type the following:
do shell script "pmset -g everything | grep Cycles"
Now run the script again and hit the “OK” button. The dialog will look the same as before, but this time we’re interested in what is in the ‘Replies’ (not ‘Result’) panel in the lower half of the AppleScript editor:

Note you won’t see this until after you hit the “OK” button on the dialog panel. What we need to do now is capture this result in a variable so that we can start extracting some of those useful numbers, so immediately underneath this line, add:
set x to the result

Step 6: In order to understand what follows, temporarily add the following two log lines:

Now run the script. Run it once with the power supply connected, then again with the machine running on battery power and compare the output in the ‘Replies’ field after you’ve hit the “OK” button.
The output of the log lines is shown in the Replies field between
(* *)
and they tell you the values of the variables. “Word 1” is the first text item in the result (exactly what delimits text items in a script depends on a built-in AppleScript variable called text item delimiters, which you can read about here).
If the AC Power is connected, word 1 should be “AC”, otherwise, it should be “No”. Similarly, word 2 should be either “charging” or “not” (sometimes the battery doesn’t charge due to a poor connection or if its more than 95% full). If AC is not connected, Word 2 should be “AC” (Word 1 and 2 together, in this case read “No AC”). However, different macs may have different power management options, so do some tests and check that you get the same results. If you don’t, you’ll need to experiment logging different words to find out which words correspond to my ‘word 1′ and word 2’. Here’s a summary again of the word numbers you need to determine for each of the values, with those on my machine given in brackets:
AC connected: word (1)? = “AC”; word (2)? = “charging” or “Not”
On battery power: word (1)? = “No”; word (2)? = “AC”
If your machine gave different results, make a note of which word number corresponds to my word 1 and word 2, and wherever I mention ‘word 1’ and ‘word 2’ in the scripting below, substitute those for the correct word numbers you found in your tests.
That these words always appear in the same position on the same machine is a very handy fact that makes it easy for us to determine whether the mac is running on battery or mains power, and in the latter case whether the battery is charging or not.
In the next step we’ll now put this information to good use in our script. First, however, remove all the log messages from the script.
Step 7: It’s time to add some more code to our powerstats() handler. Add this conditional test to your script, remembering to substitute any differences in word number you found in your logging tests:

This code assumes the AC is connected and sets the variable ‘charger’ to display whether the battery is charging or not. However, we need to set that variable to an empty string if the mac is running on battery power, so immediately underneath add another conditional:

In the Display Dialog command, replace iconAC with pwrSource as indicated in the image above. This will allow the Display to change the image accordingly. At this point, compile and test your script, both with the power supply connected and disconnected, ensuring that the icon changes accordingly.
If that’s working as expected, add the variable _t to the Display Dialog command immediately after the iconTime variable. Don’t forget to add another ampersand along with it as shown:

Again, compile and test your script, both on battery and AC Power.
Step 8: Time to do some math. You may remember we started the script by adding the returnNumbersInString(inputString) method, and now it’s time to use it. We want to extract all those numbers returned by the do shell script command, and currently stored as a text string in our variable, x. We’re going to need some of them as numbers because we’re going to perform some math on them to get the battery percentage health.
Start by adding the following line, which calls the handler and gets the numbers back as a list of integers:

Item 1 of nums should be the battery’s current charge. Test this by adding a temporary log statement immediately after the set nums line:
log "item 1 of nums is " & item 1 of nums
Run the script, hit “OK”, and examine the Replies panel. Compare the output of the do shell script statements, and it should be clear whether you’ve got back the battery percentage or not. If not, continue logging till you hit the right item number. I’m going to assume that you got item 1 (if you didn’t, replace my mention of ‘item 1’ with whatever yours was in the following lines), so let’s remove the log statement, and replace it with this:
set percentage to item 1 of nums & "%".
Now, down in the Display Dialog command, add the variable ‘percentage’ and another ampersand in the place shown:

Run the script and hopefully you should now see that your battery percentage is correctly shown:

Looking at the display reveals we haven’t added in the Power Source variables to the Display Dialog which we defined earlier, so do that now:

Step 9: The next step is to add the time, but this is tricky on several counts. First, if you examine the number returned by do shell script in the Replies panel, you’ll note the hours and minutes are colon-separated. As far as our list is concerned, that makes them two different items, so we have to get the hours and minutes separately (items 5 & 6 on my machine; use logging to check what they are on yours).
Secondly, if the minutes are between “00” and “09”, AppleScript will just return a single-digit between 1-9, cutting of the “0”. That’ll mean we’ll end up with a weird display for say “1:05” as “1:5”. To counter that, we’ll have to test whether the minutes is less than 10 and add a “0” back in to the string if so. Also, we’ll have to add “hr”, “hrs” or “mins” depending on how much time is remaining or left to fill the charge.
As if that wasn’t enough, there’s a problem with the power manager: if you use Apple’s battery/power icon in the menu bar, you’ll notice that if you click on it straight after changing the power source, you’ll get a “Calculating Time till Full” or “Calculating Time Remaining…” message. That’s because it takes a minute or so for the power manager to update. The menu bar icon will update live, but we don’t have that luxury. Instead, we’ll add a warning later to alert users to this and ask them to run the script again after a short delay.
Woah. That’s a lot of conditions, so here goes. Add the following immediately above the Display Dialog command:
if item 5 of nums = 0 then
set hrmins to " mins"
else if item 5 of nums = 1 then
set hrmins to " hr"
else
set hrmins to " hrs"
end if
if item 5 of nums is greater than 4 then
if pwr is "AC" then
set t to "Calculating...try refresh in 2 mins"
end if
else
if item 6 of nums is less than 10 then
set theMins to item 6 of nums as string
set theMins to "0" & theMins as string
else
set theMins to item 6 of nums as integer
end if
set t to item 5 of nums & ":" & theMins & hrmins
end if
And for all that code, we only need to add one variable and an ampersand to our Display Dialog:

There is one remaining problem, which is that if you run the script immediately after changing the power source, although the message “Time to Full” or “Time Remaining” will change, the time itself may not. This is for the reason stated earlier: its inherent to the way the power manager works. We’ll do our best to help the user by adding a Refresh button later, but otherwise this is a shortcoming we’ll have to live with.
Step 10: It’s now time to get down to the real point of this script, which is to tell the user something that the battery meter in the status bar does not: the battery health and the battery cycles. The number of charge cycles the battery has been through is, naturally, given by the ‘Cycles’ figure. Battery health, however, is not data outputted natively by the power manager. Rather, it is a percentage of the Battery’s design capacity and its current ‘fully charged capacity’ or FCC. As you might expect, these two figures are represented in the do shell script output by “Design” and “FCC”, and it is largely because we need to do a mathematical operation on these that we needed the numbersInString handler.
To figure out the Battery health, we’ll divide the Design capacity by 100 to obtain 1%, then divide the FCC by this number to figure out how many percent it is of the Design capacity. That bit of math is represented by the function FCC/(design/100). In order to avoid a whole load of decimal places, we’ll also use AppleScript’s built-in round() handler to return a whole number. Finally, we’ll add the “%” sign to the string and add the ‘battHealth’ variable to the ‘Display Dialog’ command.
Here’s the code to be added, again after the last line and before the Display Dialog command (reminder: don’t forget to check using the logging technique I showed earlier that your item numbers are the same as mine, and to substitute your own for mine if they are different):
set FCC to item 3 of nums as integer
set designCap to item 4 of nums as integer
set battHealth to (FCC/(designCap/100))
set battHealth to round(battHealth)
set battHealth to battHealth & "%"

Don’t forget to add the battHealth and ampersand to the Display Dialog, as shown above.
Step 11: Almost there. Let’s add the Cycles, which is fortunately a simple one liner:

Does that say minus 3? Yes indeed it does! A little trick with AppleScript lists and strings is that you can count items backwards from the end using the minus sign,where -1 is the last item, -2 the item before it and so on (I thought I’d just throw that in as an extra since this command was so straightforward!). As always, check the position by using logging in your own script.
Step 12: If you run your script now you should find it’s complete. To wrap up, we want to go back to where we started, and that’s improving the look and functionality of our Display Dialog box. The first thing to do is fix the buttons. We don’t need a “Cancel” button, since the “OK” button does the job of dismissing the script, but we would like a “Refresh” button, so the user can run the script again from the dialog box. To add the the buttons, change the Display Dialog command and add a conditional statement after (not before this time) it. We’re also going to add a title for the box while we’re at it:


Step 13: Your script is done, but to really finish it off, we should turn it into an app that we can run off the Dock, and to which we can add a custom icon. To create an app, choose “File > Export” and change the File Format to App. Give your script a name like “batteryPowerStat” and save it in your Applications folder.
Step 14: All you need now is an icon. You can either make your own, or you can download mine. Once you have an icns file, change its name to ‘applet.icns’ and add it to the Application bundle. To do that, control-click on your new app in the Finder, and choose ‘Show Package Contents’. Navigate to Contents > Resources, delete the file that currently exists there called ‘applet.icns’ and replace it with your custom icon.
You may need to log out and log in again before OS X flushes the old file from its memory and displays your new one.
Step 15: Only kidding! There is no step 15. 😀 I just wanted to stay “Congratulations”. If you made it this far, I hope you picked up a few AppleScript tricks along the way to creating your own battery health meter. If you need the complete code, you can find it on my Pastebin site here.
Enjoy! 🙂
FastTasks 2 update available 💥
I’ve just released an incremental update for FastTasks 2. Update 1.3 adds the ability to quickly see whether TRIM is currently on or off for your SSD disks. Since TRIM support for non-Apple SSDs requires editing a kernel extension, TRIM is regularly disabled on non-Apple SSDs every time users update or upgrade OS X. FastTasks 2 v1.3 now lets you see TRIM status in the information section of the menu.

Get the latest release of FastTasks 2 by going directly to the FastTasks support page, or if you already have FastTasks 2 running, you can use the Preferences > Check for Update > Check now menu item.
🙂
run Terminal commands from any app
In this post I’m going to show you how you can select a piece of text in any app and have it run in Terminal simply by hitting a hotkey. The trick is especially useful for running commands you find on websites (like this one!) in a browser like Safari or Firefox.
This 20-second clip demonstrates running a command from a Firefox browser and another one from TextEdit, but you can also do it from an AppleScript editor window (and indeed any app that has selectable text), which can be useful for testing the formatting of your ‘do shell script’ commands and the like:
The first thing you’re going to need is to create an Automator workflow, add an AppleScript action and insert some code. Really? Nah, just kidding. I did it for you. 🙂 Just download, unzip and double-click the .workflow file to install the completed Service:
Download Run in Terminal.workflow.zip
Click through the various dialog boxes and choose ‘Install’ on the last one* (note for Snow Leopard users: the service will open directly in Automator; just do ‘command-shift-S’ to name it and save it).

All you need to do now is set the hotkey. Open > System Preferences.. > Keyboard | Shortcuts and click ‘Services’ in the sidebar. Scroll down the window till you see the ‘Run in Terminal’ command. Click on the far right to add a shortcut of your choice. The one I used in the video is ‘command-option-control-T’ (‘T’ for ‘Terminal’ helps me remember the shortcut).
To use the Service, just highlight any Terminal command by triple clicking it and pressing your hotkey. Try this one,
cd ~/Desktop; ls -alF
which lists all the visible and invisible files on your Desktop, as a test.
You can also get to the Service from both the contextual menu (right-click > Services) and the application menu bar at the top (e.g., Safari > Services).
As a bonus, try out your new Service on the Terminal command in this post, and now you’ll be able to run Terminal commands even from Quick Look previews in Finder!
Enjoy! 🙂
how to show or hide hidden files with one click

Reveal is a one-click toggle switch to show/hide hidden files in the Finder. Unzip it, pop it in your Applications folder and drag it to your Dock for quick access. You may need to override your GateKeeper settings the first time you run it if you have those set to ‘App Store & Identified Developers’ or stricter. Don’t worry! So long as you download it from here, I personally guarantee it’s safe (I wrote it myself!). Best of all, it’s free, so enjoy!
FastTasks – free download

I’ve been planning this ever since I first wrote a shell script along the same lines. All it needed was a nice interface, and that’d be something I could use almost everyday. Well, it only took me 8 months to get round to it, but here it is. 😉

Download FastTasks»
FastTasks allows you to achieve a number of things that you would normally have to roll up your sleeves and do in Terminal or AppleScript.
The window consists of two columns: left-side for info, right-side for actions. Here’s a detailed breakdown of functions with possible uses.
–Left-side (Info):
OS X Version:
Displays your current OS Version and build number
Startup Disk:
Displays your boot volume
I sometimes forget which particular volume I’m booted into, so this is vital info for me and anyone who’s regularly booting in and out of different installations.
Router IP:
The IP address of your network router
This can be useful for troubleshooting or if you need to access your router’s Admin page.
Just select the address and paste it into Safari’s search bar.
Local IP:
Your node on the local network
Useful to copy and paste if you need your local IP/ network node.
External IP:
How the rest of the world sees you
Very useful if you’re using proxies and want to check whether they’re working.
Installed Ram:
Just a courtesy reminder, but the real value here is the summary of usage stats underneath. These are pretty good approximations to what AM shows on my 10.8, but there are discrepencies on some versions of OS X between what ‘top’ shows and what Activity Monitor shows. FastTasks uses the same information that you’d get if you used the ‘top’ command in Terminal.
By the way, there’s a refresh button (keyboard shortcuts shown) for both the memory usage and network addresses, as the displays do NOT update continuously. Using the refresh buttons does not CHANGE anything on your system: They just update the display to reflect the current state of the system.
–Right-side (Actions):
Show hidden files:
Reveal or hide the hidden files and folders in the Finder whose names begin with a period
This is probably the most useful function of the app as it provides a dead easy way to hide and unhide system files without messing around in Terminal.
Show User Library:
Reveal or hide the User Library in the Finder
Likewise, this hides or unhides the ~/Library folder in Finder. This is ‘hidden’ in a different way from files that begin with a period, and its setting can be manipulated independently of that setting, so you can have the User Library showing, but ‘hidden’ files still hidden.
Flush DNS Cache:
Flush the cache that resolves internet domain names into IP addresses
Flushing the DNS cache can sometimes help resolve problems when you can’t access certain websites. Depending on what system you’re running, you may or may not see a ‘Requires Admin password’ warning next to this button. If you see the warning, then when you press the button the system will ask you for your password. The password request is from OS X and it goes to OS X: It’s not called, seen or stored by the app itself.
Free Memory:
Purge the RAM of inactive memory
Again, depending on what system you’re running, you may or may not see a ‘Requires Admin password’ message. On Snow Leopard, this requires the Command Line Tools supplied with Xcode, so if you see a message telling you to install Xcode, you may have to live without it (availability of Xcode for Snow Leopard these days is a bit hit and miss). You’ll also see the information on the left-side refreshed under ‘Usage’ when you use the free memory function and it successfully completes.
NOTE: on some systems where both Flush DNS Cache and Free Memory display ‘Requires Admin password’, note that after supplying the password for one of those actions, the user will be able to perform the other action without authenticating for a period of around 5 minutes (unless the sudo timeout setting has been altered by an Admin user).
Lastly, at the bottom of the window you’ll see a tiny plea to donate if you find the app useful ;). Note that the underlined text ‘Applehelpwriter’ and ‘Donate’ are hotlinks that if clicked will launch Safari and load a tab with this site and a Paypal donate page, respectively.
I hope you enjoy using FastTasks. Please read the provided Licence and User Guide that are in the download. Thanks! 🙂
can’t create kext cache error

If Console is reporting the ‘can’t create kext cache / owner isn’t root‘ message, complete the following procedure.
1. Run ‘Repair System Permissions‘ in Disk Utility.
Repairing system level permissions won’t solve the kext cache problem, but you’ll want to make sure they are all in order first. There is no need to repair ACL permissions for this procedure.
2. Open Terminal.app
Copy and paste the following:
sudo chown root:admin /
Hit ‘return’ and type in your admin password. This step ensures that the admin user has ownership permissions for everything on the startup disk.
3. Fix the kext cache permissions
Paste the following code into Terminal.app, hitting ‘return’ again and supplying the password if requested (if you do this shortly after step 2 you may not be asked for the password again):
sudo touch /System/Library/Extensions
4. Clear Console log and restart
The next two steps aren’t strictly necessary, but are good practice. Open Console.app, click ‘All Messages’ in the sidebar and hit the ‘Clear Display’ button in the Tool bar. Now, restart your mac.
5. Check for the problem
See if the procedure was successful by opening Console.app again, choosing ‘All messages’ in the sidebar and typing
can't
in the filter/search bar over on the right. If you carried out the procedure above correctly, it shouldn’t return any ‘can’t create kext cache / user isn’t root’ messages since the restart time.
🙂
Featured picture: I’m not a balloon owner anymore by ~starwink
how to stop help windows always being on top

Ever called up a HelpViewer window in an app only to find that you have to close the window in order to get back to the app and start following the instructions? That can be highly annoying if the instructions aren’t easy to remember.
That’s because the HelpViewer.app is by default set to always be on top. If you want to change that, here’s a nice little Terminal trick that will let you manage HelpViewer windows just like a normal window, courtesy of new tipster site defaults-write.com. Here’s what you do:
1. If you have any HelpViewer windows open, close them first.
2. Open Terminal.app (/Applications/Utilities/Terminal.app) and paste this command into the window:
defaults write com.apple.helpviewer DevMode -bool true
and press ‘return’ on your keyboard.
That’s it! From now on, you’ll be able to switch focus between the app and the HelpViewer window so that you can work with whichever one you need on top.
Tip: If you want to reverse the behaviour, use the same command as above but replace ‘true’ at the end with ‘false’.
If you like exploring the various things you can do with defaults preferences, have a rummage around the defaults-write.com site, a nice little addition to our bookmarks list! 🙂
FastTasks – a utility for ten common terminal tasks
Update: I’ve since written a nice GUI version in AppleScript-ObjectiveC which you can download for free here»
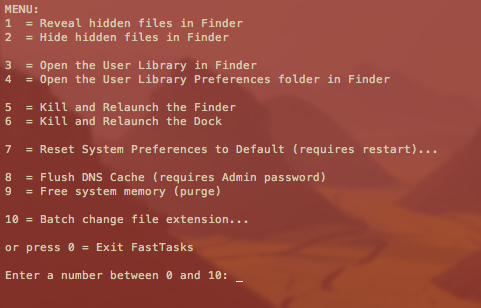
If you find you only ever go into Terminal to perform a small number of tasks that can’t be done (easily or at all) in the OS X graphical user interface, this little utility could be for you. It allows you to run a number of common tasks such as
reveal and hide hidden folders
batch change the extension on multiple files
purge system free memory
flush the DNS cache
restore system preferences to defaults
without having to bother looking up the commands. You will, however, have to do a little Terminal ‘dirty work’ to initially get the utility up and running (it’s a shell script which you need to turn into an executable file), but step by step instructions are all provided. 😉
Here’s what you do:
1. Copy or download the entire script from here FastTasks code and paste it into a text editor (TextEdit or Tincta, my favourite, will do).
2. Save the file as plain text onto your desktop with the name ‘FastTasks’
3. Open Terminal.app and paste this command:
sudo chmod 755 ~/Desktop/FastTasks
and press ‘return’ on your keyboard. You’ll be asked for you Admin password which will be invisible when you type it. If you’re wondering what you’ve just done, you’ve just changed that plain text file into an executable program.
4. Paste the next line into Terminal.app
cp ~/Desktop/FastTasks /etc/bin/FastTasks
then press ‘return’ on your keyboard.
As a result of that last command, you can now use the script by typing ‘FastTasks’ in a Terminal window or by double-clicking ‘FastTasks’ in Finder or on the Desktop.
5. By the way, if the Terminal window remains open after FastTasks has completed, change the following settings in Terminal’s Preferences:
Preferences > Settings > Shell > When the shell exits…
and change the dropdown menu from ‘Don’t close the window’ to ‘Close if the shell exited cleanly’.
And that’s it. You can now run any of the tasks in the menu without having to know the commands! 🙂
Fast tips for using FastTasks
1. FastTasks is actually quickest to run by using Spotlight and Terminal.
If you have the Spotlight hotkey set up (usually cmd-space by default), simply open Spotlight, and type ‘Term’ and hit ‘return’ on the keyboard. At the Terminal prompt type ‘fasttasks’ and hit ‘return’.2. Running it this way has another benefit. If you want to run FastTasks again after performing one task, just hit the ‘up’ arrow on the keyboard (hitting the ‘up’ arrow repeatedly will take you through previous commands entered at the Terminal prompt. Use the ‘down’ arrow to go forward), then ‘return’ when you see ‘fasttasks’ on the command line.

