Category Archives: Security-2
how Keyloggers get around OS X security
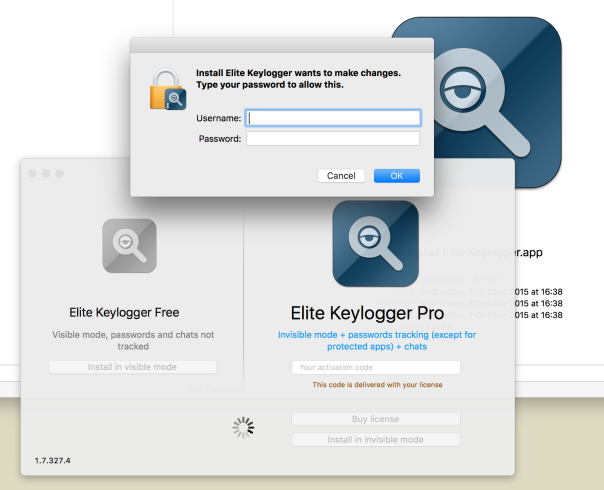
With the release of Elite Keylogger Version 1.7.327, we’ve noticed some unexpected changes to how the developers are installing and hiding their work.
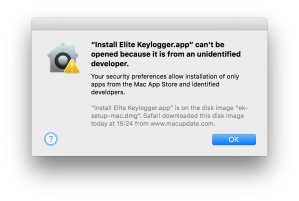
Let’s take a quick look at what happens when you install the free demo of this keylogger. First, you’ll notice that the app isn’t codesigned and requires you to override any GateKeeper settings.
Secondly, it’ll ask you for your admin password to escalate its privileges so it can write to wherever it wants in the system. So far nothing new. But here’s where the new release gets interesting.
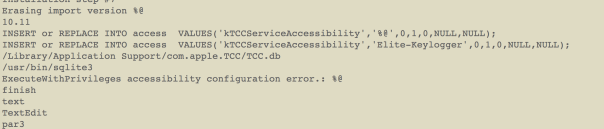
What it does next is automagically insert itself into System Preferences/Security & Privacy/Privacy/Accessibility without throwing the required authorisation dialogue:

Forcing apps to be in this list if they want to leverage System Events to control a computer was a change brought in with OS X Lion 10.7, and it isn’t supposed to be circumventable.
The idea was that to get in this list, apps were forced to throw an authorisation dialog to get the user’s permission, even if the user had already given the app admin privileges elsewhere.
Unofficially, we’ve heard that Apple had once promised to crackdown on developers who tried to circumvent this security feature and to close any gaps that were exposed. As it is, we’ve not only been aware of a way around this security feature since late 2013, but it seems it’s not just the less reputable that are at it. Dropbox has been inserting itself into the Accessibility list since at least 10.10.5, without asking for permissions (in our screenshot, we never authorised either of these apps to be in this list, nor did we ever unlock the padlock to let them in).
The way that Elite Keylogger does this is through a sql database insertion, you can see the code they use here:
Another interesting development is that Elite’s developers, widestep, are now leveraging a hidden binary called FScript64 that is placed and hidden with the chflags -hidden flag set here:
/Library/ScriptingAdditions/FScript64.osax
We first saw this binary used in Refog’s Hoverwatch keylogger, but this is the first time we’ve seen the same code shared with other keyloggers. We can only speculate as to why developers from apparently-competing products are sharing code.
A couple of other things to note with Elite: If you drag the app to the Trash, the secret FScript64.osax will be left behind. If you use the uninstaller, the hidden binary will be removed, but another hidden data file will be placed here:
~/.ek
Our troubleshooting app DetectX already knows about both of these files, so if you want to check whether you’ve got rid of both of these or have other keylogger files present, download a free copy from sqwarq.com.
DetectX registers the addition of Elite Keylogger
Finally, note that even if you use Elite Keylogger’s uninstaller, the app will remain in the list of Accessibility apps and it will remain in your list of login items. You’ll need to manually remove them both, and the hidden .ek file AND the osax if you didn’t use the uninstaller or didn’t use DetectX to help you remove the crud.
As always, be careful about what you download, use apps like DetectX or FastTasks 2 that can log changes that downloaded apps make to your system, and beware of all apps that require your admin password in order to be installed. There are legitimate reasons for that in some cases, but not many.
how to detect WireLurker malware

Security researchers have this week been getting themselves het up about a new malware threat to both iOS and OS X. WireLurker appears to be emanating out of Chinese file exchange sites and, at least at the moment, looks fairly limited in both its spread and its damage (update: Business Insider is reporting that Apple has blocked WireLurker-infected apps from launching).
However, researchers at Paolo Alto Networks are pointing out that what makes WireLurker particularly worrying is that the malware exploits weaknesses in Apple’s software that could, they claim, be easily be used for far more dangerous threats.
You can easily scan for the malware threat with my free app FastTasks 2 (v 1.53 or later). If you don’t see the warning as in the screenshot above or any results in the Analyser ‘Issues’ pane, you’re clean of any of the currently known files associated with WireLurker. If you do see the warning, locate the infectious files from the Analyser pane and delete (OS X will demand your Admin password to remove some of them), then restart your mac.
🙂
how to fix the “Shellshock” security flaw

Apple have today released updates to Bash for Lion, Mountain Lion and Mavericks. All users are recommended to update to Bash version 3.2.53(1) to patch the recently found “Shellshock” exploit.
At the time of writing the update for 10.9 wasn’t coming through OS X’s built in ‘Software Update’. The updates are available for download and install here:
http://support.apple.com/kb/DL1767 – OS X Lion
http://support.apple.com/kb/DL1768 – OS X Mountain Lion
http://support.apple.com/kb/DL1769 – OS X Mavericks
how to easily encrypt your files
Keep the spooks and data thieves out of your personal data with this easy-to-use, drag-and-drop 128-bit AES encryption applet. It’s a simple 1-2-3 process:
1. Download EncryptMe, copy to your Applications folder and drag the icon to your Dock.

2. Select the files you want to encrypt and drop them onto EncryptMe’s Dock icon.

3. Choose a password and you’re done!

That’s really all there is to it, but let’s take a moment to go over the details of Step 2 and 3.
How does it all work?
First of all, note that EncryptMe is an Automator “droplet” app. That means you use it by dropping files on it, not by clicking or double-clicking the icon (which will just produce an error message). If you want to know how EncryptMe works (or make your own), just open up Automator.app and take a look a the ‘New Disk Image’ action. EncryptMe sizes the disk image to fit the files you drop on its icon as long as you have enough free space on your drive.

Secondly, take a moment to pause and think about the password options. You can use OS X’s built-in password generator or make one up of your own. However, be careful. This encryption won’t just keep the bad guys out; it’ll keep you out too if you forget the password!
For that reason, you’ll need to think carefully about whether you’re going to tick the ‘Remember password in my Keychain‘ checkbox or not. Doing so gives you far more insurance against losing the password. The flipside is that anyone will be able to access your encrypted files if they gain access to your computer while you’re logged in. Leaving the box unchecked is more secure: the password you set here will have to be supplied every time an attempt to open the files is made even when you’re logged in. The bad news? Forget the password, and you’ll be in the same boat as the spooks and the data thieves, locked out of your data forever. So choose carefully here.

how to remove Google’s secret update software from your mac

If you’ve ever downloaded Chrome, even for just a trial (guilty!), you might not be aware that Google have slipped a little bit of hidden software into your Library.
This software is called Google Updater, and it secretly “calls home” on a regular basis and downloads updates to your Google software without either asking before, or notifying you after, doing so. In Developer circles, this is considered very shady practice. Users should be asked for consent and informed when software makes changes to either itself or the user’s computer, and ideally those notifications should tell the user what has been changed and how the changes could impact them.
Before I beat this drum any harder, however, I owe you at least the other side of the story. If I worked for Google, I’d probably come up with this response: “Hey look, a major source of computer virus and malware infections is that users are often using out-of-date software that hasn’t been patched to combat newly-discovered exploits. No matter how much we tell users to keep ther software up-to-date, the truth is the majority don’t. We provide an automatic updater so that users don’t have to worry about it, and can be assured they’re always using the latest and safest version of our software”.
I’ve heard this argument so many times, I don’t doubt it’s something close to what Google would actually argue. My problem with this is that while automatic updates can be a good thing if they’re security related, it’s not at all clear why an app should be updating itself automatically for any other reason, or why it’s updating itself without providing notifications about when and what updates were made.
If an independent developer did that, they’d almost certainly find their software labelled as “suspicious” at best, and “dangerous” at worst. The fact that Google is a multinational, global enterprise with a stranglehold on the internet, and which is often tangling with the law in countries throughout the world, may make you feel more or less confident that they can be trusted more than independent developers, whose income depends very much on their reputation. I’ll leave that one for the reader to decide. 😉
Do I have Google Updater?
To see if you’ve got Google Updater hiding on your system, try this quick test in Terminal. Triple click the line of code below to highlight it.
defaults read com.google.Keystone.Agent
If you’ve previously installed my Terminal workflow, just hit control-opt-cmd-T or right/control click and choose “Services > Run in Terminal” from the contextual menu. Alternatively, if you have my free utility app FastTasks 2, the Analyser’s Profile view will show you if Google Updater is installed (see ‘Locate Google Updater’ below for the locations to check in the profile view). Elsewise, manually copy and paste it into a Terminal window.
If the result comes back as
Domain com.google.Keystone.Agent does not exist
you’re fine. Google Updater has not found its way into your system. Anything else and you’re going to need to decide whether you want to remove it or not. If you’re a regular Chrome user, keeping Updater might prove convenient, though you’ll have to live with the idea that the app is updating itself in ways over which you have no control. If you rarely or never use Chrome, there’s no reason to have this hidden process regularly calling home to Google every time you’re connected to the net.
How do I remove it?
You have two options. You can either disarm it or you can nuke it. Disarming it is simplest, it’s a one-line Terminal command:
defaults write com.google.Keystone.Agent checkInterval 0
This command tells the Updater how often to “call home”. A value of 0 basically means ‘never’. Disarming it is probably better than nuking it if you still keep Chrome on your system and use it occasionally. You can temporarily set it back to something like ‘once a week’ from time to time to check for security updates with
defaults write com.google.Keystone.Agent checkInterval 604800
Nuking the Google Updater is a bit more complex. You’ll want to run some uninstaller commands, and then you’ll want to go and clear up the crud that is still left behind. And before you can do either of those, you need to find out where it’s hiding. So, we have a three-step process.
1. Locate Google Updater
Triple click the first of these two lines, and choose ‘Services > Reveal in Finder’ from the contextual menu (that’s another right-click or control-click on the selected line), and then repeat for the second line:
~/Library/Google
/Library/Google
You will likely get the error message “The operation can’t be completed because the item can’t be found” from one of these lines, but not the other. Note that the difference is all in the presence or absence of the tilde ~. Make a note of which one worked, and run the appropriate commands in step 2.
2. Run the uninstaller commands
Run these in Terminal (again, triple clicking to highlight and doing the usual trick afterwards with shortcut key or Services menu if you have my workflow installed), one at a time:
Updated, Jun 2018:
If the Updater was in your user library (with the tilde ~), then first triple-click this (it’s all one line) and run it in the Terminal:
~/Library/Google/GoogleSoftwareUpdate/GoogleSoftwareUpdate.bundle/Contents/Resources/ksinstall --uninstall
then this:
touch ~/Library/Google/GoogleSoftwareUpdate
If the Updater was in your domain library (no tilde ~), then first do this (it’s all one line):
sudo /Library/Google/GoogleSoftwareUpdate/GoogleSoftwareUpdate.bundle/Contents/Resources/ksinstall --uninstall
and enter your Admin password (note that you won’t see any indication of your password being typed in the Terminal window). Then do this:
sudo touch /Library/Google/GoogleSoftwareUpdate
3. Clear up the crud
If the updater was in your user library, open that now and go to
~/Library/Google/
and delete the folder called ‘GoogleSoftwareUpdate’. If you don’t use any other Google software (I don’t), you can just delete the entire ‘Google’ parent folder.
If the updater was in your domain library, search for the same folder and send it to the trash. You will need to give Finder your admin password to authorise the move.
Next, let’s just check the uninstaller was successful. Look for the following. If you don’t find them, good (the installer did its job). If you do, help them on their way to oblivion by sending them to the trash:
~/Library/Caches/com.google.Keystone.Agent
~/Library/LaunchAgents/com.google.Keystone.agent.plist
~/Library/Preferences/com.google.Keystone.Agent.plist
If you’ve deleted Chrome from your Applications folder too, then you might as well hunt down and exterminate its prefs list while you’re at it:
~/Library/Preferences/com.google.Chrome.plist
The following sources were used in researching this post:
http://wireload.net/products/guu-google-update-uninstaller/
http://raamdev.com/2008/howto-remove-google-software-update-on-mac-os-x/
http://blog.slaunchaman.com/2010/06/30/google-earth-now-available-without-automatic-updates/
https://support.google.com/installer/answer/147176?hl=en
‘Don’t be evil’ picture was remediated from here.
Related Posts
Terminal tricks for defeating adware
how to clear Safari’s cookies on quit
If ever there was a free app that deserved more recognition, it’s Safari Cleaner (direct download). Developed out of a simple applescript, this app does what many people would expect Safari to have an option to do in the Preferences panels: automatically clear stored information when Safari quits.
Personally, I’ve found this particularly needsome since signing into any Google service seems to be particularly irritating. Gmail, for example, needs several clicks just to be told that you don’t want to be remembered. Safari Cleaner takes care of automatically ‘forgetting’ as much or as little info as you want without you having to remember to clear cookies or caches. It’ll also, thankfully, forget Top Sites. 
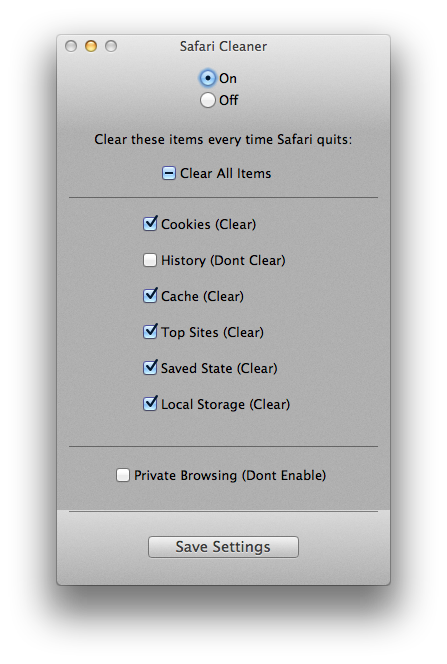
Personally, I leave my history as that’s something I regularly need across sessions, but the rest, I’m happy to be forgotten. If you’re wondering why anyone might care, well, there’s a whole bunch of reasons including protecting you from malware and malicious websites, but at least one other is nicely detailed in this Ars Technica article, which explains how cookies can be used to track your physical whereabouts.
One caveat to note with Safari Cleaner: in my tests, I’ve noticed that if you click and restart Safari in rapid succession (within about 5 seconds or less), the script hasn’t had time to complete running and caches and cookies aren’t cleared. To be safe, you probably want a nice 10 secs or so between quitting and relaunching Safari if you absolutely must be sure the previous session was wiped out.
Once you’ve run and set up Safari Cleaner’s options, you can quit the app and it’ll just carry on working in the background. Launch the app only if you want to change your options. If you want to uninstall it, note that there’s an uninstaller in the DMG, so don’t throw that away.
check for security flaw in OS X and iOS
Update: Mavericks users can now update to 10.9.2 which fixes the flaw. 🙂
News is just breaking of a flaw in Apple’s implementation of SSL security, which could affect anyone using iOS and 10.9 OSX over public/open access wifi ‘hotspots’.
If you’re using iOS, please ensure you do Software Update immediately as a patch has already been released by Apple.
No word from Apple on OS X at time of writing. You can test to see if you have the problem by clicking the following link. Basically, if SSL is working properly you shouldn’t be able to read the message on this page:
https://www.imperialviolet.org:1266
If you can read the message on that website from your Mac computer, the best advice to date is to stay off public/open access wifi networks until we hear something more from Apple.
Ars Technica have more information on the security flaw here.
security: keeping OS X’s nose out of your data

Well, probably. For most people, most of the time. But not always. The security implications of having your OS (and even Apple) copying everything you type, open or edit on your computer can sometimes be disturbing. What if you need to open a confidential pdf in Preview but are required to make sure (either morally or contractually) that all copies of that document are destroyed after viewing? No one wants to be zeroing their hard-drive every week; and what if you need to edit a Pages or Numbers document but don’t want the changes pushed to the cloud? Turning iCloud on and off is no 2-second job and can have implications for your other workflows and data. Making duplicates to save locally risks having copies stored in the hidden .DocumentRevisions-v100 folder.
Use a secure USB
With USB flash drives now coming in at large GB sizes and relatively low cost, one solution is to load and delete sensitive files via a USB. Wiping a flash drive takes considerably less time than wiping a hard disk and keeps your sensitive data nicely partitioned from everything else, but there are problems. First, there’s always the danger of negligence; in the heat of deadlines or other pressures, we might just forget to wipe that disk; second, there’s the danger of loss or theft; and third, there’s always the possibility of deep recovery by people with the appropriate tools and know-how. Some of those issues can be mitigated by encrypting the drive using Disk Utility.
Set up a RAM disk on OS X
Using an encrypted USB can be a great idea, but it both takes time to create and is not always unobtrusive. If another party should get physical access to your USB, the fact that it’s encrypted also tells interested parties that you might have secrets to hide. A faster and less conspicuous solution could be to use a RAM disk, a portion of your RAM memory that is partitioned and formatted just like any other disk. RAM disks were once common on Macs when peripherals were considerably slower at loading data, but with the speed of modern drives few people bother with them anymore. However, a RAM disk has another advantage apart from being the fastest way to read and write data: its entirely non-persistent. There’s no way of recovering something that was once in RAM once that memory has been flushed.

A 0.5GB RAM disk
Making, using and deleting a RAM disk is incredibly simple. Here I’ve created one that’s a half a gigabyte. To create it, you just need a one liner in Terminal. Triple-click the following line and copy and paste it directly into a Terminal window:
diskutil erasevolume HFS+ "ramdisk" `hdiutil attach -nomount ram://1165430`
After you hit ‘return’, you’ll see a new disk icon on your desktop and in the Finder sidebar. You can now use the RAM disk just like any other disk. Use it as the location to download, open or create sensitive files that you know you are going to destroy after use. You can, of course, even create copies of applications and run them from your RAM disk, too.
The RAM disk, while it exists, will behave just like any other disk, so it will have its own .Trashes directory, and its own Versions and Spotlight indexes just as all other disks do. That means you get all the comforts of OSX’s failsafes while the disk is mounted, but as soon as you eject or unmount the disk, all the Versions and Autosaves and Trashes disappear completely and unrecoverably. RAM disks are ideal for reading or editing short pieces of information (such as messages or passwords) that you want to quickly review or store before discarding without a trace.
You can eject the disk either in the usual way from within Finder or the Desktop, or you can use another Terminal line:
hdiutil detach /dev/disk1
And if you want to flush the contents of your entire RAM buffer for good measure, you can also do:
sudo purge
followed by an admin password (if you’re using any version of OS X before 10.9, you can just type ‘purge’ at the command line. No need for sudo or a password).
A word of caution, however. The strength of a RAM disk from a security point of view is simultaneously a danger from almost every other: — the volatility of RAM means you could easily lose everything in your RAM disk if any of the following occur: you eject the disk accidentally, the computer crashes, the power fails or battery runs flat, you log out or restart the computer. Keep these points in mind and only use your RAM disk for short sessions. Never store anything solely on a RAM disk if preserving the data is of importance to you.
🙂
how to uninstall MacKeeper – updated
Lees dan dit artikel in het Nederlands 
Lire cet article en français 
Last updated: June 16, 2018
If you’re unfamiliar with the reputation of MacKeeper but have come here because you downloaded it – or it downloaded itself after you were inadvertantly redirected to some unwanted website – and are now wondering whether you made a mistake, let me present you with a few facts.
MacKeeper is one of the most infamous pieces of software on the macOS platform. This post itself was first published in September 2011, and has since received over 2 million hits from people wishing to uninstall MacKeeper from their computers.
When I ran MacKeeper’s free trial version on a brand new clean install of macOS, it told me that my system was in ‘serious’ condition and that I needed to buy MacKeeper in order to solve all my problems.

It seems, then, that MacKeeper thinks macOS, freshly installed, is a poor piece of software engineering, but the feeling is mutual. macOS doesn’t like MacKeeper much either. macOS provides the following warning about MacKeeper:
MESSAGE FROM CONSOLE
12/05/2015 17:48:00.946 com.apple.xpc.launchd[1]: (com.mackeeper.MacKeeper.Helper) This service is defined to be constantly running and is inherently inefficient.
If you have installed MacKeeper and wish to remove it, read on.
Preparation:
i. If you have used MacKeeper’s encryption feature, be sure to unencrypt before you uninstall MacKeeper. You should also check whether any of your personal files are stored in /Documents/MacKeeper Backups.
Backups & other disks
ii. If you have any disks connected to your mac, including Time Machine, eject them before you start the uninstall procedure.
Trash
iii. If you have anything in the Trash, empty it now before you start.
You are now ready to uninstall MacKeeper.
The Easy Way
As I’ve been involved in helping people uninstall MacKeeper for over 5 years, I eventually got round to the task of automating the process so that folks who were not that technically proficient with computers could take advantage of the information on this page.
If that sounds like you, then the easiest way to uninstall MacKeeper is to use my app DetectX. This is a shareware that can be used for free 😀. You do not need to sign up to anything, subscribe to anything or give anyone your email address. Just download the app, run it, remove MacKeeper and be on your way.
After several years of testing and refining my app’s removal procedure, I now recommend using it even for proficient users as it is simply faster, more reliable and less prone to error than doing it any other way. The only people who should really consider the manual option are those that are running versions of macOS that are too old to run DetectX.
Please note also that the list of filepaths below is somewhat out of date. Follow the instructions, but consult my post here for the most recent update to the list of MacKeeper filepaths.
The Manual Way
If you need to remove MacKeeper manually then follow these instrutions carefully. They’ve been refined over the years by many people who contributed in the hundreds of comments that follow this post and have been proven to work without exception. However, bear in mind that the onus is on you to follow the instructions to the letter. For that reason, go slow, read carefully and don’t do anything if you’re not sure what you’re doing. If you have any doubts, post a question in the comments.
Here we go!
1. If MacKeeper is running, quit it. From the sidebar in any Finder window, choose your hard disk icon and go to your Library folder. Look in the Application Support folder for the folder inside it called ‘MacKeeper’:
/Library/Application Support/MacKeeper
Drag this folder to the Trash.
2. Still in Library, look for and trash any of these you find in the same way:
/Library/LaunchDaemons/com.zeobit.MacKeeper.AntiVirus
/Library/LaunchDaemons/com.zeobit.MacKeeper.plugin.AntiTheft.daemon
3. If you are using OS X Lion 10.7 or later, use the ‘Go’ menu in Finder’s menubar and hold down the ‘option’ key. Choose ‘Library’ from the menu (yes, this is a different Library folder from the one you were just in). If you are using Snow Leopard or Leopard, just click on the little ‘Home‘ icon in the Finder sidebar and navigate to the Library. Then trash any and all of these that you find:
~/Library/Caches/com.zeobit.MacKeeper
~/Library/Caches/com.zeobit.MacKeeper.Helper
~/Library/LaunchAgents/com.zeobit.MacKeeper.Helper
~/Library/LaunchAgents/com.zeobit.MacKeeper.plugin.Backup.agent
~/Library/Preferences/com.zeobit.MacKeeper.plist
~/Library/Preferences/com.zeobit.MacKeeper.Helper.plist
Be careful not to delete the wrong files: only those that have got the words ‘zeobit’, ‘MacKeeper’, ‘911’ or ‘911bundle’ should be trashed.
Update May 2015:
Due to recent changes in MacKeeper, the following files should also be searched for and removed:
~/Library/Application Support/MacKeeper Helper
~/Library/Caches/com.mackeeper.MacKeeper
~/Library/Caches/com.mackeeper.MacKeeper.Helper
~/Library/LaunchAgents/com.mackeeper.MacKeeper.Helper.plist
~/Library/Preferences/com.mackeeper.MacKeeper.Helper.plist
~/Library/Preferences/com.mackeeper.MacKeeper.plist
~/Documents/MacKeeper Backups
~/Library/Logs/MacKeeper.log
~/Library/Logs/MacKeeper.log.signed
/private/tmp/com.mackeeper.MacKeeper.Installer.config
/Library/Preferences/.3FAD0F65-FC6E-4889-B975-B96CBF807B78
The last item above will require removal in Terminal or turning on of invisible files in the GUI (various 3rd party apps can do this, including my own DetectX and FastTasks 2).
4. Go to Applications > Utilities > Keychain Access.app and double click on it. Notice the padlock in the window is up there on the left, rather than down the bottom. Click on it and enter your admin password. Now go through all the items in the ‘Keychains‘ list (such as Login, System, Root) with ‘All items’ selected in the ‘Category’ list. Anything you find related to ‘MacKeeper’ or ‘zeobit’, click on it, then choose Edit > Delete from the menu.
(Thanks to Al for also mentioning this point in the Comments below! 🙂 ).
5. Open the Activity Monitor utility (Applications>Utilities>Activity Monitor.app). In 10.10 Yosemite or later, select the View menu and choose ‘All Processes’. For earlier versions of macOS, select ‘All Processes from the drop down menu just over on the right of the dialogue box. Next, scroll down the list of items shown and see if any processes called ‘MacKeeper’, ‘zeobit’ or ‘911 bundle’ are still running. Older versions of MacKeeper may have a ‘WINE’ process running, so also look for ‘wine’. Anything you find, click on it and hit the ‘Quit Process’ or ‘X’ button (Yosemite) in the top left corner.
6. Go to your Applications folder from a Finder window and select MacKeeper. Then, hold down ‘command’ and press ‘delete’ once. If you assigned MacKeeper to be pinned in the Dock, be sure to also drag the icon off the Dock and release it anywhere over the desktop. It will, satisfyingly, disappear in the ‘poof’ of a cloud. 😀
7. When you’re done filling up your trash can with all this junk, click on the Finder> Empty Trash.
8. Go to
> System Preferences > Users & Groups (or ‘Accounts’ for Snow Leopard) | Login Items
If you see anything to do with MacKeeper in the list of items there, highlight it, then click the little minus ‘-‘ button near the bottom of the list.
9. Restart your Mac. Everything should be back to normal, but check the Activity Monitor one last time to be sure.
Supplementary: If you have a problem with MacKeeper pop-ups while using your browser, try clearing out the caches, like this:
In Safari menubar, choose ‘Safari > Reset Safari’. Make sure all the options are checked.
This will not only clear out your caches, but everything else stored by the browser. Don’t worry, it won’t affect your bookmarks, but it will reset your ‘top sites’ and history.
In Firefox menubar, choose ‘Tools > Clear Recent History…’ and choose ‘Everything’. Again, it’ll clear everything out but won’t delete your bookmarks.
Obviously, if you use any other browsers like Opera or something you’ll have to find the same options for those too.
Related Posts
Terminal tricks for defeating adware
block MacKeeper and other browser ads
protect your mac from malware viruses and other threats
FastTasks 2 – get Applehelpwriter’s free utility app from Sqwarq.com
NOTES
1. If you have any problems carrying out the steps, try starting your Mac up in Safe mode, and then running the procedure.
2. You can safely ignore any MacKeeper files that are in the BOM or Receipts folders.
3. If you have only downloaded the MacKeeper package but not ran the installer, you only need to send the .pkg file in your Downloads folder to the Trash. That’s it!
4. If you are seeing ads on this site, we recommend that you use an adblocker!
Acknowledgements
This post has been refined and improved over time thanks to suggestions and replies made in the Comments and on Apple Support Communities. Thanks especially to Al, Lyndon and Jack.

